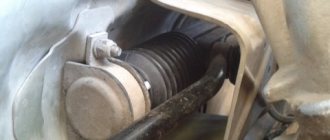
Silent blocks are elements of a car's suspension, consisting of two metal bushings separated by a rubber or polyurethane insert, designed to make the car's movement more comfortable and reduce noise when driving. These parts are installed in the moving parts of the suspension, and they are constantly exposed to mechanical stress. In VAZ 2101-2107, the front silent blocks most often suffer under loads, and the problem can be solved independently, without resorting to the use of special tools and the services of service station technicians.
When is it necessary to replace silent blocks?
If you hear a distinct knocking sound in the suspension while driving, you may need to replace the silent blocks of the front control arms on VAZ classic models. Upon inspection, they may be deformed, the rubber is torn or covered with deep cracks, and the lever moves from its original position. Silent blocks are not repaired; if they fail, they must be replaced, fortunately they are not expensive.
Damage to the silent blocks makes the ride less comfortable, reduces the level of safety due to deterioration in handling, as play appears on the arms, the suspension becomes looser and the wear of the front tires sharply increases, and this is another signal that the silent blocks of the front suspension will need to be replaced.
Removing and installing the lower front suspension arm on a VAZ 2107
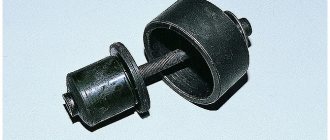
parts for fastening the lower arm of the front suspension of a VAZ 2107
1 — self-locking nut M14x1.5 (12574811); 2 — thrust washer (2101-2904045); 3 — silent block (2101-2904040); 4 — thrust washer (2101-2904035); 5 — axis of the lower lever (2101-2904032); 6 — spring washer (10517070); 7 — adjusting washer (2101-2904225/28); 8 — nut M12x1.25 (16101511); 9 — right lever (2101-2904020-01)
We remove the lower arm of the front suspension from the VAZ 2107 in case of mechanical damage or to replace silent blocks. To complete the work, you will need a device for pressing out and pressing silent blocks into the lower arm.
Removing the lower front suspension arm from a VAZ 2107
1. We prepare the VAZ 2107 car for operations (see “Preparation of the VAZ 2107 car for maintenance and repair”). 2. Remove the wheel from the VAZ 2107 (see “Wheel of the VAZ 2107 - replacement”). 3. Remove the front suspension spring from the VAZ 2107 car (see “Front suspension spring of the VAZ 2107 car—replacement”). 4. Using a 22 mm socket wrench, unscrew the two self-locking nuts of the lower arm axle and remove the thrust washers.
5. Using a 19 mm socket wrench, unscrew the two nuts securing the lower arm axle to the cross member and remove the thrust washers.
6. Using a mounting spatula, press the axis of the lower arm from the cross member and remove the arm.
Between the axle and the cross member (on the axle mounting bolts) there are washers necessary for adjusting the wheel alignment angles. They should not be removed from the bolts unless necessary. If washers need to be removed, their location should be marked. 7. When replacing the lower front suspension arm on a VAZ 2107 car, remove the ball joint from the lever (see “Ball joints on a VAZ 2107 car - replacement”). When replacing silent blocks, the ball joint does not need to be removed. 8. Install the lower arm in a vice. To press out the silent block, screw the puller bolt onto the lever axis. The supporting part of the glass should rest against the lower arm. While holding the bolt from rotating, tighten the puller nut and press the silent block into the glass.
9. Similarly, press out the silent block from the opposite side of the lever and remove the axle.
Installing the lower front suspension arm on a VAZ 2107
1. Having changed the position of the puller parts, we press the silent block into the lower arm of the front suspension.
2. Through the free hole in the lower suspension arm, insert the axle with thrust washers.
3. From the side of the pressed silent block, install an outer thrust washer on the axle and screw in a new self-locking nut without tightening it. 4. Having changed the position of the puller parts, we press the second silent block into the lever.
Tool for replacing the lower silent block
In our case, we will not use a specialized silent block remover for a VAZ, but will make do with a tool that can be found in any garage. To replace the lower silent blocks on the front arm, you will need:
- For a pry bar with a length of at least 50 cm, or longer, you can use a crowbar if the dimensions of the pit allow.
- A heavy hammer or sledgehammer with a strong, preferably metal handle.
- A set of wrenches for unscrewing nuts, you can use sockets or ratchet heads, a lever in the form of a long hollow pipe to develop the required force when tightening the nuts.
- An attachment for seating and pressing in a new silent block; you can use a piece of thick-walled pipe 5-7 cm long that has a suitable diameter.
Sometimes there is an opinion that failure to use a puller and other specialized tools increases the risk of damage to the silent block being installed. But experience shows that with the right approach, replacement is carried out quickly in compliance with all technological requirements.
Pressing out at home
Replacing these parts is not as difficult as it might seem at first glance. For example, many car owners made sure of this when they replaced parts, using special equipment for self-replacement. It is for this reason that there are many people who have decided to replace silent blocks with their own hands and at home.
First method
First of all, let's learn about how it should be ideally.
The lever in which the rubber-metal hinge needs to be replaced is installed on a special spacer for the press. The old silent will be squeezed onto this spacer. Then another spacer is installed on top - it squeezes out the old bushing. This method is used by service station workers, since they have the necessary set of spacers and a powerful press of 10-20 tons.
Second method
Almost all car owners, naturally, do not have a powerful press, but many have a jack or a good vice in their garage. If you use a powerful vice, you can successfully squeeze out the old bushings according to the principle that is already familiar to us: a spacer for the original bushing and a spacer for pressing on the bushing.
At first glance, it becomes unclear how you can squeeze out the silent tape with a jack? Everything is very simple: you need to weld a frame in the shape of a rectangle from a channel or corner so that its height is slightly higher than the lever and the jack. The operating principle is as follows: place the jack in the frame, then install the lever eye on top of the rod, as well as the two spacers mentioned above. We create the required pressure, after which the bushing is squeezed out of its seat. It must be emphasized that most often a jack with a capacity of 3-5 tons is not able to cope with such work, therefore it is recommended to use 10-ton jacks.
Third method
If you have neither a press nor a jack, but still have a strong desire to replace the silent blocks on your own, you can use the third method - using a simple press puller (bolt with nut or stud).
The principle of operation is to create pressure by gradually tightening the nut on the stud; this method can be called an analogue of a vice. This pin with a washer of suitable diameter is inserted into the eye through the silent block, then on the other side you should put on a spacer with a washer and tighten the nut. Rotating along the thread, the nut creates the necessary pressure and forces the silent to be squeezed into a special spacer.
This “method” requires the use of a strong, hardened stud and an equally strong nut. If you take a soft pin or nut, you will most likely fail. For example, there are cases when, due to strong pressure, the stud becomes bent, as a result of which the thread on the nut breaks. However, there are thousands of those who managed to change silent blocks using this particular method. After all, everything depends on the quality and strength of the material used.
The process of replacing silent blocks
To replace the silent blocks of the lower control arms on VAZ classic cars, you need to drive the car into a garage or pit box, or use a lift. The fastening points of the parts are pre-treated with WD-40 lubricant, which must be left for a while to facilitate the removal of these parts. When processing, you need to make sure that the lubricant gets into the attachment points of the unit, this will make dismantling easier. During operation, the silent block may sour, and if it is not treated in advance, it will be difficult to remove it using a pry bar and a sledgehammer.
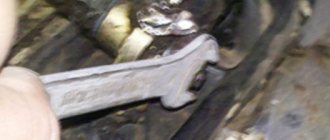
If the car is parked in a pit, it is jacked up under the beam to relieve the load from the wheels, supports are placed under the levers, and a safety block is installed under the jack to avoid injury in the event of the car falling off the supports under the levers. Using a 22 wrench, unscrew the nut holding the silent block in the lower arm. If the nut is soured, you can use a piece of pipe as an additional lever by placing it on the wrench. It is better not to throw away the original nuts, since new ones are often of poor quality and the threads break off, so sometimes it is better to install old ones. The same can be said about old washers, which are made of thick, durable metal, while the washers that come with new silent blocks are thinner and can be significantly deformed when tightened, which is unacceptable.
To dismantle the front silent block, the mount must be positioned so as to rest against the bolt of the beam and press forward towards the rear of the car. Since the pressing force on the mount will be small, it is necessary to periodically hit the lever near the silent block with a hammer, while pushing against it to create tension. After the silent block comes out of the socket, remove it, pushing it with a pry bar. In case of severe souring, the procedure will have to be done by two people: one person pulls the lever with a pry bar, the second knocks the silent block out of its socket.
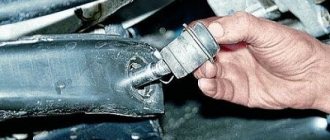
Next, the silent block of the front beam is replaced; for this, the axle is lubricated with nigrol and a new part is put on it. Using a pry bar, the lever is raised so that the silent block can be guided into the socket. After this, an extension made of a thick-walled pipe of suitable size is put on it, which must be carefully hit with a hammer until the silent block sits in place. We hold the mount by the mounting bolt and press the lever, continuing to hit the mount with a sledgehammer until the part sits in the socket all the way to the stops.
We change the lower silent blocks from the reverse side, for which you first need to knock the short rod end off the steering column so that it does not interfere with work. Using a pry bar, pressing it against the nut, we move the lever in the same way to release the silent block. Similarly, we hit the lever with a hammer, pulling it with a pry bar until the silent block comes out of its socket, then push it with a pry bar until it is completely removed. Installation of a new silent block is carried out in the same way as in the front part of the lever, using an attachment made from a tube and a hammer, the axle and seat are pre-lubricated with nigrol.
Washers are placed on both silent blocks; if the old ones are in good condition and not deformed, it is better to install them, since the new ones are of very poor quality, they bend when the nuts are tightened, reducing the service life of the parts. After the nuts are tightened on both sides, the car is lowered from the jacks and needs to be rocked to check how the suspension works. In this case, the creaking and knocking should stop, and the suspension operation should return to normal.
When tightening the silent block nuts, it is better to load the front of the car, first on one side and then on the other, for which you will again need a partner. If it is not there, you can tighten it like that, but then the nuts will need to be tightened again. The nuts are tightened as tightly as possible; if necessary, a pipe is put on the wrench to develop maximum force. At the same time, the threads on low-quality nuts can be stripped. At the end of the work, you need to reinstall the previously removed steering rod.
Video: How to replace the silent blocks of the lower arms of a VAZ without a puller.
This method is quite labor-intensive, but does not require special tools such as a puller, or additional knowledge and skills. You can make the replacement yourself in your garage if it has a hole. In this case, you can use a simple tool that every driver has. The quality of work will be in no way inferior to replacement using a specialized puller. The shock absorber silent block and other similar parts are replaced using similar principles. This technique is suitable for VAZ classic series 2101-2107.
Seal
Silent blocks VAZ 2106
Quite high loads are constantly placed on the silent blocks of car suspensions, especially on roads with poor surfaces. Such conditions significantly reduce the life of these parts, as a result of which they fail and need to be replaced. Since the controllability of the car depends on the condition of the silent blocks, you need to know not only how to identify a fault, but also how to replace these suspension components.
What it is
The silent block is a rubber-metal product, structurally made of two iron bushings with a rubber insert between them. Through these parts, the components of the car's suspension are connected, and thanks to the rubber part, vibrations transmitted from one suspension element to another are dampened.
Silent blocks connect suspension elements and dampen vibrations
Where installed
On the VAZ 2106, silent blocks are pressed into the arms of the front suspension, as well as into the reaction rods of the rear axle, connecting it to the body. The condition of these elements must be periodically monitored, and if they are damaged, repairs must be made in a timely manner.
The front suspension of the classic Zhiguli consists of the following parts: 1. Spar. 2. Stabilizer bracket. 3. Rubber cushion. 4. Stabilizer bar. 5. Lower arm axis. 6. Lower suspension arm. 7. Hairpin. 8. Lower arm amplifier. 9. Stabilizer bracket. 10. Stabilizer clamp. 11. Shock absorber. 12. Bracket bolt. 13. Shock absorber bolt. 14. Shock absorber bracket. 15. Suspension spring. 16. Steering knuckle. 17. Ball joint bolt. 18. Elastic liner. 19. Cork. 20. Insert clip. 21. Bearing housing. 22. Ball bearing. 23. Protective cover. 24. Lower ball pin. 25. Self-locking nut. 26. Finger. 27. Spherical washer. 28. Elastic liner. 29. Pressure ring. 30. Insert clip. 31. Bearing housing. 32. Bearing. 33. Upper suspension arm. 34. Upper arm amplifier. 35. Compression progress buffer. 36. Buffer bracket. 37. Support cap. 38. Rubber cushion. 39. Nut. 40. Belleville washer. 41. Rubber gasket. 42. Spring support cup. 43. Upper arm axis. 44. Inner bushing of the hinge. 45. Outer bushing of the hinge. 46. Rubber bushing of the hinge. 47. Thrust washer. 48. Self-locking nut. 49. Adjusting washer 0.5 mm 50. Distance washer 3 mm. 51. Cross member. 52. Inner washer. 53. Inner sleeve. 54. Rubber bushing. 55. Outer thrust washer
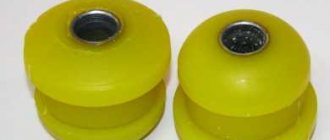
What are there
On the VAZ “Six” and other Zhiguli models, silent blocks made of rubber were installed from the factory. However, instead of them, you can use polyurethane products, thereby improving the performance of the suspension and its characteristics. Polyurethane hinges have a longer service life compared to rubber ones. The main disadvantage of polyurethane elements is their high price. If a set of silent blocks made of rubber for a VAZ 2106 costs about 450 rubles, then made of polyurethane it will cost 1,500 rubles. Hinges made of modern material not only improve the behavior of the car, but also better absorb shock and vibration, reducing noise.
Silicone silent blocks, despite their higher cost, improve the characteristics and performance of the suspension
What is the resource
The service life of rubber-metal joints directly depends on the quality of the products and the operation of the vehicle. If the car is used mainly on good quality roads, then the silent blocks can last 100 thousand km. If you frequently drive through potholes, of which there are many on our roads, the service life of the part is noticeably reduced and repairs may be required after 40–50 thousand km.
How to check
Problems with the hinges can be judged by the behavior of the car:
- controllability deteriorates;
- Vibrations appear in the steering wheel and knocks in the front when driving over uneven surfaces.
To make sure that the silent blocks have exhausted their service life and require replacement, they should be checked. First, the parts are visually inspected for damage to the rubber. If it cracks and partially comes out, then the part is no longer able to cope with its tasks.
Hinge wear can be determined by visual inspection
In addition to inspection, you can move the upper and lower arms with a pry bar. If knocking and strong vibrations of the silent blocks are observed, then this behavior indicates a lot of wear on the hinges and the need to replace them.
Video: checking the front suspension silent blocks
Changing the upper silent blocks
The event is simple, but has its own characteristics. Everything is done quite quickly. The nuts securing the bumper and ball joint are unscrewed, which is pressed out with a puller. The nuts of the upper arm are unscrewed and pulled out completely. We remove the silent blocks. We install new ones without using lubricants. The lever is put back, but the nuts are not screwed in tightly. The support is installed, then the wheel, and the car can now be lowered. And only now do we finally tighten the screw.
Sometimes difficulties may arise - the mounting screw will rust. It should be cut with a grinder and pulled out in parts.
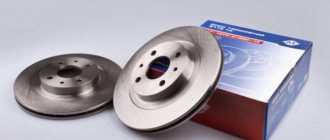
Replacing front springs
Replacing silent blocks of front levers
The procedure for replacing front springs on a VAZ 2107 is not easy. It will take a lot of time and effort to remove old parts and install new ones. Therefore, drivers often delay the time of replacement by using spacers.
However, the need to replace the springs on a car appears when the entire surface of the springs has various damages, and the height has sagged very much compared to the operating characteristics. If traces of impacts from each other are visible on the coils of the spring, then you can no longer postpone the replacement: all suspension elements will quickly begin to wear out, which will lead to serious damage.
To replace the front springs on a VAZ 2107, you will need to prepare:
- standard set of open-end wrenches;
- two jacks;
- wheel wrench;
- hammer;
- metal brush;
- mounting spatula (or crowbar);
- electrical tape.
Replacing front springs is carried out in two stages: dismantling old products and installing new ones. Even if there is damage to only one spring, both must be replaced, since otherwise it will not be possible to achieve the optimal result.
Spring - part of the suspension, closely connected with other parts and assemblies
How to remove old springs
The regulations for dismantling work are as follows:
- Jack up the front wheel and make sure that the machine is securely fixed in this position.
- Unscrew the wheel mounting bolts with a wheel wrench.
- Remove the wheel.
- Remove the shock absorber using wrenches.
- Loosen the two nuts securing the lower arm to the axle.
- Place a second jack under the lower arm so that the axle rests on it and does not sag.
- Unscrew the two nuts securing the stabilizer pads.
- Remove the mounting bracket along with the washers.
- Remove the stabilizer pad.
- Loosen the nut securing the lower ball joint pin to the knuckle.
- You need to loosen the nut until it goes down to the end of the pin. After this, you can remove the second jack.
- Hit the surface of the fist with a hammer so that the support pin comes out of it.
- Pull out the ball joint.
- Pry the spring and pull it out to the lower end of the cup.
- Remove the spring from the machine.
A similar procedure will need to be carried out on the other side of the machine to remove the second spring.
How to install a new one
Before installation, you need to secure a new gasket to the spring using insulating tape. The gasket must be fixed in exact accordance with the position of the spring coils, otherwise it may fall out and create unfavorable conditions for the operation of the suspension.
Installation work is carried out according to the following plan:
- Insert the mounting blade through the opening in the lower arm.
- Secure the lower edge of the spring with a spatula.
- Place a second jack under the lower arm.
- Using a jack, create pressure on the lever so that it becomes possible to install the spring into the cup.
- Next, perform all the steps to dismantle the spring, but only in reverse order.
Video: how to change springs with your own hands without ties
The puller is a paired tool, since to remove one suspension you will need two products
Thus, the front springs of the VAZ 2107 often need to be replaced and modernized, since despite their quality and long service life, they quickly fail on rough roads. “Long-lasting” imported springs can be purchased at a high price, but “seven-wheelers” prefer to modify the existing equipment rather than purchase expensive spare parts.