Did you like the article? Follow our channel for new ideas of useful car tips. Subscribe to us in Yandex.Zen. Subscribe.
The external car antenna of most popular cars often breaks down and gets damaged. There are frequent cases of theft or vandalism when parking a car in a yard. Finding a factory antenna is problematic; car manufacturers rarely produce simple devices as spare parts. If the receiving device on your car of an outdated design is broken or stolen, there is often no other choice but to make an antenna for the car radio with your own hands. Most drivers prefer to listen to FM radio broadcasts, which do not require long flexible or telescopic antennas for stable reception.
General principles of operation of a car antenna
Making an antenna for a car radio with your own hands at home is quite simple. But before manufacturing, you need to decide on the main parameters - the length of the antenna, its location, and the complexity of the design.
According to the postulates of radio engineering, a car antenna is defined as a quarter-wave vibrator grounded to the car body. Antennas for automobile transmitting radio stations reach a length of two and a half meters and must operate in a vertical position. For standard car radio receivers, such parameters are redundant.
For stable reception of radio signals in the most popular VHF FM band, where most stations for motorists operate, a whip antenna 10–20 centimeters long is sufficient. A do-it-yourself external antenna for a car radio will be the simplest solution when replacing outdated head units designed only for receiving long and medium waves.
Without considering antennas for receiving television signals and Wi-Fi Internet radio waves, we will focus on simple car antennas, which are divided into external and internal. Internal antennas, shielded by the car body, have weaker reception of radio waves. For their stable operation, additional reinforcement or a complex frame structure is required. Only a trained radio amateur can independently calculate and manufacture a high-quality internal antenna; there is no point in starting such a design for novice tuning enthusiasts.
What to look for when purchasing
Antennas for car radios are also small, but they are slightly larger than television antennas because the wavelength is longer. For this purpose, short pins are suitable, reminiscent of devices for receiving walkie-talkie signals, but their length will be shorter than that of police flashing lights. To avoid accidentally buying an antenna for a TV receiver instead of a special model for a radio, study its technical characteristics:
- the antenna for the radio is designated as FM or AM (frequencies 70-108 MHz);
- for television - DVB - T (frequency up to 900 MHz);
- for navigation - GPS (400 MHz);
- for radio communications - CB (27 MHz).
Also remember to pay attention to the antenna connectors . Most often, they should match your device, but it won’t hurt to check this before purchasing. It is believed that an external type car antenna provides better reception, but this only applies to work in urban environments. However, devices for installation inside a car interior are easier to install, but at the same time they are cheaper, and accordingly, they will work worse than external ones.
Today, you can find all kinds of hybrid products on sale that can be used for all of the above needs - watching programs, listening to FM radio stations, and navigation. There are also models with the function of switching reception from highway to city and vice versa. Such techniques differ from each other in sensitivity and interference suppression features. So, on the highway, the reception range can increase to 80 km.
Tandem models are common , equipped with a pair of pins, one of which is intended for watching TV programs, and the second for listening to radio broadcasts. Of course, to use such devices for their intended purpose, you will need special equipment.
The process of making a homemade antenna
Flexible and telescopic antennas for manufacturing require the selection of special antenna materials and additional radio components. Plus, they break just as easily as your car's previous antennas.
A stationary solid antenna that imitates the fashionable “shark fin” receiving device is easy to manufacture. To make such a homemade antenna for a car radio with your own hands, you will need simple materials and tools:
- metal pin with thread;
- fixing nuts;
- copper wire;
- metal tools;
- soldering iron and soldering supplies (flux, solder, rosin);
- insulators;
- antenna cable.
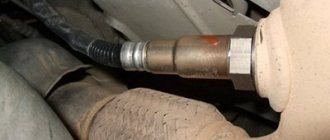
The main element of the antenna is a metal pin, the thread of which is selected according to the size of the standard location of the antenna or the mounting bracket you have chosen. Standard pre-threaded anchor bolts work well for the antenna base. At the opposite ends of the pin, you need to drill two holes for attaching the copper wire of the antenna vibrator. Unshielded wire is wound in two layers along the entire length of the pin.
The wound wire is clamped with fixing bolts and sealed in the upper hole of the antenna. For the outer layer of insulation, amateurs use various materials: Cold Welding glue, epoxy resin, polymorphus, thermoplastics. Melted vinyl and carbon fiber have proven themselves to be bad, causing interference with radio wave reception.
After manually molding thermoplastic or epoxy, the antenna will look inconspicuous.
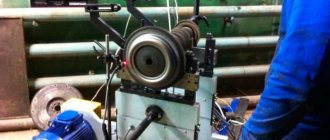
After trying on the antenna at the installation site and checking its performance, the outer surface is processed on a lathe and finished by hand.
Depending on the color of the material used, the finished antenna can be left black or painted with waterproof acrylic paint to match the body color.
You can watch the video on how to make an antenna for a car radio with your own hands for outdoor trips:
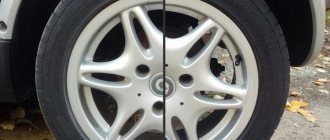
A well-processed homemade antenna on the roof looks no worse than the fashionable “shark fin” antennas that are equipped with expensive Mercedes, Audi and BMW.
If there is no regular place on the car body, a homemade antenna for a car radio can be installed on magnetic brackets or vacuum suction cups. It is preferable to use magnetic holders, which are more firmly held on the roof of the car while in motion.
It is undesirable to make unnecessary cuts in the car body, so you can use existing technological holes or minimally expand the grooves of the rear light seals. All cable outlets on the body must be sealed with sealant. Remote magnetic brackets for taxi drivers' radios are well suited for conversion. In this design, you only need to remove the extension coil (located at the base of the antenna) and connect the cable directly to the pin. Theoretically, the best place to install the antenna is considered to be the center of the roof, but usually car enthusiasts install a homemade device on the left wing or in the rear of the roof.
To connect an outdoor antenna, you must use a shielded coaxial cable. To lay the cable inside the cabin you will need:
- Remove the interior trim from the cable entry point to the center panel. All operations must be carried out carefully, without using brute force, while maintaining the plastic clips of the fasteners.
- Lay and secure the cable. It is advisable to avoid intersections with standard electrical wiring, which cause additional interference to radio reception.
- Compare the antenna and head unit connectors. If necessary, resolder the antenna connector or use an adapter.
- Check the operation of the car radio receiver.
- Assemble the removed interior elements.
The principle of operation of a car radio antenna
A car receiving antenna for a radio (hereinafter referred to as APRA) is a radio-technical device in which the following electrophysical processes are technically implemented:
- Electromagnetic waves incident on the AUG induce eddy currents on the surfaces of the conductive working elements of the antenna structure.
- Eddy currents excite an alternating electromagnetic field, which is supplied via the automatic control gear feeder to the input of the radio-electronic device. Depending on the functionality included in the device model used and the frequency range of the received radio signal, the car driver has the opportunity to:
- receiving radio messages;
- watching TV shows;
- using a navigator.
Most radio programs intended for car radios in the Russian Federation are broadcast in the so-called FM range (from 88 to 108 MHz). The length of the FM broadcast radio wave ranges from 280 to 340 cm. In order for an antenna for a car to be able to most effectively convert FM radio waves for radio, the following optimum technical support for high-quality radio reception has developed:
- antenna design – vertical conductor like a straight pin;
- pin length is ¼ of the broadcast wavelength.
In Fig. Below is an FM whip radio antenna with a spiral section.
For FM radiation in the range 88-108 MHz with a wavelength of 2.8-3.4 m, the electrical length of the AUGRA should be 70-85 cm. Deviation from these dimensions significantly worsens the matching of the receiving antenna with the radio receiver, which negatively affects the efficiency of the entire radio receiver complex. In order to reduce the excess linear size and increase ease of use, the automatic control gear is manufactured according to the principle of an asymmetrical quarter-wave vibrator.
Additional Information. An asymmetrical quarter-wave vibrator is a flexible rod installed perpendicular to the metal body of the car, which plays the role of grounding.
The flexible rod is made of a dielectric material, an electrical wire is wound around it, and then the structure is covered with a dielectric shell. The use of a spiral section makes it possible to further reduce the vertical size of the antenna. In this case, the length of the APRA pin can be reduced to 30-50 cm.
APRA classification
Antennas installed on a car are classified according to the following main characteristics:
- for its intended purpose, taking into account the further use of the received signal;
- according to the method of installing the antenna device;
- at the location of the receiving device;
- by the method of amplification of the received radio signal.
Appointment of APRA
By purpose they are distinguished:
- radio antennas that receive broadcast signals from radio stations exclusively for the car radio;
- TV antennas – for receiving television broadcasts;
- GPS antennas – for the car navigation system and traffic route correction;
- mobile radio antennas for radio communications.
Installation methods for automatic control gear
Based on the method of installing antenna devices on cars, they are distinguished (see figure below):
- magnetic AUGRA, equipped with magnetic soles for fixation on a metal surface (mainly on the roof);
- mortise antennas that require a hole in the body;
- antenna devices on an elastic suction cup, which ensures reliable adhesion of the device base to the car body;
- Automatic gearboxes using a threaded connection;
- radio antennas on clamps, also called gutter or overhead antennas, mounted on metal gutters;
- built-in devices, the main elements of which are hidden during installation under sealing rubber bands, in doors, etc.
APRA locations
Depending on the location on the car, there are two types of antenna devices:
- external (or external) antennas placed on the outside of the vehicle;
- internal (or cabin) antenna devices, most often fixed on the windshield inside the cabin.
The best result of receiving FM broadcasts is achieved if the AUGRA is placed outside in the center of the car roof as the highest point of the car. In this case, a good radio signal will be picked up from all directions.
Types of radio signal amplification
In accordance with the method of signal amplification, AUGRA are divided into:
- passive, without a built-in radio signal amplifier;
- active automatic control gear equipped with a built-in amplifier.
In Fig. Below is shown one of the modifications of the active external radio antenna of the famous Calearo brand, installed on the rear of the car roof.
How to install a TV in a car
For this you will need a receiver. The modern market offers a wide range of these devices. The quality of TV signal reception depends on the receiver model and system. To watch programs or movies without interference, you will need a good car TV antenna. Her choice needs to be done first.
TV receivers are divided into two types:
There are innovative models configured to receive the new DVB-T broadcast standard. But they are not yet widespread. The digital standard is not cheap, and not accessible to everyone, due to many restrictions.
Therefore, before choosing a television device, you need to think about buying a suitable antenna.
AUGRA installation options
Installation of automatic control gear must comply with the following requirements:
- ensuring reliable fastening of the radio receiver to the car, preventing movement when exposed to various mechanical loads (wind, bending, etc.);
- ensuring tight contact with the body, which acts as a mass, which significantly reduces the level of interference and improves signal quality.
All options for installing a receiving radio antenna come down to three main methods for fixing the automatic control gear on a vehicle:
- mortise mounting using a through hole drilled in the roof or other part of the body;
- magnetic mount using a magnetic antenna base;
- a pin mount, which is a mechanical fixation of the antenna rod for a car radio on a special clamp-type bracket.
APRA mortise mount
The mounting pin of the radio antenna base is inserted into the through hole, and a nut is screwed onto it from inside the passenger compartment. The advantages of the “mortise fastening” method include:
- the strength of the device, reducing the likelihood of it being stolen;
- stability of the operating parameters of the antenna-feeder system after installation.
Among the disadvantages, the following circumstance is noted: the edges of the drilled hole are centers of corrosion of the metal body, therefore it is recommended to use standard technological holes.
Important! In the fastening area, it is necessary to strip the metal of paint to ensure reliable conductive contact of the nut, as an element of the antenna, with the metal of the car body.
In Fig. Below is an antenna base with a pin and a hole in the roof of the car prepared for installing the AUGRA.
Magnetic mount APRA
The magnetic fastening of the antenna is provided by magnets located at its base - the sole. Magnets can be purchased separately from the antenna device. The most popular magnets are with diameters from 90 to 170 mm. The stability of the automatic control gear directly depends on the diameter of the magnet.
Salon APRA
Cabin antenna radio receivers are active type radio equipment installed in the vehicle interior. The fundamental difference between interior active antennas and externally mounted devices is the presence of a built-in RF amplifier, which uses power from the head unit (radio or other device). The undeniable advantages of salon active APRAs are:
- maintaining radio signal parameters in the FM range at a stable level;
- In-cabin automatic control gears do not affect the aerodynamics of the vehicle;
- absence of external mechanical influences;
- inaccessibility to vandals and robbers.
Indoor antennas are usually mounted on the windshield or rear window. Fixation methods: suction cups, tape, magnets.
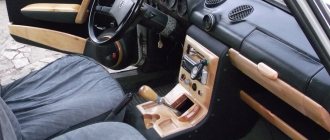
In Fig. Below is shown the interior antenna of the Triad-190 model, fixed in the corner of the windshield using double-sided tape.
Connecting the antenna to the radio
Connecting the automatic control gear to the radio is an electrical connection that ensures reliable contact of the sound-reproducing equipment with the antenna. In general, the car’s passive radio antenna is connected via a plug or connector to the ISO standard antenna socket in accordance with the instructions for installing and connecting the standard antenna system.
When installing an active automatic control gear, equipped with two wires for connecting the power supply and a terminal for connecting to the radio, the connection algorithm is more advanced:
- the black wire of the receiving device must be connected to the car body, creating a negative contact;
- the blue wire (as a variation of red) connects to the radio;
- The amplifier's power cable is connected to the head unit.
Note! With this connection method, power will be supplied to the amplifier only when the radio is running.
APRA of a new type
The canonical shape of a car receiving radio antenna in the form of a flexible rod is dictated by the conditions for high-quality reception of FM radio waves. Technological progress and different operating conditions of automobiles have brought variety to the traditional design of the automobile “radio mast” and its configuration. The principle “the higher the antenna, the better the radio reception,” which has been dictating requirements for the manufacture of standard and homemade antennas for decades, has given way to practicality and changing design trends in the automotive industry. Of the new developments that have gained a foothold in the market for automotive antenna devices, two types of AUGRA stand out:
- Flat mesh stickers installed on the rear or side window of the car. While losing to some extent in the quality of FM broadcast reception, flat antenna devices win in the struggle to preserve the integrity of the product from:
- exposure to vandals in the parking lot;
- bird strikes during long-term parking;
- damage at a car wash;
- ice formation.
- Shark fin antennas add the grace of a sea predator to the contours of a fast car. The overall dimensions of the device are so small that they do not create problems when entering a garage or under a low-hanging canopy. In Fig. The antenna is shown below with its overall dimensions.
Cable selection for AUGRA
Radio antenna devices permanently installed on the car (mortise and pin mounts) have good contact with the metal of the body. The input impedance of commercially produced antennas is 50 Ohms, and a standard RG-58 coaxial antenna cable with an outer diameter of 5.0 mm fits perfectly with them. A cable length of more than 5 meters is not recommended due to the increasing attenuation of the received signal.
Automatic gearboxes installed on a car magnetically are not electrically connected to the body. To connect them with the radio, we recommend cables RG-213 or RK 50-7-11 with an outer diameter of 10.5 mm. The cable length is determined to be 360-390 cm. Changing the length in any direction from this indicator leads to the loss of the possibility of high-quality configuration of the equipment.
Step-by-step installation instructions on the roof
If the supplied cable is not long enough, an additional one will be required. The cable must be braided and have a resistance of 75 ohms.
- At the installation site, it is necessary to drill two holes: one with a diameter for mounting the antenna and one with a diameter of 5 mm for an auxiliary one.
- The metal at the installation site is cleaned from the inside of the cabin.
- To avoid corrosion, the installation site is treated with mastic on the inside of the cabin and sealants on the outside.
- For installation, it is necessary to make an insulator (spacer) from copper and fluoroplastic washers to which the cable is soldered.
- The junction of the insulator and the cable must be sealed.
- We install the antenna on the roof and tighten the insulator nut from the inside of the cabin.
- We lay the cable from the antenna to the radio under the car trim.
- We connect the antenna to the radio and check the signal quality. Watch the video on installing the antenna
Sometimes standard antennas installed on cars have low sensitivity, or over time, as a result of mechanical or other damage, they stop working completely. At first, of course, every driver thinks that he doesn’t need this antenna, they say, I’ll listen to CDs, not the radio. But over time, the downloaded music begins to get boring and you want to listen to the banal chatter of DJs on the radio. That’s when the need to purchase an active car antenna arises.
DIY antenna for car radio
Often, for some reason, a standard antenna does not suit the car owner, prompting him to independently design a receiving device. There are plenty of “recipes” on how to make an antenna at home from scrap materials. Many car enthusiasts are impressed by shortened antenna devices, which allow entry into low garages without necessarily unscrewing the antenna pin. To make a car radio antenna that imitates the now fashionable “shark fin” with your own hands, there is no need to select special antenna materials or additional radio components. You can make do with improvised materials.
Materials and tools for homemade automatic control gear
To assemble an antenna with your own hands, a home craftsman will need the following materials and tools:
- an anchor bolt, the thread diameter of which corresponds to the size of the existing hole for the mortise or pin fastening method;
- 2-3 nuts with the same thread as on the anchor bolt;
- copper wire;
- metalworking tools and soldering iron;
- cold welding glue for metal, epoxy resin or Polymorphus plastic.
Manufacturing process
The manufacturing process of automatic control gear consists of the following stages:
- drilling holes at both ends of the anchor bolt to secure the copper wire;
- winding two layers of wire along the entire length of the bolt;
- soldering the wire in the upper hole of the bolt and tightening the winding with fixing nuts;
In Fig. Below is a semi-finished product after winding and fixing with nuts.
Assembly instructions
Making your own antenna amplifier for a car radio is considered a simple task, which is carried out in 4 stages. At the first stage, you need to prepare items that may be needed during the manufacture and installation of the antenna. After this, the device is assembled and installed on the car. Connecting the device completes the process.
Production of an inactive installation
The easiest way to make your own are passive amplifiers. They have a simple design that even a beginner can understand.
To complete this task you will need the following items:
- copper wire (no more than 2 mm in diameter);
- screwdriver;
- file;
- fasteners;
- thermal glue.
The process of manufacturing a passive installation involves performing several mandatory steps. Among them are the following:
- The wire is twisted into a spiral.
- It is placed on the screw, secured with a nut and a locknut.
- To ensure the strength of the connection, the contact point between the fasteners and the wire is treated with thermal glue.
- After the applied composition has dried, the product is sanded with a file or sandpaper.
- The finished device is attached to the vehicle body.
- Connect the wires and check the product in operation.
Additionally, you can coat the antenna with a primer and paint it in the chosen color.
Creating an active fixture view
Making an active device yourself is much more difficult than making a passive one. This is explained by the need to create an amplifier that improves signal reception.
For a DIY FM antenna you will need a few tools and some materials. Their list includes:
- soldering iron;
- wire cutters;
- copper wire (diameter 2 mm);
- amplifier;
- connector suitable for radio;
- glue.
Algorithm of actions:
- A wire going to the radio is soldered to the amplifier.
- A connector is attached to the opposite end.
- Connect the antenna plug.
- 2 holes are drilled in the car body.
- The wire coming from the device is laid around the perimeter of the door.
- To prevent it from falling out, it is fixed with glue.
- The receiver is attached to the roof of the car.
- Lay the cable going to the radio.
Installation and connection features
In order to quickly and efficiently complete the work, you must adhere to the prescribed rules and take into account all the important nuances. If you approach the task responsibly, you can avoid any problems and achieve a good result.
Main features:
- Any type of device must be installed on a previously cleaned surface. To do this, use special products that can degrease the selected area.
- Wires should only be laid after installation of the product has been completed.
- The car antenna design must have 3 wires: for grounding, power and contact.
- The contact wire and power cable should be combined with each other. This can simplify installation and improve the quality of the received signal.
- The antenna installed on the outside of the car body must be reliably protected from environmental influences. Otherwise, rain or snow may cause oxidation of the metal parts of the device.
- Do not mount the antenna near other metal devices.
Homemade car TV and GPS antennas
To make a homemade television antenna, home-grown Kulibins use:
- two aluminum rings, diameters 130 and 270 mm;
- wooden slats 3x3 cm;
- TV cable.
The assembled antenna receives signals in the VHF and UHF ranges.
To make a GPS antenna, craftsmen advise using copper wire with a cross-section of 2.5 mm2, which is bent using pliers to form the desired configuration. In Fig. Below is a drawing of a homemade device, which, after manufacturing, is attached to a GPS receiver.
Antenna systems are an integral attribute of radio communication equipment in a car, providing not only reliable communication between the driver and the outside world, but also creating quite comfortable conditions for spending time while driving or stopping while listening to radio programs or watching television films.
How to install a TV in a car
To install TV in a car and be able to watch programs and movies, you need a good car TV antenna.
New TV models are compatible with various other devices located in the car: cameras, video cameras, players. You can connect a navigator, parking sensors, and car cameras to them.
There are 2 types of TV receivers: tuners and liquid crystal analog.
Special models have been developed that are configured for broadcasting according to the DVB-T standard.
Before choosing a television device, you need to think about a suitable antenna for your car. The built-in receivers have an active car TV antenna, so the quality of the received signal is high. External ones are passive and do not have an amplifier.
How a car antenna works
Such a device is necessary to receive electromagnetic waves. It begins to convert the energy flow of these waves into an electrical signal. After these manipulations, this signal can be amplified and converted. Reception of such waves is possible only when the antenna is tuned to the required frequency or frequency range.
In order for it to capture the required frequency range, you need to choose the right length, because The quality of the received signal and sound will depend on this. In order for the device to pick up FM frequencies, the antenna must be at least 750 mm long. This explains the relationship between the size of the device and the quality of the resulting sound.
To make an antenna for a radio with your own hands, you should first decide on the type of mechanism.
There are several types, each of which is used for its own purposes.
For example, an active antenna is an electronic mechanism that combines a radio wave receiver and a radio frequency amplifier. It is capable of processing a weak signal that is sent to the canvas, then to the body of the amplification device, after which it is transmitted via cable to the antenna input of the car radio installed in the vehicle interior. Passive antennas can only receive signals from local stations.
Car TV antenna for the best reception
In the past, television in the car was a rarity. But with the development of innovative technologies, this privilege has become available to ordinary motorists. Now it is necessary almost as much as mobile communications. Some drivers believe that a car TV only interferes with their ability to keep an eye on the road and forces them to constantly be distracted. But a car TV antenna still remains a popular device.
Why install TV in your car? Paradoxically, it can be useful for the driver. This is a great opportunity to stop for a while, take a break from a busy trip, relax, watch your favorite show or movie. This method is often used in regular vehicles so that passengers can pass the time in an interesting way.
How to do it yourself
Many car enthusiasts are interested in the question of how to make an antenna for a car radio with their own hands. For a homemade antenna, you will need to prepare all the necessary tools and strictly follow the step-by-step instructions.
Before installing the antenna in the car with your own hands, you need to prepare the place by clearing it of accumulated dirt and dust.
Required spare parts and tools
The set of necessary tools and spare parts includes:
- anchor bolt;
- soldering kit;
- about 3000 mm of soft wire made of copper;
- plastic case;
- circuit for an amplification device;
- transistor KT368A;
- wire that will lead into the car interior;
- for an active dipole - resistors and capacitors.
Manufacturing process
First you need to wrap the wire around the anchor bolt. All turns should be smooth, there should be no overlaps. Then you need to solder the wire leading to the car radio in the cabin to the winding. You should select a plastic case that matches the resulting design and the size of the standard location for the antenna.
You can proceed to installing the mechanism on the roof of the vehicle. There are several ways how this can be done:
- using magnets;
- using vacuum suction cups;
- clamps;
- install a place for a standard antenna;
- using thread.
The wire should be routed along the body, preferably along one of the vehicle pillars. You can drill 2 holes in the housing; it is advisable to lay the wire around the perimeter of the doorway and secure everything.
After installation, you should lay the cable along the side and connect it to the radio.
Installation of the radio receiving mechanism on the car body using the connector provided:
- Take the wire and cut the thread.
- On one side, the thread must be longer than the height of the insulator, because there will be 3 more nuts.
- Tighten the first nut.
- Insert the wire into the insulator connector and tighten nut No. 2.
- Secure everything with a locknut.
- Insert the insulator into the hole located on the transport body.
- Strip the central core of the radio cable.
- Wind several turns of the protected core and secure everything with nuts.
- Connect the wire shield to the vehicle body.
- Connect the antenna connector to the second end of the cable.
- Secure the cable in the interior. For these purposes, it is recommended to use heat-protective glue.
If the user has chosen an active type of receiving mechanism, then it must be installed on the windshield using the bracket of your choice with a vacuum suction cup.
All installation and connection work must be carried out with the vehicle's power unit turned off.
Advantages and disadvantages
A DIY external antenna for a car radio can be mounted at home under any vehicle body. Such mechanisms do not have any problems with the installation height for receiving an FM signal. Another advantage of a homemade device is the better quality of signal reception compared to factory-made mechanisms. If necessary, the user can convert it into a GPS antenna.
The disadvantages include the fact that employees of the state road safety inspection may have questions about a homemade antenna. Wires from the receiving mechanism can damage the interior of the cabin. In some cases, it may be necessary to drill into the body to install this unit.
- How to make an amplifier from a car radio
- Pioneer radio pinout by color
- How to connect an active subwoofer in a car
- Tablet in car instead of radio
Connection and setup
The design of a car antenna for receiving radio in a car includes 3 wires:
- For grounding and installation of the receiving device. It is connected to a metal fastener and screwed on.
- Wire for power supply. It must be connected to the wire coming from the radio receiver.
- Contact. It is installed in a special connector, which is on the car radio body. In some devices, the power and contact wires can be combined into one common one.