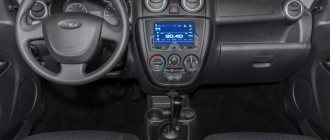
Hello, dear readers of the blog Kak-kupit-auto.ru . Replacing the stove on Kalina is not an easy task, but that is exactly what we will talk about in this article. Kalina's stove is one of its main advantages. It heats well, and even in severe frost the interior warms up quite quickly. While Kalina is new, everything is going great, but soon Kalina may disappoint its owner. If the heater radiator starts to leak, then puddles of antifreeze will appear on the floor mats, and in the worst case, antifreeze can even flood the electronic engine control unit.
Replacing a stove radiator without removing the panel
you find an oily liquid in the area of the stove radiator replace the stove radiator of your viburnum and preferably do this as soon as possible, before the leak gets worse. The heater radiator in Kalina is located in the center console, just below the radio compartment, slightly to the right and above the gas pedal.
By removing the plastic cover, you can see the surface of the radiator and visually assess its condition. Look, on my Kalina after the eighth winter the heater radiator looked like this:
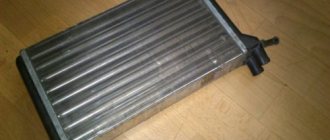
The standard Kalinovsky heater radiator is made from the same materials: plastic and aluminum. In winter, it experiences large temperature changes, which is why the radiator begins to leak, usually in the cold season. On my viburnum, the radiator of the stove began to leak already in the third year of its life, but it happened so slowly that I didn’t notice anything.
The antifreeze penetrated inside the ECU and oxidized the board, it shorted out, and the car stopped starting. Having installed a new ECU (price 5,000 rubles), I wrapped it in polyethylene (I should have done this on a new car). Another 5 years passed, the oxides at the end of the radiator became more and more noticeable, and last winter, the first drops of antifreeze fell on the carpet on the driver’s side:
I think that all this time the antifreeze was leaking very slowly from the radiator into the air duct, from where it managed to evaporate with the air flow. Later, having taken out the original radiator of Kalina’s stove, I discovered a green puddle under it:
So, when I saw drops of antifreeze, I realized that I could no longer put off repairing the stove . In the spring, I planned a mandatory replacement of the radiator of Kalina’s stove and, while waiting, I began to study the Internet in search of information.
Why aluminum from the factory
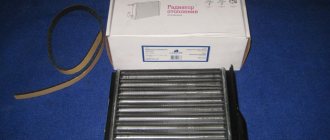
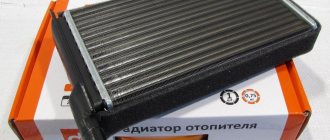
Original DAAZ heater radiator (aluminum).
It is cheaper and transfers heat better.
Filled with G12+ Felix Carbox-40 from the factory.
Although the choice of antifreeze type raises questions here. It reacts poorly to aluminum, so many Kalina owners completely replace the antifreeze.
Kalina stove. Replacing the stove on Kalina
After taking half a break from the Internet, I realized that there is not enough information on this issue. All I was able to reliably find out is that replacing a stove radiator on a viburnum is not an easy task. Our respected designers designed the car in such a way that to replace the heater radiator it is necessary to disassemble almost half of the interior of the car:
Then I called the car service center and found out that I would have to pay 5-7 thousand rubles for the procedure for replacing Kalina’s stove. The amount alarmed me, but what seemed most unpleasant to me was the need to dismantle many elements of the interior, including the front panel. Somehow I didn’t want, as a result of non-factory assembly, to get new crickets or breakage of existing components, so I began to persistently look for alternative options for replacing the radiator without removing the front panel of the car .
I spent quite a long time studying information on the Internet and as a result I found out that:
- To install a new radiator, you need to remove the old one (this is understandable), but this can be done without removing the dashboard, you can only break off its long fittings from the old radiator, sticking out from the passenger compartment into the engine compartment
- But installing a new radiator without dismantling the dashboard is impossible. Installing a new radiator is hampered by its long fittings. You cannot shorten them on a new radiator - then you will not be able to put hoses on them from the engine compartment side. Look, the fittings don’t protrude too much into the engine compartment, especially the lower one:
Compare, on the left is the new radiator (with fittings), and on the right is the old one (without fittings):
Major part malfunctions
The most common causes of radiator malfunctions are:
- Clogging of channels and honeycombs, which leads to an increase in pressure, results in a breakdown of the tube from the inside.
- Flow. The device may leak due to an air lock.
- Wear. During operation, the pipes wear out.
The most dangerous failure is a leak; it can occur in one or several places. Leaks can be detected by visually inspecting the system as a whole and the connections. A leak in a copper radiator can be eliminated by soldering; the aluminum product will have to be replaced.
Heating device made of copper
Dimensions of the standard radiator of the Lada Kalina stove
At one time, I was never able to find either the dimensions or a clear image of the radiator of the Kalina stove ; one might say, I had to select the radiator blindly, agreeing to return it if it didn’t fit. Therefore, I hasten to share this information with you, dear readers. I hope it will be useful, for example, if you decide to install a heater radiator from another car.
So, the dimensions of the Kalina stove radiator : 240 x 195 x 50 mm
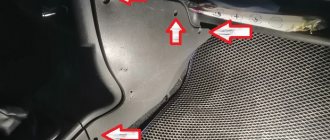
You may also find the dimensions of the niche in which the Kalina heater radiator is installed useful: 54x198 mm. However, if you are planning to install a heater radiator from another car, keep in mind that the edges of this niche are strongly rounded:
Design and principle of operation of the heating system
The Kalina's stove, like most other cars, is connected to the cooling system.
The device is a structurally complete unit consisting of the following elements:
- Fan motor.
- Heater radiator in a plastic casing with connection pipes.
- System of dampers, air ducts and regulators.
The principle of operation of the stove is as follows. Antifreeze circulates through the heater radiator connected to the engine cooling system. The flow intensity can be changed with the appropriate regulator. Heating directly depends on this. To remove heat from it, a fan is used, which is located in a separate housing and connected to the adjacent casing by an air duct. For greater efficiency, all joints are reliably sealed. The heater casing is unified and can be used both on cars with and without air conditioning.
The air for the heater can come from both inside the car and from outside; there is a corresponding switch for this. Most often, it is installed in the second position, which avoids fogging of the windows. The flow forced by the fan passes through the radiator and, already heated to a certain temperature, is supplied to the cabin. Here it can be distributed according to the wishes of the driver and the position of the corresponding dampers.
Methods for replacing a stove radiator on Kalina
Now, dear readers, I will describe methods for replacing a stove radiator that I managed to find on the Internet. I managed to figure out four ways to install a stove radiator on Kalina , of which I chose the last one (then it seemed optimal to me).
- Removing the dashboard
- Shortening the radiator fittings
- Sawing out air ducts
- Gazelle stove
Let's look at each of the methods for replacing the Kalina stove and look at the pros and cons of each of them.
Removing the dashboard
This method of replacing the Kalina stove radiator is officially recommended by the manufacturer. According to this method, as planned by our designers, to replace the heater radiator , you must remove the dashboard - the front panel of the car. I immediately rejected this option for at least two reasons.
- Firstly , I don’t want to disassemble “half the car” to replace the stove, because during assembly, something may be assembled incorrectly, something may creak, and something may stop working altogether
- Secondly , I wouldn’t want anyone to do this on their own, and the service costs about 5-7 thousand rubles. – quite expensive and no guarantees))
Here you will find a detailed description of this barbaric procedure.
Sawing out air ducts
The second way to replace the stove on Kalina is to cut out part of the air duct,
then a new heater radiator is inserted,
and the sawn-off wall of the air duct is returned to its place using glue:
I rejected this method because it seemed to me the most barbaric and collective farm (after disassembling the panel, of course). On the other hand, it has its advantages:
- no need to remove the metal plate with rubber band
- no need to disassemble the brake pedal
- original pipes and radiator are used (everything fits perfectly)
This method can be quite effective, provided that you can restore the tightness of the sawn air ducts.
Shortening the radiator fittings
The third method is to shorten the fittings on the standard Kalinovsky stove radiator. Theoretically, it is possible to shorten the fittings of the original Kalinovsky radiator to such a length that it becomes possible to install it in a niche. Then you need to use longer hoses (for example, from the 2108 stove) and put them on shortened fittings directly inside the car.
At that moment, the only mention of the successful use of this technique seemed unconvincing to me, and I could not find any other evidence. When I imagined how I would assemble all this in the area of the carrion unit, this method did not seem very promising to me, however, now, having studied the location of the units, I think that next time I should try installing a standard radiator using this method.
I note that will most likely not be possible to use rubber seal therefore the tightness of the interior is reduced and this is the main disadvantage of this method, not counting the inconvenience of assembling the pipes on the radiator.
Stove from Gazelle or from Volga
The name of the method speaks for itself - the idea is to replace the standard radiator with a heater radiator from another car, for example, a Volga or Gazelle. Looking ahead, I will say: I do NOT recommend , a little later you will understand why.
The point of this method of replacing a stove radiator is that, instead of the standard one, you can put a stove radiator from a Gazelle or Volga in Kalina (it should fit in size), but its fittings have a different configuration, so they must be routed to the right - on the passenger side .
In order to bring out the fittings on the right, you need to make holes in the plastic wall under the glove compartment, and throw the hoses through the top - behind the dashboard, fortunately there is enough space there. Holes in the wall can be made using a soldering iron, but don’t worry about aesthetics - the hoses can only be seen from the height of the seat surface.
The advantage of this scheme is that to replace the radiator there is no need to disassemble anything under the hood, just drain off the excess antifreeze, and the rest of the work is done inside the car.
In my opinion, Kalina’s designers should have used exactly this scheme: position the heater radiator with the fittings to the right and make it come out towards the passenger, and on the left, on the contrary, close the compartment hermetically. In this case, to replace the radiator on the passenger side, there would be no need to disassemble two pedals, and under the hood you would only need to drain the excess antifreeze.
Here I found a detailed positive report on how the Volgov radiator is ideal for replacing the standard one on Kalina.
Reviews about the copper radiator were only positive, so I decided to install one for myself and started looking for a radiator. However, I was unable to find this copper miracle. Instead, I always came across these radiators, whose height exceeds the permissible height by more than a centimeter. By the way, the price of such a copper radiator is about 2 thousand rubles.
Having never found a copper radiator of a suitable size, I bought it for 650 rubles. Gazelle radiator made of plastic and aluminum and installed it on the viburnum. I won’t describe the installation process in detail, because... this path of development turned out to be a dead end. I’ll just give you a photo to compare sizes:
Please note: the Gazelle stove radiator (pictured on the right) is a centimeter smaller in width, and its fittings are thin - only 16 mm, while the Kalinovsky one is 18 and 20 mm. In addition, the fittings seemed too long to me, so I shortened them. As it turned out, this was impossible to do.
I used solid 1.5 meter hoses from the engine to the radiator so as not to create unnecessary resistance. The fittings on the engine have a diameter of 20 mm. I was unable to put an 18-gauge hose on them, so I used a reinforced hose with a diameter of 20 mm.
And so, a week after installing the Gazelle radiator, antifreeze began to drip from under the hoses on the stove radiator. After tightening the clamps, I discovered that the leak was only getting worse. Then I removed the hoses and realized that these fittings were so flimsy that under the pressure of the clamps they simply folded inward.
I had to buy another Gazelle radiator, but this time with more powerful fittings with a diameter of 18 mm. Strange, but this radiator was cheaper - only 600 rubles.
The second copy looked more serious, it had a reliable, solid appearance, the box bore the inscription “made in Germany,” but it was also about a centimeter smaller in width than Kalinov’s. In the summer, I shouldn’t have attached any importance to this, but with the arrival of winter it became clear: the tightness of the radiator plays a key role in the efficiency of the stove.
When installing the second radiator from the gazelle, I did not cut the fittings, put the hoses going to the engine on them (two reinforced hoses with a diameter of 20 mm, a length of 1.5) and secured each hose with two clamps. Subsequently, over six months of operation, no leaks arose here:
So, I drove with the second radiator from June to December, and with the onset of frost I realized that my stove was practically not heating. Now I understand that the heater radiator , so cold air under pressure from the fan, instead of passing through the radiator plates, rushed past, into the gap formed due to the insufficient width of the radiator.
In addition, when installing the heater radiator from a gazelle, I did not sufficiently seal the radiator with foam rubber. Look how my heater radiator from a gazelle. This is an example of what not to do, but you will see how to seal a stove radiator a little later.
How to choose a new radiator
Before changing the heat exchanger, you need to select a new one. Particular attention should be paid to the material.
Based on this feature, radiators are divided into two types:
- Aluminum. Has lower thermal conductivity. If damaged, it cannot be soldered, but it costs much less. The vast majority of experts advise choosing this one.
- Copper. It is generally accepted that this heat exchanger is better. Its advantages are high thermal conductivity and maintainability. There is only one drawback - the price.
The heat capacity of the model does not play a decisive role; aluminum is more than enough to heat the interior. Maintainability, in modern times, is a dubious advantage; hardly anyone will solder. The quality of the radiators is approximately the same, so there is no point in overpaying for copper.
What if you turn the stock radiator upside down?
So, friends, with the arrival of cold weather, I noticed that the stove was heating rather weakly, and at an outside temperature of -10°C, the windows thawed only after 30-40 minutes of intense traffic. It was impossible to drive like this, and during the next thaw I decided to start the third (I hope the last) replacement of the stove radiator .
By this time, I had come to the understanding that enough experiments were enough and I still needed to install the original heater radiator from Kalina , ideal in size and shape. Moreover, before installation, it must be carefully sealed with foam rubber so that the air from the fan passes through the radiator fins and not past it.
At that moment, I didn’t yet know how I was going to install a standard radiator, but I still didn’t intend to cut out the air ducts or disassemble the dashboard. It seemed to me that there must be some simpler and more logical way to install a standard radiator. Having purchased new pipes and a heater radiator from Kalina in advance (650 rubles), I removed the installed radiator from the gazelle and tried to install the standard radiator in its place. As one would expect, the fittings rested against the partition of the engine compartment, so the standard radiator could not be pushed into the niche even half its length.
After dismantling the radiator from the gazelle, I began to think about how to install a standard radiator without breaking anything. I twisted and turned the radiator, placed it this way and that way, and suddenly an idea came to my mind: what if we turn the heater radiator with the fittings not towards the engine, but towards the driver?
The idea, although bold, was viable, so after 4 hours hot air was already blowing from the heating system deflectors. Now, let's look at the whole process of replacing the stove on Kalina from start to finish using the radiator reverse method . Let's start by making a list of everything we'll need.
Choosing the right radiator: the key to its flawless operation
If you need to install a new stove on a Lada Kalina car, you need to choose this part correctly, focusing on the following criteria:
- the material from which the product is made. Aluminum devices are less expensive, but they have one significant drawback - if cracks or other defects appear, replacing the radiator is not possible. You can throw it away immediately without wasting time. Therefore, it makes sense to purchase, albeit expensive, but reliable and repairable copper-brass part;
- the presence of coolant swirlers, which are made of high-quality plastic. Radiators with such elements work much more efficiently and become less clogged.
Tools and materials for repairing the Kalina stove
Necessarily:
- Two screwdrivers: Phillips and flat (for unscrewing clamps)
- Ratchet wrench
- Heads 7 and 8 (for unscrewing clamps)
- Heads for 10, 13
- Long head 10 (5 cm long)
- Keys for 10, 13
- Long pliers or pliers (to break out the old radiator fittings)
- Metal file (carefully saw off the fittings of the new radiator)
- Sharp knife (for cutting foam rubber)
- Standard heater radiator Kalina 11183
- 3 meters of reinforced hose, internal diameter 20 mm
- Two corners made of tubes (D=18-20 mm, size 50x50 mm)
- Foam rubber 5 and 15 mm thick
Desirable:
- Lighting: carrying lamp or lantern
- A piece of coolant drain hose + adapter tube
- Needle-nose pliers (for unscrewing hard-to-reach clamps)
I draw your attention, dear readers, that for repairs, two tubular angles with a diameter of 18-20 mm (according to the hose diameter) measuring 50x50 mm , which will turn the fluid flow from the fittings upward (they are on the right in the photo):
You can try to do without these corners , but in this case the hoses will be very bent and it is possible that antifreeze will not be able to circulate freely through them. In addition, the load inevitably increases in places of fractures, therefore the risk of leaks increases, which are extremely undesirable in the car interior.
I bought the corners for 50 rubles. in the GAZ spare parts store. At the same time I grabbed a handful of clamps of the appropriate size
Preparatory process with preliminary disassembly
To ensure the ability to carry out repair work to replace the radiator, you will need to acquire the following tools:
- locksmith set, which includes a wide range of standard keys;
- a hacksaw for metal with the ability to extend the blade;
- a container paired with a hose to drain antifreeze;
- silicone sealant or other means for gluing plastic;
- with a rag.
During the procedure for replacing the heater in the LADA Kalina model, we also recommend replacing its power supply and return pipes. On old hoses there is a high probability of cracks appearing, which can manifest themselves unexpectedly and negatively. This approach will eliminate the need to repeat the labor-intensive disassembly procedure in order to replace the pipes
We advise you to pay attention to silicone products
Replacing the stove on Kalina using the radiator reverse method
So, let's begin. We park the car so that on the left you can open the driver's door and carry out work in the area of the pedal assembly. Open the hood, remove the air filter and air duct .
It is recommended to plug the holes in the air filter and in the throttle with a clean cloth so that during operation dust, dirt and foreign objects that could further damage the engine do not get inside.
We remove the battery and the platform under it (keys 10, 13, ratchet wrench with a head 13).
To completely remove the platform, unscrew the hard-to-reach nut with a 10mm head, which secures two pipelines to the platform. These hoses have to be unscrewed every time you remove the platform under the battery, so I connected them together and don’t screw them to the platform anymore, because they won’t go anywhere anyway
Next we need to drain the antifreeze , but this can be done in at least two ways .
How to drain antifreeze on Kalina?
To avoid burns, work with coolant only when the engine is cool.
There are two ways to drain antifreeze:
- 1) You can unscrew the drain plug on the lower right side of the engine radiator and open the expansion tank cap. If you drain using the classic method, I recommend that you replace the standard radiator cap with this tuning version, which is sold in the store for 15 rubles. The slots for the screwdriver on the standard plug (pictured on the left) quickly break, you have to look for it by touch - it does not protrude from the radiator, and the tuning plug (pictured on the right) is clearly visible and can be easily unscrewed by hand. I recommend all potassium growers to install such a plug!
- 2) The second method of draining antifreeze is to drain only that part of the antifreeze that is in the heater radiator (1-2 liters). In this case, all the drained coolant will be collected in a canister and not a drop will be spilled, and the rest of the liquid will remain in its place in the system.
The technique is as follows: remove the hose from the heating of the throttle assembly:
Coolant will be drained from this hose, so it must be extended with another hose , and the free end placed in a canister where the drained antifreeze will be collected. As an adapter , I use a high 10 head, fortunately it has a through hole, and, in fact, it is a tube.
Next, we clamp our finger on the heating fitting of the throttle assembly (from which the hose is removed) and blow into the expansion tank . The pressure in the system increases and antifreeze rushes through the hose directly into the canister. When air comes out of the hose, it means that most of the antifreeze has already left the stove.
Blowing into the expansion tank is not an amateur activity, so some would prefer to drain the coolant through the radiator cap, but I made a simple device that allows me to pump air into the system using a compressor. Having disassembled the old cap from the expansion tank, I drilled a hole in it and inserted a nipple from the car inner tube from the inside:
Now we pump the reservoir with a pump or compressor and the coolant drains itself.
An important step is removing the knot
The cooling radiator and related components are unscrewed using the following tools:
- socket wrench 10;
- pliers with cylindrical thin ends;
- Phillips screwdriver;
- when carrying out work on Kalina with air conditioning, use a set of TOPEX internal socket wrenches (star-shaped).
To dismantle the radiator, you must first remove the engine cooling fan, having first disconnected the power connector from it. The fan is attached to the radiator with 4 bolts. The bolts are unscrewed with a 10 mm socket wrench, after which the fan is removed through the top.
The next step is to remove the rubber pipes from the radiator: upper, lower and coming from the expansion tank. The pipe clamps are loosened using pliers or a screwdriver. Next, use the same key to unscrew the 2 nuts securing the unit. The cooler can now be tilted towards the engine and pulled out.
When working with an air conditioned Kalina, you will have to deal with an additional cooling device attached to the main radiator. To separate them, you need to unscrew 4 bolts with a star key.
When removing the radiator, pay attention to the lower support pads; they can be removed along with the unit or remain in the body holes. It is better to remove the pillows to examine them for functionality.
The same applies to rubber-metal bushings installed on the cooler body. If necessary, these parts must also be replaced.
A radiator malfunction can be localized by plugging its large pipes, immersing it in a container of water and supplying air at a pressure of no higher than 1 bar through a small fitting. If there are many places where air breaks through, then the unit is replaced with a new one.
If you have 1-2 small fistulas, try to negotiate a repair at a service station; you should not undertake this yourself. The design of the aluminum radiator is such that careless movements can easily cause even more damage.
The new cooler is installed together with the cushions in place and screwed with nuts
Further assembly is carried out in the reverse order, and attention should be paid to the condition of the rubber pipes and clamps. It might be better to replace them too
Dismantling the old heater radiator Lada Kalina
So, when the antifreeze is drained, remove the pipes supplying the stove from the upper and lower fittings of the engine.
The diameters of the lower and upper pipes on the engine side are 20 mm.
The diameter of both fittings excluding the sides is also 20 mm.
If you pay attention to the protruding sides on fittings , it becomes clear why it is very difficult to put a reinforced hose with a diameter of 18 mm . In any case, I was unable to do this. But the 20th hose fit perfectly, so I recommend that you use a hose with a diameter of 20 mm .
Looking ahead, I will say that a reinforced hose at a regular hardware store at a price of 60 rubles per meter. Two pieces of 1.5 meters each are enough to spare even for installing a heater radiator from a Gazelle, and for installing an inverted standard radiator, 1 meter in each direction will be enough. It’s better to buy a hose with a diameter of 20 mm (it’s on the right in the photo), because... it is easier to put it on the fittings on the engine side.
I had the 20th hose installed with a radiator from a Gazelle, but when replaced with a standard radiator, these hoses went to waste, and their place was taken by a hose with a diameter of 18 mm (since it was in stock). However, to connect it to the engine, I made adapters, but more on that below.
Next we need to get to the heater radiator and remove the old pipes from them. This is not easy to do - the fittings are in a hard-to-reach place , so I unscrewed the left link from the steering rack (in the photo it lies on top of the steering rack), although you may be able to do without this operation. The clamps on the fittings were heavily oxidized , and there was simply no room for working with a wrench, so I was able to unscrew the clamps only with long, thin-nose pliers :
When the hoses are removed, unscrew the nut, which is located on a long pin, to the left of the heater radiator :
Looking ahead, I will say that this pin a steel plate to the engine shield , on which a rubber gasket , ensuring the tightness of the interior. Here is a photo of it from the pedal side:
The lower pipe is easier to unscrew:
The pipes have been removed. The upper hose is longer (in the photo it is below)
Now we move into the interior and unscrew the three screws securing the heater radiator , as well as the shiny steel plate :
Next, remove the gas pedal from the bracket. You can disconnect it from the throttle cable, but I didn’t do this - I just moved it to the side.
At the same time, we’ll immediately pull out the brake pedal - this will provide us with enough space to remove the radiator from its niche. You need to disassemble the brake pedal if you prefer to easily get out the old radiator without sawing it with a hacksaw, as is done here. To do this, remove the locking plate and take out the cotter pin that secures the pedal the rod :
Next you need to remove the brake pressure sensor . the two terminals from the sensor , loosen the plastic nut by 19 and unscrew the sensor from its thread.
Hint : if you mark with a marker the place on the thread where the nut was located, then during assembly, setting up the brake light will take you much less time.
When the pedal is disconnected and sensor is removed, the pedal moves freely in the longitudinal direction. We move the pedal back (towards ourselves) and to the left. This will be prevented by the stop on the pedals , into which the dismantled sensor previously rested. The stop may even bend slightly - this is not a big deal (during reassembly we will return it to its original position), the main thing now is to pull the pedal towards you.
Next, raise the Shumka and use a 10 mm socket to unscrew the three bolts securing the gas pedal bracket to the body.
We remove the bracket, turn the excess noise to the side and you can try to remove the heater radiator from its socket. If you succeed, then this whole article was written in vain, because in the same way you can put a new radiator in place)). If a miracle did not happen, and you were prevented from pulling out the radiator by the fittings sticking into the engine compartment, then take some pliers and feel free to bite the fittings under the base. Try not to damage the seal attached to the steel plate - we will need it later.
When the outer part of the fittings is broken off, remove the steel plate with the seal . If the fittings are still in the way, break them off at the base.
Next, lightly remove the old radiator from its seat. Now you can start installing the new one. If you try to install the radiator as is, try not to crush its edges - the aluminum plates are very thin and can be easily damaged.
Without removing the windshield
In this case, the windshield protective cover and cabin filter remain in place. Roughly speaking, there are fewer preparatory operations. But the algorithm for the main stage of work is radically different from the traditional one. It looks like this:
- Disconnect the accelerator pedal cable.
- We remove the pedal.
- We are dismantling the sensor for turning on the rear parking lights.
- We disconnect the brake pedal from its drive by disabling the clamp and the metal pin.
- Remove the steering column.
- Remove the trim on the left side of the dashboard.
Installing an inverted stove radiator on Kalina
So, let's look at how to install the radiator upside down - with the pipes facing the driver rather than the engine:
If the fittings are not cut, then there is very little space left to fit the hoses. Theoretically, you can first put on the hoses and install the radiator already assembled with the hoses, but I took a different route. I had two tubular angles , I connected them to the hoses, then installed the radiator and finally connected the angles to the radiator. I cut the fittings on the radiator to a minimum, leaving 30 and 50 mm .
The length of 30 mm was chosen based on the fact that it will allow, if necessary, to install a second clamp on the upper fitting . By adding another 20 mm (hose diameter), I got the length of the lower fitting - 50 mm .
Now I checked - the antifreeze is not leaking, so the second clamp on each fitting is not needed. To install one clamp, you can reduce the length of the fittings by another 15 mm , therefore, I recommend that you, dear readers, in order to save space, limit the length of the fittings to 15 and 35 mm .
After installing the corners on the radiator, I ended up with something like this design.
Having installed the heater radiator into the mounting socket, I realized that along the length these corners fit end to end. Therefore, I once again recommend that you make the fittings 10-15 mm shorter.
I then left the clamps in place and the corners to make installation easier. Remembering the unsuccessful experience of installing a gazelle radiator, I decided to properly seal the radiator and covered it with foam rubber according to the following scheme.
The entire far wall is sealed with foam rubber , plus two 15x15 square strips are glued to the side of the fittings, top and bottom. Thanks to these two strips, there is no blowing from under the radiator at all, neither from above (cold air) nor from below (warm). Therefore, I recommend that you, dear readers, do the same, because thanks to the correct sealing, the flow from the fan will pass through the heater radiator , which means it will heat up better.
I did not glue thick foam rubber on the right and left so that it would not peel off during installation. It seemed to me that there would be enough foam rubber 5 mm thick, and I must say that the radiator fit into its niche quite tightly.
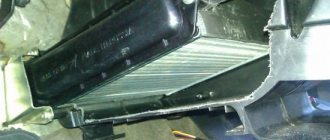
When the radiator is covered with foam rubber, we leave it to dry , and at this time we will install the hoses in their places . I had to modify the metal plate . Initially it looked like this:
The protruding wall had to be broken off, since it did not allow installing the radiator and hoses at the same time. After modification, the part acquired the following appearance:
Next we insert the hoses into the rubber seal . Hoses, especially those with a diameter of 20 mm, will sit quite tightly in the rubber band, so they should be inserted into the rubber band before the plate with the rubber band is installed on the body.
We install the metal plate and seal in their place. It should be emphasized that the presence of a standard seal has a positive effect on the tightness of the interior and sound insulation , so it is advisable to keep it.
Using a 10mm deep socket , not forgetting to install the washer, we pull the plate to the engine shield:
When rubber plate the hoses from the passenger compartment into the engine compartment and put them on the engine fittings. You shouldn't have any problems with this, because... you will use a hose with a diameter of 20 mm, but I had to make adapters from the 18th hose to the 20th using improvised materials.
I made some of the adapters on the engine side from a standard pipe from the Kalina stove, 20 mm in diameter, which I planned to use and therefore bought in the store, along with the radiator:
As adapters , I used tubes with a diameter of 18-20 mm, which I bought a long time ago at a GAZ auto parts store.
Now that the hoses were mounted in place, I installed the heater radiator in the niche, complete with seals:
After this, we insert the corners into the hoses, tighten the clamps, and remove the excess part of the hoses upward, behind the ventilation duct.
And the last step is to connect the corners to the radiator . I don't know if this makes any difference, but I connected the lower hose from the engine to the lower radiator fitting, and the upper hose to the upper one.
Then I put everything together, and I got this wonderful picture.
It would be nice to also fasten the radiator to the ventilation duct with three screws that are intended for this, but I have not done this yet, because... The radiator already sits very tightly, there is no blowing from under it anywhere, and there is no particular desire to tinker with the fastening while it’s winter)).
On the right there are traces of the installation of the gazelle stove - holes made with a soldering iron. The foam rubber sealed them tightly, but in the summer I plan to seal them with epoxy resin, so the seal will be fully restored. Now I know for sure that I wasted my time with the Gazelle stove in vain. You need to install a standard heater radiator from Kalina , period!
Now let's list in reverse order everything that needs to be returned to its place.