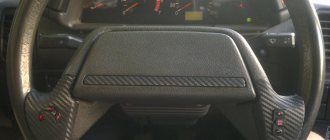
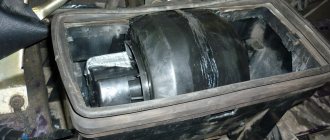
Mechanical window lift
In order for the mechanical window regulator to work properly, it is recommended to carry out preventive maintenance of its mechanisms once a year.
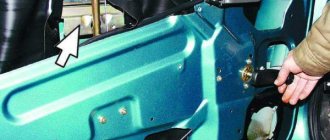
The first step is to dismantle the door trim to gain access to the mechanism. After this, using a rag soaked in gasoline, thoroughly clean all mechanical elements from old grease and dirt that has gotten inside. Then you need to visually inspect the mechanical window regulator for defects.
The most common types of defects are:
{typography list_number_bullet_green}1. The metal cable has stretched; 2. The surfaces of the gear wheels are heavily worn out;|| 3. The intermediate rollers are worn out or deformed;|| 4. The fastening elements are loose;|| 5. The glass guides are damaged;|| 6. The splines on the drive handle are licked;|| 7. The glass fastenings are faulty. {/typography}
Damaged or worn elements must be replaced with known good ones.
After inspecting the condition of the mechanisms, you need to completely lower and raise the glass several times, thus checking the functionality of the unit.
The glass should lower and rise smoothly and evenly, the force applied to the handle should be small
In addition, it is very important that the glass rises completely and is securely fixed in any position. Regardless of its position, there should be no transverse or longitudinal play
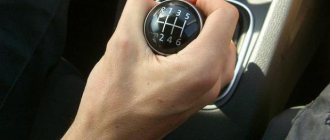
There should be no slipping or jerking when rotating the handle.
If the mechanical window regulator does not function properly, and the malfunction has already been eliminated, it should be adjusted. Only fully functional mechanisms should be adjusted, otherwise a positive result will not be achieved.
The procedure for adjusting the mechanical window regulator is as follows:
{typography list_number_bullet_green}1. Raise the glass completely and fix it in this position, adjust the location of the metal cables
It is very important that when the glass is completely closed, there is still a small amount of travel left for the handle, since the cables stretch a little during operation;|| 2. Secure the cable clamps;|| 3
Adjust the position of the rollers that are responsible for tension. The tension should be reasonable. A cable that is too loose will jump off the rollers and will not secure the glass properly. And excessive tension will negatively affect the performance of the gear pair; the force to rotate the handle will be too great;|| 4. Apply grease to the gear mechanisms and lubricate the cables and rollers;|| 5. Treat the glass seals with silicone grease;|| 6. Raise and lower the window several times, checking the operation of the mechanism.{/typography}
Instructions for self-diagnosis of the drive
Repairing a window lift motor is not as difficult as it might seem at first glance.
This is done as follows:
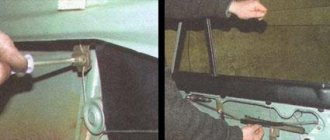
- It is necessary to remove the trim of the desired door by unscrewing the screws.
- Unscrew the door handle, as well as the plastic from the inside.
- After this, you need to carefully pull the casing from the bottom up.
- Disconnect the speaker that is attached to the door.
- Through the free holes you need to unscrew the screws that hold the glass. Important: when unscrewing the screws, you must be extremely careful so that the glass does not break.
- Remove the glass.
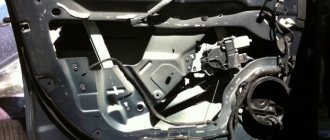
- Next, you need to unscrew the mechanism and remove it, while remembering where which contact was connected, so that when replacing it, everything should be done in the same order.
- After removal, you can disassemble the motor to thoroughly examine and clean it. You can also clean the winding, but be very careful not to damage the contacts. If the contacts are oxidized, they must be replaced and the mechanism reassembled.
- Replacement of the window regulator and assembly proceed in the reverse order.
Replacing the window regulator
Price issue
The photos below provide information about the cost of the window lift. In addition, you can see some variants of these devices.
Differences between types of window regulators
Thus, a “tens” window lifter of the mechanical type is a system of cables, rollers and gears, which, according to a kinematic diagram, work to raise and lower the glass, carried out by turning the handle of this mechanism. This is clearly demonstrated by the diagram of the VAZ 2110 window regulators, which can be viewed on our resource.
The factory electric window lifter of the VAZ 2110 is installed on models that are equipped with additional options, while the electric window lifter buttons are located on the decorative trim of the floor covering tunnel. If the new car is not equipped with this option, you can install it yourself.
Types of electric windows:
- cable (standard type on VAZ 2110);
- rack and pinion;
- plank.
Among all types of ESP, there are certain differences in the speed modes of operation for raising and lowering the glass, the degree of noise during operation of the mechanism and resistance to low temperature conditions. However, all these modifications are adapted for installation in standard locations of window regulators.
If we consider the VAZ 2110 window lifter, the price of which is set in the range of 3-3.5 thousand rubles, then you should opt for products from Forward or Granat.
general characteristics
Electric windows are used to raise and lower the windows. To lower the window, you need to press the module button in the driver's door until it clicks. When closing the windows, the button must be raised. The rear doors of the Priora car are equipped with handles for lowering and raising the windows. The rear windows in the car do not roll down all the way - this is how this model is designed. You need to remember this, otherwise you may break the window handle.
There are three types of ESP:
- cable;
- rack and pinion;
- plank.
Rack and pinion ones are more reliable and of better quality. Installation is carried out in existing holes.
The motor can be domestic or imported. Naturally, the quality of the ESP will depend on the manufacturer:
- noise level;
- lifting and lowering speed;
- performance in different climatic conditions.
Electric lifts are purchased at car dealerships or markets.
The Priora has electric windows, which the driver controls when the ignition is on and for a short time after it is turned off. This method of connecting an ESP is not always rational. Many car enthusiasts modify power windows to work without ignition.
Replacing the mechanism
When the ignition is turned off in a VAZ 2170 Priora, the power windows can be used for a short 10-30 seconds. If you open the car doors during this short time, the ESP will no longer work.
There is an old proven method of using lifts without ignition: a jumper is inserted into the ESP relay. But in a Priora car it is impossible to control the windows in this way. Under the socket in the cabin there is an automatic control unit for the electrical package, but the double-glazed window controller will not be able to be in standby mode, there will be a large load on the battery and a large current of energy leakage. The battery will not cope with the load and will fail.
Why doesn't the power window work on the Priora?
There are plenty of reasons: a blown fuse, a poor wire connection, a failure of the electric motor itself. Once the cause of the ESP's inoperability has been identified, repairs can be made. To do this, you need to correctly dismantle the unit.
Complete set of window regulators for VAZ 2110
Let's consider the completeness of the ESP using the example of the Berkut product. The electric window kit includes:
- A hinge-lever complex for moving glass vertically, which is installed on many modern passenger cars.
- Window lift motor gearbox "tens" brand PT-060, assembled using new technologies from Switzerland. The product can also be equipped with Mabuchi window lift motors. In addition, in the VAZ 2110 the window lift motor is produced by the famous European automobile concern Bosch. Thus, the VAZ window lift motor meets all international standards.
- Electrical wiring, which has the numbering of wires on the insulation according to the standard electrical diagram.
- Decorative type plugs.
- Window lifter button for VAZ 2110, the layout diagram of which can be found on our website.
- Additional fastening connections.
- Rubber adapter cuffs from the door to the counter.
To control the power windows of the VAZ 2110, there is a separate electrical circuit. The main element of the circuit is the power window control unit, which receives the command to open (close) the glass. The fundamental connection of the power windows is carried out in such a way that all commands pass through the VAZ 2110 power window relay, which “opens” or “closes” the electrical circuit.
On some modifications of the car, both the front and rear window lifters of the VAZ 2110 are installed, and on some vehicle models - a lifting mechanism for only the front side windows.
Installation of power windows on a VAZ 2110
The purchase and installation of electric power windows is carried out at specialized auto repair plants in the area where work on automotive electronics is carried out. They also install window lifters on the “ten”, which, with certain knowledge in plumbing and electricity, can be done independently.
If the VAZ 2110 power windows do not work, it is necessary to take measures to carry out repair work. However, many car enthusiasts do not know how to remove the window regulator for subsequent repairs.
Procedure for dismantling the product:
- We disconnect the ground of the car, freeing the negative wire from its mount with the battery terminal.
- We complete the wiring from a set of wires for integration into the electrical circuit of the car (shown in thick lines in the diagram).
- Use a Phillips screwdriver to unscrew the block stopper fastener for installation.
- We take out the mounting block from the case, and, turning it over, connect it to block .Ш1 of the wire harness.
- We dismantle the decorative trim of the door where the window regulator is installed.
- We pull the wiring through the technological holes in the rack and door to the electric drive of the ESP.
- When installing electric window buttons onto the floor tunnel decoration, we pull 2 wires, and when installing into the decorative door trim, we need to pull 3 wires. To preserve the glass during work, it is better to dismantle it.
- Using a screwdriver, release the rubber seal on the side window.
- With the glass slightly lowered, using a socket head at “10”, we dismantle the fasteners connecting the glass frame and the window lifter, followed by removing the side glass.
- We dismantle the upper fastener of the guide of the VAZ 2110 window lifter mechanism using a socket head on “10”, as well as the middle and lower fasteners, and then the fasteners of the window lifter mechanism.
- We remove this device through the door glass opening.
- We remove part of the protective film, which will prevent the installation of the electric drive of the system. We install ESP.
- We secure the ESP fasteners with nuts until fully tightened.
- According to the connection diagram, we power the wire blocks. Checking the operation of the ESP is tested with connection to the battery circuit. We install the side glass on the technological place.
- We install the side window clip fasteners and again test how the VAZ 2110 window regulator works when equipped.
- We embed the start buttons for the power windows into the door decorative panel. We fix the plug. We put the door trim in place.
Replacement and installation
Replacing power windows on a VAZ 2110
Now let's look at the process of installing power windows step by step:
First, power is cut off from the battery. In some situations this cannot be done, so you have to turn off the cigarette lighter power circuit, instrument panel, lights and buttons. It is to these circuits that you will need to connect the side window power window wiring.
Replacing the electric motor for a window lifter VAZ 2110
- Next you need to carefully remove the interior trim.
- The glass must be securely fixed so that it does not fall when the window lifter mechanism is removed. You can use tape for these purposes.
Slowly remove the manual window lift mechanism. This is done this way:
- unscrew the fastening bolts of the glass and the window lifter mechanism;
- find the mechanism guide, which is fixed with four nuts;
- Unscrew the bottom nut first, then the two middle and top nuts;
- now unscrew the three nuts securing the window regulator, they can be seen in the place where the rotating handle is located;
Replacing the electric window motor of a VAZ 2110
Carefully remove the window lift mechanism of the VAZ; if this is difficult due to the upper fastening, you need to press on it with a screwdriver and pull.
At this stage, the dismantling is complete, now you need to install the new purchased power window. The process is carried out as follows:
- the mechanism is placed inside the door, it is pushed into the largest gap;
- it is secured with two studs; they must be inserted into the gaps where the two middle nuts were secured, securing the guide of the old window lifter. The new mechanism is mounted using nuts.
Replacing power windows on a VAZ 2110
Note. The fasteners that are on the window lifter lever system and on the glass itself are combined. To carry out this process, you need to supply power to the contacts of the drive motor, for example, from a battery. When the fasteners are aligned, they need to be secured using the bolts that are included in the electric drive kit.
Since friction is involved during operation, all surfaces must be well lubricated.
Replacing power windows on a VAZ 2110
At the final stage, all that remains is to connect the power window to the car's electrical system. This can be done either on your own or with the assistance of an experienced electrician who will do everything in just five minutes.
Note! In the latter case, you can save time and prevent problems that may arise from incorrect connection steps.
Let us pay attention to rack-and-pinion electric windows, which are most often installed on domestic cars. You can see how this is done in video reviews posted online.
Three well-known manufacturers produce mechanisms equipped with a cable wire, which includes springs to compensate for the tension of the cable. Visually, such designs are the same, but despite this they use different gear motors. For example, imported motors are installed in Syzran designs, while domestic ones are installed in others. In addition, there are some differences in performance indicators. The approximate cost of a cable sample set is 850 rubles. As for the “Granat” electric window lifter, marked in the photo below, it is worth noting that its price is relatively higher - about 950 rubles.
Video review of replacing front electric windows on a Priora
This video is embedded from my YouTube channel.
I hope that the replacement process is shown in the most accessible and understandable way!
The price of the motor is from 600 rubles, but for the entire assembled mechanism you will have to pay at least 1000 rubles. The Priora has lifts from the VAZ 2110, so you shouldn’t look for “Prior” ones.
You can often hear from car enthusiasts that the window regulator on a Priora does not work, and this leads many to the fact that they are forced to seek help from a car service center. But in fact, if you look at everything in detail, there is nothing complicated and you can safely handle it yourself. In addition, saving money and everyone’s precious time.
Possible breakdowns
The window regulator on the Priora does not work and this is due to a number of reasons, the essence of which we will look into in detail. So, a passenger car VAZ-2170 Priora can be equipped by the manufacturer with electric windows for:
- Two front doors
. As a rule, the two rear doors are equipped with manual rack-and-pinion lifts (); - On all four doors.
Depending on the type, devices of the cable and rack operating principle are distinguished. By type, there are faults associated with the electrical and mechanical parts. The most common mechanical failures include:
- “Licking” of teeth on the gear of the lifting mechanism;
- Defects in the cable mechanism that led to its damage or excessive stretching, which subsequently causes it to jump off the guide rollers.
As we see, there are few mechanical reasons and they are extremely rare. Electrical defects
If it happens that all four window regulators fail, then the reason must initially be sought in fuse number F31
, which is located in the central power supply control unit. The manufacturer placed the fuse and relay mounting block under the steering rack. So getting there and checking the condition will not be difficult for any driver, even an inexperienced one.
You just need to open the plastic panel under the steering wheel and perform a visual inspection to find the damaged (burnt out) mechanism.
If you have problems opening the rear doors using the control buttons that are located on the door compartments, but the windows are driven by the central control unit, then we begin to look for the reason in a mechanism called the rear window switch. Often the mechanism randomly blocks the current supply, as a result of which the glass does not move.
Diagnostics are carried out
using a tester. If the product does not pass current, then it should be replaced with a working one, since it cannot be repaired. The cost of the device is low, so there will be no big expenses. Next breakdown option
when one window regulator is faulty and cannot be moved using the central control unit. First of all, we test the mechanism on the corresponding doorway. If there are no complaints about the operation of the relay button, then we look for the cause in the head power supply, otherwise we replace the faulty relay. We finally check the entire system for serviceability.
In addition, a possible breakdown could be trivial mechanical damage to the electrical wire, as people say, it has become frayed. It can be eliminated by twisting or soldering the two ends of the wire, followed by mandatory insulation for safety purposes.
Now, as for the electric motor itself, the cause of the breakdown may be, and, as a rule, it is, significant wear of the commutator brushes
(freezing). Such freezing occurs due to the fact that the part is structurally made of plastic and, due to heating, can be deformed and modified.
The brush becomes motionless or inactive and is not able to perform its functions in full. Another reason why the power window on the Priora does not work. As you can see, you can eliminate the cause of the breakdown yourself, without having the proper experience, everything is quite simple and clear.