Contact and non-contact ignition systems were installed on the engines of VAZ 2106, 21061, 21063, 21065 cars.
Here are diagrams of their structure with a description of the elements and operating order.
Contact ignition system for the engine of a VAZ 2106 (1.6 l), 21061 (1.5 l), 21063 (1.3 l)
Description of the scheme
— Electric current enters the ignition system after turning the key in the ignition switch from the battery through the primary circuit or, when the voltage supplied by the generator becomes higher than the battery voltage, then from terminal “30” of the generator also through the primary circuit.
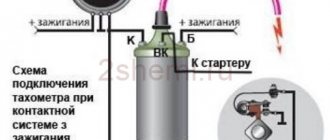
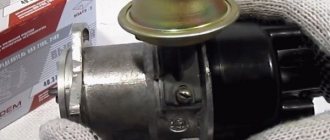
— The contact ignition system uses a B-117A ignition coil, an ignition distributor (distributor) 30.3706 with a breaker, a contact group and a capacitor.
— The operating procedure of the contact ignition system of the VAZ 2106 is similar to the operation of the contact ignition system of other VAZ cars — “The principle of operation of the contact ignition system.”
Contactless engine ignition system for VAZ 21065 (1.6 l)
Description of the scheme
— Electric current enters the ignition system after turning the key in the ignition switch from the battery through the primary circuit or, when the voltage supplied by the generator becomes higher than the battery voltage, then from terminal “30” of the generator also through the primary circuit.
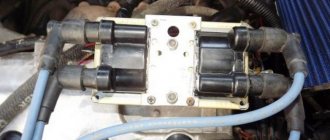
— The contactless ignition system of the VAZ 21065 uses an ignition distributor sensor (distributor) 38.3705 with a Hall sensor, an ignition coil 27.3705 and a switch 3620.3734.
Notes and additions
— If necessary, you can replace the contact ignition system of a VAZ 2106 carburetor engine with a contactless one and vice versa without any consequences for its operation. It is impossible to move the coil and distributor separately from system to system.
TWOKARBURATORS VK -More information on the topic in our VKontakte group and Odnoklassniki TWOKARBURATORS OK
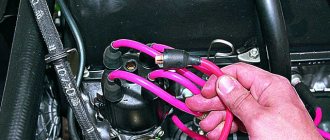
The ignition system of the VAZ 2106 car in the figure is represented by a distributor (3), a reel (6), spark plug elements (5), an ignition switch (2), wires with high voltage insulation, which are distributed to spark plug elements and a coil from the distributor and low-voltage connecting wiring .
In addition to the contact ignition system of the VAZ 2106, the “sixes” also use an ignition circuit using transistors that switch the current pulse and supply it to the spark plugs.
Difference between factory device and electronic type system
Any ignition mechanism implies the same device. The electronic ignition connection diagram for the VAZ 2106 provides for the presence of many common elements. These are spark plugs, armored wires, a distribution device, a coil. The presence of candles is mandatory, because without them a spark will not form.
Armored wires are used to connect high-voltage parts. They are cords made of special fibers along which a power charge moves.
The ignition distribution device (distributor) is different for many cars. Its functions can be understood based on its name. The installation of contactless ignition for the VAZ 2106 is not complete without such an element.
The coil has the property of increasing the voltage supplied to the winding surface. Comparing the contact and electronic ignition of the VAZ 2106, it follows that the first is characterized by a central axis, which carries out its movement thanks to the drive mechanism from the oil pump. There is a small cam on the axis that participates in the operation of the contact block. This part also serves to transfer the power charge to the coil. Transmitting a large current requires the operation of the entire contact group, which complicates the process and leads to many problems.
The electronic ignition system of the VAZ 2106 requires a Hall sensor. This component serves as a contact breaker and has no direct contact. It also creates a weak impulse, which will not be able to ignite the upper winding surface of the coil. This device enhances the push and delivers at the right time.
BSZ device
The contactless ignition system of the VAZ 2106 consists of the following structural components:
- The main device is a distributor or distribution unit. Inside this element there is a photoelectric Hall controller and a vacuum drive designed to change the advance angle. The distribution unit also includes a slider equipped with a movable contact element.
- A coil designed to produce a high voltage signal. This element is equipped with two windings - primary and secondary. The first consists of a small number of turns of thickened cable, and the second consists of a thin conductor, but the number of turns is larger.
- Electronic module. It is a switching device equipped with an aluminum radiator designed to cool the system. It is also used as a fastening component.
- Spark plug. They are installed on the cylinder block and connected to the switchgear via high-voltage cables.
- The wire itself, which connects structural elements to each other.
BSZ circuit for classic VAZs
The first contact element of the coil is connected to the generator device via an ignition switch relay. Its second component goes to the electronic module. A high-voltage cable with a large cross-section is routed from the coil to the distribution mechanism. Two bundles of conductors come out of the distributor, which connect it to the switch unit and spark plugs.
Disadvantages of the conventional ignition mechanism
Today, the contactless ignition system of the VAZ 2106 is used on many cars of this series. The contact mechanism is not available on newly produced vehicles. After all, this is due to the following shortcomings in the operation of the car and its parts :
- The occurrence of such a phenomenon as a spark jumping, which was reflected in their burning;
- Frequent cleaning;
- Short period of operation of the contact group;
- Frequent wear of the bearing on which the contacts are located, which led to instability of the engine;
- Stretching the balancers.
These shortcomings do not appear immediately, but one by one. Therefore, the owner of the “six” may be in constant repair. The structural structure of the contact group affects the charge power, reducing this value. As a result, the power unit begins to function worse and fuel consumption increases.
Therefore, car owners begin to think about the question - how to install electronic ignition on a VAZ 2106? And for those who have already done this, the topic is interesting - how to set the electronic ignition?
Electronic ignition kit for VAZ
Installation of a contactless ignition system
The BSZ must be installed and connected after removing the non-working system:
- First, the sealing gasket from the old switchgear is installed onto the new one, and the cover is removed from it. The slider in the distributor is rotated so that it is directed towards the mark. The timing shaft is installed in the socket and secured with a nut. There is no need to tighten it completely, since you will need to adjust the operation of the system and loosen the nut again.
- The spark plugs are being installed. Before installing these elements, it is recommended to set the gap between the electrodes; it is 0.8-0.9 mm.
- The distribution unit cover is being installed, and high-voltage cables are connected. When performing this task, you need to take into account the cylinder numbers, they are marked on top of the reel.
- The new device is fixed in place of the old device. If the contact elements on the coil are installed in the opposite direction, then before performing the task, the fixing clamp is loosened. Then the device body is rotated 180 degrees. The coil is mounted on the machine.
- A switching device is installed next to the short circuit. To do this, dismantle the expansion tank with windshield washer fluid. Using a drill, two holes are drilled in the side member of the car body, and the module is fixed using self-tapping screws. The electronic component itself must not be installed below the liquid reservoir. Otherwise, if it is damaged and water leaks, the device may flood, which will lead to its inoperability.
- The connecting cables are connected to the control module, switchgear and coil. For connection, a circuit is used that is included with the contactless ignition system. The block from the switching mechanism must be connected to the connector on the distributor. And the conductors are connected to contact elements marked “B” and “K” located on the high-voltage coil. When making connections, you need to take into account the wires that were attached to the old coil; they need to be fixed on the new device in the same way.
- A vacuum tube is fixed to the fitting of the membrane element of the distribution device, which is connected to the carburetor device. The installation procedure can be considered complete at this point.
In later versions of the “sixes” there are holes on the body designed for fixing the switching device. They are located on the side member on the left, if you look in the direction of travel of the car.
Photo gallery
Removing the slider cover by releasing the clips
Use wrenches to unscrew the conductors from the switchgear
Connecting wires to the new ignition coil
Connecting high voltage cables to a new switchgear
Advantages of electronic ignition
New contactless mechanisms do not have the negative qualities of the contact group, which affects their durability. The supplied pulse becomes stable and the fuel mixture ignites better. As a result, the installation of contactless ignition of the VAZ 2106 has a number of advantages :
- Reduced fuel consumption;
- Easier car starting at sub-zero air temperatures;
- Stability of engine operation at idle speed;
- Correct adjustment of the system will not require quick reconfiguration;
- Increased service life of spark plugs.
Assessing these advantages, we can say that the electronic ignition circuit of the VAZ 2106 has significant significance, which is felt upon first use. Moreover, many of the shortcomings that appear with a factory ignition will disappear.
Mechanical part
Voltage is supplied to a given circuit at a certain key position. The color depends on the year of manufacture of the car. As a rule, such a problem leads to a broken ignition key, which, in turn, requires additional expenses for purchasing a new part.
Unlocking Take an awl and insert it into the hole, pressing the latch with it. If there is no diagram or it is lost, then read on.
At the same time, they forget that electricity can affect not only the hand, but also car parts. Read it in 6 minutes.
Often such a malfunction ends with the ignition key breaking and, as a rule, replacing the VAZ ignition switch. Mechanical part. Often, failure of the ignition switch in the mechanical part is provoked by: tight turning of the ignition key; jamming in one of the positions.
The mechanical part is installed directly in the ignition switch itself.
Therefore, the key closes the contacts of the ignition circuit, thereby starting the car engine. After removing the lock, pull off the retaining ring from its reverse side and install a new contact group as in the photo.
To replace it you must: Disconnect the battery Remove the plastic casing, having first unscrewed the screws that secure it. This will help them connect the part without much hassle. VEHICLE ELECTRICAL EQUIPMENT.
Selection of electronic ignition
The contactless ignition circuit for the VAZ 2106 depends on the type of power unit of the car. Various design features of the distribution element are provided. If a 1.3 liter motor is installed, the distributor has a shortened spindle. If you have a 1.5 L or 1.6 L engine, the distributor spindle is the same for these varieties. The delivery packaging of the contactless mechanism includes the following components:
- Distributor used for ignition distribution. In relation to the volume of the car engine, different articles are distinguished. For a 1.3-liter engine, a device with article number 38.3706-01 is required. Car engines of 1.5 l and 1.6 l should select an element with the designation 38.37061.
- A coil characterized by high voltage. It provides conversion of current not exceeding 12 V. The element serves to multiply low voltage. Can raise up to 20 kV. The article number of the device is 27.3705.
- Electronic type control module - designated 36.3734 or 3620.3734.
Wires are selected as connecting elements. It is possible to use a kit from Niva. The connection diagram for contactless ignition on a VAZ 2106 cannot be made using a contactless kit for a VAZ 2121. The distributor included in the kit for this brand is externally similar to the required device, but their technical indicators are different. Therefore, you should not use this device.
You also need to purchase candles. The gap between the electrodes should be 0.7-0.8 mm. They allow you to quickly ignite the air-fuel mixture in the cylinders.
Standard classic ignition system
Preparatory stage
Many people are interested in the question of how to install contactless ignition on a VAZ 2106 if there is no garage and inspection hole. But this device does not require an inspection hole; all operations can be performed near the hood. Additional auxiliary equipment required:
- Set of keys (for 8,10,13);
- Two screwdrivers - flat and Phillips;
- Pliers;
- Drill (use of drills for working with metal is allowed);
- Screws.
You can also borrow a spanner wrench that has a long handle. It will allow the crankshaft to rotate. If it is not found, then you can use the method of rotating the rear wheel, after placing the anti-recoil objects and turning on 4th or 5th speed.
When solving the problem of how to install electronic ignition on a VAZ 2106, first you need to carry out the preparation stage:
- Open the car hood;
- Remove the negative terminal of the battery;
- Remove the wires from the spark plugs and the distribution device;
- Unscrew the spark plugs.
Next, you need to prepare a new kit and begin the dismantling process.
Preparing to replace the BSZ
To repair a faulty ignition system yourself or replace it with a more advanced one, you do not need specialized tools. It is more convenient to carry out work in the garage, but using a pit is not necessary. You can simply change the unit on the street, the main thing is that the lighting is of high quality.
Tools
Before performing the task, prepare the following tool:
- open-end wrench 13, will be used to dismantle the nuts securing the distributor fastening;
- 10 and 8 wrenches will be required to remove the coil;
- two screwdrivers - with a flat head and a Phillips head;
- pliers;
- electric drill or hand tool;
- drills, the dimensions of which must correspond to the diameters of the screws used to fix the switching device.
It is more convenient to perform the BSZ repair procedure on a VAZ 2106 using a spanner wrench equipped with a long handle. This will fit over the ratchet nut and be used to rotate the crankshaft by hand.
Preliminary work
Before removing and installing contactless ignition, the following preparatory work is carried out:
- The car's engine compartment opens. All actions related to replacing the ignition system must be performed with the on-board network de-energized. This will prevent short circuits and prevent failure of electrical equipment. Therefore, the negative clamp is disconnected from the battery terminal.
- The high-voltage cables must be disconnected from the spark plugs. After disconnection, a visual diagnosis of their contacts is performed. If they are damaged, it is better to replace the wires immediately. The other ends of the cables are disconnected from the distribution unit.
- The spark plugs are unscrewed; a special wrench is used for this.
- Then the screwdriver is lowered into the spark plug hole of the first cylinder. The crankshaft rotates until the piston rises to top dead center. The mark on it should be opposite the long mark, which is located on the cylinder block.
If there is no ratchet nut wrench, the crankshaft rotation procedure is performed by turning the rear wheel of the machine. It must first be hung by placing the car on a jack. When performing this task, the vehicle must be secured using wheel chocks. To spin the wheel, the parking brake lever is lowered and fourth or fifth gear is activated.
The channel “VAZ 2101-2107 REPAIR AND MAINTENANCE” talked about the features of preparing classic VAZs for replacing the ignition system.
Stages of replacing the contact mechanism
How to install contactless ignition on a VAZ 2106? First, the old mechanism is dismantled according to the following diagram:
- Remove the distributor cover and place its slider in a perpendicular position to the engine centerline. This is done by turning the starter off and on.
- Using a marker or chalk, make appropriate marks on the position of the slider.
- Disconnect the vacuum channel and wires from the distributor.
- Taking the key number 13, unscrew the fixing element of the coil-wire connection.
- Remove the wires from the coil. You need to remember in what position certain cores are located.
- Remove the coil.
It should be taken into account that when removing the distributor, the gasket located at the seating area of the cylinder body may fall out.
The marks on the pulley and block must match
After the operations have been completed, the installation stage of the new kit begins:
- Having removed the spacer element from the old distributor, place it on the newly mounted device. Unfasten the distributor cap.
- Having rotated the slider, set it in the position that corresponds to that intended during previous operations.
- Place the distributor shaft into the socket and tighten the nut. Since in the future we will adjust the contactless ignition of the VAZ 2106, there is no need to use force when twisting it.
- Tighten the spark plugs and install the distributor cap.
- Install the wires to the desired cylinders.
- Install a new coil. If the contacts do not match, you need to loosen the clamp and unfold the housing.
- Remove the washer tank and make a couple of holes in the side member to secure the electronic module. It is worth ensuring that the module should not be located below the tank to prevent flooding with water.
- Connect the new module according to the attached diagram. And also connect old wires from the tachometer and other devices.
- Secure the vacuum tube.
- Start the car. If it is not possible to start, then you should change the position of the distributor to change the ignition timing.
Recent car models are equipped with mounting holes. After you have succeeded in setting the contactless ignition on the VAZ 2106, the process of setting the appropriate ignition timing begins
Malfunctions of the “six” ignition system
When operating a vehicle, the following malfunctions of the ignition system occur, which must be eliminated before further driving the vehicle.
| Malfunction | Remedy |
| The contact group has a coating of dirt, is oxidized or there are contact burn points, the distance between the contacts is increased | It is necessary to clean the contact group and adjust the gap |
| Weak fasteners or wiring caps in the low-voltage circuit have oxidized, a broken wire or a short circuit to the car body | Test the wiring and their connections, replace damaged sections of the circuit |
| Defective ignition switch (no contact closure) | Test the area, replace the defective contact element of the ignition switch |
| The capacitor is broken and does not hold capacity | Replace the product |
| There is no voltage in the primary type bobbin winding | Replace the product |
| Incorrect adjustment size in the distributor contact group | Set recommended size in contact group |
| Excessive wear of the PCB pad or increased diameter of the distributor lever bushing | Replace contact group |
| Defect in the bearing of the movable type distributor plate | Replace the bearing or the entire distributor |
| The ignition spark plug elements have an uncertain contact in the threaded part of the cylinder head, the spark plug caps from the insulated HV wires have broken or become oxidized; the insulated HV wires are dirty or their insulating layer is damaged | Test the contacts and, if necessary, restore the joints, clean or change the wiring |
| The corner of the distributor cover has undergone severe wear or has become defective and is in a non-contact state | Check the carbon of the distributor cap and, if necessary, replace it |
| Loss or loss of voltage through chips, through cracks or burnout points in the cover or rotor part of the distributor, as well as through a layer of soot or drops of moisture on the internal cavity of the distributor cover | Carry out a check, clean the cover from foreign layers of moisture and soot, replace the distributor elements (cover and rotor) if they are damaged |
| Failure of the resistance in the slider (distributor rotor) | Replace the slider resistance |
| The car bobbin has external or internal defects | Replace the car bobbin |
| The glow elements of the spark plugs (electrodes) are dirty with oil or the gap between the interacting elements is set incorrectly | Clean the spark plug elements and carry out adjustments to align the gap between the interacting elements |
| Ignition spark plug elements have external defects in the form of cracks and chips on the insulator element | It is necessary to replace spark plug elements with updated products |
| Incorrect connection of high-voltage wires to the contacts on the car distributor cover | Connect the high voltage wires according to the appropriate diagram (1-3-4-2) |
| Incorrect installation of the ignition in the vehicle | Test the installation of the MH and, if necessary, adjust it |
Work on changing the ignition
How to adjust the electronic ignition on a VAZ 2106 after placing a new kit on the car? The first stage of adjustment is to configure the distributor:
- Remove the spark plug from the first cylinder;
- Place your finger on its hole;
- Rotate the crankshaft in a clockwise direction.
Adjustment of the electronic ignition on the VAZ 2106 is carried out when a stream of air begins to flow onto your finger. At this point you should stop turning. Next, the location of the distributor changes, namely, the slider should look towards the drive cylinder.
The next step in answering the question of how to set up electronic ignition on a VAZ 2106 is changing the ignition timing. This stage involves connecting the central coil wire to the spark plug and further shorting it to ground. The slider is turned in the opposite direction clockwise until a spark is formed. It is also necessary to ensure that this section is located at the point of interaction between the slider and the first cylinder.
How to set electronic ignition on a VAZ 2106 if detonation occurs? After equipping the car with the purchased kit and making adjustments, you need to warm up the car and press the gas, set second gear, listen to the engine. If there is no noise or detonation, then the setting is correct. In a situation where detonation occurs, the ignition must be adjusted later.
How to adjust contactless ignition on a VAZ 2106 if you need to adjust the leading angle using a strobe light. The device is connected to the machine voltage with preliminary removal and plug of the vacuum hose. After this, the engine should run to normal idle speed and loosen the bolt on the distributor. The strobe beam should fall on the crankshaft pulley. Rotate the distributor until the marks are located opposite the marks on the fuel mixture distribution cover. After this, secure the device.
Thus, now many will know how to install and how to set up contactless ignition on a VAZ 2106. The procedure can be performed independently if you have available tools and a set of a new device.
Installing electronic ignition on a VAZ 2106 is a way to modernize a car, which is often used in practice.
Starting the engine and setting the ignition
When you have succeeded in installing and connecting the BSZ, you may need to adjust the operation of the system. If, when installing contactless ignition on a VAZ 2106, the marks were not lost and the wires were connected correctly, the engine will start immediately. After the power unit starts, the engine should warm up, this will take a few minutes, you can help with the gas pedal. Then you need to adjust the ignition.
The adjustment procedure can be performed using several methods:
- by ear - this option is less accurate, but it will allow you to correctly configure the system;
- using a strobe light.
If the power unit does not start, and no action occurs when the starter device is cranked, you need to make sure that the “high voltage” is connected correctly. The problem may be turning the distributor cap when installing the system. If this happens, the slider will send a pulse signal to the fourth cylinder instead of the first. You need to screw the cover back and check that the wires are connected correctly.
The procedure for adjusting the advance angle is performed by turning the distributor body, the action algorithm is as follows:
- With the power unit running, loosen the nut that secures the distributor housing.
- Slowly scroll the device clockwise and counterclockwise. You need to focus on hearing. It is important that the car engine runs as stable as possible. The rotation angle should be no more than fifteen degrees.
- When the power unit operates stably and does not trip, the distributor nut is screwed in completely.
Channel “Ato! moto-life" spoke in detail about adjusting the advance angle on contactless SZ.
A more accurate option to adjust the ignition timing on a VAZ 2106 is to use a strobe light.
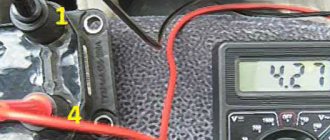
The device is connected to the battery terminals, as well as the high-voltage cable of cylinder number 1. Then the power unit is started, and the strobe indicator light is carefully brought to the marks installed on the block. The device will allow you to determine the location of the mark that is on the pulley when the engine is running. Using a wrench, the distributor nut is loosened and the assembly is rotated. It is necessary to ensure that this mark is combined with the last, shortest one.
When the setup procedure is completed, the car’s power unit warms up, you need to test the work done by driving it in different modes. If, as a result of pressing the gas, a metallic ringing is heard from the engine compartment, then there is detonation in the engine. This is due to the fact that the ignition timing is too early. To adjust, the distributor nut must be loosened and the device rotated clockwise a few degrees. There should be no detonation.
On a VAZ 2106, after replacing the ignition system, the idle speed of the power unit may increase as a result of improved spark formation. To reduce this parameter to the optimum (about 900 per minute), you need to tighten the fuel volume bolt. On Ozone carburetor devices, this element is large and is located on the right side, below the internal combustion engine. If the car has a Solex unit installed, then for adjustment a plastic lever mounted at the rear is used; it rests on the damper axis.
The Do-It-Yourself Car Repair channel spoke in detail about the procedure for adjusting the BSZ on VAZ cars.
History of the VAZ 2106 car
The VAZ 2106 diagram gives motorists a detailed idea of the location of the main components of the vehicle. This model is a small-class car (the version that was exported is Lada 2106) with a four-door body.
It is equipped with an engine with a displacement of 1.57 liters and a power of 75.5 hp. The motor is located in the front part, along the longitudinal axis. The history of the VAZ 2106 brand began in 1976. It was a modernized model 2103.
In the summer of 1998, production of cars and their modifications was stopped at AvtoVAZ OJSC, but, at the same time, began at RosLada in the city of Syzran. Since July 2001, this model began to be produced from vehicle kits at DOJSC Izhmash-Avto.
Models of the VAZ 2106 car
- VAZ-2106 is a car with an engine cylinder capacity of 1600 cm3, with left-hand controls.
- VAZ-21061 is a car with an engine cylinder capacity of 1500 cm3, with left-hand controls.
- VAZ-21062 is a car with an engine cylinder capacity of 1600 cm3, with controls located on the right.
- VAZ-21064 is a car with an engine cylinder capacity of 1500 cm3, with controls located on the right.
General information about the brand
Domestic cars of the 2106 brand were manufactured for the purpose of operating on roads equipped with improved surfaces, regardless of weather conditions. The cars are equipped with a four-door all-metal sedan body.
Cars are equipped with carburetor gasoline engines, four-speed or five-speed gearboxes. There is an independent spring front suspension; The rear suspension is dependent spring. The car's braking system is dual-circuit; there are disc brakes on the front wheels.
The rear ones are equipped with drums. Cars of the VAZ 2106 family were equipped with radial tubeless tires. The steering column has an anti-theft device that is built into the ignition switch.
The modification range of the VAZ 2106 family includes:
- VAZ 2106, 21065-00 - equipped with a model 2106 engine;
- 21061, 21065-01 – equipped with a model 2103 motor;
- 21063 – there was an engine from 21011.
- Car brand 21065 is the luxury version of this family. It has the following differences from the 2106 model: it is equipped with a five-speed gearbox and a final drive with a gear ratio of 3.9. Some cars were equipped with a Solex-type carburetor and a contactless ignition system. The car's electrical equipment is complemented by an electrically heated rear window, halogen headlights and a rear fog lamp. The body has been modified: the upholstery and seat headrests have been updated; The car is supplemented with bumpers of the 2105 model. Spare parts for the presented vehicles are available everywhere. In addition, the electric power steering is a kind of “novelty”, so to speak, the trends of the 21st century are making themselves felt. Thanks to this, car maintenance and repairs are not a big problem.
Ignition circuit for VAZ 2106
The VAZ 2106 ignition circuit includes an ignition distributor, a coil, spark plugs, a lock and low and high voltage wires. The VAZ 2106 connection diagram for this car system is shown in the photo.
- Until 1980, machines of this brand were equipped with the R-125B distributor. It was installed together with carburetors of type 2103. This distributor had a mechanical octane corrector, with which it was possible to slightly change the ignition timing, however, at the same time, there was no special vacuum regulator. After 1980, when engines were equipped with carburetors 2107-1107010-20 (“Ozone”), they began to use a 30.3706 distributor, which had a vacuum ignition timing regulator.
- The coil used was type B117-A. There was an open magnetic circuit. The device is oil-filled and sealed.
- Spark plugs of type A17DV or similar ones, but of foreign manufacture, were used.
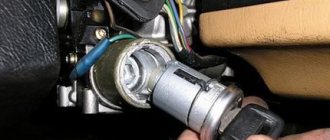
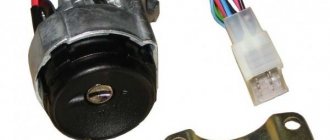
- The cars were equipped with a VK347 lock, which had an anti-theft device. It works as follows: when the key is removed (from position III “Parking”), the locking rod extends from the switch body in a special way. It fits into the groove of the steering shaft and thus the shaft is blocked.
Designation of wire colors on VAZ 2106 diagrams
| Letter on a wire | Color |
| B | White |
| G | Blue |
| AND | Yellow |
| Z | Green |
| K or Ki | Brown |
| P or K | Red |
| ABOUT | Orange |
| R | Pink |
| WITH | Grey |
| F | Violet |
| H | Black |
2sh.jpg
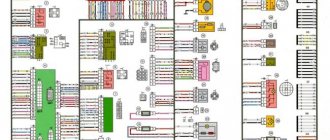
The VAZ 2106 electrical circuit diagram is a detailed “plan” on the basis of which the entire system of electrical connections of the vehicle operates. It consists of:
1 — front lights; 2 — side direction indicators; 3 - battery; 4 - relay from the battery charge warning lamp; 5 – relay with which the low beam headlights are turned on; 6 — relay for high beam headlights; 7 – car starter; 8 - generator; 9 – high beam lighting devices (headlights); 10 — low beam devices; 11 – sensor with which the fan motor is turned on; 12 — electric motor of the SOD fan (engine cooling system); 13 – horn (sound signal); 14 — ignition coil; 15 – ignition distributor; 16 — spark plugs; 17 – carburetor solenoid valve; 18 – sensor that shows the coolant temperature; 19 — engine compartment lamp; 20 – car reverse light switch; 21 – sensor indicating the oil pressure level; 22 — oil pressure sensor; 23 - sensor from the warning lamp, indicating the brake fluid level; 24 – electric motor, which is used by the windshield wiper; 25 — switch (equipped if a non-contact ignition system is used); 26 – electric motor from the windshield washer; 27 — fan motor relay; 28 – machine voltage regulator; 29 – special relay-breaker for the windshield wiper; 30 – special additional fuse block; 31 — main fuse block; 32 — relay-breaker for car alarms and corresponding direction indicators; 33 – relay with which the rear window heater is turned on; 34 — brake light switch; 35 – special plug socket for a personal transport lamp (not installed since 2000); 36 – special additional resistor of the automobile electric heater motor; 37 – electric motor, without which the heater cannot operate; 38 – mandatory switch for the heater electric motor; 39 – machine clock; 40 – lamp that illuminates the glove box; 41 — car cigarette lighter; 42 — alarm switch; 43 – special regulator for lighting transport devices; 44 - warning lamp, which symbolizes insufficient brake fluid level; 45 – light switch for headlights, sound signals and direction indicators; 46 — car ignition switch; 47 — rear window heater switch; 48 — car rear fog lamp switch; 49 — external lighting switch VAZ 2106; 50 — door lamp switches (A-pillars); 51 — electric window motor (some of the manufactured vehicles are equipped with it); 52 — door lamp switches (rear pillars); 53 — switch for the warning lamp of the car parking brake; 54 – lampshades that provide interior lighting; 55 - fuel level indicator in the car, which has a reserve warning lamp; 56 — coolant temperature indicator; 57 - oil pressure indicator, equipped with a warning lamp for insufficient pressure; 58 – car tachometer; 59 — control lamp (CL) of the parking brake; 60 – battery charge CL; 61 — CL carburetor air damper; 62 — side light CL; 63 — CL turn indicators; 64 — CL main beam headlights; 65 — auto speedometer; 66 — carburetor choke switch CL; 67 – “left-door” switch for the electric window motor; 68 – automotive power window relay; 69 – “true” switch for the electric window motor; 70 — rear transport lights; 71 – lights that illuminate license plates; 72 – sensor showing fuel level and reserve; 73 — rear window heater; 74 – lamp used to illuminate the trunk; 75 — rear traffic fog lamp.
5avz.jpeg
The VAZ 2106 fuse diagram is one of the simplest. It presents two lines with automotive fuses. This structure is attached with two nuts to the machine body. If you need to remove the fuse line, you will have to disconnect the battery. The disadvantages of such a fuse circuit (block) are its inconvenient covers.
The main disadvantage is that due to the unbending legs, contact sometimes disappears. And in some cases, as a result of poor contact, the fuse heats up and, as a result, the plastic ruler melts. This drawback can easily be corrected by replacing the block with fork-shaped fuses. It will take 10 minutes, but in the future, thanks to this “do-it-yourself VAZ 2106 tuning”, you will get rid of various hassles associated with electricity.
Ignition system VAZ 2106
The VAZ-2106 car is mainly equipped with a classic electric ignition system.
On the modified VAZ 21065 model, contactless systems were installed. In the classic form, B117A coils are used, in the non-contact system - 27 3705, the main difference of which lies in some details and winding data. The history of the production of the famous VAZ “six” VAZ 2106 dates back to 1976. From the very beginning of its production, a classic of the domestic automobile industry, equipped with an 80 hp engine. forces, has become the most popular and sought-after model among car enthusiasts.
VAZ2107 fuse and relay diagram
The electrical wiring of the machine is protected by fuses, which are mainly installed in the central and additional units, located at the bottom of the instrument panel on the left side next to the steering column. The circuit from the battery to the terminals and connections is closed when the car ignition is turned on.
Owners of 2106 should be aware that the old design of fuses has long become obsolete, since each time they operate they overheat, which affects the density of the cells. Lack of tight contact between the fuse and the connectors leads to their burning. Therefore, replacement of the fuse blocks is necessary. To avoid unnecessary problems with the electrical wiring, you should inspect the safety devices every six months. If the contact part burns, it is necessary to replace the fuses and clean the sockets. Today, many VAZ 2106 owners are modernizing classic blocks, replacing them with modern blade fuses.