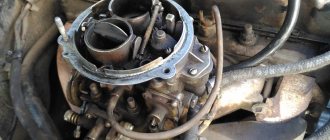
The stable operation of a carburetor engine directly depends on the performance of the carburetor itself. Until recently, cars of the VAZ family were equipped with a fuel supply system using this unit. The carburetor requires periodic maintenance, which is something that almost every Zhiguli owner faces. You can do the cleaning and adjustment work yourself, just read and follow the step-by-step instructions.
- What is it for?
- Carburetor design
- Idle system
- Float chamber
- Econostat
- Acceleration pump
- Transition system
- Starting system
- What carburetors are installed on the VAZ 2106
DAAZ
- Ozone
- Solex
- Signs of a carburetor malfunction
Stalls at idle
- Dips during acceleration
Video: eliminating air leaks
- Video: fixing the stalling engine problem
- XX adjustment
Video: how to make idle stable
- Video: how to clean the carburetor
- How to remove
Video: how to remove a carburetor using the example of a VAZ 2107
Carburetor VAZ 2106
The VAZ “six” was produced by the Volzhsky Automobile Plant for 30 years, from 1976 to 2006. The car was equipped with carburetor engines with a volume of 1.3 liters to 1.6 liters. Various carburetors were used as part of the fuel system, but the most common was Ozone.
One of the most common carburetors for the VAZ 2106 was Ozone
What is it for?
For any carburetor engine, an integral component is the carburetor, which is designed to prepare the optimal composition of the fuel-air mixture by mixing air and fuel, as well as to supply this mixture to the cylinders of the power unit. For more efficient fuel combustion, mixing with air must occur in certain proportions, usually 14.7:1 (air/gasoline). Depending on the engine operating mode, the ratio may vary.
Carburetor design
Whatever carburetor is installed on the VAZ 2106, the differences between them are minimal. The main systems of the node in question are:
- idle system;
- float chamber;
- econostat;
- accelerator pump;
- transition system;
- starting system.
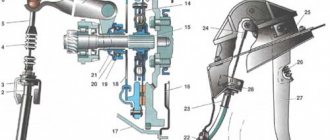
Ozone carburetor diagram: 1. Accelerator pump screw. 2. Plug. 3. Fuel jet of the transition system of the second chamber of the carburetor. 4. Air jet of the transition system of the second chamber. 5. Econostat air jet. 6. Econostat fuel jet. 7. Air jet of the main metering system of the second chamber of the carburetor. 8. Econostat emulsion jet. 9. Diaphragm mechanism for pneumatic drive of the throttle valve of the second chamber of the carburetor. 10. Small diffuser. 11. Jets for the pneumatic drive of the throttle valve of the second chamber of the carburetor. 12. Screw—valve (discharge) of the accelerator pump. 13. Acceleration pump nozzle. 14. Carburetor air damper. 15. Air jet of the main metering system of the first chamber of the carburetor. 16. Damper jet of the starting device. 17. Diaphragm trigger mechanism. 18. Air jet of the idle system. 19. Fuel jet for idle system.20. Fuel needle valve.21. Carburetor strainer. 22. Fuel fitting. 23. Float. 24. Idle speed adjustment screw. 25. Fuel nozzle of the main metering system of the first chamber.26. Screw for the “quality” of the fuel mixture. 27. Fuel mixture “amount” screw. 28. Throttle valve of the first chamber. 29. Thermal insulation spacer. 30. Throttle valve of the second chamber of the carburetor. 31. Diaphragm rod of the pneumatic drive of the throttle valve of the second chamber. 32. Emulsion tube. 33. Fuel nozzle of the main metering system of the second chamber. 34. Accelerator pump bypass jet. 35. Accelerator pump suction valve. 36. Accelerator pump drive lever
To better understand the operation of the device, the listed systems should be considered in more detail.
Idle system
The idle speed system (IAC) is designed to maintain stable engine speed when the throttle valve is closed. In this operating mode, the engine receives power without external assistance. Fuel is taken by the system from the float chamber and mixed with air in the emulsion tube.
Diagram of the carburetor idle system: 1 - throttle body; 2 — throttle valve of the primary chamber; 3 - holes for transition modes; 4 - hole, adjustable with a screw; 5 — air supply channel; 6 — mixture quantity adjustment screw; 7 — adjusting screw for the composition (quality) of the mixture; 8 — emulsion channel of the idle system; 9 — additional air adjusting screw; 10 — carburetor body cover; 11 — air jet of the idle system; 12 — fuel jet of the idle system; 13 — fuel channel of the idle system; 14 - emulsion well
Float chamber
The design of any carburetor includes a float chamber in which a float is located that controls the fuel level. Despite the simplicity of this system, there are times when the fuel level does not correspond to the optimal value. This is due to a violation of the tightness of the needle valve. The reason for this phenomenon is the operation of the car on low quality fuel. The problem is eliminated by cleaning or replacing the valve. The float itself needs adjustment from time to time.
There is a float in the float chamber of the carburetor that controls the fuel level
Econostat
The econostat provides the engine with fuel when operating at high speeds and supplies the fuel-air mixture in proportions corresponding to the speed. By its design, the econostat consists of a tube with different sections and emulsion channels, which are located at the top of the mixing chamber. At maximum engine loads, a vacuum occurs in this place.
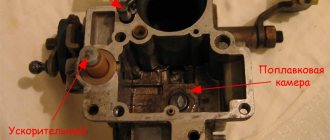
Acceleration pump
To prevent failure when you press the gas pedal sharply, the carburetor is equipped with an accelerator pump, which supplies additional fuel. The need for this mechanism is due to the fact that during sudden acceleration the carburetor is not able to supply the required amount of fuel to the cylinders.
Accelerator pump diagram: 1 - valve-screw; 2 - sprayer; 3 - fuel channel; 4 — bypass jet; 5 - float chamber; 6 — accelerator pump drive cam; 7 — drive lever; 8 — return spring; 9 — diaphragm cup; 10 — pump diaphragm; 11 — inlet ball valve; 12 — gasoline vapor chamber
Transition system
Transition systems in the carburetor enrich the fuel mixture during the transition from idle to the operation of the main metering systems, when the accelerator pedal is smoothly pressed. The fact is that when the throttle valve is opened, the amount of air passing through the diffuser of the main dosing system increases. Although a vacuum is created, it is not enough to drain fuel from the nozzle of the main metering chamber. The combustible mixture becomes leaner due to the large amount of air in it. As a result, the engine may stall. The situation with the second chamber is similar - when opening the throttle valve, it is necessary to enrich the fuel mixture to prevent dips.
Starting system
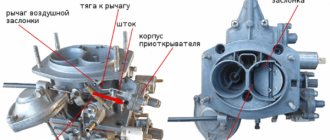
When starting a cold carburetor engine, it is not always possible to ensure the supply of the required amount of fuel and air. To do this, the carburetor has a starting system that allows you to regulate the air supply using an air damper. This part is located on the first chamber and is adjusted with a cable from the interior. As the engine warms up, the throttle opens.
Choke is a device that covers the inlet for supplying air to the carburetor when starting the engine when cold.
Diaphragm trigger diagram: 1 - air damper drive lever; 2 - air damper; 3 — air pipe of the primary chamber of the carburetor; 4 - traction; 5 — starting rod; 6 — diaphragm of the starting device; 7 — adjusting screw of the starting device; 8 - cavity communicating with the throttle space; 9 — telescopic rod; 10 — damper control lever; 11 — lever; 12 — axis of the throttle valve of the primary chamber; 13 — lever on the axis of the primary chamber damper; 14 — lever; 15 — axis of the throttle valve of the secondary chamber; 1 6 — throttle valve of the secondary chamber; 17 — throttle body; 18 — throttle control lever of the secondary chamber; 19 — thrust; 20 - pneumatic drive
When the choke handle is pulled out, the mixture is enriched, but a gap of 0.7 mm remains so as not to flood the spark plugs.
What carburetors are installed on the VAZ 2106
Despite the fact that the VAZ “six” has not been produced for a long time, a large number of these cars are found on the roads. Their owners often wonder which carburetor can be installed instead of the standard one, with the following goals being pursued: to reduce fuel consumption, improve the dynamic performance of the car and generally achieve optimal performance characteristics. It is quite possible to realize these desires today, for which purpose the standard carburetor is replaced. Let's consider what modifications of the devices in question can be installed on the VAZ 2106.
DAAZ
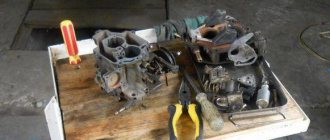
At the beginning of the production of cars of the VAZ family, the power units were paired with carburetors of the Dmitrov Automotive Aggregate Plant (DAAZ). To manufacture these units, a license was purchased from Weber. Many “sixes” still have exactly these carburetors today. They are characterized by good dynamics, simple design and high fuel consumption, usually at least 10 liters per 100 km. It is very difficult to purchase such a carburetor in good condition. To assemble a normally functioning unit, you will need to purchase several devices.
Initially, the VAZ 2106 was equipped with a DAAZ carburetor, which provided good dynamics, but also had high fuel consumption
Find out more about the DAAZ carburetor: https://bumper.guru/klassicheskie-modeli-vaz/toplivnaya-sistema/karbyurator-daaz-2107–1107010-ustroystvo-i-regulirovka.html
Ozone
The Ozone carburetor was created on the basis of Weber, but the unit had distinctive features:
- fuel efficiency;
- reduction of exhaust gas toxicity.
In those days, this carburetor was considered the most environmentally friendly. If the device is adjusted correctly, then the dynamics should be good, and fuel consumption should be 7–10 liters per 100 km. Despite its positive qualities, the knot also has disadvantages. The fact is that the secondary chamber is opened using a pneumatic drive, which sometimes refuses to work. In addition, problems arise with the forced idle system due to wear on the diaphragm.
The Ozone carburetor was more economical and environmentally friendly compared to the DAAZ
If the adjustments are violated or the mechanism is dirty, the secondary chamber may not open at all or open, but with a long delay. As a result, the dynamics deteriorate, stable engine operation at medium and high speeds is disrupted. In order for the Ozone carburetor to operate smoothly, the unit must be periodically serviced.
More information about the Ozone carburetor: https://bumper.guru/klassicheskie-modeli-vaz/toplivnaya-sistema/karbyurator-ozon-2107-ustroystvo.html
Solex
DAAZ-21053 carburetors (Solex) are especially popular among Zhiguli owners. The device has good dynamics and efficiency indicators. For the “six” this is one of the best options. Compared to previous carburetors, Solex has design differences, since it is equipped with a fuel return system: it supplies fuel back to the fuel tank. As a result, it is possible to save about 400–800 g of gasoline per 100 km.
Some Solex modifications were equipped with an idle speed control valve and an automatic cold start system.
The Solex carburetor has good dynamics and fuel efficiency
The operation of such a carburetor showed that the device is quite capricious due to narrow fuel and air channels, which often become clogged. As a result, problems with idle speed arise, and later other problems. Fuel consumption is 6–10 liters per hundred with measured driving. In terms of dynamics, the Solex is second only to the Weber of the first years of production. In order for this carburetor to work flawlessly, it is necessary to carry out preventive maintenance in a timely manner.
Find out more about Solex: https://bumper.guru/klassicheskie-modeli-vaz/toplivnaya-sistema/karbyurator-soleks-21073-ustroystvo.html
Installing two carburetors
The owners of Zhiguli cars, who are not satisfied with the operation of the engine at high speeds, are thinking about installing two units for mixing fuel and air. The fact is that the channels of a standard intake manifold have different lengths, and this does not allow the engine to develop full power. The introduction of two carburetors ensures a more uniform supply of the fuel-air mixture, which increases torque and increases the power of the power unit.
If you are interested in upgrading your six, you need to know that you can do this kind of work yourself. To carry it out you will need patience, the necessary materials and components. Installing two carburetors requires the following list:
- two intake manifolds from an Oka car;
- tees for the fuel system;
- throttle valve drive parts;
- set of hoses and tees;
- a strip of metal 3–4 mm thick.
When installing two carburetors, a more uniform supply of the fuel-air mixture into the combustion chamber of the engine is ensured.
In addition to the above, you need to prepare a set of standard tools (screwdrivers, wrenches, pliers), as well as a vice, drill and metal cutter. As for the choice of carburetor, you need to install two identical models, for example, Ozone or Solex. The installation process begins with removing the standard intake manifold and adjusting the Oka parts so that they fit neatly to the cylinder head.
For ease of work, it is recommended to remove the block head.
When preparing intake manifolds, close attention is paid to the channels: the surface should not have any protruding elements. Otherwise, the mixture flow will experience resistance while the engine is running. All interfering parts must be removed using a cutter. Having completed all the preparatory procedures, the carburetors are installed. Then the devices are adjusted by unscrewing the quality and quantity screws by the same number of turns. In order for both devices to open at the same time, it is necessary to make a bracket that will connect to the gas pedal. A suitable cable, for example, from a Tavria car, is used as a drive for carburetors.
Important little things
Any Solex (except 21073) has jets with very thin holes. It should be noted that because of this, the jets are very sensitive to debris in the fuel, and the carburetor itself often becomes clogged with dirt. For this reason, fuel filters should be changed regularly. To increase reliability, you can install an injection fuel filter. It will be a little more expensive, but you can increase the interval between inspections of the unit.
If the decision to install a Solex carburetor on a classic is made, then in addition to the carburetor, additional spare parts may be needed. The unit can be installed with or without recreating the EPH system - only the unconnected solenoid valve will remain. The easiest way is to get by with this system. But experts say that although the EPHH allows for 5% fuel savings, the system is unreliable and often fails. And this significantly reduces the reliability of the entire unit.
To prevent the solenoid valve from cutting off the fuel supply to the Solex idle channel (after all, the EPHH unit is not installed as standard), it is necessary to remove the valve needle from the housing. But the easiest way is to connect the valve from the ignition switch.
When installing Solex on rear-wheel drive VAZs, you need to plug the return flow with a plug or connect it through a check valve to the fuel supply system to the fuel filter.
Signs of a carburetor malfunction
As you use a car with a carburetor, certain problems may arise that require cleaning, adjusting the unit, or replacing any of its parts. Let's look at the most common problems with the mechanism and methods for eliminating them.
Stalls at idle
One of the most common malfunctions of carburetors of the VAZ 2106 and other “classics” is problems with idle speed. In this situation, the following happens: when you press the gas pedal, the engine normally picks up speed, and when you release it, the engine stalls, i.e., when the transition to idle mode (idle) occurs. There may be several reasons for this phenomenon:
- clogged jets and channels of the XX system;
- solenoid valve malfunction;
- problems with the forced stroke economizer;
- failure of the quality screw seal;
- the need to adjust the unit.
One of the common causes of a stalled engine at idle is clogged carburetor jets.
The design of the carburetor is made with a combination of the XX system and the primary chamber. As a result, problems may occur that lead not only to failures, but also to a complete stop of the motor. The solution to these problems is quite simple: replacing faulty elements, if necessary, cleaning and blowing the channels with compressed air.
Dips during acceleration
When accelerating a car, dips may appear, which represent a drop in acceleration or a complete stop of the car.
Dips can vary in duration - from 2 to 10 seconds; jerking, twitching, and swaying are also possible.
The main cause of this problem is a lean or rich fuel mixture entering the cylinders of the power unit when the gas pedal is pressed.
First of all, it is worth noting that failures can be caused not only by carburetor problems, but also by clogging or malfunction of the fuel system, as well as the ignition system. Therefore, you first need to check them and only after that start repairing the carburetor. The most likely cause of VAZ 2106 failures may be a clogged hole in the main fuel jet (GFJ). When the engine operates under low loads or in idle mode, a small amount of fuel is consumed. When you press the gas pedal, high loads occur, resulting in a sharp increase in fuel consumption. If the GTZ is clogged, the passage hole will become smaller, which will lead to a lack of fuel and failures in engine operation. In this case, the nozzle must be cleaned.
The appearance of dips can also be caused by clogged fuel filters or loose fuel pump valves. If there is an air leak in the power system, then the problem in question is also quite likely. If the filters become clogged, they can simply be replaced or cleaned (the mesh at the inlet to the carburetor). If the problem is caused by the fuel pump, the mechanism will need to be repaired or replaced with a new one.
One of the reasons for failures when pressing the gas pedal is a clogged fuel filter.
As for air leaks, this usually happens through the intake manifold. It is necessary to check the tightness of the connection between the carburetor and the manifold. To do this, with the engine running, spray WD-40 on the connections between the manifold, gaskets and carburetor on all sides. If the fluid leaves too quickly, it means there is a leak in that place. Next, you need to remove the carburetor and eliminate the malfunction (align it under a press or resort to improvised means).
Video: eliminating air leaks
Pouring candles
The problem with flooded spark plugs is familiar to almost every owner of a car with a carburetor engine. In this situation, starting the unit is quite difficult. When you turn the spark plug out, you can see that the part is wet, that is, it is filled with fuel. This indicates that the carburetor supplies a rich fuel mixture at the time of start-up. In such a situation, it is impossible for a normal spark to appear.
The problem with flooded spark plugs can occur both during a cold and hot start of the engine.
There are many reasons that lead to flooded spark plugs, but they all prevent normal spark formation
Since there may be several reasons for this phenomenon, it is worth considering them in more detail:
- Starting the engine with the choke pulled out. If you close the air damper on a warm engine, an over-enriched mixture will be supplied to the cylinders, which will lead to flooding of the spark plugs.
- The starter is faulty or needs adjustment. The problem in this case usually manifests itself when it is cold. In order for the starting device to be properly adjusted, the starting gaps must be set properly. The trigger device itself must have a complete diaphragm and a sealed housing. Otherwise, when starting a cold unit, the air damper will not open slightly to the required angle, thereby depleting the fuel mixture by mixing in air. If there is no such opening, the mixture will become enriched when starting cold. As a result, the candles will be wet.
- Faulty spark plugs. If the spark plug has black soot, an incorrectly set gap between the electrodes, or is completely broken, then the part will not be able to ignite the fuel-air mixture and will be flooded with gasoline when the engine starts. This indicates the need to have a set of spark plugs in stock so that replacement can be carried out if necessary. With such a malfunction, the part will be wet both cold and hot.
- Needle valve malfunction. If the carburetor needle valve in the float chamber has lost its tightness and allows more fuel to pass through than it should, the fuel mixture becomes rich during start-up mode. If this part fails, the problem can occur during cold and hot starts. Valve leakage can often be determined by the smell of gasoline in the engine compartment, as well as by fuel leaks on the carburetor. In this case, the needle must be checked and, if necessary, replaced.
- The fuel pump is overfilling. If the fuel pump drive is not adjusted correctly, the pump itself may pump fuel. As a result, excess gasoline pressure is created on the needle valve, which leads to an increase in fuel in the float chamber and an enrichment of the fuel mixture. To fix the problem, you need to adjust the drive.
- Clogged air jets of the main dosing system (GDS). GDS air jets are necessary to supply air to the fuel mixture so that it has the necessary proportions of gasoline and air for normal engine starting. Lack of air or its complete absence due to clogged nozzles leads to the preparation of an enriched combustible mixture and flooding of the candles.
Smell of gasoline in the cabin
Owners of the VAZ 2106 and other “classics” sometimes encounter such a nuisance as the appearance of the smell of gasoline in the cabin. The situation requires urgent search and elimination of the problem, since fuel vapors are harmful to human health and are explosive. There may be several reasons for this smell. One of them is damage to the fuel tank, for example due to a crack. Therefore, the container must be checked for leaks and, if a damaged area is detected, repairs must be made.
Due to incorrect adjustment of the fuel pump rod, fuel may overflow and the smell of gasoline may appear in the cabin.
The smell of gasoline can also be caused by fuel leaking from the fuel line (hoses, tubes), which could simply become unusable over time. Attention should also be paid to the fuel pump: if the membrane is damaged, gasoline may leak and smell may enter the cabin. Over time, the fuel pump rod wears out, which requires adjustment work. If the procedure is performed incorrectly, fuel will overflow and an unpleasant odor will appear in the cabin.
Stalls when you press the gas
There are many reasons why the engine stalls when you press the gas pedal. These could be:
- clogged accelerator pump nozzles;
- incorrect adjustment of XX;
- blockage of the transition system.
In addition, the reason may be in the distributor itself, for example, due to poor contact. As for the carburetor, you need to clean and blow out all the holes in it, check the jet markings with the table for a specific modification and, if necessary, install the appropriate part. Then the ignition is adjusted, having previously set the gap on the distributor cams, and the carburetor is also adjusted (fuel quality and quantity).
Video: fixing the stalling engine problem
Which Solex to choose
Units produced by Dimitrovgradsky differ mainly in the geometry of the jets. There is a difference in the diameters of the diffusers, as well as in the size and design of the air jets. The cam profile also differs.
However, without any unpleasant consequences or modifications, absolutely any Solex from the entire series can be installed on a car for which the carburetor was never made. Many models and modifications of these carburetors were produced - they were equipped with VAZ-08, 09, AZLK-21412, ZAZ-1102. There are “Solex” for VAZ-2104, 05, 07. This all means that absolutely any unit from the mentioned line can be installed on rear-wheel drive VAZs without modifications or almost without them.
The result of tuning depends on the choice of a particular Solex. But in any case, the engine’s traction will improve and the car will accelerate smoothly. To save money, it is worth choosing the Solex modification on the Tavria - this is DAAZ-2181. If you need increased acceleration dynamics, then select DAAZ-21073. It features diffusers of larger diameter. This carburetor was created for engines with a displacement of 1.7, and after installing this Solex on a classic, you should prepare for high fuel consumption.
Solex models 2108, 21083, 21051-30 are considered by motorists to be the golden mean. The units are capable of providing better dynamic characteristics and lower fuel consumption when comparing their characteristics with Ozone.
Installation process
Now you can start installation:
- To protect the collector from dirt, the engine compartment must be thoroughly washed.
- Then the drives and cables, as well as hoses, are disconnected from the standard carburetor.
- To remove the choke cable casing, remove the bracket from the choke panel.
- The surface of the collector is carefully cleaned and sealant is applied.
- After these operations, you need to install gaskets in the form of a sandwich. First the thin one is placed, then the thick one, then the thin one again. The purpose of a thick gasket is to provide thermal insulation. And to make the installation process more convenient, the carburetor is installed on the manifold without a cover. The damper drive must be at the front of the car.
- They mount the throttle valve linkage - on the VAZ-2104 it will be more convenient if it is on the cylinder head side. The slide or “helicopter” is sometimes sawed through the center so that it fits evenly on the carburetor. And so that in normal operation the damper does not jam on the spring, plastic tips are installed on the rods.
- Next, pull the choke drive cable over the cylinder head cover and adjust it to the required length. Adjustment is carried out by changing the length of the casing. The cable is then connected to the carburetor.
- After this, you can install the top cover.
- Next, the fuel supply, return, and heating hoses are connected to the carburetor. The return hose is equipped with a check valve. The return spring clings to the axis of the old rocker on the cylinder head cover.
Preparatory activities
If a motorist is interested in adjusting the Solex VAZ-2107 carburetor with his own hands, he must first carry out a number of preparatory steps.
Initially, you need to warm up the power unit to operating condition (temperature 85–90 degrees).
In the next step, you need to squeeze the handle of the air damper drive mechanism all the way; people simply call it “choke.” After this, the damper should be in a position in which the air channel is completely free, i.e., located in the direction of air movement.
Installing a Solex carburetor on a VAZ classic
This video tells you how to install it
…
Installing a Solex carburetor on a VAZ classic (2106) part 1
Today Nail Poroshin will tell and show the main nuances of the installation
53rd
Carburetor
for the Classic! Everyone...
If there is a tachometer, the device must be connected to the engine being turned off. Otherwise, if there is no unit, the item should be skipped. The positive side of the device should go to the ignition coil, and the negative side should go to the “ground” of the vehicle (body, engine or battery negative). Before connecting the device, you should read the operating instructions.
The last action should be to start the engine, turn on the high beam optics and the heating device.
Important adjustment points
After the installed structural element has reached its optimal position, it is necessary to press the gas pedal: the motorist must check the functionality of the motor, which will “raise” the crankshaft speed without interruption. At the same time, there should be no sudden damping of the engine after the pedal is released. If there are negative aspects, you will have to re-adjust the carburetor.
The CO content in the exhaust gases of the power unit must also be checked; according to the rules, after such manipulations it should decrease. With ideal performance of all components, CO should fluctuate within 1.5%.
When the screws do not help normalize the speed, the car owner will have to additionally check the power unit, since such moments indicate that the fuel “goes” to the mixing chamber, bypassing the idle system. In this case, you need to pay attention to the carburetor solenoid valve to close it. At the same time, you should measure the diameter of the nozzle hole, which is sometimes larger than necessary.
Settings
The popularity of the Solex carburetor is due to its ability to operate steadily in any, even extreme conditions. But for this, correct installation alone is not enough; the device must be configured correctly. Many car enthusiasts prefer to entrust this process to specially trained specialists, although the work can be done independently. Carburetor adjustment is performed in the following order:
- Setting the correct level in the float chambers. To do this, warm up the engine for several minutes, then turn off and remove the fuel hose. Remove the carburetor cover and choke cable. The lid is lifted horizontally so as not to damage the floats. Measure the distance from the gasoline level to the carburetor cap in each chamber. If it differs from the norm (25-35 mm), the float is bent in the desired direction.
- Idle speed adjustment. To do this, the engine is warmed up to operating temperature and turned off. Use a screwdriver to carefully tighten the mixture quality screw until it stops, start the engine and remove the choke. The screw regulates the minimum permissible idle speed, ensuring stable engine operation. The optimal value is 800-900 rpm.
Difficulties in adjusting idle speed lie in the lack of engine response to the rotation of the quality screw. This happens when installing too large jets, their deformation and poorly tightened plugs. The problem is diagnosed by removing the valve while the engine is idling, after which it should stall. If this happens, the problem is in the size of the nozzle, and if not, the fuel flows past it. Then check the locking screw on the second chamber, which ensures smooth rotation of the throttle valve.
Principle of operation
First of all, gasoline is supplied to the chamber, before which it is filtered through a mesh. In this case, the fuel level is regulated by a float, and when the required amount is reached, the valve blocks the access of gasoline. Through the float chamber, gasoline is supplied to the first and second chambers. The air that has previously passed through the air filter also enters there. Air, already mixed with gasoline, is transferred into the chambers through jets, resulting in an emulsion. The mixture passes through the econostat and goes through the sprayers into the diffusers. The resulting finished mixture is sent through the throttle valve to the cylinders. When idling, fuel is taken from only one chamber. The second switches on only when the engine is warm and when power develops.
What you might need
The first step is to purchase spare parts that will be needed during the installation of the Solex on a classic model VAZ:
- You should buy thin paronite gaskets. But they need to be made specifically for Solex. The holes in the gasket for diffusers differ from Webers and Ozones.
- Instead of two gaskets, you can buy one with two holes. It is placed between the carburetor and the getinax gasket. In addition, they take another one - with an oval hole. It is intended for installation between the manifold and the getinaks gasket.
- They also buy a return hose. Its length must be at least 80 centimeters. Otherwise, it will not reach the fuel line under the pump.
Problems in applying the transition regime
Under special conditions, an area of high vacuum forms under the closed carburetor flaps. When they open sharply, the vacuum can instantly decrease, which causes disturbances in the operation of the primary chamber, forming a failure, since at idle speed gasoline was sucked out of the channel through the nozzles.
To eliminate the consequences, the idle jet or pump nozzles are adjusted, changing in order of rotation, in order to eliminate the resulting difficulties with dips and delays when pressing the gas pedal quickly and abruptly.
It is always worth remembering that this kind of manipulation is carried out exclusively with a preheated engine.
Idle mode - second stage
Having completed adjusting the fuel level in the float chambers, the engine again warms up, coming into working condition. Further work proceeds as follows:
- The mixture quality screw is located in the recess of the lower part of the carburetor, and then screwed in counterclockwise all the way.
- When tightening this part, it is very important to control your own strength, since excessive persistence can lead to thread failure.
- Make five or six turns clockwise to remove the screw.
- The engine starts again and the choke is removed.
- The quantity screw allows you to set the minimum frequency for the motor to operate without interference.
- If the device is working properly, then the revolutions are made in an amount from five hundred per minute to one thousand two hundred.
- The quality screw is turned at a fairly slow pace until unstable motor operation begins.
- Then, in one or one and a half turns, it turns back again for stable frequency activity.
- The idle speed is regulated by a quantity screw ranging from eight hundred and fifty to nine hundred pieces per minute; if it is not possible to establish the process, then the quality screw comes to the rescue.
- Attention!
The result of adjusting the idle speed is a competent ratio, where the engine operates extremely steadily and with a minimum vacuum.
Tools and equipment for work
To carry out maintenance work you will need:
- A set of standard keys;
- Screwdrivers;
- Pliers;
- Rags;
- Carburetor cleaner (“Carb Cleaner” or equivalent);
You will also need a repair kit for the carburetor. Various types of repair kits are available, some of which include only gaskets, while others include all parts (jets, screws, emulsion tubes, etc.). It is better to purchase a complete set.
Since the carburetor consists of many small parts, disassembling it into its component parts, washing and troubleshooting and tuning is carried out in stages so as not to lose sight of anything.
New or used?
You can buy a new Solex for a classic, but it is also possible to purchase a used carburetor. In the second case, it is necessary to carry out an inspection - thoroughly clean the channels, polish the diffusers. In addition, it is better to purchase and replace jets.
But at the same time, you should not buy modern products - it is better to ask your friends and acquaintances for those that were made in the USSR. Modern jets found in repair kits often do not correspond to the calibration dimensions.
In order for the diffuser to work effectively, burrs and protrusions are removed from its elements using a file. Such defects create air turbulence, and this does not have the best effect on filling the cylinders.
Introduction
Any car makes its owner happy until any troubles begin to happen to it. Naturally, such circumstances upset every driver. If the car is not new, then the repair costs may be too high, and it is very difficult to resolve the issue on your own. However, real VAZ connoisseurs are trying to study their iron horse inside and out and carry out repair work themselves. This primarily concerns the repair of important components; many are interested in installing a Solex 21083 carburetor on a VAZ-2107.
The most popular carburetor for the VAZ-2107 is Solex
Since the release of VAZ cars with carburetor engines, parts from the following manufacturers have been installed on them: Ozone, Solex, Weber. But Solex carburetors were and continue to be the most popular. Let's look at the adjustment and tuning of the carburetor of this brand in a little more detail.