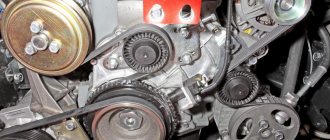
Removing the generator Niva Chevrolet (VAZ-2123)
For clarity, we carry out the work with the air filter removed. Remove the engine screen. Disconnect the wire terminal from the negative terminal of the battery. Remove the auxiliary drive belt (see “Checking the condition and replacing the auxiliary drive belt,” p. 41).
Using a 13mm wrench, unscrew the nut of the generator lower mounting bolt.
Replacing the generator belt rollers is a standard procedure that you can do yourself. This article provides detailed instructions on how to carry out replacement on a Niva Chevrolet car.
Before moving on to the symptoms and solution to the breakdown, it is worth talking about the possible causes of failure, as well as what they are expressed in :
- Entry of a foreign body. This is most likely evidenced by traces of impacts on the body and marks on the flat side of the belt. Incorrect belt tension adjustment - too strong or too weak. In this case, the tension indicator, tensioner cover or tensioner limiter breaks. This can be caused by incorrect tightening of bolts or incorrect sizing. Work in high temperature. Part misalignment. Because of this, belt marks can be seen on its surface. Mechanical damage from tools during installation.
A number of signs indicate the need to replace old rollers with new ones. They appear both directly while driving, in the form of extraneous noise , and during visual inspection.
Replacement is necessary if:
- Mechanical damage on the surface of the rollers; Noticeable play; Grinding noises when turning. This is a clear sign that the car needs repairs; Damaged bracket or bearing; Leaking oil; High temperature during operation; Strong vibration during operation; Difficulty in turning the shaft.
It would also be a good idea to check the serviceability of the belt. It should not have cracks, cuts or delaminate. If it has defects, it must be replaced.
1. First of all, you need to loosen the belt and remove it, otherwise you will not have access to the bearings themselves. To do this, you need to loosen the roller, which is held by a platform with nuts. There are three nuts, they require a 10mm wrench. Once they are all unscrewed, you need to unscrew the adjusting screw so that it moves up from the platform. This will allow the section with the rollers and belts to move freely up and down. In order to remove the belt, move the platform up. It is also worth noting that it is not necessary to remove the belt completely - just lower it from the faulty part.
2. The next step is to remove the faulty rollers:
- Place the car in first gear to prevent the crankshaft from turning; Unscrew the nut that secures the part. Remove the spring washer and remove the part.
The process of removing generator rollers on a Niva Chevrolet is identical to any other car.
Replacement takes place in several steps:
1. First, remove the bearing protective cover;
2. After this, using the 17th spanner , remove the nut that holds the bearing structure;
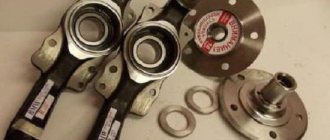
3. Next you need to remove the spacer ring, which is located behind the roller;
5. The new ring is installed in its place; 6. A new roller is installed in place of the old bearing. Before doing this, you should check the diameters of both parts to avoid the mechanism not working; 7. Next, the bearing is fixed using a washer with a spring mechanism and a nut;
8. After this, the belt is put on the new roller.
After this, a final check of all mechanisms is carried out and the elements are collected in the reverse order.
1. You can put the car in 4th gear, put the belt on the roller and push in the direction of rotation of the crankshaft. When it starts to turn, you need to pull the belt onto the generator pulley, and it will fall into place on its own.
Generator operation
The Niva Chevrolet generator is responsible for the reliable and high-quality operation of the electronics system. The owner should promptly identify possible malfunctions and carry out high-quality repairs, because the functioning of all lighting devices depends on its working condition. This also affects the battery charge. A continuous supply of current is provided by a generator.
Although it has small dimensions, the generator is very durable. To prevent a breakdown and prevent the auto regulator from malfunctioning, the owner must follow the rules for operating the vehicle.
Particular attention should be paid to how the Chevrolet Niva generator works. Malfunctions that led to a malfunction in its operation can be found in auto diagnostics. And repairs depend entirely on the severity of the breakdown.
Stop over-tightening the oil filter.
Every time I buy another used car, I, like many of you, naturally immediately change all the fluids in the car, as well as all the filters. Including oil. In general, this is unnecessary maintenance, a guarantee that the car will last as long as possible. After all, you must agree that an honest car seller is a rarity these days. I have been convinced more than once that all owners need only one thing - to sell their car as quickly as possible. For this they are ready to do anything. So, “a big lie” about the last recent maintenance, in which all the fluids were allegedly changed, is a normal occurrence when communicating with a car owner.
You know, I bought a lot of cars on the secondary market. There were both good and bad. I admit, I have made the wrong choice more than once, buying outright rubbish. True, I was always lucky, I quickly got rid of unwanted cars. Moreover, I often gave away a car I didn’t need, even more expensive than I bought it for.
And you know what irritates me most about used cars during the first maintenance after purchase? Oil filters. You won't believe it, but every car I've ever purchased on the aftermarket had terribly tight oil filters, which caused me a lot of inconvenience. Yes, I understand that a loose filter can also turn into a whole problem. But this does not mean that when replacing it, the filter needs to be tightened as if it will remain in the engine forever.
Did you know that every part in a car must be tightened with a certain force? For this purpose, the automotive industry even has entire specifications that indicate the torque (force) required for reliable and correct fixation of parts, components and attachments of the car.
Of course, it is worth mentioning that it is not convenient to screw in oil filters on all cars. After all, it all depends on where its landing nest is located.
For example, on my 1992 Jeep Cherokee (photo above), the oil filter is in a very convenient location, allowing it to be easily accessed from above. It only takes a few minutes to unscrew the old filter and install the new one. The filter on this SUV screws in very easily.
But, for example, another one of my cars (Jeep Grand Wagoneer - pictured above) has a slightly different location of the oil filter. Therefore, if you screw the filter very tightly later, when replacing it with a new one, unscrewing the oil filter will not be so easy. Most likely, in this case, you will have to use a special tool for unscrewing oil filters to unscrew the filter, or adapt your home tool to a special filter puller. Agree, it is very inconvenient. This is what constantly irritates me when, after buying a used car, I change the engine oil along with the oil filter.
But that's only half the problem. In many cars, removing the oil filter can be a real hassle. Especially in those cars where the design of the engine compartment and engine does not provide easy access to the filter.
For example, the photo above is of the engine compartment of a 1995 Jeep Cherokee, which has an oil filter located very close to the engine.
Removing this filter from the engine is very difficult even with the help of tools, since the space between the filter is very small. The thing is that when you use a tool to unscrew the filter, you have virtually no room left to rotate the filter. In this case, many auto repairmen and car owners, when dismantling the old filter, get rid of it as best they can, using the dirty method that is so popular in our country: a flat screwdriver + a hammer.
For example, here's how to unscrew an old oil filter from a Nissan:
Why did I decide to raise this topic? As you can see, there are many cars in the automotive world that, due to their complex engine compartment design and engine features, have oil filters located in places that are inconvenient for replacement. That's why I urge anyone who changes their own oils and oil filters not to tighten them too tightly. Can you imagine what it will be like to unscrew a tightly screwed filter, if it is still located in a very inconvenient place. Then you yourself will suffer.
Malfunctions that occur in the operation of the generator
The Chevrolet Niva generator, the photo of which is provided in our article, may have the following malfunctions:
- the pulley is damaged or completely worn out;
- current collecting brushes are worn out;
- rectifier failure;
- voltage regulator failure;
- the collector is worn out;
- the bearing is worn out or completely destroyed;
- The charging circuit wires are damaged.
The car owner needs to familiarize himself with the main reasons why generator malfunctions occur. In addition, you should know how to eliminate these breakdowns, as well as preventive measures to prevent them.
Voltage regulator: purpose and principle of operation
The generator set is equipped with a semiconductor electronic voltage regulator built inside the generator. The voltage of a generator without a regulator depends on the rotation speed of its rotor, the magnetic flux created by the field winding, and, consequently, on the current strength in this winding and on the amount of current supplied by the generator to consumers. The higher the rotation speed and the excitation current, the greater the generator voltage; the greater the current of its load, the lower this voltage.
The function of the voltage regulator is to stabilize the voltage when the rotation speed and load changes by controlling the excitation current.
Electronic regulators change the excitation current by turning on and off the excitation winding from the supply network (additional diodes).
As the rotor speed increases, the generator voltage increases. When it begins to exceed the level of 13.5 ... 14.2 V, the output transistor in the voltage regulator is turned off and the current through the field winding is interrupted. The generator voltage drops, the transistor in the regulator unlocks and again passes current through the field winding.
The higher the rotation speed of the generator rotor, the longer the time the transistor is in the locked state in the regulator, therefore, the more the generator voltage decreases. This process of locking and unlocking the regulator occurs at high frequency. Therefore, voltage fluctuations at the generator output are unnoticeable, and it can practically be considered constant, maintained at a level of 13.5...14.2 V.
Generator "Niva Chevrolet"
Depending on the type of current, generators come in constant and alternating current. Owners of the named car from time to time do not know what generators they use for this model? The Chevrolet Niva was provided with an electromechanical alternating current device. There is a built-in diode bridge - rectifier. To provide work to electrical consumers, it converts alternating current into constant current. The diode bridge with the generator is one mechanism; they can be placed both in the housing and in the cover of the generator.
The operation of the latter is influenced by the speed of the vehicle and the revolutions of its engine, because the generator is connected by a belt to its crankshaft. To regulate the output current, a voltage regulator relay is installed. In addition, modern generators have integrated voltage regulators.
The Chevrolet Niva generator may be subject to the following malfunctions:
If the malfunction is of a mechanical type, then it includes a breakdown of the fastening, housing, faulty condition of the pressing springs, bearings, belt drive, or other breakdowns that are not related to the electrical system.
With the first type of defects, winding breaks, burnout or wear of the brush are likely, the rotor may pierce, and a short circuit may appear between the turns. The diode bridge and the relay regulator may be in a faulty state.
From time to time, signs arise indicating that the Chevrolet Niva generator is in a faulty condition, but this problem can be caused by completely different breakdowns.
Tools:
There seemed to be a service in the area where we worked. I'll give the car back and go to the office while they fix it. The charge was just enough to get to the box.
The last meters were walked by hand. The electrician came out and said in a menacing, confident voice that everything was full today and he couldn’t do it. But the problem was solved immediately by itself.
My property was already in a box and I couldn’t leave on my own. But the comrade who was supposed to come has not yet appeared. In general, they quickly diagnosed me that the diode bridge had burned out.
The auto parts were a block away from the service station. An hour later I was back on the wheels. Hooray!
Parts and consumables:
The diode bridge burned out photo from the network. When overcoming puddles, it will be much more difficult to fill it than the lower ones. So I started thinking, maybe I’ll install a more powerful generator, because I plan to install a trunk and, of course, a chandelier; I think 4 lamps from hella will fit in quite well.
Plus I will also install a winch, and it also drains the battery pretty badly.
And if the gene is weak, then when fighting off-road, we can get a situation where we are skidding in the dark, the chandelier is turned on, the engine is boiling - both fans are threshing at full strength, we are pulling with a winch - will the gene be enough for 80 amperes? Such energy consumption, of course, will not happen often, but when it happens, it’s better to be safe, isn’t it?
So I’m looking at a gene for the Pramo ampere, it costs about rubles.
But first, let's check the generator that I got with the car by default. It seems to me that either the brushes there are worn out, or something else - well, it cannot charge the battery normally; in 4 months of summer operation I have already recharged the new battery 3 times. Apparently the gene charges only superficially. On the other hand, wouldn’t it be bad to drain the battery per ampere? After all, the battery is new and it would be wrong if it only lasts a year or two. If there is wear, the bearings or generator covers must be replaced. Check for a break in the stator winding.
Connect a test lamp one by one between all winding terminals. In all three cases the lamp should be on. If the lamp does not light up, there is a break in the winding.
Replace the stator or winding Check if the stator windings are shorted to the housing. Connect the lamp to the terminal of the stator winding, and the wire from the current source to the stator housing. If the lamp lights up, it means there is a short circuit: Inspect the drive-side generator cover assembly with the bearing. If, when rotating the bearing, you feel play between the rings, rolling or jamming of the rolling elements, the protective rings are damaged or there are traces of lubricant leakage, and cracks are found in the cover, especially in the places where the generator is attached, it is necessary to replace the cover assembly with the bearing; the bearing in the cover is rolled.
Check the ease of rotation of the bearing on the slip ring side. If, when rotating the bearing, you feel play between the rings, rolling or jamming of the rolling elements, the protective rings are damaged, or there are signs of lubricant leakage, the bearing must be replaced.
To do this, use a puller to press the bearing off the rotor shaft and press on a new one using a suitable mandrel, applying force to the inner ring of the bearing. Inspect the generator cover from the slip ring side. If cracks are found, the cover must be replaced. Damage to the capacitor or loosening of its mounting on the generator; deterioration in contact with ground is detected by an increase in interference to radio reception when the engine is running.
Niva Chevrolet: Generator is the most common problem
how to properly remove the generator
on
a Chevrolet Niva
with your own hands.
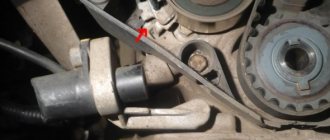
- You need to remove the connector from the crankshaft position sensor.
- Unscrew and remove the bolt that secures the sensor.
- The nut securing the generator needs to be loosened a little and moved towards the block. When the generator is displaced, its belt will loosen and be removed without any problems.
- Using a jack installed on the side where the generator is located, raise the car by engaging first gear.
- Pull the belt so that it moves away from the pump pulley. Turn the wheel so that the place where the guy is pulled runs across the pulley.
- Then remove the belt from the other pulleys.
- The new one must first be put on the generator pulley and the crankshaft pulley, and only later put on the pump pulley.
- Turn the wheel until the belt is on the pulley.
- Put the generator in place, and tighten the belt, attach it to the bracket with a nut.
- Replace the crankshaft position sensor.
The process of replacing the alternator belt is complete.
Installation
To install the generator, perform the operations in the reverse order of removal.
Install the auxiliary drive belt, adjust its tension following the recommendations set out in the subsection “Adjusting the tension of the auxiliary drive belt”. In this case: the tightening torque of the bolt nuts is 15.24 Nm (1.5.2.4 kgf m).
Replacing the alternator belt on a Chevrolet Niva with air conditioning
Niva Chevrolet - replacing the generator and drive belt
Chevrolet Niva replacing the alternator belt in the field☝
no charging Niva Chevrolet. generator repair
How to replace the alternator belt on a Chevrolet Niva with air conditioning?
how to replace a belt on a Chevy Niva
Chevrolet Generator Repair
Diode bridge and how to replace it without errors.
Replacing the NIVA alternator belt. Alternator belt after 25 km. on NIVA 21214
Generator brushes. How to replace.
The real favorite among SUVs in the modern automobile market of the country is the Chevrolet Niva. It combines the excellent qualities of both a touring SUV and a car for family trips. Thanks to its light weight and short overhangs, the Chevrolet Niva can drive off-road and ford. It can handle steep climbs with ease.
But the electronics system is one of the most vulnerable parts of a car. With regular inspection of electrical elements and timely removal of dirt and moisture from them, repairs will not be required even throughout the entire operation of the vehicle.
How to replace the tension roller
The design of the generator roller is quite common. The bearing is its main part. If the belt loosens or slows down, you need to check the bearing itself by turning it by hand. A serviceable roller rotates quietly, without jerking or biting. If the roller is in a faulty condition, you need to replace it, which can even be done in the garage, with the smallest set of tools.
Install a pry bar or other tool that can prevent the crankshaft from moving so that the clutch disc is blocked. By loosening the bolt that secures the roller, relieve the tension on the belt. Having unscrewed the axial bolt one hundred percent, the tension roller is removed. Then they install a new roller and adjust the belt tension.
After replacing the roller, it is necessary to re-inspect and check its operation. The instruction manual contains a detailed summary regarding the described difficulty.
Checking and tensioning the drive belt
To check the tension, push the belt to the side. The belt tension is considered normal if the belt bends 10 mm when pressed firmly with the thumb. If the deflection is greater, loosen the nut 6 securing the generator 4 to the tension bar 5. Moving the generator away from the engine using a mounting blade, tighten the Chevrolet Niva generator belt and tighten the nut 6 again.
After 10 thousand km. mileage, and in some cases even earlier, it is recommended to check the tension of the drive belt and, if necessary, tighten it.
Average rating:
5.00 ( 1 out of 5)
Generator brushes
Worn brushes of the Chevrolet Niva generator can lead to a voltage drop in the electronic system of the car. This is considered one of the main and frequent circumstances of this type of malfunction. But because the generator has a simple design and is easy to get to, even an inexperienced car owner can replace its brushes .
The main signs of brush failure include:
- voltage drops occur;
- the battery does not hold a charge;
- weak headlights at night, blinking;
- The radio turns off, etc.
Usually, during inspection, small elements of the generator are occasionally inspected. Therefore, worn brushes can suddenly remind you of them. But before deciding what replacement
The Niva Chevrolet generator brushes are needed, you need to find out if there are other defects that can cause similar symptoms. And only after making sure, you can disassemble the generator housing.
Troubleshooting
Repair of the Niva Chevrolet generator may be necessary only in some cases when replacing parts does not solve the problem. There are several signs after which it is worth checking the serviceability of the generator assembly. They are as follows:
- After starting the engine, the indicator light indicating the battery should go out. If after the engine starts running the signal still works, then the battery is not being charged, the generator voltage is not enough to charge.
- When the engine was turned on, the headlights became dim. Although there is a charge from the battery, it is too small to support the normal operation of electronic devices in the car; measuring instruments show low voltage characteristics - 12 V.
- There is noise from the motor side, in addition, points 1 and 2 are observed. The sounds may resemble metallic surfaces colliding or whistling. Most likely, the bearing has broken and needs to be replaced.
Also interesting: How to connect a stove in a field 21213
These 3 signs will help identify, but not recognize, a problem. Without special devices, it is very difficult to guess which part is damaged. Only service diagnostics can give a clear idea of the breakdown.
The diagram and design of the generator, of course, will help in finding a breakdown, but if a person has not previously made such repairs on his own, it is better to take the car to a service center.
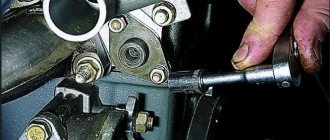
Removing the generator
For this process you need to take a Phillips screwdriver. In addition, you need to use a car tester or an ohmmeter, a 10mm wrench and a test lamp.
To change the generator, you need to remove it from the engine compartment. First, you should disconnect the wire and terminal of the battery with a negative charge. Next, disconnect the block with wires and the generator output, and take out the protective cover from there. Then, unscrewing the nut, disconnect the wires on the contact bolt of the generator. After this, unscrew the bolt that secures the generator to the tension bar and pull it out. You also need to unscrew the bolt-shaped fastening at the bottom of the generator.
Then you should remove the belt. After removing all bolts, the generator must be pulled out of the bracket using a mounting spudger. To install a new one, you need to go through the entire process in reverse order.
Having replaced the described electromechanical device, it is necessary to inspect its drive belt and adjust the degree of its tension. But before you replace your old Niva Chevrolet generator with a new one, you need to make sure that the replacement is really necessary. There are times when you can do repairs yourself, without the help of professionals.
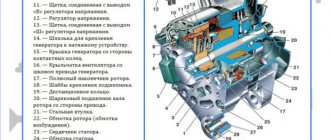
In order to avoid trouble, it is necessary to note how correctly the generator covers are placed. Next, you need to remove the plastic protective casing by unfastening the three latches on it. The voltage regulator and brush holder are removed together. In order to release the rectifier unit and capacitor, you need to disconnect the wires from the regulator terminal. The stator winding has three terminals. And in order to carry out the operation to remove the rectifier unit and capacitor, it is necessary to bend these leads a little. Use a flat-head screwdriver to pry off the side where the slip rings are located and remove the cover from the generator.
Holding the generator rotor in a vice, unscrew the fastening from the pulley. Then remove the spring washer, pulley and stubborn washer. Later, the rotor and spacer ring are carefully pulled out and their condition is checked. If the ring shows signs of damage, scratches and noticeably worn condition, it must be sanded with ordinary sandpaper. If the result is not good, the ring is ground on a lathe to remove a small layer of metal.
Having connected the rotor to the slip rings, use a tester to inspect the resistance of its winding. If the wiring is broken, the meter will show a never-ending reading. For this reason, the rotor must be replaced.
To check whether the rotor winding closes or not, you need to connect the test lamp to a network carrying 220 V alternating current. One wire of the lamp is connected to the rotor, and each ring is connected to the second in turn. If the lamp lights up, the rotor needs to be replaced.
Video “Step-by-step instructions for replacing the generator on Niva 2121”
The video shows a step-by-step replacement of a generator set on a Niva (video author - Ivan Matieshin).
Niva is an excellent domestic SUV that can compete with modern jeeps. VAZ 21214 received a durable body, a powerful power plant and a reliable suspension. Like any car it has its drawbacks. These include the location of the generator - the unit is installed in the lower part of the body. When testing for strength in forest and mountainous areas, dirt, sand, and water get into it. Another unpleasant point is that coolant constantly drips onto the unit.
The problem can be solved by moving the generator upstairs.
After reading this article, you will learn:
- What is needed to move the generator upstairs. How does the process work for cars with and without power steering? Is it worth buying a new unit for VAZ 21214.
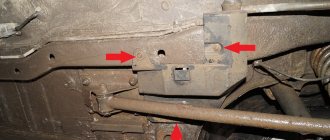
Study this drawing carefully. The author decided to make a bracket for moving the generator with his own hands. The part is made of metal, the thickness of which should be 4 mm, and the width and length should be 80 mm. To assemble the bracket, you will need parts from other domestic cars:
- Belt 6РК1290; Adjustment bar; Crankshaft pulley from tens.
Replacement procedure
To change the generator on a Chevrolet Niva, you will need to follow a few fairly simple steps.
- First of all, you should take care of the safety of the work being carried out. To do this, you need to put the car in a repair place, turn off the engine and remove the terminals from the battery.
- The next step is to remove the wire from the contact bolt, which is located on the rear panel of the generator. You will also need to remove the block from the assembly that secures the brushes.
- After this, you should begin dismantling the alternator belt. The belt is tensioned using a special plate called a tensioner. You can adjust the tension using the fastening bolts; they need to be loosened. The plate is located in the area of the tension roller and is attached to the structure with three bolts. To unscrew them, you need to take an open-end wrench for two bolts, and use a wrench to loosen the third.
- Next, all that remains is to remove the belt and unscrew the generator mounting bolts. There are only two bolts - top and bottom, but they are massive, and you will need a wrench for a large diameter. If the bolts will not turn, you will need to hold them from behind.
Also interesting: Farewell chord: LADA 4×4 Bronto frees up the conveyor belt for a new generation
When the bolts are unscrewed, all that remains is to dismantle the generator and begin installing a new one.