FakeHeader
Comments 13
In short, I'll take it under warranty, let them rack their brains.
That's right, then write down what the trouble was. Good luck
I went today under warranty and attended the inspection. In short, the problem was in the lamps themselves (When you start shaking them, they light up), it turns out they shook the lamps for me at TO-3 and said that there was a bad contact.
yes, they are fooling our brother ((
Are all the previous ones intact?
Is there an abnormal alarm?
Are all the previous ones intact?
If the front burnt out, then both would stop burning. (I tried)
As I understand it, you didn’t ask the reason at the maintenance? And they didn’t say it themselves either?
At first I didn’t ask, but the next day when the light stopped burning I asked. He told me that the contact was bad in the connector itself. (Although I tried the same thing myself, it didn’t help me.)
Damn, masters)) So take it back to them - let them establish contact)) It’s good if it’s a trifle, but if there’s something wrong with the wiring, then it’s fraught with trouble in the future. I read somewhere about problems with DRLs when the signal was connected incorrectly, the lamps burned out there too... Right now I can’t find the source. I read it on the Lada Granta Club, it seems. But you yourself don’t associate any of your recent manipulations? Maybe he changed something?
When you turn on the car, the DRLs come on and two lights come on. When the headlights are turned on, the right DRL lamp does not light up, and also when the daytime running lights are turned on, all the lamps are on, but the right one is not.
The fuses are fine. Also, in the parking mode, the right brake light does not light up, although when the brake is pressed, it lights up. What could be the problem?
- You turn on the dimensions - the light and backlight do not light up - 3 answers
- Electric headlight corrector for Lada Granta – 1 answer
- Removing headlights on Grant - 1 answer
Change the light bulbs. The lamps have two filaments - P21/4W and W21/5W.
So, flies separately, cutlets in the other direction! DRLs are DRLs, dimensions are dimensions. DRL - thick filament in the lamp, 21 watts, size - thin, 5 watts. In this case, the lamp burned out. And it’s not a fact that the new one is good, the lamps themselves burn out once a month, then one, then another.
Got distracted. It would be a good idea to check for DRL voltage on the cartridge. If indeed the new lamp is working. Or replace the left lamp with the right one.
Further. Daylight. I don't understand this term. No, in general it’s clear that there are fluorescent lamps in lamps, but I don’t know how to apply this to a car.
Further. Right stop. Here, as I understand it, this is a “luxury” package; I won’t offer anything other than diagnostics of the body electronics unit.
If you are sure that the fuses are all right (although there is a weak contact on them), then there remains a weak contact on the lamps or the absence of ground. Electrics is the science of contacts. The fuses are intact, the lamps are intact, only the contacts remain (they are weak or completely absent). Multimeter in hand and ring.
Subscribe
to our channel in
Index.Zen
Even more useful tips in a convenient format
Now we will try to figure out why the low beams on a Lada Granta may not turn on.
Replacement instructions
So, if you want to achieve a better glow and increase the service life of your optics, just change the lighting sources in it. As practice shows, the most popular option in this regard is to replace traditional halogen lamps with diode light sources. But before you begin this process, you need to understand that simply installing a diode instead of a halogen will not be enough.
After all, this process has certain features:
- Typically, for installation it is necessary to tear off the base previously installed on the diode element in order to transfer it to the required hole.
- Replacing Lada Granta DRL lamps also involves checking the polarity of the lighting sources in order to maintain the functionality of the safety element. If you do not do this, the fuse will fail in any case, thus de-energizing the safe operation of the on-board network.
Car daytime running lights
The replacement procedure is as follows:
- First, you need to turn off the ignition, open the hood of the car and disconnect the terminals from the battery. This will allow you to turn off the device and ensure further safe operation when the power supply is de-energized.
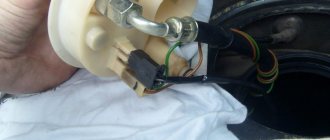
- Let's start the replacement with the light sources in the right lamp. To do this, pull out the cartridge; to do this, you need to rotate it counterclockwise.
- Then the failed lighting source must be removed from its seat; to do this, simply pull it towards you.
- After completing these steps, make sure that the antennae on the removed bulb correspond to the location of the contacts on the new one. The antennae themselves should fit into the mounts on the optics without any problems. Install the new lighting element at a 45 degree angle.
- Next, the lamps in the left headlamp are replaced. Here the procedure will be slightly different, since it has its own characteristics, in particular, it will be more difficult to reach the light bulb. Before changing devices, it is necessary to dismantle the air filter unit; to do this, disconnect all fasteners and clamps, as well as pipes. It will also be necessary to unscrew the pipe through which the coolant passes. The block itself is supported by three special clamps; they must be removed.
- After completing these steps, you will need to repeat all the replacement steps described above. Further assembly is carried out in reverse order. Now all you have to do is connect the battery and check the functionality of the optics.
Price issue
The cost of a set of lamps or the daytime running lights themselves can vary greatly depending on the manufacturer and place of purchase. Below are the average prices for headlights, as well as lighting sources that can be purchased on the Russian market.
1. Set of DRL SOV LED DRL (price - about 2 thousand rubles)2. Set of light bulbs 1156 PY21W BAU15S 42 LED 2835 (price - about 2600 rubles)3. Set of flexible DRL-110 with rotation (price - approximately 1,500 rubles)
Main reasons
Consider in detail the most basic reasons for such a breakdown.
Fuses blown
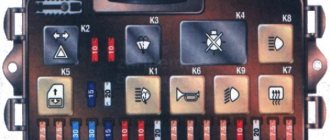
The fuses in the mounting block have burned out (F12 - right side, F13 - left side). Their rating is 7.5A.
F12 - left headlight, F13 - right headlight
The fuses in the photo are marked with an arrow. (top - left headlight, bottom - right headlight)
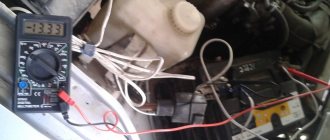
In this case, the voltage regulator may be faulty. As a result, a power surge occurred and both fuses were blown. It is necessary to check the voltage of the electrical circuit under load.
If the problem persists after replacing the fuses, it is better to contact an automotive electrician.
If you are on the road at the time of a breakdown, you can install a “bug” instead of fuses.
Carefully insert a piece of wire into the fuse connectors, preferably one, the left fuse. In this case, do not put the cover of the mounting block back on, as you will have to conduct a visual inspection; the wire may begin to heat up.
Important. We do not recommend using bugs or higher rated ceramic fuses. Try not to overload the electrical circuits, for example, when installing a cigarette lighter splitter, route the power cable directly to the battery through an additional fuse.
Low beam bulbs burnt out
“Right low beam” burned out
The low beam bulbs burned out, both of them at once, either a coincidence, or a short one, or the low beams were not turned on at idle. At high speeds, the current is greater, so both can burn out at once. The voltage regulator may also be faulty.
The low beam contact relay is broken
Location of the contact relay in the mounting block
The low beam may not turn on due to a broken contact relay. This breakdown is a very common reason. Due to the design of the relay and its low cost, the contact group may become stuck.
- Open the fuse box (mounting block).
- We take out the relay number K9.
- It is advisable to take a known good relay for a test drive. Or you can lightly tap the old relay with a key or coin.
- Reinsert the contact relay.
- Checking the low beam operation.
Light control module failure
Light control module on Grant
This fault should be checked last. The cost of a new part is about 900 rubles, so the easiest way is to replace the module with a known good one, for example, take it from another car.
Grant providers recommend installing the MUS from a luxury model.
If your high beams also do not work, then check whether voltage is coming to the MUS.
A little background
One sunny day you got bored and decided to do some easy tuning of your Lada Vesta, which, as you know, starts with the light bulbs.
It's no secret that standard DRL lamps look somewhat depressing, with a yellowish tint. It’s especially sad that they decided to make LED running lights on the X-ray’s sibling.
So, you bought Chinese white LED bulbs with huge declared lumens to embellish the appearance of your pet. You start dismantling the old ones, install new lamps and, in anticipation of white rays of light, start the car and get... no light.
After slight bewilderment, you try to return everything to its original state - install the incandescent lamps back in place and again check the operation of the running lights. But a miracle does not happen, the light is still missing and you begin to sort through ideas, look for the reason for what happened. Usually the first thought that comes to a car owner’s mind is “The fuse has blown!” You open the fuse table, find the required F39 and are perplexed - it is intact.
If all else fails
If none of the above helped you, then most likely there is a break in the circuit somewhere. It could appear as a result of:
- mechanical impact (mice, rodents);
- time (the wiring has deteriorated);
- overheating of the wire and damage to its insulation.
This is a job for a professional electrician. The algorithm of actions is as follows.
- We look at the voltage on the fuses. There should be 12 volts constantly.
- We look at the voltage on one of the 33 contact chips. We need one with gray-black and gray wires in the corner part. These are the wires for the low beam headlights.
- We look at the voltage at the headlight terminals.
If there is voltage everywhere, then the problem is an open circuit between the mounting block and the headlight.
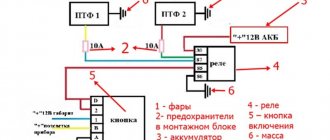
Scheme 4
This option is a variation of the previous scheme when a reed switch is not available. Then the contact marked 86 is attached to the oil pressure lamp in the dashboard. In this case, the lights will also turn on after the engine starts. This option is done with your own hands somewhat easier than the previous one.
How to properly connect daytime running lights
Lada Granta running lights do not work
The question is that the DRL light does not work (does not light up), but when the headlights are turned on, it lights up. Can someone tell me the reason?
Comments 15
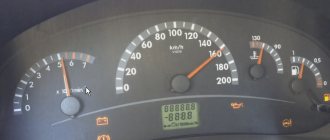
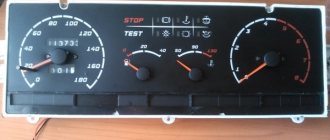
Hello! Who can tell me that the brake system warning light is constantly blinking, the fluid level sensor is normal, off, the parking sensor is working, I checked with a jumper and it does not go out, Lada Granta car, thanks in advance!
I have the same problem... I changed the lamp and three days later it burned out again (you need to look for diodes that are better than 30 rubles each.
The light bulb is definitely burnt out, it is a two-filament light bulb. I had it too.
both DRLs are on the same fuse F23 10 Amp. So anyway, it's a light bulb. And no offense, of course, but starting a discussion about the light bulb, it seems to me, is overkill.
This is one filament that has burned out in the lamp!
If the fuse had burned out, then the left tail light, the left DRL and the front light would not have lit up (there is one fuse per side)… it’s just the thread that’s burned out
there is a two-contact lamp. There are two threads, maybe one is dead. On the contrary, the marker did not light up, but the DRL did light up. I changed the fuse and it worked)
Do you remember the fuse number?
left clearance F10.DRL F 23
There is a two-filament lamp, one DRL filament burned out
I support, one filament has burned out, you can check it visually, change the lamp, or immediately install diodes and bend the contacts, then the fire will burn out and nothing will burn out :)
Which contacts need to be bent?
I support, one filament has burned out, you can check it visually, change the lamp, or immediately install diodes and bend the contacts, then the fire will burn out and nothing will burn out :)
I inserted an LED lamp, the fuse burned out (right row, 4th from top to bottom). I changed the fuse, but the problem remained! The right side and front and rear markers do not light up, the DRL on the right also does not light up. The fuse is intact!
Now we will try to figure out why the low beams on a Lada Granta may not turn on.
Scheme 3
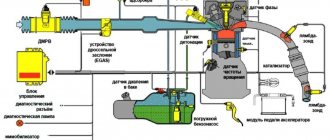
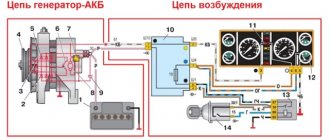
Here, the running lights turn on after the engine starts. The relay, battery and generator are involved. We connect the negative of the DRL to the car body, and the plus to the relay contact marked 30. We connect the relay contact marked 87 to the positive of the battery. We connect the relay contact marked 85 to vehicle ground through the DRL. And with mark 86 we connect to the reed switch, the second contact of which is connected to the plus of the generator. After starting the engine, move the reed switch around the generator so that the relay is activated and the running lights turn on. After this, we pack the reed switch in thermopolymer and attach it to the generator. It is very important that the reed switch is attached exactly in the place of the generator where the relay operates.
Connection diagram for running lights from the generator
Main reasons
Consider in detail the most basic reasons for such a breakdown.
Fuses blown
The fuses in the mounting block have burned out (F12 - right side, F13 - left side). Their rating is 7.5A.
F12 - left headlight, F13 - right headlight
The fuses in the photo are marked with an arrow. (top - left headlight, bottom - right headlight)
In this case, the voltage regulator may be faulty. As a result, a power surge occurred and both fuses were blown. It is necessary to check the voltage of the electrical circuit under load.
If the problem persists after replacing the fuses, it is better to contact an automotive electrician.
If you are on the road at the time of a breakdown, you can install a “bug” instead of fuses.
Carefully insert a piece of wire into the fuse connectors, preferably one, the left fuse. In this case, do not put the cover of the mounting block back on, as you will have to conduct a visual inspection; the wire may begin to heat up.
Important. We do not recommend using bugs or higher rated ceramic fuses. Try not to overload the electrical circuits, for example, when installing a cigarette lighter splitter, route the power cable directly to the battery through an additional fuse.
Low beam bulbs burnt out
“Right low beam” burned out
The low beam bulbs burned out, both of them at once, either a coincidence, or a short one, or the low beams were not turned on at idle. At high speeds, the current is greater, so both can burn out at once. The voltage regulator may also be faulty.
The low beam contact relay is broken
Location of the contact relay in the mounting block
The low beam may not turn on due to a broken contact relay. This breakdown is a very common reason. Due to the design of the relay and its low cost, the contact group may become stuck.
- Open the fuse box (mounting block).
- We take out the relay number K9.
- It is advisable to take a known good relay for a test drive. Or you can lightly tap the old relay with a key or coin.
- Reinsert the contact relay.
- Checking the low beam operation.
Light control module failure
Light control module on Grant
This fault should be checked last. The cost of a new part is about 900 rubles, so the easiest way is to replace the module with a known good one, for example, take it from another car.
Grant providers recommend installing the MUS from a luxury model.
If your high beams also do not work, then check whether voltage is coming to the MUS.
Addition block
It is located on the bottom right of the instrument panel, near the heater air duct, and is also covered with a lid. The cover is attached to a screw; to remove it, you need to unscrew this screw. To dismantle the relay block itself, wrench No. 10 is useful.
The relay block is responsible for the following functions and components.
- Turn on the engine cooling fan (low and high speed).
- Main relay.
- Fan fuse.
- Fuel pump switch relay.
You need to know which guards protect which elements. This is especially true if one of them is responsible for two or three nodes. For example, if you discover that the cigarette lighter does not work (usually some device is connected through it, for example, a DVR), you should check the radio. If it does not turn on, then it is necessary to replace fuse F20. You can replace the damaged element yourself. There is no need to contact a car service, since after replacing the fuse everything should work.
If any fuse or relay malfunctions, you must remove the blown element and put a new one in its place. The blocks must be restored or assembled in the same sequence as they were disassembled.
Before replacing the fuse, the cause of the blown fuse must be determined and eliminated. To avoid failure of engine control system elements, do not install homemade fuses or fuses with an increased rating.
Mounting block of relays and fuses Kalina.
The Lada Kalina relay and fuse mounting block is located on the left side, behind the exterior lighting control panel. To get to the fuses and relays, you need to pull the tab on the left side of the instrument panel and open the mounting block cover.
1. By pulling the tab on the left side of the instrument panel, open
2. Mounting block Lada Kalina.
Decoding the relays and fuses in the main block of the Lada Kalina.
K1 – headlight washer relay; K2 – power window circuit activation relay; KZ – starter activation relay; K4 – additional relay (ignition relay); K5 – turn indicator and hazard warning relay; Kb – windshield washer and wiper activation relay; K7 – headlight high beam relay; K8 – horn relay; K9 – front fog lamp relay; K10 – rear window heating relay; K11 – front seat heating circuit relay; K12 – backup relay.
If all else fails
If none of the above helped you, then most likely there is a break in the circuit somewhere. It could appear as a result of:
- mechanical impact (mice, rodents);
- time (the wiring has deteriorated);
- overheating of the wire and damage to its insulation.
This is a job for a professional electrician. The algorithm of actions is as follows.
- We look at the voltage on the fuses. There should be 12 volts constantly.
- We look at the voltage on one of the 33 contact chips. We need one with gray-black and gray wires in the corner part. These are the wires for the low beam headlights.
- We look at the voltage at the headlight terminals.
If there is voltage everywhere, then the problem is an open circuit between the mounting block and the headlight.
When you turn on the car, the DRLs come on and two lights come on. When the headlights are turned on, the right DRL lamp does not light up, and also when the daytime running lights are turned on, all the lamps are on, but the right one is not.
Necessary materials
Before connecting daytime running lights to your car, you will need to stock up on all the necessary tools and materials. To do the job yourself, you will need:
- pliers;
- wire cutters;
- soldering iron;
- insulated two-core wire;
- LED DRLs;
- relay for cars 12V;
- reed switch;
- single-core wire;
- plastic clamps.
Once everything you need is in stock, you can begin connecting the DRLs to your car with your own hands.
Main reasons
Consider in detail the most basic reasons for such a breakdown.
Fuses blown
The fuses in the mounting block have burned out (F12 - right side, F13 - left side). Their rating is 7.5A.
F12 - left headlight, F13 - right headlight
The fuses in the photo are marked with an arrow. (top - left headlight, bottom - right headlight)
In this case, the voltage regulator may be faulty. As a result, a power surge occurred and both fuses were blown. It is necessary to check the voltage of the electrical circuit under load.
If the problem persists after replacing the fuses, it is better to contact an automotive electrician.
If you are on the road at the time of a breakdown, you can install a “bug” instead of fuses.
Carefully insert a piece of wire into the fuse connectors, preferably one, the left fuse. In this case, do not put the cover of the mounting block back on, as you will have to conduct a visual inspection; the wire may begin to heat up.
Important. We do not recommend using bugs or higher rated ceramic fuses. Try not to overload the electrical circuits, for example, when installing a cigarette lighter splitter, route the power cable directly to the battery through an additional fuse.
Low beam bulbs burnt out
“Right low beam” burned out
The low beam bulbs burned out, both of them at once, either a coincidence, or a short one, or the low beams were not turned on at idle. At high speeds, the current is greater, so both can burn out at once. The voltage regulator may also be faulty.
The low beam contact relay is broken
Location of the contact relay in the mounting block
The low beam may not turn on due to a broken contact relay. This breakdown is a very common reason. Due to the design of the relay and its low cost, the contact group may become stuck.
- Open the fuse box (mounting block).
- We take out the relay number K9.
- It is advisable to take a known good relay for a test drive. Or you can lightly tap the old relay with a key or coin.
- Reinsert the contact relay.
- Checking the low beam operation.
Light control module failure
Light control module on Grant
This fault should be checked last. The cost of a new part is about 900 rubles, so the easiest way is to replace the module with a known good one, for example, take it from another car.
Grant providers recommend installing the MUS from a luxury model.
If your high beams also do not work, then check whether voltage is coming to the MUS.
Replacement instructions
So, if you want to achieve a better glow and increase the service life of your optics, just change the lighting sources in it. As practice shows, the most popular option in this regard is to replace traditional halogen lamps with diode light sources. But before you begin this process, you need to understand that simply installing a diode instead of a halogen will not be enough.
After all, this process has certain features:
- Typically, for installation it is necessary to tear off the base previously installed on the diode element in order to transfer it to the required hole.
- Replacing Lada Granta DRL lamps also involves checking the polarity of the lighting sources in order to maintain the functionality of the safety element. If you do not do this, the fuse will fail in any case, thus de-energizing the safe operation of the on-board network.
Car daytime running lights
The replacement procedure is as follows:
- First, you need to turn off the ignition, open the hood of the car and disconnect the terminals from the battery. This will allow you to turn off the device and ensure further safe operation when the power supply is de-energized.
- Let's start the replacement with the light sources in the right lamp. To do this, pull out the cartridge; to do this, you need to rotate it counterclockwise.
- Then the failed lighting source must be removed from its seat; to do this, simply pull it towards you.
- After completing these steps, make sure that the antennae on the removed bulb correspond to the location of the contacts on the new one. The antennae themselves should fit into the mounts on the optics without any problems. Install the new lighting element at a 45 degree angle.
- Next, the lamps in the left headlamp are replaced. Here the procedure will be slightly different, since it has its own characteristics, in particular, it will be more difficult to reach the light bulb. Before changing devices, it is necessary to dismantle the air filter unit; to do this, disconnect all fasteners and clamps, as well as pipes. It will also be necessary to unscrew the pipe through which the coolant passes. The block itself is supported by three special clamps; they must be removed.
- After completing these steps, you will need to repeat all the replacement steps described above. Further assembly is carried out in reverse order. Now all you have to do is connect the battery and check the functionality of the optics.
Price issue
The cost of a set of lamps or the daytime running lights themselves can vary greatly depending on the manufacturer and place of purchase. Below are the average prices for headlights, as well as lighting sources that can be purchased on the Russian market.
If all else fails
If none of the above helped you, then most likely there is a break in the circuit somewhere. It could appear as a result of:
- mechanical impact (mice, rodents);
- time (the wiring has deteriorated);
- overheating of the wire and damage to its insulation.
This is a job for a professional electrician. The algorithm of actions is as follows.
- We look at the voltage on the fuses. There should be 12 volts constantly.
- We look at the voltage on one of the 33 contact chips. We need one with gray-black and gray wires in the corner part. These are the wires for the low beam headlights.
- We look at the voltage at the headlight terminals.
If there is voltage everywhere, then the problem is an open circuit between the mounting block and the headlight.
Lada Granta running lights do not work
The question is that the DRL light does not work (does not light up), but when the headlights are turned on, it lights up. Can someone tell me the reason?
Comments 15
Hello! Who can tell me that the brake system warning light is constantly blinking, the fluid level sensor is normal, off, the parking sensor is working, I checked with a jumper and it does not go out, Lada Granta car, thanks in advance!
I have the same problem... I changed the lamp and three days later it burned out again (you need to look for diodes that are better than 30 rubles each.
The light bulb is definitely burnt out, it is a two-filament light bulb. I had it too.
both DRLs are on the same fuse F23 10 Amp. So anyway, it's a light bulb. And no offense, of course, but starting a discussion about the light bulb, it seems to me, is overkill.
This is one filament that has burned out in the lamp!
If the fuse had burned out, then the left tail light, the left DRL and the front light would not have lit up (there is one fuse per side)… it’s just the thread that’s burned out
Lamps for increased visual comfort
Although the standard lamps with a yellowish dull tint in the running light system may still remain in good working order, many Lada Granta owners strive to immediately replace them with halogen ones with bright white light. The reason for this is to increase visual comfort. It is also noted that this can emphasize the exterior profile of the car.
Comparison of DRL lamps - the photo shows a standard (installed from the manufacturer) and a luxury lamp
Halogen bulbs from the following manufacturers are very popular among car enthusiasts:
- Philips.
- Lighthouse.
- OSRAM.
- IPF.
- General Electric and some others.
Like other modifications, halogen lamps for DRLs still have the same characteristic number of disadvantages. First of all, this is increased heating and, because of this, the shelf life decreases with increasing power. For this reason, when choosing such sources for the Lada Granata, you should take into account that they can be produced in two versions:
Light Day.
The first option meets all legal requirements, but at the same time has average durability. The second one is more economical and, although it does not shine as brightly, it lasts longer.
Main reasons
Consider in detail the most basic reasons for such a breakdown.
Fuses blown
The fuses in the mounting block have burned out (F12 - right side, F13 - left side). Their rating is 7.5A.
F12 - left headlight, F13 - right headlight
The fuses in the photo are marked with an arrow. (top - left headlight, bottom - right headlight)
In this case, the voltage regulator may be faulty. As a result, a power surge occurred and both fuses were blown. It is necessary to check the voltage of the electrical circuit under load.
If the problem persists after replacing the fuses, it is better to contact an automotive electrician.
If you are on the road at the time of a breakdown, you can install a “bug” instead of fuses.
Carefully insert a piece of wire into the fuse connectors, preferably one, the left fuse. In this case, do not put the cover of the mounting block back on, as you will have to conduct a visual inspection; the wire may begin to heat up.
Important. We do not recommend using bugs or higher rated ceramic fuses. Try not to overload the electrical circuits, for example, when installing a cigarette lighter splitter, route the power cable directly to the battery through an additional fuse.
Low beam bulbs burnt out
“Right low beam” burned out
The low beam bulbs burned out, both of them at once, either a coincidence, or a short one, or the low beams were not turned on at idle. At high speeds, the current is greater, so both can burn out at once. The voltage regulator may also be faulty.
The low beam contact relay is broken
Location of the contact relay in the mounting block
The low beam may not turn on due to a broken contact relay. This breakdown is a very common reason. Due to the design of the relay and its low cost, the contact group may become stuck.
- Open the fuse box (mounting block).
- We take out the relay number K9.
- It is advisable to take a known good relay for a test drive. Or you can lightly tap the old relay with a key or coin.
- Reinsert the contact relay.
- Checking the low beam operation.
Light control module failure
Light control module on Grant
This fault should be checked last. The cost of a new part is about 900 rubles, so the easiest way is to replace the module with a known good one, for example, take it from another car.
Grant providers recommend installing the MUS from a luxury model.
If your high beams also do not work, then check whether voltage is coming to the MUS.
Russian requirements for DRLs
The characteristics of DRLs and the requirements for their installation are determined by Russian GOSTs 41.87-99 and 41.48-2004, taking into account the EEC Rules.
- DRL parameters:
- emitters must be at least 40 cm in area;
- White color;
- the light source is not regulated, i.e. any lamps are allowed: incandescent, gas-discharge, LED;
- luminous intensity – 400-800 cd.
- Required DRL operating mode:
- automatically turn on simultaneously with the ignition;
- go out when the headlights are turned on, except when the headlights flash to give warning signals.
- Installation/placement of DRL:
- at a height of no lower than 25 and no higher than 150 cm above the road surface;
- no more than 40 cm from the edge of the vehicle;
- between the inner edges of a pair of DRLs - at least 60 cm.
In general, if you install DRLs on a car, then only certified devices - their parameters comply with Russian GOSTs. During installation, you must comply with all requirements for their placement. Then running lights will be useful and safe, and, in addition, it will be possible to avoid fines for incorrect use of lighting devices.