One of the most important elements of the fuel injection system of a gasoline engine is the electric fuel pump, which is located in the fuel tank of the car. The fuel pump pumps fuel into the system from the gas tank, creating a certain pressure.
Auto repair experts identify the following common fuel system problems that are related to the fuel pump:
- The fuel pump pumps poorly and does not create the required pressure;
- the fuel pump does not pump when the ignition is turned on;
Considering that the fuel pump is an electromechanical device, the most common fuel pump malfunctions are related to both the mechanical and electrical parts. Next, we will look at what signs indicate a breakdown of the fuel pump and why the fuel pump stops pumping partially or completely.
Read in this article
Signs of fuel pump malfunctions
The main symptoms of fuel pump failure, as well as malfunctions in its operation, are:
- the car starts with difficulty, the engine runs unstable, there are dips, jerking when pressing the gas pedal, etc.;
- the pump does not pump after turning on the ignition, does not turn the starter and does not pump the fuel pump, the engine does not start;
There have also been cases when the fuel pump stops pumping while driving. In such a situation, the engine begins to malfunction and stalls immediately after the remaining gasoline in the fuel line is used up. The problem can occur either regularly or periodically.
Symptoms of unit malfunction
Malfunctions of the Priora fuel supply pump can manifest themselves in different ways.
Sometimes it fails completely, in other cases it maintains too low pressure in the system. Symptoms of problems are:
- after turning the key in the ignition switch, the characteristic sound of the fuel pump is absent, and the engine does not start;
- when the ignition is turned on, the pump pumps, the power unit starts, but when you try to move away, the engine stalls and starts with difficulty;
- The car jerks while driving, stalls and does not want to start.
The first symptom indicates a malfunction in the electrical circuit that supplies power to the unit. Also, a complete failure may be the result of a breakdown of the pumping device itself, and it has to be replaced. Fortunately, such breakdowns are quite rare. Electric fuel pumps installed on VAZ cars are considered quite reliable devices and operate without problems for 150-200 thousand km.
The remaining 2 symptoms indicate that the amount of fuel supplied to the injectors is not enough for normal driving. If the car somehow starts and idles, then there is no longer enough fuel to move. Since the characteristic symptoms of low pressure in the line are similar to the symptoms of problems with other units and systems, it is necessary to carry out diagnostics and more accurately determine the cause.
The fuel pump does not pump: causes and diagnostics
Let's start with the fact that if the gas tank is full, the battery is charged, the spark plugs are dry and there is a spark, the starter turns the engine normally, but the engine does not seize, then you should pay attention to the gas pump. A common problem is that there is no power to the fuel pump after the ignition is turned on. In a similar way, the malfunction manifests itself in motion, when the power to the fuel pump is lost and the engine suddenly stalls.
An equally important point is how much the fuel pump pumps. In other words, the pump may hum and buzz (power is being supplied), but not create the required pressure in the fuel line. The pressure in the fuel system with a working fuel pump must be more than 3 bar (which depends on the specific car model). The indicated pressure is accumulated in the fuel rail and has an indicator of 300 kPa and above.
To check, you need to measure the pressure in the fuel rail with a pressure gauge, taking into account the indicators that are the norm for a specific car model. Using the example of injection VAZs, the pressure when the ignition is turned on is 3 atmospheres, at idle the figure is 2.5 atmospheres, when you press the gas 2.5-3 atmospheres. This method will help you accurately determine:
- malfunction of the fuel pressure regulator in the rail;
- breakdown of the fuel pump or a noticeable decrease in its performance due to wear;
- severe contamination of filters (fuel filter and/or fuel pump mesh);
In the second case, when you press the gas, the pressure does not increase; in the latter case, the pressure gauge needle rises, but very slowly or jerkily.
A decrease in pressure below the norm will lead to the fact that the engine may not start or start with difficulty, stall, jerk, operate unstably and with failures. If this happens due to the fault of the pump and not the fuel filter, then there is a high probability that the coarse filter screen of the fuel pump is clogged. In this case, there is no need to change the fuel pump itself, since it will be enough to replace or even clean the mesh.
If you suspect that there is no voltage to the fuel pump, there is a quick way to check. It is enough to turn the ignition key and listen, as when you turn the key you should hear a slight hum from the fuel pump. If such a buzzing noise is not heard, it means there is no power to the fuel pump, there are problems with the wiring, etc.
Also in the general list of possible reasons why the fuel pump does not pump, the following are noted:
- failure of the fuel pump fuse;
- fuel pump relay failure;
- problems with the ground of the fuel pump;
- malfunction of the electric motor of the fuel pump;
- oxidation or damage to fuel pump contacts and terminals;
- the fuel pump itself is faulty;
Wiring to the fuel pump
On most cars, the wiring to the fuel pump consists of three wires: “plus”, “minus”, and also a wire for indicating the amount of fuel in the gas tank. If the fuel pump does not pump, then the cause may be a lack of power.
To check the power to the fuel pump, just take a 12-volt light bulb and supply it with power from the external connector of the fuel pump. After turning the ignition, the control lamp should light up. If this does not happen, then the problem is in the external circuits. If the lamp comes on, it will indicate the need to check the internal contacts of the fuel pump.
To check the external wiring, you should alternately connect the positive and negative contacts, which are removed from the fuel pump power connector, to the ground of the pump. The contacts must also be connected to the fuel pump relay. If you place the negative contact on ground, after which the ignition is turned on and the light comes on, then this means that this contact is faulty. If the light bulb does not light up, then problems with the “plus” are obvious. If you place a contact on the relay and the light comes on, there is probably damage to the wire on the section that connects the relay and the fuel pump itself.
Problems with the immobilizer (APS)
Often the Lada Granta does not start due to improper operation of the APS. If it is activated, the key is read and the engine starts. The immobilizer (APS) identifies the “native” key by reading the code from it.
If it is incorrect, then the APS blocks the operation of all vehicle systems. Here it is necessary to immediately clarify that APS is not activated upon sale in all trim levels. Lada Granta sedan is equipped with an anti-theft alarm in models 023, 024 and 050.
Lada Granta liftback in the 711, 713, 750 and 751 configurations. Many car dealers cheat when selling and say that the immobilizer cannot be activated. But by law they must do this at the request of the car owner.
If the key is not registered, the indicator lights up continuously for about 20 seconds. without blinking, and then goes out. During training, blinking occurs at a frequency of 5 Hz, at the end of training at a frequency of 10 Hz. When problems arise in the system, a sound alert is added to the light indication; it appears at the 10th and 20th second.
Decoding signals:
1 signal + flashing indicator – the code from the key cannot be read, possible reasons:
- problems in the communication coil circuit. In this case, you need to check the resistance and inspect the circuit;
- There is no transponder in the key. To eliminate the problem in the training key, you should check the presence of the transponder and its markings; if it is missing, then use a “clean” key and the CSUD to retrain the entire system;
- The transponder (located in the red key, you need to remove the red head) may be broken. In this case, for a training key, you need to retrain the system with a clean key, and for a working key with a remote control, you need to replace the remote control with a new one and train the system again;
2 beeps + flashing indicator – the relationship between the APS and the ICS is broken, possible malfunctions:
- There was a communication failure on the w line. In this case, it is necessary to eliminate violations in the chain between the APS and the ICS;
- violation in the APS and KSUD chain. It is necessary to replace them one by one to identify where the malfunction occurred;
- there is no voltage on the APS and KSUD power supply. In this case, you need to check and restore the voltage.
3 beeps + intermittent indication - “foreign” key or APS. In this case, it is necessary to carry out training using a “clean” key and a “clean” KSUD. For APS, you need to configure the system using a training key native to the ICS.
4 signals + flashing indicator – the controller does not provide confirmation to start the engine. This suggests that the KSUD has already been trained with another system; it needs to be changed to a clean one and retrained.
To find out exactly the cause, it is necessary to make a diagnosis. If the controller is broken, it must be replaced and re-learned.
If there is an APS, then you need to replace it and train it along with all the working keys, since structurally in the Lada Granta the APS is located in the instrument cluster.
If there is a suspicion that the keys have been read, then retraining should also be done.
Step-by-step instructions for training the immobilizer and working keys:
- close the driver's door tightly;
- turn on the ignition using the red key;
- turn off the ignition and remove the key, the indicator flashes at a frequency of 5 Hz;
- quickly (within the next 6 seconds) turn on the ignition using the black key;
- further: we hear 3 beeps and after 6 seconds - 2 beeps;
- turn off the ignition and remove the key;
- if you need to train several more working keys, then you need to repeat steps 4 to 6 (the maximum number for training is 4 keys);
- over the next 6 seconds, turn on using the red training key;
- then: 3 beeps, after 6 seconds - 2 beeps;
- turn off the ignition, after 6 seconds we hear 1 signal;
- the indicator starts blinking very quickly (with a frequency of 10 Hz);
- turn on the ignition - we hear 3 beeps, the indicator goes out, the learning process is completed;
- turn off the ignition;
- Now you need to check the immobilizer: to do this, you need to turn on the ignition with a working or training key, if the indication does not light up, then everything went well, we try to start the engine.
Other causes of fuel pump malfunctions
Quite often, unprofessional installation of additional electrical equipment or security anti-theft systems leads to the fact that the power to the fuel pump is lost due to mixed up contacts or other connection errors.
Finally, let’s add that the gas pump in the gas tank is immersed in gasoline, in which it is actively cooled. The habit of driving with an empty tank can quickly damage the electric motor of the fuel pump, as it burns out.
What functions does the fuel pump relay perform, signs of breakdown. Where is the fuel pump relay installed, how to properly check the fuel pump relay.
Why does the starter turn normally, but the engine does not catch and does not start? Main causes of malfunction, checking fuel supply and ignition systems. Adviсe.
Diagnose faults that may indicate problems with the fuel pump. Self-check of the device, measuring the pressure in the fuel rail.
The causes of whistling and increased noise during operation of the fuel pump are overheating of the pump. How to diagnose and fix the problem yourself. Tips and tricks.
How to change a fuel pump. Location of the fuel pump, releasing pressure in the system, unscrewing the fuel lines, removing the pump, reassembling.
What to do if the car accelerates worse, does not pick up speed, or has failures during acceleration. Why the engine does not pull, how to find the reason for the decrease in power.
If the starter of your car turns normally, but the car does not start, the first thing you need to do is check that the fuel pump is turned on. On domestic cars, its operation can be heard from the passenger compartment; when the ignition is turned on, a characteristic buzzing sound comes from under the rear seat or trunk. If the fuel pump does not work, you need to check the integrity of the fuses and the activation of the main relay of the engine management system and the fuel pump relay. On the VAZ-2107, VAZ-2108, VAZ-2109 and their modifications, relays and fuses are located on the shelf under the glove compartment or under it. On VAZ-2110 and similar ones, you should look in the heater console on the passenger side by unscrewing the fastening screws and removing the side cover. On GAZ cars they are located under the hood on the front wall of the cabin, closer to the passenger side.
Ignition coils
Custom ignition coil
The Lada Granda has two types of ignition coils: individual and four-terminal, they are controlled by the engine controller.
One of the signs of poor coil performance is poor idling, a drop in power and high gasoline consumption. The car starts poorly or stalls.
If the coils are partially broken, then paired misfires and ignition in the cylinders often occur. To remove the coil, you need to reset the terminals from the AMB and remove the leads from the controller. Then disconnect all high voltage wiring.
After this, the coil must be disconnected from the bracket by unscrewing the mounting screws. If you plan to replace the coil, make a note of its markings.
There are several ways to test the coil for faults:
- Testing a short to ground. To do this, using an ohmmeter, you need to connect the wire from the coil to the first end of the ohmmeter, and the body to the second. It should show an infinite value, if you see a specific value then there is a leak.
- We check the primary winding for a break. To do this, you need to connect the ends of the device to the contacts; if the device shows an infinite value, then one of the coils is broken and needs to be replaced with a new one.
- We check the secondary winding (for a 4-lead coil). To do this, first test the winding on the 1st and 4th cylinders using an ohmmeter. If it shows an infinite value, then the coil is working. Repeat these steps with the winding on the 2nd and 3rd cylinder.
- Checking high voltage wiring. The wires are checked one by one. To do this, connect an ohmmeter to the wire, measuring the resistance with a maximum value of 20 kOhm. The normal value is approximately 3 to 8 kΩ. If it shows infinity, then the wire must be replaced. It is advisable to carry out such a check annually.
After installing the coils in their place, you must strictly observe their markings; the cylinder number must match the number on the wire.
If the Lada Granda started and immediately stalled. The most common reasons:
- Damage to the ignition coil connections. Needs to be repaired or replaced with new ones.
- Low fuel pressure.
- Poor sealing in parts of the catalytic manifold or receiver.
- Poor performance of the engine control system.
The Lada Granda has many design flaws, but if you know all the weak points of this car, then finding the cause of the breakdown will not be difficult. Carefully monitor your car, undergo regular maintenance, replace parts in a timely manner, and the Lada Granda will serve you for many years.
The fuel pump relay does not turn on.
If the fuel pump does not work, then first of all you need to check the attraction of the main relay and the fuel pump relay. If the main relay does not click, then it is necessary to check its switching circuit and its serviceability. How to do this is described in the article the main relay does not turn on,
In the case when the main relay turns on, but the fuel pump relay does not, it is necessary to check the power at pins 85 and 86. When using a test lamp, its current consumption should not exceed 0.25A, otherwise damage to the controller may occur. If the control lamp does not light up on any terminal, then the relay is not receiving power. This may be caused by a blown fuse or a broken power cord.
In the case when the lamp burns brightly on one terminal, and at half-glow on the second, and the relay may be activated, you should remove the relay from the socket and connect terminals 85 and 86 with a test lamp. When the ignition is turned on, the control lamp should light up and go out after approximately 20 - 30 seconds. If the lamp lights up and there is poor contact in the connection between the block and the fuel pump relay. If the lamp does not light up, there may be a break in the wire connecting the relay to the controller or the controller itself may be faulty.
Engine and spark plugs
Often candles simply flood, especially in winter. This could be due to a weak battery spark, wiring problems, or unsuitable spark plugs.
The most primitive way to dry them is to press on the gas and crank the engine for 10 seconds using the starter.
But in winter this rarely helps, and the candles need to be dried. To do this, they need to be removed and thoroughly cleaned of dirt. This can be done with a toothbrush. In this case, you need to leave the same gap of 0.7-1 mm .
After cleaning, the candles need to be dried. This can be done using a hair dryer. Thrifty and experienced drivers recommend carrying spare spark plugs with you and, if necessary, simply replacing them on the road. To reduce the risk of flooding, monitor the battery charge and once every three days, load the engine up to 5000 rpm for a few seconds. for cleaning and preventing contamination .
The fuel pump does not pump and 12 hours of torment... - logbook of the 2012 Lada Granta on DRIVE2
Hi all. Time is short again, so I'll try to keep it short. Yesterday my wife and I are going to go shopping. I go out onto the porch, start the car with the key fob and surprise, it won’t start. I open it and start cranking it up, but it’s silent and doesn’t even register. Once again I turn the key and don’t hear the fuel pump. It’s 2:30 p.m. I check the fuse, according to me f21, it’s ok. Relay k12 is ok. I started sinning on whitefish, my hands were already itching to disassemble the panel. Here, after a little googling, I found a proven method, I attach a light bulb to the chip that goes to the fuel pump under the rear seat. It burns as expected, which means the brains and everything else are in order. I jump to the conclusion that it was the fuel pump that failed. The time is 16.00 in 2 hours, the store that I trust will close. Without opening the gas tank, I went to get a new gas pump. Then, when I arrived back, I opened it and checked that the gas pump was working; after inspecting everything, I assembled it with the old fuel pump. I turn the key and it doesn't buzz, I disassemble it, install a new fuel pump, and check the buzz. I insert it into the tank, connect the chip and it is silent. I take it out, clean all possible contacts, then connect the chip, but don’t put it in the tank, then I was overjoyed and the infection began to buzz. I assembled everything to my joy, I turned the key and it didn’t buzz. I found the reason already at 1:30 a.m., the contacts under the cover were all oxidized in the crimp areas. The new bns came with wires and a chip. I soldered the mating connectors to this chip and that’s it.
Again, I was not attentive, when I assembled everything, the pump turns, but the car does not start, I check the pressure in the rail, there is none. I understand that the polarity is confused. I take it apart and exactly on the chip that came with the bns as a bonus, the red wire goes to minus, and the black wire to plus. I fixed it and everything began to hum and rattle, and I, contentedly sniffing gasoline at the beginning of the third night, went to wash and sleep. Today I woke up. All the work was made difficult by the cold garage, I had to run around to warm up... So far, everyone and have a good mood! At the 100,000 mileage I will try to post a video review.
The contacts have already been removed from the chip
What was to be sung
My lack of care and machinations of parts suppliers + to minus and vice versa
New pump, old one will be a spare.
Price: 1,150 ₽ Mileage: 99,200 km
Fuel system
It happens that the tank simply runs out of gas, do not forget to monitor its level. You also need to pay attention to its quality. Due to low-quality gasoline, spark plugs often flood, the filter becomes dirty, and moisture forms.
If you have filled in with low-quality fuel, then in this case you need to remove the gas tank and change the coarse and fine filters, you can try to blow out the fuel pipes.
If the injectors are dirty, they can be cleaned using any available method. When there is a lot of water in gasoline, you can add a little alcohol to the tank.
But if there are a lot of impurities and dirt, then only strong cleaning will help. You see that the starter is spinning, but the engine refuses to work and you can’t hear the fuel pump pumping. It may fail, there is no tightness in the power system or the pressure regulator is malfunctioning.
The first thing you need to do is check the pressure in the rail, the normal value is 3.5-4 atmospheres .
Then you need to remove the hatch and measure the voltage in the connector; the light bulb can be inserted into the two terminals in the middle and cranked with the starter. It should light up and if the voltage reaches, but there is no pressure, you can try to hit it. The brushes could simply be stuck. If they are normal, then the coarse mesh may be clogged, it needs to be cleaned or replaced; in winter it may freeze up.
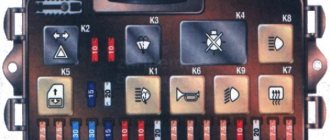
If electricity is not supplied, you need to check fuse F21 and relay k12. The relays (power coils) need to be removed, tapped on them a little, or simply warmed thoroughly in the palms of your hands.
The fuel pump decided to fray my nerves - logbook of the 2015 Lada Granta Liftback on DRIVE2
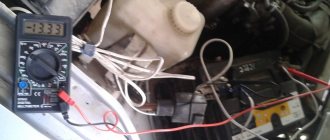
7 months after the purchase, when the joy of the purchase had already faded, (not that I was disappointed, I just got used to it), as usual, at the most interesting moment, it simply did not start. After minor manipulations, it was discovered that the fuel pump was not pumping. Fuses, alarm system, immobilizer, that’s what had to be checked, because I couldn’t even think about the fuel pump itself, well, there were no prerequisites for this... In the morning, a friend and I drove the car into the garage and it began... The multimeter showed that the voltage on the EBN (electric fuel pump) was at when the ignition is turned on and while the starter is running, it means that all of the above logically disappears. I disassembled the EBN module and connected it directly - it buzzes. Well, I think it got dirty, clogged, etc. I put it back, collect it, silence. How is that possible?!)) I repeated the same thing again, only I worked directly for about a minute, and everything worked, even in assembled form. But, just in case, I bought a new motor. A month has passed. I came back from my shift, decided to go on business, and again a familiar situation)) Without thinking twice, I disassembled the EBN module and replaced the motor with a new one. Well, that's it, I think the problem is solved)) Naive)) I'm putting everything back together, and what do you think happened? That's right, shut up)) Although directly, both the new and the old work. This means the problem is in the wiring located in the module itself, I thought and I was not mistaken. Having removed this same wiring, it was discovered that the contacts coming from the main power chip had oxidized and turned completely black. After cleaning, everything still works to this day. But now there is a spare motor) Unfortunately, there are no photos, but the information may be useful to someone.
How to check the functionality of the pump?
If the engine is absolutely “dead”, follow this algorithm:
- Turn on the ignition without turning the starter. A working electric fuel pump should respond with a quiet but distinct buzzing sound coming from the rear row of seats. If there is no sound, go to the next step.
- Using the car's operating instructions, find the number of the fuse that protects the pump's power circuit. Try replacing it; if unsuccessful, check the wiring and clean the contacts from oxides.
- If previous manipulations did not produce results, you need to measure the fuel pressure in the fuel rail.
Lada Granta fuel pump repair
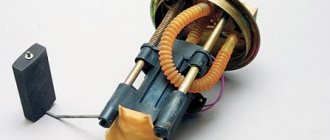
This article discusses the basic procedures for repairing the Lada Granta fuel pump. The fuel module (fuel pump) of the Lada Granta includes a fuel level sensor, a coarse fuel filter, an electric pump and a pressure regulator. All these elements are installed in the bracket and body of the fuel module. The main malfunctions of the fuel module: - failure or incorrect operation of the fuel level indicator sensor; - clogged or damaged module fuel filter; - failure of the fuel pump; - failure of the pressure regulator.
In most cases, malfunction of the fuel level sensor is caused by contamination or oxidation of its contact group.
Tools necessary for repairing the Lada Granta fuel pump
You will need: screwdriver, pliers.
Repair and inspection operations of the Lada Granta fuel pump
Repair of a car fuel module is shown using the example of a car with a VAZ-21116 engine. On cars with other engines, this work is performed in the same way.
1. Disconnect the drain tube from the module glass by prying it up with a screwdriver.
2. Overcoming the force of the spring, move the module glass slightly up along the guides and, using a screwdriver, remove the retaining ring from one of the guides. After this, the module glass can be moved slightly away from the bracket.
3. Disconnect the ground connector from the fuel pressure regulator.
4. Using a screwdriver, press out the clamp of the wiring harness block.
5. . and disconnect it from the intermediate block.
6. Disconnect the wiring harness connector from the fuel pump.
7. Unclench the two latches of the fuel level sensor and move it up along the grooves of the module cup.
8. . remove the sensor from the module.
9. Wash the sensor rheostat contacts and its slider plate with gasoline, and then wipe with a lint-free cleaning cloth soaked in alcohol.10. Use a screwdriver to pry the spring clamp of the fuel pressure regulator.
eleven. . remove the retainer from the bracket.
12. . and remove the regulator.
13. Inspect the pressure regulator O-rings. Replace heavily compressed, hardened or torn rings by removing them by prying them off with a screwdriver.
Before installation, lubricate the sealing rings of the fuel pressure regulator with a thin layer of grease or engine oil.14. Press out the plastic clips...
15. . and remove the module shell from the bracket guides.
16. To replace or clean the fuel filter, pry up the base with a pointed tool.
17. . and remove the filter from the pump nozzle, overcoming the resistance of the spring lock washer.
18. Before reinstalling the filter, remove the lock washer, straighten it with pliers and install it in the filter housing.
19. Install the filter in the reverse order of removal.20. To replace the electric pump, press out the plastic clip.
21. . and remove the electric pump from the bracket.
22. Assemble the Lada Granta fuel module in the reverse order of disassembly.
Repair parts
It is worth carrying out independent equipment repairs if you are completely sure that the malfunction lies precisely in it. A large number of plastic elements make the pump very fragile. For this reason, care must be taken when disassembling.
- Using a screwdriver, you need to pry up and remove the drain module of the part.
- The ground wire will be disconnected from the equipment.
- The intermediate wire connector is disconnected (from the inside).
- The pressure regulator is removed.
- The gasoline element module is removed by pressing the plastic retainer.
- The filter mesh is removed from the housing. If it is dirty, it can be cleaned. But it is more advisable to install a new mesh.
Damaged elements must be repaired or replaced with new parts. At the same time, it is advisable to replace the fine fuel filter. It is located near the jack cup in the right rear wheel arch. The equipment is assembled in the reverse order.
If Kalina's fuel pump does not work, the reasons often lie in a malfunction of the part itself. This equipment is inexpensive. It is quite possible to remove the unit and replace it with a working one yourself. It is better to purchase original spare parts.
How to change the fuel pump on a Lada Granta: photos and videos
The fuel pump for the Lada Granta is not a consumable item and usually does not bother car owners. Replacement is simple, but the price tag for the fuel pump is steep, but more on that below.
Replacing the fuel pump on video.
Replacement tool
The Soviet hammer - they haven’t come up with a better one yet!
Replacing the fuel pump in detail with a description of each step
The algorithm of actions is as follows:
- Remove the negative terminal from the battery. A mandatory requirement if you carry out any work that affects the electrical system of your car.
- The fuel pump is located under the rear seat. The rear seats need to be raised, I remove them altogether. It comes off easily. You need to “pull the string” in the center of the seat and remove it.
Pull the loop and pull it up
- We lift the rug and clean out the dirt in the seat. It must be clean, as this dirt can get into the fuel tank. The contour of the slot is indicated in the figure
- Disconnect the fuel pump connector to relieve pressure in the fuel system.
- Next, under the hood, unscrew the cap from the fuel rail, and use a screwdriver to press the breather (nipple) - this releases the pressure.
- Put the cap back on. Below I will describe an alternative option for relieving pressure in the fuel frame.
- Unscrew the 4 bolts securing the fuel pump.
- Next, using a hammer and a drift (chisel or straight screwdriver), we “scroll” the pump counterclockwise.
- Next, remove the lock washer by simply pulling it up.
- And take out the fuel pump.
Relieving pressure from the fuel rail using a screwdriver
4 bolts securing the plastic fuel pump cover
Remove the fuel hoses from the fuel pump.
Removing hoses from the fuel pump
An alternative option for relieving pressure in the fuel rail
The main method is a little inconvenient and dangerous. Since gasoline can ignite, and if the muffler pants have not yet cooled down, it can cause a fire in the engine compartment. Therefore, there is an easier way.
- Disconnect the power supply from the fuel pump.
- Start the car and let it run until it stalls on its own.
This method also relieves pressure in the fuel rail. Its advantage is that if you have a 16-valve engine, you do not have to remove the cover from it to get to the nipple!
Choosing a fuel pump for the Lada Granta
The fuel pump is universal and fits all models of the VAZ family.
There isn't much choice. There are two models on the market, and according to reviews, they do not cause problems. You can take any one.
The fuel pump on Kalina, Priora and Grant is the same!
Granta won't start - spark plugs are dry
After the spark plugs have been removed, we inspect them. Dry spark plugs indicate that gasoline is simply not supplied to the cylinders. There are a huge number of reasons for this, but the main ones are quite typical. First of all, turn on the ignition, and then listen to see if the fuel pump is working. If it does not work, then we listen to see if the fuel pump relay clicks after turning on the ignition. If it does not click, it means there is no voltage supplied to it, and this in turn means that either the fuse has blown or the problem is in the ignition switch. We almost completely exclude the second option, because this is a special case that requires separate consideration.
After we have made sure that voltage is supplied from the ignition switch to the fuse, and then from the fuse to the fuel pump relay, we lift the back seat, and then remove the chip from the fuel pump. Here we need either a multimeter or a test lamp. Turn on the ignition, the lamp should light up, or the multimeter should show a voltage of 12 volts at the terminals of the block. If there is none, then we look for a break along the path from the fuel pump turn-on relay to the fuel pump itself. It is worth clarifying that this is a very rare case, which in practice is almost impossible; you should start the search from the chip itself; most likely, the wire broke at its base.
After we are convinced that the fuel pump is pumping fuel, we go into the engine compartment, find the fuel rail, unscrew the cap from it, and then press the spool. Naturally, this must be done with the ignition on. What is all this for? This is necessary in order to clarify whether the fuel rail is pressurized. The pressure in the fuel rail may not build up at all; the reason for this is most likely either the fuel filter, which is clogged, or the fuel pressure regulator in the fuel rail.
Problems with the operation of the vacuum type device
The vacuum pump may malfunction. This can happen for several reasons:
| Problems | Causes | Solution |
| Insufficient vacuum | Insufficient oil level | Add oil to the required level |
| The oil has become dirty | Dirty engine. The higher the alkali content in the oil, the faster the engine cleans and the oil turns black. | Replace the oil with clean oil. If the alkali content is high, replacement is required after 5,000 kilometers. |
| The oil fill hole is clogged | Small particles on the surface of the lid | Clean the inlet and rinse the filter |
| The integrity of the hoses is compromised | Wear, mechanical damage, hose connection failure | Check hoses and their connections |
| Insufficient pump power | Loss of voltage from the generator to the pump due to unsuccessful implementation of standard wiring, insufficient device size | Replace the wiring or purchase a new part of the required power |
| Oil started leaking | The integrity of the oil container is damaged | Replace container |
| The cover of the hole for draining the oil does not fit well or the rubber ring has become unusable | The thread of the cover is torn off, the ring is worn out | Replace the cover and replace the gasket |
| Oil splashes | Permissible oil level exceeded | Drain some of the oil to the desired level |
| The pressure at the air evacuation fitting has been exceeded | Insufficient pump power | Install a more powerful pump |
| The pump is hard to start | The temperature has become too low | The device must be turned on and off several times in a row or the oil must be heated |
| Breakdowns in the electrical part of the pump | Voltage surges, short circuit | Check and eliminate breakdowns |
| Garbage has accumulated inside | Dirt in the gas tank | Examine the contents and remove the blockage, clean the gas tank |