Before the onset of cold weather, every responsible driver carries out a preventive inspection of the car and eliminates possible malfunctions. Most often, oil and antifreeze are changed regularly, and the car tires are changed to winter ones. The stove, which is one of the main units of the car, which provides comfort for the driver and passengers in the cold season, also requires special attention.
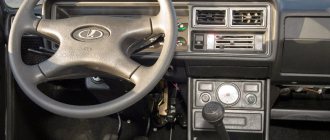
Heater regulator on the dashboard of a VAZ-2107 car
This article will discuss the design of the VAZ-2107 stove and its correct configuration for high-quality heating of the interior.
The design and principle of operation of the VAZ-2107 stove
In order to carry out preventive maintenance of the heating system of the vehicle interior and correctly configure its operation, you must first understand the structure of the VAZ-2107 stove.
The stove in the seven is located in the cabin and is attached to the partition of the engine compartment with four fasteners. A rubber seal is installed between the motor and the stove. Air arrives to the stove through special holes in the hood. At the rear of the heater in the engine compartment there is an air supply box. The air passes through the radiator, where it is heated, and enters the car either under the pressure of cold air from the street at high speeds of the car, or under the action of a fan, which creates air movement under pressure. The fan has three operating speeds: neutral, low and high. The fan speed switch is located on the dashboard of the car.
A visual diagram of the operation of the VAZ-2107 heater
The heater radiator uses liquid from the car's cooling system to function. The amount of hot liquid that enters the radiator can be adjusted using the tap. It is located near the floor of the vehicle on the passenger side and comes from the flexible rod control lever. The control lever is located on the dashboard of the vehicle. The top heater switch controls the heater tap. In the extreme right position, the switch fully opens the tap, allowing the maximum possible amount of coolant to enter the radiator. In the switch position on the left, the tap is closed, antifreeze does not enter the radiator, and the stove remains cold.
Exterior view of the heater radiator of a VAZ-2107 car
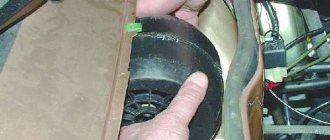
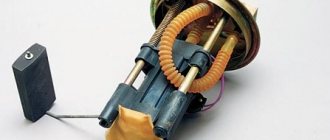
The heater motor is located under the radiator. A resistor is included in the electrical system of the motor, which makes it possible to switch fan speeds.
Under the action of the fan, warm air flows through the tubes towards the side windows, to the windshield and to the deflectors. Using deflector grilles, you can change the air supply route for directional airflow. Hot air is controlled by opening or closing the stove damper, the lid of which is adjusted by flexible rod levers. The middle lever is responsible for closing the air supply hatch. In the extreme right position of the switch, the maximum possible amount of air from the street enters the car. In the extreme left position and the lid is tightly closed, air does not enter the cabin.
The lowest lever is responsible for the distribution of air flows. The right position of the lever ensures maximum air supply to the side windows of the car, the left position ensures blowing of the windshield.
A detailed diagram of connecting the ventilation and heating system of the VAZ-2107 can be found in the technical documentation for the vehicle.
Repair of the electrical heating system of the VAZ interior
– the fan electric motor does not rotate at any position of the rotation speed switch: most likely, the electric motor itself has failed (the brushes have worn out), or there is no voltage at terminals 2 (ignition switch malfunction) and 4 connectors of the mounting block (fuse F4 has blown), it is also worth checking the mass of the engine itself (it should be no more than 3 ohms). The electric motor on the “classic” VAZ 2101 - 2107, as well as on the VAZ 2121, as well as on the VAZ 2121 “NIVA”: installed in the cabin, immediately behind the heating radiator; in VAZ 2108, 2109, 21099, 2113, 2114, 2115 - under the hood, in the compartment behind the engine shield; in VAZ 2110, 2111, 2112 and Priora 2170 - also under the hood, behind the plastic protection, on Kalina - in the cabin, under the dashboard.
– maximum fan speeds, according to the diagram, are without a switch, and if only the minimum and average speeds do not work for you, then the reason must be looked for in the speed switch button or in additional resistors (values in the diagram);
– sometimes, when you turn on the stove, you hear a very loud noise, high tones (squeaking) and there is no proper airflow. This indicates a malfunction of the heater electric motor itself (jamming of the impeller or armature bearings), in this case either replacement or disassembly and lubrication will help (not recommended, as it helps for a short time);
Common stove malfunctions and options for eliminating them
Before the onset of cold weather, it is imperative to check the functioning of the main elements of the VAZ-2107 heater.
Most often, the following malfunctions occur in the interior heating system of the seven:
- Poor quality connection of pipes and air supply pipes.
- Radiator and heater tap leaking.
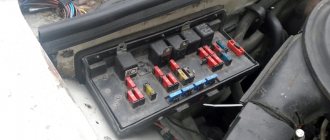
- Malfunction of the electrical equipment of the stove - oxidation of the wires, failure of the motor or fuse of the stove. The fuse is located in the block under the hood of the car. The fuse box is located on the partition between the passenger compartment and the engine compartment on the passenger side.
Even a novice driver can fix such malfunctions in the heating system. More serious breakdowns may lead to the need to purchase a new stove.
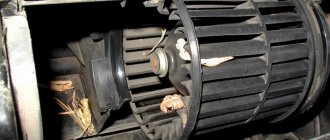
First you need to conduct a visual inspection of the heating system parts. To do this, you need to disassemble the stove and clean it of particles of debris and dust collected over the summer.
Debris and dust accumulated during operation on the radiator of a VAZ-2107 car
One of the most common problems in the heating system of the VAZ-2107 is poor-quality sealing of the stove air ducts. This problem can be eliminated by treating the cracks in the plastic elements of the heater housing with silicone. Also, the holes near the pipes must be sealed with rags. Eliminating the holes will reduce the loss of warm air and will result in faster heating of the interior.
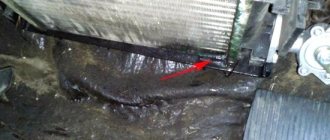
The next step is to check the heater and radiator valves for leaks. This is the main headache for owners of domestic cars. If the stove faucet or pipes are leaking, they must be replaced with new products. At the same time, the sealing butt gaskets are also changed. If the radiator itself is leaking, then there are two options for solving the problem. Most often, sevens have an old-style copper radiator installed. A copper radiator can be soldered and thus extend its life. If the seven is equipped with an aluminum radiator, then it cannot be repaired and must be replaced with a new product.
If, after carrying out all the preventive manipulations, cold air enters the cabin, the reason may be a clogged radiator, then it will need a thorough cleaning. Experts recommend carrying out preventive radiator flushing at least once a year. At the same time, all hoses and pipes are washed.
For preventive purposes, it is important to inspect the stove wiring for oxidation or poor contact insulation in order to avoid short circuits, burnout of the motor and heating system fuse. If the stove is working, then a visual inspection and troubleshooting is sufficient. Otherwise, it is necessary to check the functioning of the electrical circuit elements using a tester.
Such simple manipulations will save you from unpleasant situations with the heating system during the cold seasons.
How to make the stove heat in a VAZ: Video
General diagram of the electrical equipment of the VAZ 2104 carburetor
Electrical diagram of a VAZ-21043 car with instrument panel 2107: 1 - headlights; 2 — side direction indicators; 3 - battery; 4 — starter activation relay; 5 — carburetor electro-pneumatic valve; 6 — carburetor microswitch; 7 - generator 37.3701; 8 — gearmotors for headlight cleaners*; 9 — electric motor of the engine cooling system fan; 10 — fan motor activation sensor; 11 — sound signals; 12 — ignition distributor; 13 — spark plugs; 14 — starter; 15 — coolant temperature indicator sensor; 16 — engine compartment lamp; 17 — oil pressure warning lamp sensor; 18 — ignition coil; 19 — brake fluid level sensor; 20 — windshield wiper gearmotor; 21 — carburetor electro-pneumatic valve control unit; 22 — electric motor of the headlight washer pump*; 23 — electric motor of the windshield washer pump; 24 — reverse light switch; 25 — brake light switch; 26 — relay-breaker for alarm and direction indicators; 27 — windshield wiper relay; 28 — mounting block; 29 — lamp switches on the front door pillars; 30 — lamp switches on the rear door pillars; 31 — diode for checking the serviceability of the brake fluid level warning lamp; 32 — lampshades; 33 — parking brake warning lamp switch; 34 — brake fluid level warning lamp; 35 — indicator lamp panel; 36 — plug socket for a portable lamp**; 37 — glove box lighting lamp; 38 — rear window cleaner and washer switch; 39 — alarm switch; 40 — three-lever switch; 41 — ignition switch; 42 — ignition relay; 43—econometer; 44 — instrument cluster; 45 — carburetor air damper warning lamp switch; 46 — battery charge indicator lamp; 47 — control lamp for the carburetor air damper; 48 — turn signal indicator lamp; 49 — speedometer; 50 — fuel reserve warning lamp; 51 — fuel level indicator; 52 — instrument lighting regulator; 53 — clock; 54 — cigarette lighter; 55 - fog light circuit fuse; 56 — heater fan electric motor; 57 — additional resistor of the heater electric motor; 58 — electric motor of the rear window washer pump; 59 — rear fog light switch with control lamp; 60 — heater fan switch; 61 — switch for heated rear window with control lamp; 62 — external lighting switch; 63 - voltmeter; 64 — indicator lamp for external lighting; 65 — control lamp for high beam headlights; 66 — oil pressure warning lamp; 67 — parking brake warning lamp; 68 — tachometer; 69 — coolant temperature indicator; 70 — rear lights; 71 — pads for connecting to the rear window heating element; 72 — sensor for level indicator and fuel reserve; 73 — courtesy lamp for the rear part of the cabin; 74 — license plate lights; 75 — rear window wiper gear motor. The order of conditional numbering of plugs in the blocks: a - headlight units, headlight and rear window cleaners, windshield wiper relay breaker, carburetor electro-pneumatic valve control unit; b — mounting block, three-lever switch and instrument cluster; c — relay-interrupter for alarm and direction indicators; d — rear lights (pin numbering in order from top to bottom).
Stove modernization
Very often, in parallel with the prevention of stove malfunctions and its settings, the driver modernizes the heating system for more efficient operation.
Most often, for these purposes, the standard fan and resistor are replaced with products from the figure eight. The new fan is larger in size, due to which a larger amount of warm air is supplied, and the vehicle interior warms up faster. The new fan fits into the standard seat with virtually no modifications. It is only necessary to cut off one of the aerodynamic ridges from the impeller. After such improvements, it will also be necessary to replace the standard fan button with a product from the figure eight.
Sometimes, for better airflow of the driver’s side windows, additional small fans are installed in the deflectors. Such improvements, combined with preventive maintenance, will ensure comfort and warmth in the cabin even in the coldest times.
Restoring stable idle
Restoring a stable idle shouldn't be too difficult. Troubleshooting procedure;
- Using a key set to “17”, unscrew the pneumatic valve from the carburetor.
- The valve is disassembled, washed well with kerosene or pure gasoline and blown out with compressed air.
- We screw it into place and check its functionality.
If, however, the cause of the unstable idle speed has not been eliminated, you need to check the power supply control circuit. If the power supply circuit is broken, the carburetor pneumatic valve is constantly in the closed position. This results in the engine not idling. Repairing the open circuit will solve this problem without much effort.
Malfunctions associated with the electro-pneumatic valve are extremely rare, but if this happens, it should be replaced.
Source
Let's sum it up
Timely diagnostics, preventive cleaning and inspection of elements of the vehicle’s heating system is a guarantee of high-quality operation of the stove. Experts recommend checking the heating system on the VAZ-2107 at least twice a year - in autumn and spring. Any driver can handle preventive cleaning and adjustments of the stove on his own; to do this, you just need to understand the structure of the heating and ventilation system of the cabin and the principle of its operation. The easiest way to do this is to always have a visual instruction manual for your car nearby.
Don’t put off any further work to improve the functioning of your car’s heating system. Proper care will ensure uninterrupted operation of the heater and a comfortable temperature in the interior at any time of the year.
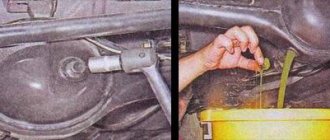
Checking the hoses
The second way to expel air from the VAZ-2107 stove is to find the hoses from the cooler under the hood and move them. It is quite possible that such a mechanical effect will provoke the release of an air bubble.
You need:
- Open the car hood.
- Find the radiator outlet, bypass and supply hoses.
- Press your hand three times on each of the hoses.
After the completed manipulations, check the operation of the heater. If warm air comes out, then the problem is solved. If everything remains as it was, it’s time to try the next method of airing.
What to do if the stove motor does not work (does not turn on, the blades do not spin)?
Possible causes of malfunctions and ways to eliminate them:
- The wires are damaged, oxidized or their tips are loose.
Crimp the terminals, strip the ends, replace faulty wires.
Clean the commutator or replace the motor.
Heater fan motor does not work at low speeds
- An additional resistor has burned out, its wires are damaged or their tips are not tightly attached.
Replace the resistor, crimp the terminals, strip the ends, replace faulty wires.
Heater fan motor armature rotates slowly
- The collector is dirty or oxidized.
Clean the commutator or replace the motor.
Replace the heater fan motor.
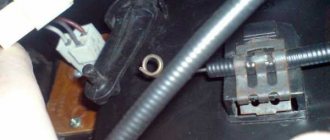
Contacts of the heater fan speed switch are burnt out
You checked the fuse and saw that it was intact. Let's dig further. Now we take and remove the gear shift button from the panel and disconnect the wires from it. Afterwards, we reliably connect one end of the indicator light to ground, and alternately insert the other end into the removed terminals of the wires disconnected from the button. The ignition must be on!
If the light does not light up, then power is not supplied to the speed switch and the mounting block is most likely faulty.
If the light comes on when testing one of the contacts, it means either the button or something else is faulty. How to find out? Very simple! To do this, we make a jumper from a regular wire, from the contact, during the test of which the indicator light came on, to one of the other two contacts. The stove motor will work if the button is faulty. If the motor does not work, then it is the motor that is faulty.
Additional designations
When connecting a generator or tampering with the wiring and ignition system of a VAZ, you should know the location of the fuse box in the car. There are 17 of them in total, of which 2 are reserve.
- reverse gear rear lamps;
- electric motors for headlight and glass washer pumps;
- heated rear window;
- direction indicators, hazard warning lights;
- fog lights;
- tachometer, voltmeter, warning lights on the dashboard;
- cigarette lighter and clock;
- sound signal;
- interior lighting, brake lamps;
- high beam headlights;
- high beam warning lamp;
- engine compartment lighting and license plate lighting;
- glove compartment lighting;
- low beam on the right;
- low beam on the left.
The electrical diagram of the VAZ 2022 car will help in repair and maintenance. You can download the image in high resolution using the link.