Any vehicle, in addition to the main parts - engine, generator, wheel set, etc., includes several auxiliary systems that facilitate the operation of the machine. Immobilizers are among these elements that are not required for driving, but are very important. These devices provide security for a vehicle that has been tampered with. The immobilizer simply blocks the engine part of the car, preventing criminals from stealing it.
Despite the fact that the quality of products of the domestic automobile industry has increased several times in recent years, cars produced in Russia still have a large number of faults. Among these “childhood diseases” are problems with the immobilizer on the Prior. The standard anti-theft system often fails: the indicator lights up, the ignition is blocked and the fuel supply is cut off. As a result of errors, the vehicle simply refuses to start. If you are faced with a similar situation, read our article: it tells you how to disable the immobilizer on a Priora.
One way alarms
These are the simplest of security systems.
Usually their functions roughly correspond to those performed by the standard Priora alarm system. Disabling one of the important lines of car control, turning on the central locking, sound alarm about an attempted burglary. Among the additional functions, some have a trunk opening and automatic closing of the door windows when closed. The range of key fobs of these systems usually does not exceed 50 meters. Important! These additional functions for Priora are initially included in the standard electrical package. Therefore, they should be installed and connected there, rather than running duplicate lines.
How to disable the immobilizer on a Priora
Immobilizer Lada Priora VAZ 2170 - design features, key training, actions when keys are lost, additional functions
Most specialized and passenger cars, including the Lada Priora, are equipped with an anti-theft device called an immobilizer. These devices can be standard, that is, installed by manufacturers, and additional or non-standard. In a standard immobilizer, the engine is blocked not physically, but by software, and in an additional one, using an electromagnetic relay, that is, physically. The principle of operation of the immobilizer is to break the electrical circuits of the ignition, starter, fuel supply, that is, all vital systems of the car.
A modern immobilizer has an electronic unit that performs regulatory and control functions. To turn the device on and off, an electronic code key is used, which is inserted into a special socket. A microprocessor built into the electronic unit establishes the authenticity of the key, closes the necessary circuits and disables the lock. There are devices that are turned off by manually entering a code. It must be said that such immobilizers are quite rare. Unauthorized disabling or destruction of this anti-theft device leads to blocking of the vehicle systems.
The car will not start if the device breaks down or the program crashes. Knowing how to disable the immobilizer on a Priora, you can bring the car back to life. You need to know that the controller can make one trip in emergency mode, but for this you need to activate this function in advance. If this function is activated, you will only need to enter the correct password and the vehicle systems will be unlocked. This way you can get either to a car workshop or to your home. It is no secret that in some workshops all repairs come down to replacing the old immobilizer with a new one. It costs quite a lot. But if you tinker a little, you can reflash a frozen device yourself.
It must be said that the Lada Priora car is in great demand among Russian buyers. It is designed both for young and active people who do not like to sit in one place, and for serious people. In 2013, the updated Lada Priora 2 went on sale. The car has three trim levels: “Standard”, “Norma” and “Lux”. A standard immobilizer is available in all three trim levels. This car is equally well suited for driving around the city and for out-of-town trips to a picnic. The car has an attractive appearance and a comfortable interior. You should try to study your car as best as possible. This way you can save a decent amount of money on its repair.
Operating principle
As we found out earlier, the immobilizer on the Prior is an element of the security system that protects the car from theft. The design of the device is quite simple; the immobilizer consists of 4 main elements:
- automatic anti-theft system unit;
- a sensor that detects the presence of a key with a standard chip;
- wires for transmitting signals and connecting the system to the comfort unit;
- keys with transponder.
Despite its design simplicity, the device functions in a rather “cunning” way. The operating principle of this device is based on the phenomenon of electromagnetic induction:
- Turning the key provokes the transmission of a pulse to the inductor.
- A change in current strength occurs in the inductance of the switch - this allows the element to receive a signal from the pumping loop.
- The capacitance is charged, which powers the microcircuit with the code built into it.
- Generation of a reverse pulse by the chip.
- Reception of the return pulse from the chip by the pump loop.
- Transporting the signal to the APS.
- Comparison by the system of the current code with the code stored in the block memory.
- If the codes match, the machine starts.
If the system does not recognize the code, the anti-theft complex will interfere with the operation of the engine part of the car. The emergency system will go into protective mode and block the power supply to the gasoline pump, starter and ignition equipment. As a result of such fraud, the Lada Priora will not start.
The most famous and popular security systems
The cigarette lighter on the Priora does not work reasons
Many different companies produce car security alarm kits. Moreover, one company has in its assortment both one-way and feedback systems. For Priora owners, the most popular were the following:
- StarLine.
- CHER-KHAN.
- Pandora.
- Magnum.
- Sheriff.
- Alligator.
- Tomahawk.
- Clifford.
- Stalker.
- Pantera.
These are the top 10 alarm systems that dominate the domestic market. They are the ones that are most popular among Russian car owners. Of course, in principle, any of them can be installed on the Priora with your own hands, you just need to know what and where to install the Electrical package from Priora
Immobilizer device
How to change the low beam bulb on a Priora List of required actions
The VAZ immobilizer device is functionally similar to the APS-4, but in this system the code key is sewn into the ignition key, and the reader is located in the steering column. A number of additional features are also presented - control of rear PTFs, electric windows, k-line diagnostics of the immobilizer.
Structurally, APS-4 differs from APS-6. Moreover, APS-6 of different years of production differ slightly from each other. This is the case when “the manufacturer reserves the right to make changes that do not affect the performance of the product.” The internal structure of the immobilizer, despite its low cost, is quite complex. It is a microcontroller based on PIC16C65B, a K-Line circuit for exchanging data with the ECU via a diagnostic line and EEPROM memory for storing learning codes.
It is also necessary to keep in mind that very often APS-6 is installed in a housing from APS-4, that is, externally the unit is marked APS-4, and the board is marked APS-6.
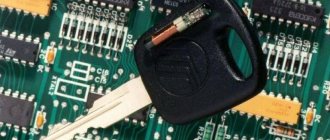
The microchip on Priora cars is located inside the standard key fob, which controls the central standard lock (and standard alarm). The Priora car has an immobilizer
structurally integrated with the glass unit controller.
Possible causes of malfunctions
What to do if the immobilizer has blocked the engine from starting? ways to solve the problem
If the immobilizer “does not see” the key, there may be several reasons. There is nothing to break in this system (unless during repairs or installation of additional equipment the reader antenna or its wiring is damaged), software failures occur more often - for example, the immobilizer “forgets” the code written into it.
This may not necessarily be a problem with a specific immobilizer (like in old Renault Megane/Scenic), but may cause the auto-start alarm to be installed incorrectly. If the installer, instead of connecting the immobilizer crawler, attaches one of the chips to the reader antenna (this preserves the functionality of the keys from the kit), then when the ignition is turned on with the second key, where the chip is stored, the immobilizer will receive a signal from two chips simultaneously. This situation is abnormal for the controller, and over time it deletes one of the codes from memory.
It is worth considering that if the immobilizer prevents the car from starting, this may indicate an unsuccessful theft attempt. The first thing a car thief needs to do after he has dealt with the ignition switch (and, note, the Hollywood stereotype about tearing off and twisting wires has nothing to do with reality) is to register his own chip in the immobilizer memory. If you have access to the diagnostic connector, this can be done in literally seconds on many machines.
From his own practice, the author noticed that an attempt at theft becomes noticeable only after a thorough inspection of the lock cylinders - their damage is so small. Therefore, in the morning, having opened the car without any problems and trying to start the engine, the owner is surprised to find a blinking immobilizer indicator, indicating that the immobilizer does not recognize the chip code in the key as correct. When connecting diagnostic equipment on such a car, you may find that only one key is registered in the immobilizer memory instead of the standard two.
Therefore, you can often see installation of anti-theft locks on diagnostic connectors and re-pinning of connectors, making direct connection of the programmer impossible. However, such measures make sense only on common cars, with which it is easier to choose another object than to waste extra time on theft. If a specific car is stolen to order, then the thief will be able to gain access to the CAN bus without a diagnostic connector.
Where and how best to install alarm elements
The design of the Priora is such that it is simply impossible to choose any other place to install the alarm unit other than in the area of the main computer, which is located in the “beard” of the control panel under the heater unit. You can access it by removing with your own hands the side plastic panels located in the area of the accelerator pedal on the driver's side and the left foot on the passenger's side.
Why is it convenient to stay there? And the fact that the electrical package is located directly above the control unit. It has all the functions necessary for the alarm to work. That is, this “package” controls the central locking, power windows, trunk opening and starter. Right next to it is the relay and fuse box for the engine control system. Therefore, there is no need to pull wires far in different directions. Everything can be installed on site with your own hands. After all, Priora is even equipped with hood and trunk opening sensors straight from the factory.
Car alarm connection points
There cannot be a single exact recipe here. The fact is that each car alarm manufacturer places the output points on the control unit connector differently, and here you will have to navigate using the technical documentation included with the kit. This is if the owner decides to install the alarm with his own hands. When this is done by a specialist from a service station or sales center, they have the appropriate literature for all types of systems.
It is best to run the alarm power cable separately, directly from the battery. The minus is to install on site. Near the Priora ECU there is a special stud from the body for a stable “mass”. The relay contacts that break the circuit usually cut into the fuel pump control wire directly from the relay in the row near the ECU. The remaining wires must be installed according to the documentation included with the kit. The exact assignment of the contacts of the Priora electrical package can be seen in the diagram and fig. below.
In accordance with the described contacts and the available documentation of the system, you can slowly install an alarm system on the Priora with your own hands.
A useful video on the alarm system on the Priora is below:
- Alarm Leopard: user manual
- How to connect and disable the standard alarm on a Priora
- What are car locks for and how are they used?
- Professionals choose Leopard alarm system
Where is
In the LADA Priora car, the automatic anti-theft system (APS) is structurally built into the electrical package unit (comfort unit). Depending on the year of manufacture of the car, its location may be different. In early Priora models, it was located under the center console (beard), which is located in the middle of the dashboard. Under the electrical package unit in these models there was an electronic engine control system (ECM) or an electronic control unit (ECU).
In subsequent modifications of the Lada Priora car, the comfort unit, in which the immobilizer is located, was placed on the left side of the mounting block by the designers. The latter contains relays and fuses. Due to the fact that the electrical package unit is fixed to the surface of the body, behind the mounting block, it is difficult to get to it.
According to factory technology, to dismantle the comfort unit, it is necessary to disassemble part of the instrument panel, which is long and difficult. But there is another way:
- Before performing any operations on the vehicle's electrical equipment, be sure to remove the contact terminal from the negative electrode of the battery. Remove the plastic panel from under the steering wheel by unlocking the mounting fasteners.
- The mounting block becomes visible, behind it the assembly with the immobilizer is screwed in a perpendicular position. Blindly, use your hands to approach the 3 wiring connectors of the electrical package unit and disconnect them.
- Using a bell wrench with a working head of 10, unscrew the 2 mounting bolts that hold the electrical package unit by touch. The bolts are not visible, they are located behind the fuse box.
- Carefully remove the assembly; it can only be removed in one position.
Disabling the immobilizer on the Lada Priora
Protective device diagram
On the Lada Priora, as on other domestic cars, an immobilizer is installed that will block the engine ignition system when starting without a key. Along with this, this protection system often fails, so you need to know how to disable the immobilizer on a Priora if it does not start, and how to activate the immobilizer back. It is quite difficult to carry out this work, since it will require certain knowledge in electronics and the necessary tools and devices.
- First you need to decide where the immobilizer is located in Priora. Professional installation of alarm systems to bypass the standard immobilizer. This requires disconnecting and removing the entire engine control unit located at the bottom of the console. For this purpose, it is necessary to unscrew the side covers of the console on both sides using a curved screwdriver and unscrew the controller, which is attached to three bolts. Then you need to disconnect the terminals and remove the control unit. After unscrewing the four screws at the edges of the block, you should disassemble it.
- Then you need to make some modifications to this control unit, namely, resolder the chip resistor. To do this, you need to connect the unit to the computer and, using a pack loader, read the flash and eeprom firmware, which must be saved. After this, the eeprom firmware must be installed again in the block, and then the chip resistor must be soldered in its original place.
- Then you need to disable the immobilizer unit on the Priora in order to prevent it from being blocked during the installation process. How to disable the immobilizer on Kalina, VAZ 2110, Niva Chevrolet and other cars. Detailed instructions, video and photos. To do this, you need to disconnect the twenty-pin connector, and the eighteenth and ninth wires need to be cut off from the connector and connect these two contacts together. The connection point must be insulated using insulating tape. Then you need to connect all the connectors to the control unit and put it in its original place. After installing the console, you can start starting the engine.
Bypass immo using crawler
You can bypass the engine blocker by breaking the conductors. To complete the task, you will need to dismantle the protective cover on the steering column, which is secured with two self-tapping screws.
After this, the following is done:
- There are two thin cables going to the ignition switch; either of them (green or white insulation) must be cut.
- Then you need to connect a two-wire loop from the break point to the bypass module.
- This element is connected instead of an inductive loop. Then the chip is installed. It is installed in the standard key. The lineman is connected to the anti-theft installation.
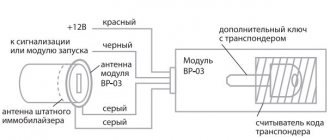
If it is necessary to disable the security system, the loop contacts must be closed. The use of special Starline bypass modules is allowed. The device model VR-03 can function with any anti-theft systems.
Loading …
Disabling the immobilizer anti-theft device on a Lada Priora car
On many domestically produced cars, including Priora cars
The standard immo is installed. Very often there are cases when the protective system fails (for example, when antenna contacts are broken). In this situation, it becomes necessary to disable the device on the Priora. Sometimes very unpleasant situations arise when the owner cannot start his own car. It is quite problematic to complete the process of deactivating the immobilizer, since for this purpose it is necessary to have specific skills in working with electronics, as well as special devices and tools.
- First you need to find the actual location of the immobilizer in Priora. In this case, you will need to disconnect the entire unit used to control the engine and remove it. It is located in the place where the lower part of the console is located. The console has side covers on both sides that need to be removed using a shaped screwdriver, then unscrew the controller; it is secured with only 3 bolts. Then you remove the terminals and take out what is the control unit. After you have managed to tighten the 4 screws on the block, you need to disassemble it.
- Then you need to modify the control unit itself, that is, you have to resolder the resistor chip. The process will go like this: you connect the control unit to your PC, and, using the pack-loader, read the eeprom and flash firmware, which you need to save. After carrying out this procedure, you install the firmware into the unit again, and then solder the same chip resistor to the place where it was originally located.
- After this, deactivate the anti-theft device block on the Lada Priora in order to prevent it from being blocked during the installation process. It is necessary to disconnect the connector with twenty contacts, and wires 18 and 9 will have to be cut off from the connector, and then these two contacts will be connected together. The place where the wires are connected must be insulated with electrical tape. After this, all the connectors will need to be connected to the control unit, and then placed where it was originally located. Once the console is installed, you can start the engine with complete confidence.
We connect the lineman in VAZ cars
Let's say you purchased a Starline BP-3 module or its equivalent. If a second, that is, “alternative” connection option is provided for the signaling, you will not be able to use the specified module complete with it. By connecting two cords into the antenna cable, you will get the following:
- When the car starts, the immobilizer actually turns off;
- The rest of the time the circuit of the standard antenna is broken, the engine does not start.
If the signaling does not start the engine when you turn the key, just buy a BP-5 lineman or something similar.
“XS-3” cords are included in the cable break. The “BP-5” module circuit has the property that you can disable the immobilizer when the lineman is de-energized using the key in the lock. This is a universal option, but there are also compromises.
The first example is with broken wires
To connect the crawler module, remove the steering column cover in the car (held in place by 2 screws). Then, follow these steps:
- Either of the two thin wires coming from the lock (“white” or “green”) must be cut;
- A two-wire loop leads from the break point to the crawler module;
- The cable is connected instead of the inductive loop, then the chip is installed and the lineman is connected to the signaling system.
The first step is illustrated by the figure:
If the owner decides to turn off the alarm, the loop wires can be short-circuited with each other. This will be enough. Thus, the lineman can be switched off without disassembling the casing.
In our example, a “gray” wire cable intended for the antenna was included in the break of the “green” cord:
You can use this scheme, but it has disadvantages:
- The signaling must necessarily turn on the crawler module at the moment the key is turned in the lock;
- The standard VAZ immobilizer will only accept the chip that you install inside the module.
From point “2” it follows that it will not be possible to program the immobilizer. You can get rid of these shortcomings by installing a “BP-5” crawler (“Scheme 2” from the standard instructions). The corresponding diagram was given above.
Galvanic coupling is not necessary
The following is the information required to make a lineman from scrap elements. The solution in question was tested on a Priora car (APS-6). The verdict is this: autostart really works, and if desired, everything can be quickly turned off without interfering with the car’s wiring.
You can make an additional antenna yourself:
- A layer of tape is wrapped around a rod with a diameter of 57 mm;
- The coil turns are wound on top (50 turns of PEL-0.35 wire);
- The coil is coated with epoxy resin, the leads are soldered, and insulated.
The result will be what is shown in the figure.
The mating side of the circuit contains 50 turns of wire of any brand. The result looks like this:
Both coils are closed into a circuit opened by the relay contacts. The relay itself is controlled by the alarm, there is nothing complicated here.
Remember that when connecting any auxiliary relay to the alarm outputs, a diode is installed in parallel with its winding (cathode to “+12 V”). Otherwise the electronics will fail.
Let's say you need to program not the signaling system, but the immobilizer, for which it is advisable to disable the crawler module. Then, if the relay is activated every time you turn the key, do this:
- The alarm control output is programmed for another option (not for crawler control);
- Perform actions with the immobilizer;
- Set the required value again in the signaling programming table.
This recommendation will be useless if you use the “BP-3” module included in the gap in the standard wiring. Draw conclusions.
How to disable the immobilizer on the Lada Priora yourself (instructions)
A standard immobilizer is now installed on all injection models of cars of the Togliatti Automobile Plant. This device automatically starts the engine by exchanging data with the electronic control unit. The car starts immediately after the immobilizer reads the corresponding code and confirms its compliance with the data stored in the ECU memory. Thanks to this, the capabilities of the device cannot be used by an attacker - if the car is not disarmed, the system will simply block the fuel pump and ignition.
Owners of cars equipped with an immobilizer quite often encountered problems caused by interference from cell phones, as well as a complete discharge of the battery, due to which the device simply stopped working. That is why the manufacturer has released additional software that allows you to start the engine bypassing this equipment. In addition, it became possible to disable the immobilizer and start the car in the traditional way. This is what we will look at in this article, but first we will try to understand the design of the device.
Design of a standard immobilizer on a Priora car
If you have experience working with modern anti-theft equipment, then you will easily discover the similarity of the standard immobilizer of a Lada Priora car with the APS-4 system.
The only structural difference is that the engine start code reader is mounted directly into the steering column, and a chip with this same code is installed on the ignition key.
In addition, we can highlight several new functions that the manufacturer has equipped the Priora immobilizer with:
- the ability to control power windows;
- turning on and off the rear fog lights;
- vehicle diagnostics carried out via K-line. By the way, it is precisely because of this possibility that the slightest interference can make it difficult to use the immobilizer to start the engine.
If the device fails, you must either contact a specialized car service center or use an additional password to start the engine. It must be a combination of 6 digits and is entered by pressing the gas pedal. As practice shows, it is better to choose passwords that are not too complex so as not to waste a lot of time entering them.
In addition, there is another way to start the engine bypassing the protection system. However, in order to do this, you will need to know how to disable the immobilizer on the Lada Priora without a training key. Step-by-step instructions to quickly do this can be found below.
Disabling the immobilizer: just a few simple steps
A procedure such as disabling the immobilizer will seem quite complicated to inexperienced drivers, since it requires special knowledge in the field of electronics. You also need to understand the design of your car.
The immobilizer on the Priora is turned off in several stages:
First we get to the immobilizer. For this purpose, you will need to remove the electronic control unit of the power unit, disconnect the wires supplying power to it and disassemble the part; the next stage is making small changes to the design of the control unit. You will need to unsolder the chip resistor from its standard place, connect it to a personal computer or laptop and read the ee prom and flash firmware
In this case, it is important to save the first one on your PC, since it will be useful in the future; after that we install the chip in place and return the saved firmware; at the last stage, we disconnect the immobilizer physically, that is, we disconnect the twenty-pin connector and connect wires 18 and 9 cut from it to each other. After this, you can assemble the control unit, install it and start the engine
Is it possible to disable the immobilizer using the key? No, since the device is reliably protected from such manipulations. It can only be removed from the engine control circuit (possibly even temporarily, until the failed code is restored). You can also take advantage of the possibility of emergency engine starting by entering a special password.
Malfunctions and their elimination
The LADA Priora automatic anti-theft system has one significant drawback. It consists of a frequent malfunction that occurs due to a crooked implementation of the data transmission mechanism between the anti-theft device itself and the car's comfort unit. As a result of such a breakdown, various unpleasant situations arise: the corresponding indication lights up on the dashboard, and the engine refuses to start.
The latest versions of LADA Priora include the ability to emergency disable the immobilizer in the event of any malfunction of the device. The function is activated by registering a password in the machine's ECU. Having completed simple manipulations, the driver is able to start the engine, even with a faulty immobilizer.
What is included in the alarm kit
First of all, this is, of course, the control unit of the system. It is also a receiver and transmitter of the necessary signals. Yes, this is again an ECU (electronic control unit) with a program embedded in it. Depending on the type of alarm, the unit is equipped with a certain number of outputs to various nodes.
A separate element is a remote shock sensor. It reacts to the force applied to the car, that is, it gives a signal about an attempt to penetrate the car. By the way, it is adjustable. Each owner adjusts its sensitivity with his own hands. You can install it anywhere in the Priora cabin. Typically all installers place it under the fuse box to the lower left of the steering column.
Signal bell. An audible alarm that sounds a siren or other programmed sound in the event of a break-in attempt. Usually, they try to install it under the front hood in the engine compartment in the area of the left side member.
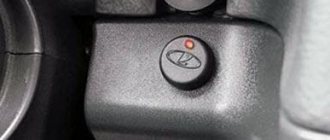
"Vallet" button. This is a small button on a long two-wire wire. The owner of the Priora must know it, regardless of whether the alarm was installed with their own hands or the installation was carried out at a service center. It is placed in a secret place, as it serves as an emergency shutdown of the system.
Standard wiring harness with relays and fuses. Typically, a relay is installed to open a signal from the block of any Priora circuit in response to a signal from the ECU. The fuses are located on the line of constant current supply to the alarm system.
Well, and two key fobs: a working one and a spare one. Their design and number of buttons also depends on the type of system being installed.
Disabling the immobilizer without a crawler yourself
Depending on the unit model, reprogramming the ECM may require changing the installation diagram of the component elements. Such devices include M73 microprocessor modules from the manufacturer Avtel. Before performing the task, it is necessary to remove the microprocessor from the seat and connect the K-Lin adapter to it.
To remove the immo, you will need an adapter wiring harness; you will have to make it yourself.
When the transition harness is ready, perform the following steps:
- The OpenBox program is installed on a PC or laptop. The utility is freely available. After downloading it, the software is launched; at the first stage, the car owner needs to read the standard EEPROM firmware. Factory software information is stored separately. It may be required to perform modifications or if it is necessary to roll back to its original state.
- Then the HxD file editor is loaded. The downloaded firmware opens on the computer.
- At the beginning of the opened text, a line is added that consists of two FF characters. Changes to the firmware are saved.
- Then the edited file must be loaded into the memory of the microprocessor module. To perform this task, it is allowed to use ready-made versions of untrained firmware. They can be found in the public domain on the Internet.
- The microprocessor module is disconnected and the device is installed back.
If the car is equipped with a January 7.2 block, then to deactivate it, use the diagram shown in the photo in the gallery. It is assembled on the basis of the K-Lin adapter. A positive contact switch must be added to the circuit; it will be used as an ignition switch.
The Bureau of Technical Solutions channel talked about disabling the engine blocking device yourself.
After this, the following steps are performed:
- ChipLoader software is installed on a PC or laptop. The program version must be 1.97.7 or higher.
- The utility is launched and the required type of microprocessor is selected in the window that opens.
- Then you need to connect to the module; to do this, use the “Establish connection” option.
- Information is being read from the EEPROM board.
- In the program window, press the “Delete immo” button. As a result, the utility will automatically adjust the information written to the file.
- The program closes. The microprocessor module can be disconnected from the computer and installed back on the car.
In M74 models, the procedure for deactivating the blocker is performed differently:
- The battery is disconnected from the car; first, the clamp on the negative terminal must be loosened with a wrench.
- The connector is disconnected from the immobilizer control unit.
- A homemade harness is connected, which is made according to the diagram. It should use a double switch, since with its help the voltage can be supplied to the device in stages.
- The assembled circuit is connected to the battery via a VAG-COM cable.
- The first button on the switching device is activated. With its help, a pulse is sent that allows programming of the block. The WinFlashECU utility starts on the PC. In the settings window that opens, you must specify the type of microprocessor module, as well as the information transfer speed. It is recommended to select the last parameter as minimal.
- The second button is activated. Then a message will appear in the window that opens indicating that communication with the module has been established.
- The standard software of the control unit is saved. Then this file must be replaced with a new one. The total time to complete the task will take no more than a few minutes.
- When the firmware is completed, the program is disabled. The power and wiring must be disconnected from the device.
- Then the engine blocker control unit is again connected to the machine’s electrical network. When carrying out this task, it may be necessary to adapt the zero position of the throttle valve. To do this, start the engine and make a test drive. When the speed increases to four thousand per minute, the power unit brakes. In this case, second gear must be engaged.
Photo gallery
Training procedure for activating the immobilizer priors.
- Close all car doors. Turn on the ignition with the training key and wait in the on state for at least 6 seconds.
- Turn off the ignition. The lamp should begin to flash rapidly (5 times per second) while the learning procedure is being carried out correctly. If the lamp stops flashing quickly, it indicates an incorrect operation, an out-of-time interval, or a malfunction. Remove the training key from the ignition switch.
- While the lamp is flashing (about 6 seconds), you must insert the working key into the lock and turn on the ignition. If everything is done correctly, the buzzer will emit three beeps when the ignition is turned on.
- Wait with the ignition on (about 6 seconds) until the buzzer emits two more sound signals. If after 6 seconds the buzzer does not produce sound signals and the rapid flashing of the light stops, then you need to turn off the ignition and start the procedure again. If the situation repeats, this means a malfunction or that this working key has already been trained with another immobilizer.
- Turn off the ignition.
- If it is necessary to train the second working key, then you should perform steps 3-5 again, using the second trained working key to turn on the ignition. If not, continue from step 7.
- While the lamp is flashing (about 6 seconds), you must remove the key from the ignition switch, reinsert the training key into the lock and turn on the ignition. If everything is done correctly, the buzzer will emit three beeps when the ignition is turned on.
- Wait with the ignition on (about 6 seconds) until the buzzer emits two more sound signals.
- Turn off the ignition. Do not remove the training key from the ignition. Approximately 6 seconds after the ignition is turned off, the buzzer should emit a single beep and the lamp should begin to flash twice as fast. If the buzzer does not emit a sound signal and the rapid blinking of the light stops, then you need to turn off the ignition and start the procedure again. If the situation repeats, this means a malfunction or that this training key does not fit this controller.
- No later than 6 seconds after the sound signal (while the lamp is flashing quickly), you must turn on the ignition with the same training key. After waiting 2-3 seconds, turn off the ignition. No later than 5 seconds after turning off the ignition, the buzzer should emit three beeps and the light should stop flashing quickly. Do not turn on the ignition for at least another 10 seconds. When working with some controllers, the light stops blinking and the buzzer emits 3 sound signals when the ignition is turned on. In this case, you should still turn off the ignition and wait at least 10 seconds. Be sure to wait for the alarm to sound and the hazard lights to flash.
At the end of the learning procedure, it may be necessary to resynchronize the immobilizer and controller codes. This means that after completing the learning procedure, the controller will not allow the engine to start when the ignition is turned on for the first time. To carry out resynchronization, you must turn on the ignition with any trained key (preferably a working one). Wait 6 seconds. If the immobilizer light begins to show an error condition (flashes once per second), then turn off the ignition and wait at least 10 seconds. After this, turn on the ignition again. The light should not flash and the engine should start.
If 3 seconds after turning on the ignition the light comes on with a constant light, this means that the controller has not activated the anti-theft function and the learning procedure should be repeated again.
The factory instructions read like this:
Collect the black key. Close the doors. Turn on the ignition with the RED key. Quickly (within 5-6 seconds) turn off the ignition. The indicator lamp flashed
Pull out the key. Quickly (within 5-6 seconds) turn on the ignition BLACK. 3 squeaks + 2 squeaks. Quickly (within 5-6 seconds) turn on the RED ignition 3 beeps + 2 beeps. Turn off the ignition KEY IN LOCK. 1 squeak. Quickly (within 5-6 seconds) turn on the ignition for 5 SECONDS!!! (Attention!!! Be sure to wait until the alarm sounds and the hazard lights flash). Turn off the ignition. KEY IN THE LOCK until the machine goes out on the panel.
Problem Resolution
What to do if the immobilizer blocked the engine from starting? First of all, make sure that it itself is functioning normally - the indicator on the dashboard (if there is one) indicates that the chip code is not recognized. If the indicator “shows no signs of life” when you turn on the ignition, then you should probably start by checking the electrical system - perhaps the fuse has blown in the section of the circuit where the immobilizer unit is powered.
Re-register a key that is not recognized by the system - this solves the problem. However, there are two ways to program the immobilizer. In the first case, which is used on most foreign cars, programming of key codes is carried out by a dealer diagnostic scanner, via an internal network (the request goes to the manufacturer’s servers). The entire set of keys is registered at one time, since at the beginning of the training procedure, data on previously registered keys is erased from memory. So the owner himself cannot do anything with the immobilizer: he turns to the official dealer of his brand or to a company specializing in such work. As a matter of fact, the existence of universal devices for training immobilizers “plays into the hands” of car thieves. And you should approach the choice of a company offering immobilizer training services more carefully - the car owner will not control how many keys are actually registered, and there may be an “extra” one for the future.
The second method of training the immobilizer involves the presence of a master key in the kit, which is used to program the others. This allows the owner to perform immobilizer training himself, but only if the master key itself is recognized. For example, the APS-6 unit, which is very familiar to VAZ owners starting with Kalina, has a similar learning mechanism.
You will also be interested in:
To program “working” keys using a training key on the APS-6 unit, you need to:
- After closing the doors, turn on the ignition with the learning key.
- Wait at least 6 seconds, then turn off the ignition. The immobilizer indicator will blink rapidly, indicating the start of the learning procedure.
- Insert the registered key into the lock and turn on the ignition. Do this before the immobilizer light goes off. The buzzer will beep three times, indicating that the chip in the key has been recognized and read. If the indicator goes off and there are no beeps, this means either that the ignition is turned on too late (repeat step 1 onwards) or that the immobilizer is faulty.
- Wait until two more beeps sound. This confirms that the key code is stored in the controller's memory.
- Repeat steps 3 and 4 for the remaining keys.
- After turning off the ignition with the last key you registered, with a pause of no more than 6 seconds, you need to reinsert the training key into the lock and turn on the ignition. First, three beeps will sound, then two more.
- Turn off the ignition, but do not remove the key from the lock until you hear a single signal. The blinking frequency of the immobilizer indicator increases. If not, go back to step 1 and try again. A secondary error will clearly indicate that training with this master key is impossible. Therefore, contact the service.
- When a single signal is heard, you need to quickly turn on the ignition. The buzzer will sound three times and the immobilizer indicator will go off. After 2-3 seconds, turn off the ignition. The car will respond by flashing the hazard lights and beeping.
- Remove the learning key. Before checking the operation of the registered key, wait at least 10 seconds.
The procedure looks complicated, but it ensures that the user cannot accidentally trigger relearning by simply using the master key to turn on the ignition.
In some systems without a master key, the manufacturer provides emergency PIN codes for key programming. On old Renaults, the PIN code is calculated through the Trantir program using the code printed inside the key body; on Kia/Hyundais up to 2007, it is determined by the last digits of the VIN, even without special programs (online services), and so on. The code entry itself is performed both by standard means of the car (Renault has an interior door lock button) and through the diagnostic connector. In this case, you will have to buy an adapter for old cars with inexpensive devices like VAG K-Line from Aliexpress. You can find the necessary software on the Internet. The already mentioned Kia/Hyundai uses the Cascade program, in which the immobilizer learning process is interactive and placed in the corresponding menu item.
Information about the car device Immobilizer
Most people who recently purchased a car have no idea that their vehicle is equipped with an anti-theft device. An immobilizer is an electrical type device that does not block the ability to start the engine. The main function that the immo antenna performs is to break the electronic circuits of the car in the amount of one piece or several at once, due to which the potential for vehicle theft is reduced. For this reason, the attacker may not even know that the car he intends to “illegally purchase” is equipped with an immobilizer.
There are 2 types of immobilizer: additional and standard. The standard type of anti-theft device is integrated into the vehicle during its assembly phase. Using special software (software), it limits access to the unit that controls the car’s engine. The standard type of immo is usually a transport immobilizer, that is, a wireless immobilizer.
The transport immobilizer consists of three main elements:
- Electromagnetic type relay - with its help, circuits are broken;
- The manual block is designed to control all components of the system. Thanks to this component, commands are transmitted and signals are processed;
- Chip, key, password, card or code owned by the owner of the car. The immobilizer system recognizes these components.
Thanks to this antenna, radio exchange between the immobilizer key and the control unit occurs. Recently, immo with a remote control type for the Lada Priora car began to have several immo antennas. The anti-theft device is placed on the vehicle's locking tongue, secured with just one screw, the antenna connector is usually located deep in the car panel right behind the rubberized curtain of the steering column.
What to do if the immobilizer does not work?
If the locking device is “buggy” and does not see the key, it is necessary to determine their cause based on the signs of malfunctions. If you cannot solve the problem quickly, you can try to bypass the immobilizer.
Causes of malfunctions
All failures in the operation of the blocking device can be divided into two groups:
- Software. This type of malfunction is associated with incorrect functioning of the software installed in the microprocessor module. Also, software problems may affect the operation of the immobilizer unit or the chip in the remote control. To fix the problem, you will need to dismantle the mechanism and reflash it. If the malfunction directly affected the key, the chip must be repaired or completely replaced in case of a serious malfunction.
- Hardware related problems. The main problems include circuit failure or malfunction of one of the components of the blocking system. To determine the cause, a complete diagnosis of the device will be required.
It is important to remember that the battery in Lada Prioras should not be allowed to be completely discharged. As a result, chaotic information will be recorded in the immobilizer memory, which will lead to failures.
User Pavel Master spoke about problems in the functioning of the locking system due to a faulty key.
More details about the problems:
- Malfunctions in the operation of the immo can occur as a result of disconnecting the battery from the vehicle's electrical network. In Lada Priora cars, the blocking unit is not always firmly attached to the key, so de-energizing the on-board network will lead to problems. But this problem is more typical for reflashed devices.
- The battery discharged when trying to start the power unit. If the engine does not start due to problems in the power system, the driver may crank the starter mechanism for a long time. This will eventually lead to battery discharge. In particular, this problem often occurs in winter.
- The blocker may not function correctly as a result of replacing the motor or microprocessor unit. When changing the power unit, you also need to buy an electronic control module and a new chip tag for the device. Otherwise, there will be a need to re-bind the key to the immo block.
- Malfunctions in the operation of the blocking device can be caused by problems with electrical equipment and devices. One of the safety elements associated with the immobilizer may have burned out.
- Damage to the firmware of the blocking device. The immo coding is stored on a specific microprocessor unit board. If the memory malfunctions, it will have to be programmed again.
- The chip in the key is faulty. The problem may be software in nature or the problem may be due to physical damage. To determine the cause, you will have to disassemble the key.
- Problems are often caused by interference from mobile phones and smartphones, which is especially noticeable when the ignition is activated.