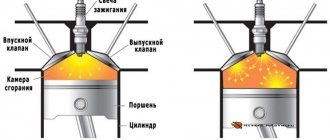
To ensure high compression in the engine, and this greatly affects its efficiency and other capabilities in terms of efficiency, ease of starting and specific consumption, the pistons must be installed in the cylinders with a minimum clearance. But it is impossible to reduce it to zero; due to different temperatures of the parts, the engine will jam.
Therefore, the gap is determined by calculation and strictly observed, and the necessary seal is achieved by using spring piston rings as a gas and oil seal.
Selection of pistons for block cylinders
For new engines, the gap between the piston and cylinder is 0.025-0.045 mm and is set by installing pistons of the same class as the cylinder class.
To do the job you will need a bore gauge.
1. We prepare the car for work (see “Preparing the car for maintenance and repair”).
2. Remove the pistons from the cylinder block (see “Piston rings and connecting rod bearings - replacement”).
How to use the caliper, see the attached instructions or special literature.
3. Using a bore gauge, we check the wear of the cylinder walls.
We carry out measurements in four zones (5, 12, 62 and 112 mm from the upper edge of the cylinder) in the longitudinal and transverse directions of the engine. The cylinder does not wear out in the upper belt. Based on the difference in bore gauge readings in different belts, we determine the degree of wear of each cylinder.
Engine cylinder diameters are divided into five size classes (see Table 8.4). The class of each cylinder is stamped on the lower mating surface of the cylinder block.
Table 8.4. Cylinder diameter classes
Small uniform wear of the cylinder (within 0.05 mm) can be compensated by installing a piston of a different class with a larger diameter.
If the maximum wear is 0.15 mm or more, boring the cylinders and installing repair size pistons is required.
The cylinders are bored by 0.4 mm and 0.8 mm to fit the dimensions of the repair pistons.
4. There are markings on the piston bottom, where:
2 — piston pin hole class; C - piston class; ← - mark that should be directed towards the front end of the crankshaft; G - piston mass group.
Based on the diameter of the hole for the piston pin, pistons are divided into three classes (1, 2, 3) every 0.004 mm.
According to the outer diameter, pistons are divided into five classes (A, B, C, D, E) every 0.01 mm (measured in a plane perpendicular to the piston pin, at a distance of 55 mm from the piston bottom).
In terms of size, pistons come in nominal and two repair sizes. Pistons of nominal size are not marked. Pistons of the first repair size are manufactured with a diameter increased by 0.4 mm and are marked with the symbol “Δ”. Pistons of the second repair size have a diameter increased by 0.8 mm and are marked with the symbol “□”.
All pistons on the engine must be of the same mass group. Pistons of the nominal group are designated by the symbol “G”. Pistons with increased and decreased mass by 5 g are designated “+” and “-”, respectively.
The class of the finger is marked with paint on its end.
According to the outer diameter, the fingers are divided into three classes (blue, green and red), every 0.004 mm.
To make it easier to select a finger for the piston hole, the required class of the finger is indicated with paint on its inside.
The required pin class is indicated on the connecting rod cover (number 2). Depending on the weight of the heads, connecting rods are divided into classes. The marking is applied on the connecting rod cover with the letter “M”.
Connecting rods of the same weight class must be installed on the engine (see Table 8.5).
Source
Piston rings for VAZ 2106
The pressure of the working gases after ignition of the fuel mixture exceeds 60 kg/cm2, which creates an axial load of more than 3000 kg. and lateral load up to 250 kg. High temperature contributes to accelerating the destruction process, when the VAZ 2106 piston needs to be replaced.
Replacement
Personally, I carried out this procedure with the engine removed, since the car was almost completely disassembled. But everything can be done even with the engine installed, but then it is most convenient to carry out repairs on a pit or a lift.
So, after the pan cover is removed, you can take a 14mm socket with a wrench and unscrew the two nuts securing the connecting rod cover. This is shown more clearly below:
When both nuts are unscrewed, you can remove the cover by hand; it can usually be easily removed without any problems:
Then, with a certain force, you need to press the connecting rod bolt with your hand or even with the handle of a hammer:
Until the piston comes out from the back of the cylinder. It will roughly look like this:
This should be done quite carefully so as not to damage either the piston itself or the cylinder walls:
Next, you can begin to remove and replace the piston rings if the cylinders are not yet worn out. To do this, carefully pry the edge of the ring with your fingernail or finger and remove it from the piston groove:
And carefully turn the ring until it is completely free from the groove:
After all the rings, both compression and oil control, have been removed, you can measure the clearance by inserting them into the cylinder and inserting a feeler gauge into the hole between the two edges:
The nominal ring gap ranges from 0.25 to 0.45 mm. The maximum permissible gap at which it is necessary to urgently change the rings is 1.0 mm.
If the values exceed the nominal values, we replace the rings with new ones. After which you can install all the parts in the reverse order of removal. It is worth paying special attention that when installing the rings, their locks should be directed in different directions for greater tightness of the cylinder.
Changing the oil in the rear axle at the link.
Installation
Before installing new piston rings, you need to check the gap at their joints.
It is assumed that the gap between the ring and the landing groove area has already been checked and complies with the standards.
Arrange the pistons and connecting rod assemblies and new piston rings in such an order that the set of rings matches the given cylinder on which the joint clearance will be measured.
Insert the top ring into the first cylinder and push the piston bottom inward so that the ring inside the cylinder becomes perpendicular to its axis. The ring should be at the bottom of the cylinder, in a position corresponding to bottom dead center.
The gap at the piston ring joint is measured with a feeler gauge. Compare the result with the set value.
If the gap is larger or smaller than specified, repeat the measurement to ensure that the ring can be installed.
If the gap is too small, then it must be increased, since otherwise, during engine operation, the ends of the ring will close, which can cause serious damage. The gap at the piston ring joint can be increased by carefully filing the ends with a thin file. Clamp the file in a vice with soft jaws and carefully move the ring along it, removing excess material.
Piston markings
Calculator for calculating the working volume of an internal combustion engine
Calculator for calculating the cylinder displacement of a car engine
The marking of pistons allows us to judge not only their geometric dimensions, but also the material of manufacture, production technology, permissible installation gap, manufacturer's trademark, installation direction and much more. Due to the fact that there are both domestic and imported pistons on sale, car owners sometimes face the problem of deciphering certain designations. This material contains as much information as possible, allowing you to obtain information about the markings on the piston and understand what the numbers, letters and arrows mean.
1
— Designation of the brand under which the piston is manufactured.
2
— Product serial number.
3
- The diameter is increased by 0.5 mm, that is, in this case it is a repair piston.
4
— Value of the outer diameter of the piston, in mm.
5
— Thermal gap value.
In this case it is equal to 0.05 mm. 6
- Arrow indicating the direction of installation of the piston in the direction of movement of the machine.
7
— Manufacturer’s technical information (necessary when processing the engine).
Why does the gap between the piston and cylinder change?
Car designers strive for engine parts to operate in fluid friction mode.
This is a method of lubricating rubbing surfaces when, due to the strength of the oil film or the supply of oil under pressure and at the required flow rate, direct contact of the parts does not occur even under significant load.
On the subject: How to understand that the cylinder head gasket is broken
This state cannot always be maintained and not in all modes. Several factors influence this:
- oil starvation, the supply of lubricating fluid, as is done in the sliding bearings of the crankshaft and camshaft, under pressure into the area between the piston and cylinder is not carried out, and other lubrication methods do not always give a stable result; special oil nozzles work best, but for various reasons they put them up reluctantly;
- a poorly made or worn honing pattern on the surface of the cylinder, designed to hold the oil film and prevent it from completely disappearing under the force of the piston rings;
- violations of the temperature regime cause the thermal gap to zero, the disappearance of the oil layer and the appearance of scuffing on the pistons and cylinders;
- the use of low-quality oil with deviations in all significant characteristics.
It seems counterintuitive, but the cylinder surface wears more, although it is usually made of cast iron, a solid cast iron block or various dry and wet liners cast into the aluminum of the block.
Even if there is no liner, the surface of the aluminum cylinder is subjected to special treatment, and a layer of a special hard wear-resistant coating is created on it.
This is due to a more stable pressure on the piston, which, in the presence of lubricant, almost does not remove metal from it during movement. But the cylinder is subject to rough operation of spring rings with high specific pressure due to the small contact area.
This is interesting: How to check the camshaft position sensor DPRV
Naturally, the piston also wears out, even if this happens at a slower rate. As a result of the total wear of both friction surfaces, the gap continuously increases, and unevenly.
Information on the piston surface
Discussing the question of what markings on pistons mean, it is worth starting with what information the manufacturer puts on the product.
- Piston size . In some cases, in the markings on the bottom of the piston you can find numbers indicating its size, expressed in hundredths of a millimeter. Example - 83.93. This information means that the diameter does not exceed the specified value, taking into account the tolerance (tolerance groups will be discussed below; they differ for different brands of cars). Measurement is carried out at a temperature of +20°C.
- Installation gap . Its other name is temperature (since it can change along with changes in the temperature regime in the engine). Designated as Sp. It is given in fractional numbers, meaning millimeters. For example, the marking on the SP0.03 piston indicates that the gap in this case should be 0.03 mm, taking into account the tolerance range.
- Trademark . Or an emblem. In this way, manufacturers not only identify themselves, but also provide information to craftsmen about whose documentation (product catalogs) should be used when selecting a new piston.
- Installation direction . This information answers the question - what does the arrow on the piston point to? It “tells” how the piston should be mounted, in particular, the arrow is drawn in the direction of forward movement of the car. On cars where the engine is located at the rear, instead of an arrow, a symbolic crankshaft with a flywheel is often depicted.
- Casting number . These are numbers and letters that schematically indicate the geometric dimensions of the piston. Typically, such designations can be found on European machines, for which the piston group elements are manufactured by companies such as MAHLE, Kolbenschmidt, AE, Nural and others. To be fair, it is worth noting that casting is now used less and less. However, if you need to identify the piston using this information, then you need to use a paper or electronic catalog of a specific manufacturer.
VAZ pistons marking
According to statistics, owners or engine repair technicians of VAZ cars are most often interested in the marking of repair pistons. Below we provide information on various pistons.
VAZ 2110
For example, let's take the engine of a VAZ-2110 car. Most often, this model uses pistons marked 1004015. The product is produced directly at AvtoVAZ OJSC. Brief technical information:
- nominal piston diameter - 82.0 mm;
- piston diameter after first repair - 82.4 mm;
- piston diameter after the second repair - 82.8 mm;
- piston height - 65.9;
- compression height - 37.9 mm;
- The recommended clearance in the cylinder is 0.025...0.045 mm.
Additional information can be printed directly on the piston body. For example:
- “21” and “10” in the area of the hole for the finger - designation of the product model (other options - “213” indicates the VAZ 21213 engine, and for example, “23” - VAZ 2123);
- “VAZ” on the inside of the skirt is the manufacturer’s designation;
- letters and numbers on the inside of the skirt are a specific designation of foundry equipment (you can decipher it using the manufacturer’s documentation, but in most cases this information is useless);
- “AL34” on the inner side of the skirt is the designation of the cast alloy.
The main marking symbols applied to the piston crown:
- The arrow is an orientation marker indicating the direction towards the camshaft drive. On the so-called “classic” VAZ models, sometimes instead of an arrow you can see the letter “P”, which means “in front”. Likewise, the edge where the letter is depicted should be directed towards the direction of movement of the car.
- One of the following symbols is A, B, C, D, E. These are diameter class markers that show the deviation in the outside diameter value. Below is a table with specific values.
- Piston mass group markers. “G” is normal weight, “+” is weight increased by 5 grams, “-” is weight decreased by 5 grams.
- One of the numbers is 1, 2, 3. This is a piston pin hole class marker that determines the deviation in the diameter of the piston pin hole. In addition to this, there is a color designation for this parameter. So, the paint is applied to the inside of the bottom. Blue color - 1st grade, green - 2nd grade, red - 3rd grade. The following provides additional information.
For VAZ repair pistons there are also two separate designations:
- triangle - first repair (diameter increased by 0.4 mm from the nominal size);
- square - second repair (diameter increased by 0.8 mm from the nominal size).
Please note that for different brands of cars (including for different engines), the difference between repair pistons should be found in the reference information.
VAZ 21083
Another popular VAZ piston is 21083-1004015. It is also produced at OJSC AvtoVAZ. Its technical dimensions and parameters:
- nominal diameter - 82 mm;
- diameter after first repair - 82.4 mm;
- diameter after the second repair - 82.8 mm;
- piston pin diameter - 22 mm.
Piston repair: what you should pay attention to
Modern materials and technologies for manufacturing parts make it possible to operate the engine under very intense conditions. The maximum crankshaft rotation speed reaches one hundred revolutions per second. In this case, the piston and connecting rod reach a translational speed of up to 30 m/sec twice for each revolution (two hundred times per second). and the same number of times they come to a complete stop, causing huge cyclic inertial loads (the weight with such acceleration increases by more than a thousand times). Therefore, technologists try to make the piston as light as possible, making it from an aluminum alloy with a cast steel plate that compensates for thermal deformations. The piston has stiffening ribs and hard anodizing, up to the fire zone, which protects the bottom and the groove of the upper compression ring from burning out. Friction is reduced by the most advanced brands of oils with additives. But it is impossible to avoid wear, so periodically, after a certain mileage, the piston VAZ 2106 is replaced. It is better to do this when the first symptoms appear:
Operating a car with wear and tear can lead to damage that will require major repairs, which will increase the price many times over.
How to dismantle the piston yourself
First of all, it is necessary to thoroughly wash the engine, since after disassembly it will be difficult to prevent grains of sand and dirt from getting inside. The engine must be placed on a sturdy rack at a height convenient for work. Prepare rags, a set of tools and accessories:
- socket, ring wrenches and heads 10 mm., 12 mm., 13 mm., 14 mm., 17 mm., 19 mm., 22 mm., and wrench 36 mm.;
- a set of thin flat probes;
- bore gauge;
- micrometer;
- calipers;
- torque wrench;
- device for compressing rings on the piston;
- bushing for installing piston pins;
- gas-burner;
- hammer;
- core;
- portable lamp;
- large flathead screwdriver.
Tip: Before disassembling with your own hands, all parts are marked with a core, and a photo of the initial location is taken with the numbers and marks of the removable parts so that they can be installed in their place if they are suitable.
Disassembly sequence
- The engine with the head, pan and side covers removed is laid on its side to allow access to the pistons and connecting rods. Wrench 36 mm. the crankshaft is rotated to the position of maximum extension of the nuts of a pair of connecting rods.
- Using a head and a long wrench, you need to unscrew two nuts each, securing the connecting rod cap of the first and fourth cylinders, you can use any one, but it is more correct to follow the chosen sequence. By lightly tapping with a hammer, the cover moves out of place, allowing you to easily remove it from the studs. It is advisable to first familiarize yourself with the stages of work via video.
Tip: The caps and connecting rods form a pair; during their manufacture, the final boring of the mounting hole is done in assembled form, so they are marked with the cylinder number and cannot be replaced. You need to make sure that the numbers match when assembling and are directed in the same direction.
- Using the wooden handle of a hammer, resting against the pin, the connecting rod with the piston is pushed out through the upper plane of the cylinder block. The crankshaft is rotated to the maximum extension position of the nuts of the other two connecting rods. All four pistons are disassembled in the same way. The main bearings are unscrewed and the crankshaft is removed for visual inspection.
Attention: The main bearing caps are marked with marks; it is very important to place them only in their place, since they are not interchangeable; this is required by the boring technology and assembly instructions.
- The liners are removed from the connecting rods and covers. When repairing a VAZ 2106, the piston rings are replaced, starting with the upper compression ring, all the rings are sequentially removed from the pistons, and the piston pins are knocked out with a bushing. If possible, it is better to use a press. The parts and the block are washed with kerosene, blown with compressed air, the cooling and lubrication channels are purged.
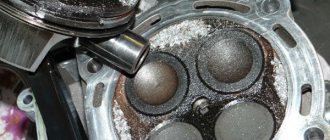
- Sanded surfaces are wiped and checked for damage. For inspection, a portable lamp is used, changing the angle of illumination to conveniently examine small scratches. Cracks are not allowed; if they are detected, defective parts will have to be replaced, including the block.
- Wear is measured using a bore gauge in four planes located from the top plane at a distance of 5mm, 15mm, 50mm. and 90 mm. In each plane, two measurements are taken in perpendicular directions.
Marking of ZMZ pistons
Another category of car owners interested in piston markings have ZMZ brand motors at their disposal. They are installed on GAZ cars - Volga, Gazelle, Sobol and others. Let's look at the symbols on their bodies.
The designation “406” means that the piston is intended for installation in the ZMZ-406 engine. There are two markings stamped on the piston crown. According to the letter painted on the new block, the piston is matched to the cylinder. When repairing with cylinder boring, the required clearances are made during the process of boring and honing for pre-purchased pistons with the required size.
The Roman numeral on the piston indicates the correct piston pin group. The diameters of the holes in the piston bosses, the connecting rod head, as well as the outer diameters of the piston pin are divided into four groups, marked with paint: I - white, II - green, III - yellow, IV - red. On the fingers, the group number is also marked with paint on the inner surface or on the ends. It must match the group indicated on the piston.
The group number should similarly be marked with paint directly on the connecting rod. In this case, the mentioned number must either coincide or be next to the number of the finger group. This selection ensures a situation where the lubricated pin moves with little effort in the connecting rod head, but does not fall out of it. Unlike VAZ pistons, where the direction is indicated by an arrow, on ZMZ pistons the manufacturer directly writes the word “FRONT” or simply puts the letter “P”. During assembly, the protrusion on the lower head of the connecting rod must coincide with this inscription (be on the same side).
There are five groups, with a pitch of 0.012 mm, which are designated by the letters A, B, C, D, D. These size groups are selected according to the outer diameter of the skirt. They correspond to:
The value of the piston group is stamped on its bottom. So, there are four size groups, which are marked with paint on the piston bosses:
- 1 - white (22.0000...21.9975 mm);
- 2 - green (21.9975...21.9950 mm);
- 3 - yellow (21.9950...21.9925 mm);
- 4 - red (21.9925...21.9900 mm).
Pin hole group marks can also be applied to the piston bottom in Roman numerals, with each digit corresponding to its own color (I - white, II - green, III - yellow, IV - red). The size groups of the selected pistons and piston pins must match.
The ZMZ-405 engine is installed on the GAZ-3302 “Gazelle Business” and GAZ-2752 “Sobol” vehicles. The calculated gap between the piston skirt and the cylinder (for new parts) should be 0.024...0.048 mm. It is defined as the difference between the minimum cylinder diameter and the maximum piston skirt diameter. There are five groups, with a pitch of 0.012 mm, which are designated by the letters A, B, C, D, D. These size groups are selected according to the outer diameter of the skirt. They correspond to:
- A - 95.488...95.500 mm;
- B - 95.500...95.512 mm;
- B - 95.512...95.524 mm;
- G - 95.524...95.536 mm;
- D - 95.536...95.548 mm.
The value of the piston group is stamped on its bottom. So, there are four size groups, which are marked with paint on the piston bosses:
- 1 - white (22.0000...21.9975 mm);
- 2 - green (21.9975...21.9950 mm);
- 3 - yellow (21.9950...21.9925 mm);
- 4 - red (21.9925...21.9900 mm).
Thus, if, for example, the letter B is written on the piston of a GAZ engine, this means that the engine has been overhauled twice.
It is clear that the piston should be as light as possible, stronger and change its shape as little as possible when heated and other influences.
Here is a typical portrait of a modern piston for a car or motorcycle engine. It (the piston) is cast from an aluminum alloy with the addition of silicon and when cold has an oval shape, so that when the piston is heated, due to the reasons mentioned above, it becomes closer to cylindrical. And in order to optimize the shape of the contact patch of the piston skirt with the cylinder, the profile of the piston skirt is made barrel-shaped - and with a margin so that the piston retains the shape of the barrel even in a hot state.
In addition, in order to minimize thermal deformation of the piston, steel, temperature-compensating inserts are poured into the piston body, which are designed to keep the boss area from excessive expansion. The main disadvantage of cast pistons is that the casting process is not free from a large percentage of technological defects; voids remain inside the metal of the future piston, and cracks occur. And the hardness of the alloy after casting and hardening is relatively low: 80 units on the Brinell scale.
Therefore, in order to maintain the required strength of the cast piston, its mass has to be increased. For example, a regular factory piston for a 16V VAZ engine, produced by casting in a chill mold, weighs 370 grams. Forged pistons have emerged as an alternative to factory cast pistons. In principle, it is more correct to call them stamped, because Pistons are produced not by repeated pressure treatment, but by a single treatment. The piston blank is placed in the matrix, pressed with a punch, and the semi-finished piston is ready. Naturally, it will acquire the final shape of the piston only after machining.
Pressure stamping of the piston makes it possible to strengthen the metal and at the same time make the piston much lighter, stronger, more reliable and durable. In this case, the problem arises of the impossibility (or rather, great difficulty) of pressing thermal compensating inserts into the piston and, as a result, the need for a more careful selection of the piston profile.
The raw material for the manufacture of forged pistons is high-silicon aluminum (silicon content 10-18%), subjected to preliminary deformation in the form of a rod that has been repeatedly drawn through dies. In the process of such broaching, the cross-section of the rod is reduced fourfold and at the same time the pores in the metal of the future piston are eliminated and its structure changes. The rod is cut and placed into blanks into a hydraulic press.
A force of 250 tons and a temperature of 500 degrees, maintained by an induction heating system, works wonders: the metal of the future piston, like plasticine, spreads between the matrix and the punch in a few seconds, taking the shape of the piston blank. Since the piston manufacturing process takes place at a constant temperature, it is called isothermal stamping. Constant heating plays a big role here, because if the temperature in the matrix zone drops, then the piston may be under-stamped and the metal will be unevenly distributed.
If the temperature rises, the aluminum of the future piston will simply begin to melt. As a result of isothermal stamping from pre-deformed metal and a subsequent cycle of hardening and mandatory aging, a blank is obtained for a future forged piston with high mechanical characteristics - hardness of 130 units and the absence of technological defects such as cavities, cavities and cracks. The set of molded pistons of the “Tuning” version weighs 50 grams lighter compared to standard, factory VAZ pistons.
“Revolutionary” in national racing classes was the transition to pistons with 2 rings, without a middle ring. At the same time, due to the simultaneous change in the piston profile, there was no noticeable increase in oil consumption.
Toyota pistons markings
The pistons on Toyota engines also have their own designations and sizes. For example, on the popular Land Cruiser, the pistons are designated by the English letters A, B and C, as well as numbers from 1 to 3. Accordingly, the letters indicate the size of the hole for the piston pin, and the numbers indicate the size of the piston diameter in the “skirt” area. The repair piston has +0.5 mm compared to the standard diameter. That is, only the letter designations change for repair shops.
Please note that when purchasing a used piston, it is necessary to measure the thermal gap between the piston skirt and the cylinder wall. It should be within 0.04...0.06 mm. Otherwise, it is necessary to carry out additional diagnostics of the engine and, if necessary, carry out repairs.
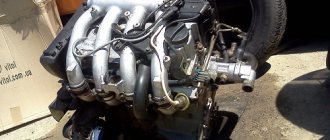
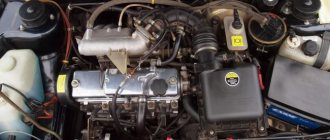
How to remove the cylinder head?
- First of all, it is necessary to immobilize the car. Wheel chocks are installed under the wheels, and the gearshift lever is set to the “first gear” position. Open the hood of the car and find the location of the cylinder head.
- First, all parts that interfere with free access to the head are removed. These can be: an air filter, a carburetor (or injector), “pants”, as well as various cables, pedal drives and electrical sensor wiring. The spark plugs are unscrewed from the cylinder head and, if necessary, the distributor is removed.
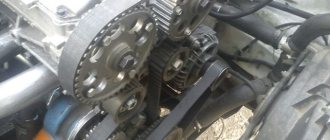
- Drain the engine oil and coolant. Open the timing cover and remove the belt. This is necessary in order to free the camshaft. After this, unscrew the nuts securing the cylinder head cover and remove it along with the gasket. It is recommended to install a new gasket before assembly.
- Now you can proceed directly to dismantling the cylinder head. Unscrew the special fastening bolts and remove the head along with the gasket. After this, you will have open access to the cylinder block.