Do-it-yourself replacement of front pads on a Toyota Corolla
The pads located on the front wheels wear out faster than the rear ones, so if you hear a clear squeaking noise during braking, you should understand that this is a sign of wear.
The sequence of actions will be as follows:
- Place the Corolla on a jack and remove the front wheel;
- Unscrew the upper and lower bolts by 14, holding the pad support;
- The free end of the caliper is brought out, and it is worth paying attention to the fact that there is no tension in the hose;
- It is necessary to remove the pads on both sides. If they are strongly welded on both sides, you can use a screwdriver, but do not use excessive force.
After this, the installation process is performed in reverse order.
Installing new pads
As in the case of changing a wheel, you must first, without using a jack, loosen the wheel nut, then lift the car and slowly carefully remove the wheel. In my case, this is a double procedure, since I changed the pads on two wheels at once.
Installing new pads
When the wheel has already been completely removed, you need to use a wrench (preferably using a socket and a wrench) to unscrew the lower guide in the caliper. You don't have to touch the top guide at all. Firstly, if you unscrew it, you still won’t be able to remove the pads. Secondly, it is better not to unscrew two guides at the same time. Once the bottom guide is unscrewed, you can move the bracket up and remove the old pads.
Installing new pads
When buying new pads through the officials, I was advised to immediately buy plates on them, which prevent the appearance of unpleasant squeaks. They are on all the pads, but I didn’t want to remove the old ones and use them.
If it is not possible to buy new plates, you can leave the old ones. You just need to clean them well with a metal brush, and then put them on new pads. In general, I was lucky, they advised me to buy them along with a set of new pads. And it’s quite difficult to find them on sale now.
After installing the plates, you need to recess the brake cylinder rod. I did this with a regular pry bar, but, in principle, this can be done with any other tool that is suitable in thickness.
Installing new pads
IMPORTANT! It should be taken into account that if you recess the rods of two cylinders at once, the amount of brake fluid in the expansion tank may slightly increase. Some car owners sometimes even drain the brake fluid completely, but I didn't do that.
The places where new pads will be installed must also be thoroughly brushed to remove dirt and rust. After fixing the new pads, you need to assemble everything in the reverse order: fix the pad with brackets, tighten the lower guide, put the wheel in place.
Installing new pads
Replacing brake fluid on a Toyota Corolla
Every car owner can say with confidence that the fluid in the brake system is one of the important elements in the safety of the car, on the correct functioning of which much depends.
The purpose of this system is to slow down or completely stop the car, and its replacement can be done along with replacing the brake pads.
Brake fluid change frequency
Most often, the frequency of changing the fluid in the braking system will depend on how fast the car travels a certain number of kilometers. You can clarify this quantity by looking at the technical documentation for the machine. If we talk about Toyota Corolla, then this should be done every 40-50 thousand kilometers traveled.
The reason for the replacement is its increased hygroscopicity, that is, the ability to absorb moisture from the air. This causes the boiling point of the liquid to decrease. For example, only 3% liquid in the composition is enough to lower the boiling point by 30 degrees.
Replacing brake pads on a 2008 Toyota Corolla
One of the most important safety elements in a car is its braking system.
The life and health of people, as well as the safety of the vehicle itself, depend on the quality of its work. The system's job is to effectively reduce the speed of the car after it accelerates.
In this article we will talk about how to replace brake pads on a 2008 Toyota Corolla.
Every driver knows that it is the pads that perform direct braking. This occurs by pressing them against the brake disc of each wheel individually. Constant friction gradually destroys the working brake material of the pads and over time they become unusable, ceasing to perform their function efficiently.
Which ones to choose?
Today there are many different manufacturers. The highest quality pads are produced by Germany, France, Spain and Japan. In addition to the manufacturer, it is important to choose the right size pads for your wheel caliper.
Like any spare part, they are divided into: original and non-original. It's your choice here. The original lasts significantly longer than the non-original. The price of such pads is usually twice as high.
In general, as always, it’s up to you to decide whether to choose the quality or cost of the product.
Step-by-step instructions for replacing pads
Before starting work, you need to prepare your workplace - this is necessary if you are afraid of getting dirty. We lay a blanket in front of the wheel and wash the disk. After this, you need to jack up the car on the side where we will change the block. We unscrew the wheel we need and begin direct work with the brake system.
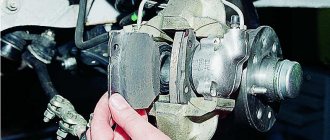
First of all, we need to unscrew the bolt holding the caliper using a suitable wrench. The photo clearly shows the location of the bolt that needs to be tightened.
Having unscrewed the bolt holding the caliper, lift it up and, for ease of work, tie it to the body with wire. The photo shows how everything needs to be done.
After this, you need to press in the brake piston. This must be done first of all to apply heat-resistant lubricant. For this we used a clamp. In the photo below everything is visible and clear.
After the piston has been pressed in, we need to press out the brackets with a screwdriver. We perform the following actions: press the bracket - pull the block towards you.
So we pulled her out. Let's pay attention to what it looks like and what components it consists of. The photographs will show the general view, as well as the disassembled block. Brackets will also be shown. The photos are signed.
Having disassembled it, let's see how worn it is. The block we pulled out could travel about another 20 thousand km. Below is a photo in which there are two of them - new and old.
- After we have compared them, we take a new one, lubricate it with heat-resistant paste - exactly as shown in the picture, and also lubricate the cylinder and brackets.
We put everything back together and put everything in its place. We assemble the caliper and install the wheel in its place. Work with one wheel is finished - you can move on to the next one.
Drum brake pads - removal and installation
Attention! Drum brake pads are replaced as a set on both wheels. Dust generated during the operation of machinery may contain asbestos, which is hazardous to health. Do not use compressed air to blow it away or inhale it. When working on the brakes, wear a respirator. Do not wash mechanisms with petroleum-based solvents - there are special liquids for this.
Warning. Whenever you replace the pads, you should also replace the spring clamps (“soldiers”). When heated during operation, the springs lose their elastic properties, stop fixing the pads, and the pads rub against the drums, leading to their premature replacement.
1. Loosen the wheel nuts, raise the rear of the vehicle and install secure safety stands. Wedge the front wheels to prevent the car from moving off the supports.
2. Release the parking brake.
3. Remove the wheel.
Note. All four rear brake pads should be replaced at one time, but to avoid mixing up the parts, work on each brake unit in turn.
4. Follow the instructions in the illustrations in fig. 6.4,a-d.
Rice. 6.4,a. Apply relative position marks on the drum and hub so as not to disturb the dynamic balance of the drum during installation
Rice. 6.4, b. If the brake drum is stuck on the brake pads due to excessive wear, remove the plug from the drum, pull the automatic adjuster lever with the hook and, turning the ratchet wheel of the adjusting bolt with a screwdriver, spread the pads
Rice. 6.4, c. Exploded view of a drum brake assembly
Rice. 6.4, g. Before disassembling, always wash the brake assembly with a special brake cleaner and then allow it to dry (hub assembly removed for clarity)
Rice. 6.4, d. Unhook the return spring hook from the hole in the front block
Rice. 6.4, f. Remove the front pad pressure spring with a special puller by squeezing it and then turning it 1/4 turn
Rice. 6.4, g. Remove the front block and disconnect the tension spring hook from the rear block
Rice. 6.4, h. Remove the rear pad pressure spring
Rice. 6.4, i. Pull back the parking brake lever spring and disconnect the cable end, then remove the rear shoe assembly
Rice. 6.4, n. Unhook the return spring hook from the rear shoe, then remove the spring and automatic adjuster assembly
Rice. 6.4, l. Unhook the automatic regulator spring hook from the block
Rice. 6.4, m. Disconnect the automatic adjuster lever end from the rear shoe assembly.
Rice. 6.4, n. Unclamping, remove the split washer - clamp and disconnect the automatic regulator lever from the rear block
Rice. 6.4, o. After pressing, remove the lock...
Rice. 6.4, p. and disconnect the drive arm
parking brake from the rear shoe
Rice. 6.4, r. Drive the pin out of the old rear block...
Rice. 6.4, p. and install it on the new rear
block
Rice. 6.4, vol. Install the parking brake lever onto the pin and secure the new clamp...
Rice. 6.4, y. then install the lever on the pin
automatic regulator and secure a new split washer-retainer
Rice. 6.4, f. Connect the tip of the automatic regulator to the rear block
Rice. 6.4, x. Engage the auto adjuster spring
Rice. 6.4, c. Screw the adjusting screw into the end of the automatic regulator, then hook the return spring into the hole in the block
Rice. 6.4, h. This is what the assembled rear brake pad/automatic adjuster assembly looks like from the outside
Rice. 6.4, w. View of the assembled rear brake shoe/auto adjuster assembly from the inside
Rice. 6.4, sch. Apply high-temperature grease to the friction surfaces of the brake shield
Rice. 6.4, e. Connect the cable end to the parking brake actuator lever...
Rice. 6.4, south. then install on brake
shield rear block assembly and pressure spring with holder
Rice. 6.4, i. Hook the tension spring hooks into the holes of the front and rear pads
Rice. 6.4,aa. Install the front block and the pressure spring with the holder on the brake shield
Rice. 6.4,bb. Hook the return spring into the hole on the front pad
Follow the order of actions in accordance with the numbering of the illustrations. Note. If the brake drum does not come off the axle and shoe assembly, make sure the parking brake is fully released. If the drum cannot be removed even now, you need to separate the brake pads. This is done as follows: remove the plug from the drum, then, inserting the tools into the hole, use a suitable hook to remove the automatic regulator lever, and use another screwdriver to rotate the ratchet wheel (wing) of the adjusting bolt, thus moving the shoes away from the drum (see Fig. 6.4, b ). The drum should now come off easily.
5. Before installing the drum, make sure there are no cracks, nicks, deep grooves on the working surface, rust, or overheated areas of metal that reveal themselves as tarnished colors. If the defects cannot be eliminated with fine sandpaper, the drum can be sent to the workshop for grooving, if after grooving its dimensions can meet the requirements of the Specifications.
Note. Professionals recommend grooving the drum in any case (if, of course, it is even possible and advisable), regardless of the depth of the scratches - this will eliminate possible beating, pedal pulsations, etc. At worst, you can mat the working surface of the drum with fine-grained sandpaper rotational movements. The maximum inner diameter of the drum is stamped on its surface (see Fig. 6.5).
Rice. 6.5. The maximum inner diameter of the drum is usually stamped on its surface
6. Install the drum onto the hub flange. Using a screwdriver inserted into the drum adjustment hole (see Fig. 6.4, b), rotate the adjuster thumb until the shoes block the rotation of the brake drum, then rotate the thumb in the opposite direction until the shoes no longer block the rotation of the drum. Reinstall the plug.
7. Install the wheel and tighten the nuts. Lower the car and tighten the wheel nuts to the torque prescribed in the Specifications of Chapter 1A or 1B.
8. Roll the car forward and backward several times, braking it with the parking brake. This will adjust the clearance in the rear brake mechanisms and the normal travel of the brake pedal.
9. Before starting to operate the car, carefully check the operation of the brakes on a desert road. At first, avoid sudden braking - let the pads get used to the drum.
Signs that your e 150 needs to be replaced
You can understand that the disks need to be changed by the presence of the following signs:
- The wheels begin to beat.
- During braking, the car begins to pull away from the straight path.
- When braking, a knocking or extraneous grinding noise is heard.
The official manufacturer recommends changing brake discs after the second replacement of the pads, but as a rule, Toyota Corolla front brake discs are changed between 100-130 thousand kilometers. It is also recommended that before changing them, take a measurement, which should be:
- The front ones are at least 23 millimeters.
- The rear ones are about 8 millimeters.
After the measurements, you can decide whether to replace the TD.
How to replace a Toyota Corolla brake disc: do-it-yourself repairs
The ninth generation sedan Toyota Corolla E120 series in a short period of time from 2000 to 2007 was able to become one of the most popular models ever produced by the Japanese company.
Affordable price, excellent driving performance and, most importantly, safety - all this was also appreciated by domestic motorists.
You can already buy the eleventh generation of Corolla in showrooms, but not everyone wants to part with the proven ninth generation cars.
During the entire period of operation of the 120 series, many car enthusiasts were able to master techniques for eliminating simple breakdowns, which do not happen very often, but, unfortunately, do occur. An operation such as replacing a Toyota Corolla brake disc does not pose any particular problems for a driver who knows how to use keys and is interested in the structure of the car.
General information about the Toyota Corolla brake system
The machine is equipped with a hydraulic dual-circuit system, which is divided into front and rear wheels. The main cylinder has two tanks that supply both circuits with liquid; if one of them fails, the second will work. Installed brakes vary and are divided into:
- front – disc;
- rear - drum-disc.
When should brake discs be replaced?
The timing of replacement can be determined while driving; they are expressed in the following signs:
- wheel runout;
- car leaving a straight path when braking;
- extraneous knocking or grinding noise.
The manufacturer recommends installing a new part after replacing the second set of pads. Despite this, you should still carry out a preventive inspection and measure the thickness of the unit so as not to miss replacing faulty Toyota Corolla brake discs and not get into a difficult situation on the road. The company determined the following indicators for these nodes :
- for rear TDs, the minimum thickness is 8 mm;
- for front TDs the minimum thickness is 23 mm.
Algorithm for replacing front brake discs of Toyota Corolla E120
To carry out the work you need to prepare the appropriate tool :
- a set of keys;
- jack and wheel wrench;
- stand;
- thrust shoes;
- special lubricant;
- wire.
Now you can proceed directly to the operation.
So, point by point:
- Pump out the fluid from the brake master cylinder reservoir.
- Secure the vehicle with shoes, jack up the desired side, install a stand and remove the wheel.
- Unscrew the lower caliper bolt, lift it up and tie it with wire.
- Remove the pads and unscrew the second caliper bolt and disconnect it from the bracket.
- Turn the steering wheel in the direction of work and unscrew the two bolts of the caliper bracket and remove it.
- Screw two M8 bolts into the special holes for dismantling until the disk is removed.
- Install a new disc and caliper bracket.
- Lubricate the guide bolt.
- Press in the piston of the brake cylinder and install the caliper.
When replacing brake discs on a Toyota Corolla, some drivers try to save money and not change the pads. This is an extremely frivolous act, because old pads have an uneven surface that matches the profile of the removed disc. Next, it’s easy to guess what will happen to the new part - it will also have uneven production.
Features of changing the rear discs of the Toyota Corolla brake system
This procedure is similar to that described above, with the exception of some points. Here they are:
- Release the handbrake.
- Before dismantling the disc, bring the handbrake pads together with a screwdriver.
- After replacing the pads, first spread them until there is no rotation, and then close them a little until they rotate freely.
After carrying out the work, it is necessary to fill in new fluid and bleed the hydraulic system. And remember, brakes need to be given special attention and kept in working order throughout their entire service life.
Source: https://autoclub.su/zamena-tormoznogo-diska-korola/
How to change the front ones
- The front brake pads are very easy to change. The second time, the procedure will take you no more than 10 minutes per wheel. We install chocks under the wheels and put the car on the handbrake. Turn the wheel on which you will change the pads outward, this will make it easier to work with the caliper. Step 3 Step 2 Step 1
- Using a 12-mm open-end wrench or socket, loosen the top bolt and completely unscrew the bottom one. Now you can “open” the caliper upwards and gain access to the pads.
Open the caliper
- To remove the cover, push it to the side and then pull it towards you. Installing it backwards should not cause any problems; there are special clamps there.
Clamps will help with adjustment
They do not allow the overlays to be placed incorrectly.
New consumables in place
- To get the caliper into place, press out the brake cylinder using a wrench or pry bar. On some machines this can even be done by hand.
Release the brake cylinder
- All that remains is to tighten the two mounting bolts, put on the wheel, and you are good to go.
If you have any questions, watch the video.
How to replace: video guide
As you can see, disc brakes are much easier to change than drum brakes. Their braking efficiency is relatively the same, but drum brakes are prone to overheating (but their service life is 2-3 times longer).
How to change rear brake pads
The rear brake system of the Toyota Corolla can be disc or drum. Their replacement process is significantly different. Drum brakes were most often installed on American cars. Let's start with a simpler option - replacing disc brake pads. Don’t forget about safety, put chocks under the remaining wheels, and place what you removed under the bottom of the car.
Disc brakes
- To access the pads we need to remove the top part of the caliper. It is held in place by only two bolts on the reverse side.
Hold the caliper and unscrew the mounting bolts
Unscrew them without allowing the guides to turn.
Use a second wrench to secure
Pull up the released part
Old pads can be pulled out by hand. If they don’t “go”, then help yourself with a screwdriver.
Recess the plate deep for secure installation
The block with the tin plate should be on the inside. This bar serves as a wear indicator. When the friction material wears away, it rubs against the disc and makes a loud squeaking sound.
The tin plate must be inside the mechanism
Screw in the cylinder with pliers, round nose pliers will also work
When the top part is in place, all that remains is to fasten it with two bolts, and the procedure is over.
If you have any questions, watch the video version of replacing rear disc pads on a Toyota Corolla.
Video on work to help beginners
Drum brakes
- The service life of drum brake pads is much longer than that of disc brake pads (100–120 thousand km). But changing them is much more difficult. During operation, the drum gets stuck, and removing it from its “home” place can be difficult. There are two threaded holes for removal. You need to screw the bolts into them and rotate them until the disk “breaks off”. Do not allow it to skew, otherwise it may jam even worse.
Remove drum brakes using bolts
Useful tips
- If the cylinder is pressed in very poorly, then remove the brake fluid reservoir cap. This will reduce the pressure in the system.
- When the drum does not “want” to be removed using the bolts, tap it evenly with a hammer. Be sure to use a wooden spacer (block, board) to avoid damaging the disc. Applying WD-40 to the joints will also help.
- If the caliper guides do not move well, lubricate them with graphite lubricant.
With these instructions, you will independently change the pads on a Toyota Corolla with any type of brake system. With drums, of course, you will have to put in more effort, but you need to do this less often. The main thing is to take your time and thoroughly clean all brake components during the replacement process.
Replacing brake pads Toyota Corolla detailed instructions, many photos
Replacing Toyota Corolla brake pads is usually required after 30-50 thousand mileage. Such a large range is associated with a large number of factors, ranging from driving style to the condition of the brake disc.
The front brake design of the Toyota Corolla is a disc mechanism with automatic adjustment of the gap between the pads and the disc with a movable caliper. A single-piston working brake cylinder is mounted on a movable bracket. The shoe guide is attached with two bolts to the steering knuckle. The movable bracket is bolted to guide pins installed in the shoe guide holes.
The guide pins are lubricated with grease and protected by rubber covers. A piston with an o-ring is installed in the cavity of the cylinder of the movable bracket. Due to the elasticity of this ring, an optimal gap is maintained between the pads and the ventilated disc, the surface of which is protected by the brake shield.
Naturally, replacement of Toyota Corolla pads must be carried out on both wheels at once; when replacing brake discs, the pads also require replacement. The process of replacing pads on a Toyota Corolla is not much different from the same procedure on other similar cars, although it has its own characteristics.
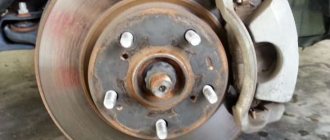
We hang up the front of the car and remove the wheel. By inserting a mounting spatula or a screwdriver with a wide blade between the pad guide and the caliper and resting it on the guide, we move the caliper, recessing the piston into the cylinder. This will help us remove the old pads more easily.
Using a spanner or socket, unscrew the lower bolt securing the caliper to the guide pin while holding the nut with another wrench. Raise the caliper by turning it around the axis of the upper guide pin. We remove the pads from their guide.
Remove the two spring clamps of the pads. Using a metal brush, we clean the pad seats in their guide from dirt and corrosion. Before installing new pads, we check the condition of the protective covers of the guide pins. We replace the torn or lost elasticity cover.
To do this, remove the finger from the hole in the pad guide and remove the cover.
Before installing the pin, put a little grease (special high-temperature grease for brake pins) into the hole in the pad guide and apply a thin layer of lubricant to the surface of the pin. If your finger is covered with rust, be sure to clean it.
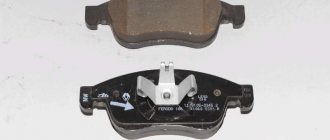
Another important point is the mandatory lubrication of the plate (which is placed on the block and covered with an overlay) with a special heat-resistant lubricant. Original pads come with lubricant included. Next in the photo you can see this plate, which is designed to prevent the pads from squeaking when braking.
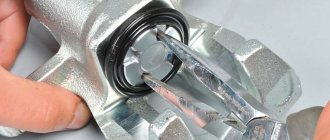
Before installing new brake pads, it is necessary to move the piston as far as possible into the cylinder. To do this, use sliding pliers to press the piston into the cylinder.
We install new Toyota Corolla brake pads into the pad guide and lower the caliper. Now we screw the lower finger. After assembly, be sure to press the brake pedal several times so that the pads take their working position.
Replacing the rear pads of a Toyota Corolla with disc brakes
Replacing the rear pads of a Toyota Corolla is required about half as often as replacing the front pads. That is, 70-80 thousand mileage for the rear pads of Toyota Corolla is normal. The disc brake mechanism of the rear wheels of the Toyota Corolla has a similar design as the front brakes. The brake pads are actuated by a single hydraulic wheel cylinder. The optimal clearance between the disc and pads is maintained according to the same principle as for the brake mechanisms of the front wheels. In addition, the rear brakes also perform the additional function of a parking brake (handbrake).
The process of replacing rear disc brake pads on a Toyota Corolla is not complicated; you can carry out the replacement yourself. Instructions below.
What problems might arise?
If you act strictly according to the instructions, then no nuances should arise. At least, it definitely didn’t happen to me. But, as practice shows, problems can still arise.
Most often, car enthusiasts face the following consequences after their work:
- brake pads are covered in grease:
- the brake disc overheats;
- there is uneven contact with the brake pad;
- there is a brake fluid leak;
- the brake system pipe is clogged;
- air gets into the brake system;
- rapid wear of the brake pedal return spring is observed;
- the return channel of the main brake cylinder is clogged;
- the correct operation of the pressure regulator, etc. is disrupted.
Moreover, often these problems can lead to re-jamming of the wheels, and subsequent replacement of the pads.
High temperature lubricant for brake service
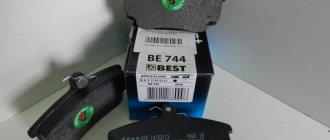
I spent a long time searching and reading about lubricants for brake system elements. Many people unknowingly lubricate the guides with the grease that comes with the brake pads, but it is intended for completely different purposes, and is not intended for the temperatures at which the caliper guides operate. And in the end I purchased for existential testing: Vmpauto 1502 Lubricant for calipers, universal “Ms 1600” costing 312 rubles 82 kopecks. The tube is 50 grams, although you could take 100 grams at once, the difference in price is not significant.
What is needed to replace brake pads?
If you don’t have the opportunity (or finances, as in my case) to put your car in the hands of service station specialists, you can try to fix the problem yourself. Moreover, as it turned out, replacing brake pads on a Toyota Corolla is not such a difficult undertaking.
Changing pads on only one wheel is not in my rules. I decided to take a professional approach to solving the problem: I bought new pads for the two front wheels, and, based on the material that I read on the forums, I decided to carry out the procedure for replacing them myself.
I’ll say right away that I didn’t prepare all the necessary equipment. Therefore, anyone who will be replacing brake pads should immediately prepare:
- jack;
- mount;
- a set of wrenches (a set of standard sockets with an adapter);
- a regular metal brush.
Verdict
When you install new pads, the most important thing is not to confuse where is up and where is down. The pads are placed with the bevel up, and not vice versa!
In general, replacing brake pads is not a difficult task. I spent about 40-50 minutes on everything (taking into account the time for smoking breaks).
Be sure to press the brake pedal several times after assembling the wheel. When pressed for the first time, the pedal may “fail”. There is no need to be afraid of this. This is explained by the fact that the caliper moves the piston and pads to their usual places after removal.
The first time I drove with the new brake pads, I felt that the braking efficiency was somewhat reduced. But, as I was told at the service station, this is quite normal, since they just need to “get in”. After a couple of days, either the pads got used to them, or I had already gotten used to them.
Sources
- https://toyota-cars.info/2021/05/31/kolodki-toyota-corolla/
- https://motorltd.ru/kak-samostoyatelno-smenit-kolodki-na-toyote-korolle/
- https://nissan-modus.ru/shiny/kolodki-i-diski-na-tojota-korolla-150-zamena.html
- https://mymirtoyota.com/zamena-tormoznyx-kolodok-na-toyota-corolla.html
- https://VmyatynNet.ru/korolla/zamena-perednih-kolodok-tojota.html
- https://CarForDrive.ru/ford-fokus-2/tormoznaya-sistema/zamena-tormoznyh-diskov-na-tojota-korolla
[collapse]
Description of replacing calipers on Corolla 150
you can replace the calipers on your Corolla 150 by following the instructions below.
- Raise the car.
- We remove the wheel.
View after removing the wheel
- Turn the steering wheel fully. This will make removing the caliper easier.
- Clamp the brake line hose to prevent fluid leakage and ventilate the system.
- Unscrew the caliper holder.
- Install in the reverse order of removal.
Sources
- https://motorltd.ru/kak-samostoyatelno-smenit-kolodki-na-toyote-korolle/
- https://g-light-auto.ru/shiny/kolodki-i-diski-na-toiota-korolla-150-zamena.html
- https://sis26.ru/zamena-perednih-tormoznyh-kolodok-toyota-corolla/
- https://razborov.net/toyota/kolodki-diski-supporta-toyota-corolla-150-3.html
- https://VmyatynNet.ru/korolla/zamena-perednih-kolodok-tojota.html
- https://LocalCargo.ru/servis-i-tyuning/zamena-perednih-kolodok-tojota-korolla.html
- https://CarForDrive.ru/ford-fokus-2/tormoznaya-sistema/zamena-tormoznyh-diskov-na-tojota-korolla
- https://zapchasti.expert/toyota/corolla-150/kolodki-diski-supporta.html
- https://igor-somov.ru/otzyvy/tormoznye-diski-tojota-korolla-2014.html
- https://toyota-navi.ru/toyota-corolla/zamena-perednih-tormoznyh-kolodok-tojota-korolla-150.html
- https://moto163.ru/ts-i-tyuning/zamena-kolodok-korolla-150.html