Published: 01/28/2021
- Introduction to the topic
- Checking the pump's functionality
- The dangers of losing weight quickly
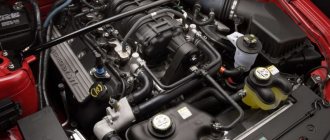
- injector and carburetor - Auto-Self.ru
- For what reasons does gasoline not flow into the carburetor?
- Post navigation
- Video - car won't start
- What does Gepatrombin ointment (suppositories) help with? Instructions, prices and reviews
- Repair of diesel engine power supply system
- Checking and adjusting the carburetor
- Gabapentin tablets: instructions, reviews, analogues and prices
- For what reasons is fuel not supplied to the cylinders?
- Why isn't fuel getting into the carburetor? Main causes and methods of troubleshooting
- Reasons leading to engine oil foaming
- Electroneuromyography (ENMG) what is it and how is it performed?
- Why is fuel not getting into the cylinders? 4 reasons
Checking the pump's functionality
After this, you should check whether the pump is supplying gasoline. To do this, just unscrew the clamp securing the supply pipe from the fuel pump to the carburetor, lower the end of the pipeline into a container and make sure that the pump pumps. Some fuel pumps have manual pumping, so checking is easy.
But there are also pumps that do not have this function. In this case, you will have to check the operation of the unit with a starter (when the crankshaft rotates, the starter also activates the pump). If uniform streams of gasoline come out of the pipe, in which no air bubbles are visible, then this is an indicator of the serviceability of the gasoline pump, as well as the fuel lines leading to him. And this already narrows the circle of searches, since problems that arise in the area from the tank to the pump are eliminated.
Why does gasoline leave the carburetor?
Gasoline evaporates
from
the carburetor
through the balancing channel.
It goes into the air filter and from there into the atmosphere. carburetors
with balancing channels do this The fuel pump plays an important role in correcting this.
Interesting materials:
How to plant daylilies correctly? How to plant muscari correctly? How to plant an orchid without roots? How to properly plant an aloe shoot? How to plant primrose from seeds correctly? How to plant Rogersia correctly? How to plant rose seedlings correctly? How to plant gloxinia seeds correctly? How to plant flytrap seeds correctly? How to plant sleep grass seeds correctly?
injector and carburetor - Auto-Self.ru
Let's start with the fact that during the operation of the car, drivers quite often encounter the fact that the engine does not start, runs intermittently, or suddenly stalls. In this case, diagnostics usually affect the ignition system (on gasoline cars) and the power system.
As practice shows, unstable operation of the power unit on gasoline cars is in many cases due to the fact that gasoline is not supplied to the engine. In this article we will talk about why this happens, as well as what the driver should do if there is no gasoline entering the engine.
For what reasons is fuel not supplied to the cylinders?
So, the general scheme of operation of the power system involves taking fuel from the gas tank, after which the fuel enters the carburetor or injector.
Next, the fuel is supplied to the intake manifold, then the fuel-air mixture enters the combustion chamber through the intake valves.
It becomes clear that if gasoline does not flow into the engine, then this problem occurs both on engines with a carburetor and on injection internal combustion engines. The simplest reason can be considered a lack of gasoline in the tank or damage to the fuel lines. In other words, we are talking about leaks as a result of any damage to the tank or fuel lines, when gasoline leaks out before it gets into the cylinders.
Common problems with the supply of gasoline to the internal combustion engine
If we exclude leaks, the next reason why gasoline is not supplied to the engine is various problems with the fuel pump. Note that on cars with a carburetor there is a mechanical type fuel pump and is located in the engine compartment.
At the same time, injection engines have an electric fuel pump. This pump is located directly in the fuel tank. If we talk about a mechanical device, then often its breakdown or incorrect operation results from damage to the membranes, as well as overheating.
The electric fuel pump usually fails in cases where it operates with a minimum amount of fuel in the tank. The fact is that cooling of this type of pump occurs precisely due to fuel. You should also highlight problems with the fuel pump relay or a break in the wiring through which it is supplied with electricity.
Let us add that if the device is not able to create the required pressure in the fuel system (no or low pressure), then the injectors on some internal combustion engines may not open, and in this case the engine will not start. In other cases, the injectors still open, but there is still not enough fuel. In this case, the unit begins to work intermittently, stalls in different modes, etc.
At the initial stage, it is necessary to measure the fuel pressure in the fuel rail of an injection engine, while at the same time not forgetting about possible problems with the pressure regulator in the rail.
Another problem that prevents fuel from getting into the engine cylinders is dirty fuel system filters. In addition to the usual fuel filter, the injector also has a fuel pump mesh, and in the event of severe contamination of the fuel pump mesh filter, the performance of the device drops noticeably.
If the fine fuel filter becomes dirty, then the flow of fuel into the engine can be completely blocked. As for the carburetor, these cars also have a fuel filter, which is usually installed in front of the carburetor. If the filter element becomes clogged, then difficulties begin with starting the engine and supplying fuel in different modes.
To avoid the above problems, filters must be changed promptly on both carburetor and injection engines. You also need to remember that the filter mesh on the fuel pump needs to be periodically cleaned or completely replaced with a new one every 50-60 thousand km. mileage
The list of possible causes of a malfunction in the fuel supply to the engine ends with contamination of the carburetor or injection nozzles, as well as failure of individual elements. As a rule, the jets in the carburetor can become clogged, and the nozzles in the injectors are subject to contamination. Debris and deposits may also partially or completely block thin channels, etc.
To prevent this from happening, the injector must be periodically cleaned using one of the available methods (ultrasound, special cleaners on a bench, etc.). It should also be added that the carburetor may require cleaning, repair or separate tuning. For example, an insufficient amount of gasoline in the float chamber will result in insufficient fuel for normal operation of the internal combustion engine.
Telegram
We'll tell you and teach you
If the injection engine stops starting, you should not turn it with the starter for a long time, discharging the battery to zero.
It is better to immediately move on to troubleshooting. For stable and trouble-free operation of the engine, a certain amount of high-quality combustible mixture prepared from gasoline and air must enter its combustion chamber.
To ignite this combustible mixture, a spark discharge must appear in the combustion chamber strictly at specified time intervals.
That is why self-diagnosis of a car engine consists of checking the flow of fuel into the cylinders and the presence of an electric spark on the spark plugs.
Is fuel getting to the cylinders?
If the sensor arrow shows that there is gasoline, check whether fuel is entering the combustion chamber. After turning the engine with the starter for 5-6 seconds, turn off the ignition, disconnect the high-voltage wire and unscrew the spark plug.
The wet end of the spark plug (where the side and center electrodes are located) will indicate that gasoline is entering the cylinders.
If you cannot find any remaining fuel on the spark plug, proceed to search for the link where the flow of gasoline stops.
Check if fuel is being pumped into the ramp. After turning the engine with the starter for a few seconds, turn off the ignition and quickly disconnect the inlet gasoline hose leading from the fuel tank from the fuel rail fitting.
Be careful! If the fuel pump is working, you are guaranteed to be doused with gasoline, so cover the fitting from yourself with at least the palm of your other hand. To avoid fuel ignition, do not perform this test on a hot engine.
If the engine was not going to pour fuel on you, then there is no gasoline in the fuel line or it is supplied, but under insignificant pressure.
What to do next? Check the fuel pump. It could either fail completely or not start working due to a blown fuse.
The reason for the low pressure created by the fuel pump may be severe clogging of its filter mesh or wear of the pump valves.
But what if fuel is supplied to the ramp, but does not enter the cylinders? Why don't the injectors allow gasoline to enter the combustion chamber?
Try disconnecting the wires from the throttle position sensor (TPS), located on the throttle block near the fuel rail. If the engine starts with the TPS disabled, the reason is a malfunction of this particular device.
If the engine does not start, reconnect the wires.
For monoinjection engines equipped with a single injector, a malfunction of the injector can be suspected.
On engines with distributed injection, all injectors cannot fail at the same time, and they do not work, most likely due to the lack of a command signal from the control unit.
Is there a spark?
Using an alligator clip, securely connect the wire from the arrester body to engine ground.
Select the crocodile mounting location as far away from the engine electronic modules as possible.
Turn on the ignition and, turning the engine crankshaft with the starter, observe whether a spark appears rhythmically between the spark gap electrodes and whether it appears at all?
You can make a test spark gap yourself by cutting off the side electrode of the spark plug and soldering one end of the wire to the spark plug body and the other to an alligator clip.
If you don’t have a spark gap at hand, unscrew the spark plug, attach a high-voltage wire to it and place the spark plug on the engine away from the electronic elements so that there is reliable contact between the spark plug body and the engine ground.
Check all high voltage wires and spark plugs. If everything is in order and there is a spark discharge, but the engine does not start, check the fuel system.
For what reasons does gasoline not flow into the carburetor?
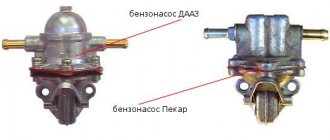
Fuel pump malfunction
Rice. 1. Fuel pump diagram: 1 - drive cam; 2 - pusher; 3 - lever; 4 — balancer; 5 - rod; 6 — inlet valve; 7 - spring.
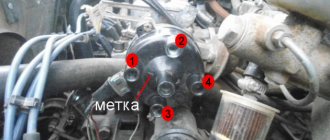
The main reason for the lack of gasoline in the carburetor of a VAZ and other brands is a malfunction of the fuel pump.
To identify this malfunction, it is necessary to remove the fuel supply hose from the carburetor fitting and place it in a container (bottle, can), then remove the connector from the Hall sensor of the distributor (systems with electronic ignition) or the armored wire of the ignition coil (contact ignition) from the distributor (central wire ) and through the spark plug, connect it to ground, then turn the ignition key and turn the starter for 5-10 seconds.
As a result of this event, gasoline from the fuel hose should partially fill the container; if this does not happen, and the fuel wires and fuel filter have sufficient throughput, then it follows that the fuel pump is faulty and requires replacement and therefore gasoline does not flow into the VAZ 2109 carburetor and other brands of cars with carburetor engines.
Video on how to repair a fuel pump yourself:
What to pay attention to when replacing a fuel pump
When replacing the fuel pump, you should pay attention that the pressure in the power supply system of a carburetor engine should be 0.25-0.45 Bar, the measurement is made with a pressure gauge installed in the fuel supply line, between the carburetor and the fuel pump, the pressure is regulated by gaskets of various thicknesses installed under the fuel pump. If the pressure is below 0.25Bar, the engine will not develop maximum power, and if it is more than 0.45Bar, then the needle valve may be “squeezed” and the carburetor will be “flooded” with gasoline
Strainer clogged
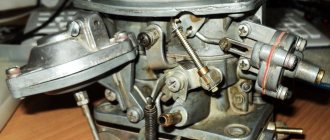
Rice. 2. Strainer in a Solex carburetor
In Ozone and Solex carburetors, this malfunction can be eliminated by washing the mesh filter in acetone and blowing it with air, or replacing it with a new one, which in my opinion would be a more correct solution, because the cost of this filter is not high and the problem is with gasoline not supplied to the carburetor will be resolved.
The filter is located in both types of carburetors, next to the fuel supply fitting, in Ozone it is a plug under the supply fitting, and in Solex, you can unscrew the fitting itself or the plug opposite. This malfunction does not occur often, since an additional filter is usually installed in the fuel system, which traps debris particles before they enter the carburetor.
Useful video on replacing and purging the carburetor fuel filter:
https://youtube.com/watch?v=mwKVERTr_3U
Needle valve stuck in closed position
The reason why there may be no fuel in the float chamber is that the needle valve is stuck in the closed position. For Solex, the repair consists of installing a bridle connecting the float and the valve needle; if the malfunction appears again, the valve should be replaced with a new one.
The process of removing the needle valve step by step photo instructions
In Ozone carburetors, the bridle is usually always installed from the factory and only replacing the valve will help. In my practice, a needle valve with a rubber seal showed good results; jamming and leaks were never observed; this valve is available for both types of carburetors and requires proper installation with subsequent adjustment of the fuel level.
How to properly adjust the carburetor on a chainsaw?
In order for self-adjustment of a chainsaw carburetor to bring the desired result, you need to carry out preparatory work. First of all, the operator must ensure that the engine is in good working order. To do this, be sure to remove the top cover of the protective plastic case and carefully inspect the engine cylinder-piston group for burrs, cracks and other defects. If they have formed, the surface of the assembly will need to be sanded. It is important not to damage the protective chrome or nickasil coating of the cylinder.
Next you need to inspect the spark plug. If a thick layer of dried carbon deposits forms on it, the part will need to be unscrewed and thoroughly cleaned. To do this, you need to heat the candle and carefully scrape off any remaining dried oil from its tip.
At the end, you will need to inspect the parts of the entire fuel system of the chainsaw. Clogging in the pipes, accumulated debris in the fuel and air filters, unstable operation of the diffuser - all this leads to the engine losing the required speed. As a result, the operator does not receive accurate information about the operation of the motor and cannot set the correct settings. To prevent this, you need to wash the carburetor parts, filter and tube. After they are completely dry, they can be installed in their original place.
Repair of diesel engine power supply system
In cars equipped with a diesel engine, the power system functions completely differently than in carburetor cars. Its job is to supply air and the required portions of fuel to the cylinders of the power unit.
The main task of the diesel engine power system is to provide the power unit with a working mixture at the right time, converting fuel energy into mechanical energy. Unlike the power supply system of a carburetor engine, the formation of a combustible fuel mixture occurs in the cylinder itself. Air and fuel are supplied separately.
The power supply of diesel engines consists of a large number of components, interconnected and responsible for each other. To avoid failures, it is necessary to carry out timely diagnostics and repair of the engine power system.
Malfunctions in the power supply system of diesel vehicles depend on:
- injection pump;
- nozzles;
- Fuel pump;
- Filters
Based on the statistics of our car service center, most malfunctions occur in mechanisms that operate under high pressure.
- Difficulty starting the engine;
- Uneven operation of the internal combustion engine in any operating mode;
- Smokiness;
- Knocks and extraneous noise in the operation of the internal combustion engine;
- Power reduction;
- Increased diesel fuel consumption.
Diagnostics of the diesel engine power system begins with those components that affect diesel fuel consumption. In this way, the filters, injectors, and fuel pump are inspected.
Watch the video on how to find an air leak:
Reasons for failure of the low pressure pump:
- Using low-quality diesel fuel;
- Late maintenance;
Mechanical damage to the ceramic necks of the TNND, as a result of negligent handling, leads to its failure and restoration is no longer possible. In such a situation, only replacement is possible.
Timely maintenance and repair of the engine power system helps to avoid unexpected breakdowns on the road.
Chainsaw carburetor design
The carburetor of any new chainsaw is an integral part of the engine, which continuously regulates the amount of air required for constant mixing with fuel and supplies the finished mixture to the internal combustion engine cylinder.
In most modern chainsaws, built-in carburetors initially have a similar design and almost the same principle of operation. There are certain differences only in the fuel units of Chinese models.
The main elements of the carburetors of all chainsaws include:
- float chamber - a small compartment whose main task is to maintain the optimal amount of fuel filled;
- atomizer is an important mechanism that is initially responsible for injecting fuel into the intake air flow;
- diffuser - located next to the standard inlet through which air enters the engine compartment of the chainsaw. The main function of the diffuser is to forcefully accelerate the suction of air masses;
- tube - required to supply air in small volumes - portions, the sizes of which depend on the needs of the fuel system.
The operating principle of a chainsaw carburetor is also quite simple. When the chainsaw is running, the engine throttle valve is activated, which, when open, allows air to flow through the factory rubber tube. With the gradual opening of the standard valve and the tube connected to it, the float located in the chamber with fuel is activated. Continuously passing through a standard diffuser, the air intensively mixes with fuel. After this, the used ready-made air-fuel mixture is sprayed through the factory intake channel into the working cylinder of the standard engine.
When spraying fuel, the pressure inside the float chamber of the chainsaw is almost identical to atmospheric pressure. At the same time, the pressure in the factory air tube is rarefied. Due to the difference in these indicators, air is continuously sucked into the tube. As engine speed increases, it requires more fuel. Accordingly, the tube should suck in more air. Thus, the ability of the engine to intensively gain speed required for sawing large wood largely depends on the carburetor.
Checking and adjusting the carburetor
If upon removal it is revealed that the filter is not clogged, then the reason for the non-flow of gasoline may be the sticking of the needle valve (1) installed in the float chamber cover, or the float itself (4) touching the body.
1 – needle valve; 2 – filter plug; 3 – mesh filter element; 4 – float.
Often during testing it turns out that gasoline is entering the chamber, but its quantity is not enough. To set the required level by bending the adjusting tongue (3), which is shown in Figure 3. When bending the tongue, you will also have to bend the float stop (2), which will allow you to adjust the needle stroke (4).
After adjustment work, you should make sure that the float moves without any jamming. If it is determined that the float is full of gasoline, this indicates its breakdown, so it is better to replace the damaged element. If you don’t have a new element at hand, you can temporarily use the old one, after sealing it with epoxy glue.
1 – float; 2 – float limiter; 3 – float tongue; 4 – needle.
If, as a result of the check, it is established that there is gasoline in the float chamber, and in sufficient quantity, but the engine “does not want” to start, then the reason for this may be clogged jets or fuel channels. In this case, the channels and nozzles should be flushed with gasoline, followed by blowing with compressed air. To do this, you will have to remove the float chamber cover from the carburetor.
If it is determined that the blockage of the jets is serious (a layer of resinous deposits has formed), then the blockage can be removed using a wooden stick, which must first be dipped in acetone. Cleaning the channels and jets is not allowed with any metal objects or wire.
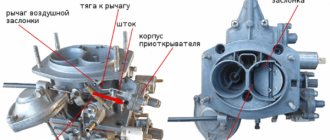
It happens that the stream of gasoline from the supply line (11), shown in Figure 4, is very weak and uneven, and there are also air bubbles in it, then this is a signal of clogging of the fuel pipes or a malfunction of the fuel pump itself.
1 – air filter housing; 2 – carburetor; 3 – gas tank; 4 – tank ventilation tube; 5 – tank lid seal; 6 – cover; 7 – tank mounting clamp; 8.11 – fuel lines; 9 – manual pumping lever; 10 – fuel pump; 12 – coolant supply fitting for carburetor heating; 13 – intake manifold; 14 – carburetor mounting studs; I and IV are places where fuel lines are disconnected when troubleshooting problems in the power system.
How to properly adjust the carburetor on a chainsaw?
To adjust the unit, place the tool on a hard, flat surface. It is best to adjust the chainsaw carburetor in a place protected from dust and moisture.
The node setup process should look like this:
- First you need to unscrew the mounting bolts and remove the protective housing of the saw. This will make it possible to inspect the carburetor and, if necessary, clean it;
- Next, you will need to remove the standard air filter of the instrument. If the saw is equipped with an additional foam insert, then it must also be removed;
- After this, you will need a screwdriver, which you need to tighten the bolts marked H and L clockwise until they stop. This must be done very carefully so as not to break the bolts;
- Then both screws should be unscrewed 1.5 turns in the opposite direction;
- Next, you need to start the chainsaw motor and let it run for about 7 minutes;
- As soon as the engine cylinder warms up, you will need to start turning the bolt L until the internal combustion engine begins to operate at maximum speed. Immediately after this, the bolt must be turned 1/4 turn in the opposite direction;
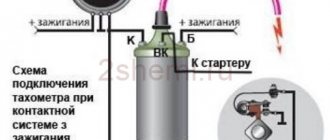
- Then you will need to adjust the engine to operate at high speeds. To do this, you need to connect an electronic tachometer to the engine and start turning the H bolt until the indicators on the instrument display coincide with the instructions for the recommended maximum speed in the instructions for the saw;
- In the end, all that remains is to adjust the operation of the saw’s internal combustion engine at idle speed. To do this, you need to slowly turn the T bolt counterclockwise until the motor runs stably and without failures. If the engine begins to stall, then bolt T should be turned in the direction of the clock hand.
To adjust the carburetor on a chainsaw, you should work with the adjusting bolts as accurately as possible. Over-tightening the screws will place increased stress on the engine and other important components of the garden tool.
For what reasons is fuel not supplied to the cylinders?
So, the general scheme of operation of the power system involves taking fuel from the gas tank, after which the fuel enters the carburetor or injector.
Next, the fuel is supplied to the intake manifold, then the fuel-air mixture enters the combustion chamber through the intake valves.
Common problems with the supply of gasoline to the internal combustion engine
If we exclude leaks, the next reason why gasoline is not supplied to the engine is various problems with the fuel pump. Note that on cars with a carburetor there is a mechanical type fuel pump and is located in the engine compartment.
At the same time, injection engines have an electric fuel pump. This pump is located directly in the fuel tank. If we talk about a mechanical device, then often its breakdown or incorrect operation results from damage to the membranes, as well as overheating.
Let us add that if the device is not able to create the required pressure in the fuel system (no or low pressure), then the injectors on some internal combustion engines may not open, and in this case the engine will not start. In other cases, the injectors still open, but there is still not enough fuel. In this case, the unit begins to work intermittently, stalls in different modes, etc.
At the initial stage, it is necessary to measure the fuel pressure in the fuel rail of an injection engine, while at the same time not forgetting about possible problems with the pressure regulator in the rail.
Another problem that prevents fuel from getting into the engine cylinders is dirty fuel system filters. In addition to the usual fuel filter, the injector also has a fuel pump mesh, and in the event of severe contamination of the fuel pump mesh filter, the performance of the device drops noticeably.
To avoid the above problems, filters must be changed promptly on both carburetor and injection engines. You also need to remember that the filter mesh on the fuel pump needs to be periodically cleaned or completely replaced with a new one every 50-60 thousand km. mileage
The list of possible causes of a malfunction in the fuel supply to the engine ends with contamination of the carburetor or injection nozzles, as well as failure of individual elements. As a rule, the jets in the carburetor can become clogged, and the nozzles in the injectors are subject to contamination. Debris and deposits may also partially or completely block thin channels, etc.
To prevent this from happening, the injector must be periodically cleaned using one of the available methods (ultrasound, special cleaners on a bench, etc.). It should also be added that the carburetor may require cleaning, repair or separate tuning. For example, an insufficient amount of gasoline in the float chamber will result in insufficient fuel for normal operation of the internal combustion engine.
https://youtube.com/watch?v=-ZZWBRzBBGM
What's the result?
As you can see, if you have certain skills and knowledge, you can determine why gasoline does not flow into the engine both on engines with a carburetor and on injection power units. However, many problems can be solved yourself. For example, it is quite possible to repair, clean and adjust a carburetor in a garage. The same can be said about cleaning injectors yourself.
Finally, I would like to note that timely replacement of fuel filters, regular cleaning of the injector or carburetor, as well as driving on good quality fuel are the key to the proper operation of the power system of a gasoline or diesel engine.
Also, driving with a half-empty tank in winter leads to the active formation of condensation, which accumulates in the gas tank. As a result, condensate (water) not only settles at the bottom and enters the combustion chamber, but also causes severe corrosion of the tank walls. As a result, rust appears in the tank, and in the case of through corrosion, active fuel leaks inevitably occur.
Diagnose faults that may indicate problems with the fuel pump. Self-check of the device, measuring the pressure in the fuel rail.
How to determine why the fuel pump does not pump or works poorly. Fuel rail pressure, pump diagnostics. Wiring, relays, fuel pump fuses.
Why is it necessary to clean the fuel pump mesh? When is it better to change and how to clean the fuel pump mesh? How to properly remove the fuel pump, subtleties and nuances.
What to do if the engine is “stupid”, does not pull, and there is a deterioration in engine response after pressing the gas pedal. Basic faults, diagnostics.
The causes of whistling and increased noise during operation of the fuel pump are overheating of the pump. How to diagnose and fix the problem yourself. Tips and tricks.
Airing of the diesel fuel system: signs of malfunction and diagnostics. How to find the location of the air leak yourself, ways to solve the problem.
Source
Reasons leading to engine oil foaming
The reason is the accumulation of condensate.
There are three reasons why air bubbles may appear in the oil of an internal combustion engine:
- depressurization of the cooling system;
- poor compatibility of different types of oils;
- condensation formation.
Let's look at each of them in more detail.
Sealing failure in the vehicle cooling system
Cylinder head gasket
It is the main cause of mixing of coolant (antifreeze) and engine oil. Often, depressurization is a consequence of breaking through the protective gasket, which is installed on the cylinder head and prevents coolant from penetrating into the engine.
The presence of cracks that appear on the surface of body parts after significant overheating, impact, or as a result of metal aging also contributes to the mixing of oil and antifreeze, leading to foaming of the resulting mixture. If a housing part is damaged, the most appropriate action is to replace it with a new part. Repairing such defects using welding in most cases leads to the re-formation of cracks, because body parts are constantly used in rather harsh conditions.
White smoke from the exhaust pipe
An additional symptom indicating an antifreeze leak may be the presence of white smoke, which, along with exhaust gases, comes out of the vehicle's exhaust pipe. It is quite simple to make sure that it is the coolant that evaporates. To do this, the car engine must be warmed up for 5-10 minutes, after which the exhaust system opening must be covered with a paper sheet for a short time. As a result of such actions, the sheet will first get wet, after which it will take some time to dry completely. If, after final drying, there are no visible stains left on the surface of the sheet formed by the fuel mixture or oil, then we can safely consider the depressurization of the car’s cooling system as an established fact.
Poor oil compatibility
Oil compatibility
This is the second reason why the oil in an internal combustion engine can foam. Often, an oil conflict occurs because the vehicle owner adds oil to the engine that is produced differently from the oil that is already present in the engine. To get a more clear picture of what has been said, let’s look at the methods of making oil and the differences in its structure.
- Mineral oils are produced by refining petroleum products. Such oils cannot boast of an ideal structure due to the wide variation in molecular sizes. As a result, the lubricating properties of mineral oils, as well as their viscosity and freezing point, cannot compete with the similar characteristics of synthetic oils, which will be discussed below.
- Synthetic oils appear as a result of a catalytic synthesis reaction, which allows the output to be a substance consisting of molecules of the same type without any impurities. It is thanks to their uniform structure that synthetic oils are distinguished by good lubricating properties, optimal viscosity and low freezing point.
The presence of condensate in an internal combustion engine can also cause oil foaming. This is explained by the fact that the chemical properties of these two liquids do not allow them to dissolve in each other. Instead, the moisture and oil form an emulsion, which is essentially foam. It should be noted that the formation of foam in this case is not a consequence of unstable engine operation or poor oil quality. Often, condensation forms in poorly heated car engines in winter or during the off-season, when the car does not drive long distances, as a result of which the moisture formed on its parts does not have time to completely evaporate. Dealing with this problem is quite simple. To do this, it is necessary to warm up the engine well before each trip, especially in winter, allowing moisture to completely evaporate from its surface.
How to flush a chainsaw carburetor?
To clean the unit from heavy contamination, it is best to use a product that is sold in pressurized cylinders. The cleaner comes with a dispenser and a long thin tube, which makes it possible to spray the product in any hard-to-reach places.
It must be remembered that cleaning the carburetor on a chainsaw is done using flammable chemicals. You need to work with them wearing a special protective mask and only in well-ventilated areas.
Read also: How does a magnet work on an antimagnetic filling?
To clean the carburetor on a chainsaw, the unit will need to be partially disassembled. The throttle valve, adjusting screws, body and other parts of the carburetor will need to be washed with the product from the bottle and set aside until completely dry. Once all the elements are dry, the assembly can be assembled and installed back on the chainsaw.
How to check without dismantling? Signs
There are several symptoms by which you can determine the malfunction of this unit:
- Jerking while moving.
- Difficulty starting the car.
- Deterioration in acceleration dynamics. The car picks up speed slowly, even if the trigger is pressed fully.
Also note that similar symptoms can occur due to malfunctions of the mass fuel flow sensor or throttle position. It would be a good idea to check and replace the filter, both gasoline and air. The resource of the latter is 10 thousand kilometers. You can determine its wear visually.
S1b › Blog › Checking the fuel system.
Hello everyone))) good article for you and me to note)
The article will describe a testing technique that does not require special devices.
From the tool you will need:
15. Replacing the fuel filter is shown here: replacing the fuel filter on Lada Priora, Kalina and Granta cars. The only difference is that after removing the filter, we direct the fuel supply hose into a plastic bottle (preferably transparent) and turn on the ignition with the key (the fuel pump turns on and fuel spills into the bottle). We inspect the condition of the fuel in the bottle. Then we install a new filter, remove the hose from the ramp and direct it into the bottle. We turn on the ignition several times and spill gasoline. We inspect the fuel in the tank again. If dirt is found after the filter, then washing the injectors is also required. We assemble the entire system and measure the pressure readings again. If the readings have not changed, then check the correct clamping of the “return” (you can try connecting a pressure gauge to the output of the regulator). If this does not help, then perhaps the blockage is serious and requires blowing with air under high pressure. It would be a good idea to check the entire pipeline from the tank for mechanical damage (dents, kinks).
16. Fuel systems without a return line are diagnosed in almost the same way. The main difference is that here the fuel regulator is located on the pump body. The fuel goes from the pump to the fine filter, and then goes to the regulator. Near the body, the fuel pipe bifurcates. One tip goes to the regulator, and the second goes to the fuel rail.
17. The main difference in the readings is the normal pressure at the ramp is 3.8 atm. When over-gassing it should jump up to 4 atmospheres. If the pressure is less, immediately check the pump. We connect a pressure gauge to the pump outlet and check the pressure. The pressure should also be at least 6 atm for a new one.
18. If the pressure is working, then check if the fuel filter is clogged. To do this, we restore the fuel line from the pump and connect to the tube suitable for the regulator. The easiest way to do this is to cut off the old tip from the fuel filter, install one end of it in a clip, and put a hose with a pressure gauge on the other. If the pressure is identical to the pump pressure, then the filter is clean. If a significant drop is visible, the filter must be replaced.
19. Next, we check the supply line to the ramp. Shut off the fuel supply to the regulator. It is easier to do this by inserting a soldered (twisted/crumpled) tip from the filter into the quick-release connection. If there is no difference here, then change the regulator. If losses are detected, then we check the entire pipeline - there may be leakage or crumpling of the pipeline, it is also possible that nozzles are leaking.
The engine is not running smoothly
Another possible option is when the engine works, but is very unstable and does not develop power.
This happened to me on a steep climb. The engine is running at high speeds in first gear, and suddenly the speed drops sharply. You tighten the choke to increase the flow of fuel into the cylinders and finish climbing the climb. The reason for this, as I think, is the smallest particles accumulated at the bottom of the float chamber, which fall into the inclined inlet with the nozzle of the primary or secondary chamber.
Source
How to flush a chainsaw carburetor?
You should think about cleaning the fuel unit of a power tool in the following cases:
- when it is difficult to start the engine;
- in case of unstable operation of the internal combustion engine at short-term idle speed;
- in case of failures when smoothly pressing the standard throttle trigger;
- with a significant increase in fuel consumption.
Most often, liquids that are found in almost every garage are used to flush the built-in carburetor of a chainsaw:
- kerosene;
- diesel fuel;
- pure gasoline;
- solvent.
Modern gardeners using powerful professional saws use more effective and gentle means:
- Mannol Vergaser Reiniger is a cleaner marketed in aerosol form. It quickly and easily breaks down even the oldest formations of resins, soot, oily deposits and other types of contaminants;
- Hi-Gear – This cleaner is distinguished by its high dissolution properties. It can remove old dried stains, oily crusts and the first signs of rust without harming the parts of the fuel system;
- Jet 100 Ultra is a high-tech spray designed to quickly clean the carburetor of a chainsaw. Shows a high rate of dissolution of the oldest oil stains.
Cleaning the carburetor on a chainsaw is performed in the following sequence:
- First you need to clean the outer part of the saw engine, and also remove and thoroughly rinse the factory air filter housing;
- Next, you can proceed to disassembling the power tool. To do this, you need to remove the filter housing and also unscrew the fasteners holding the carburetor together with the engine;
- Then you will need to carefully disconnect the thrust and gas cables from the carburetor. The springs included in the design must be removed so as not to stretch them;
- After this, you need to carefully pull off the fuel supply hoses from the factory fittings of the fuel unit;
- To clean the carburetor on a chainsaw, you need to remove it from the original mounting pins. At the same time, it is important to maintain the integrity of the gasket installed between the internal combustion engine cylinder and the fuel unit;
- The next step is to clean the outer walls of the carburetor. To do this, they can be treated with liquid cleaner or gasoline. In this case, you need to try to prevent dust and debris from getting inside the engine assembly or cylinder;
- Next, you will need to unscrew the screws securing the carburetor diaphragm, remove its cover and wash the internal cavity with an aerosol cleaner;
- After this, you need to dismantle the fuel pre-fine filter, and also disassemble the part of the assembly to which the fuel is supplied. All internal parts of the carburetor must be thoroughly washed with an aerosol cleaner. If the first cleaning does not bring results, then the washing should be repeated.
After all the internal parts of the standard carburetor have completely dried, you need to assemble the fuel unit in the reverse order and install it in place in the structure of the household chainsaw.
Air leak
Often the reason for gasoline not flowing is the junction of the pipes with the fuel pump and carburetor, since air will be sucked in through the leaks, and gasoline will not be pumped.
Air leaks can also occur between the components of the carburetor, as well as at the point where it is attached to the intake manifold. Therefore, when looking for the reason for the engine stopping, you should check the tightness of all fastening nuts and bolts. In some cases, the culprit is a rupture of the gaskets located between the parts of the carburetor, as well as at the point where it is attached to the manifold.
After checking the condition of the gaskets and tightening the fasteners, you can check the functionality of the power system.
Next, we will describe the reasons for interruptions in the supply of gasoline, which usually do not happen on the road, but they should not be ruled out.
Replace with a new one or not
If the malfunction concerns a mechanical part, the motorist has two ways to solve the problem. The first is purchasing a repair kit. It includes all the necessary parts that may break in the pump. The second is replacing the entire element with a new one. This is a more accurate and reliable method. But it is worth considering that submersible pumps are very expensive. Among the manufacturers on the market there are both originals and analogues.
How to check fuel pump pressure? Methods
It happens that the element works, but does not produce the required pressure. In injection systems, injectors are very demanding on this indicator. Due to low pressure, difficulties may arise in starting the engine and failures in dynamics. How to check the fuel pump? This can be done in several ways. The first is a check at a service station. The price of such a service is about 300 rubles. However, you can check the pressure yourself. Now there are special pressure gauges for the pump on sale. But their cost reaches two thousand rubles. You can also use the ordinary one, which is used for car wheels. Every motorist has such a pressure gauge.