Despite the fact that the “classic” VAZ 2106 has long been out of production, a considerable number of these cars are in use in Russia. Since their design is outdated, the desire of the owners of the sixth model of Zhiguli to improve it by any means is quite understandable. One of the effective options is to replace the standard ignition system with a non-contact ignition system (abbreviated as BSZ), where sparking is controlled by electronics. The replacement procedure is quite simple and accessible to anyone who wants to improve the engine performance of their “six”.
What is BSZ and how does it work?
To successfully install and configure contactless ignition, it is advisable to understand the operating principle of the system, which consists of the following elements:
- Main ignition distributor (otherwise known as distributor). Inside it is installed a photoelectric Hall sensor, a vacuum drive for adjusting the advance angle and a so-called slider with a moving contact.
- A coil that produces a high voltage pulse. It has 2 windings: a primary winding, consisting of a small number of turns of thick wire, and a secondary winding, wound with a thin wire with a large number of turns.
- The electronic unit is a switch equipped with an aluminum cooling radiator. The latter plays the role of a fastening element.
- Spark plugs connected by high-voltage wires to the distributor.
- Wires for connecting elements to each other.
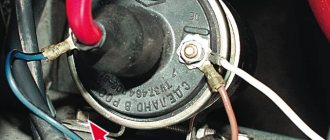
This is what the ignition system of a classic Zhiguli looks like
For reference. In the standard outdated VAZ 2106 systems, there was a contact group inside the distributor instead of a Hall sensor, and there was no switch at all.
BSZ operation scheme
The first contact of the coil is connected through the ignition switch relay to the generator, and the second to the control unit. Also, a high-voltage wire with a large cross-section goes from it to the distributor. There are 2 bundles of wires coming out of the distributor, connecting it to the switch and spark plugs. The system operates according to the following algorithm:
- After turning on the ignition by turning the key in the lock, a voltage of 12 V is applied to the primary winding of the coil, which creates an electromagnetic field.
- When the crankshaft rotates and one of the pistons reaches top dead center (TDC), the photoelectric sensor sends a signal to the switch, which briefly breaks the connection between the coil and the voltage source - the generator or battery.
- During a circuit break, a voltage pulse of 20 to 24 kV is generated in the secondary winding of the coil, transmitted through a large cross-section wire to the distributor slider.
- The movable contact of the slider directs the impulse to the spark plug where the piston reached TDC. A powerful spark jumps between its contacts, igniting the mixture of fuel and air in the combustion chamber.
- The distributor shaft is driven by a gear transmission connected to the crankshaft. When the next piston moves to TDC, the shaft rotates and the moving contact connects to another spark plug, and the Hall sensor sends the next signal and the sparking cycle is repeated.
Reference. In older systems, the circuit was broken mechanically using a cam on the distributor shaft, pressing on the contact group.
Adjusting the gap of the VAZ 2107 distributor breaker
The quality of the spark depends on the gap between the breaker contacts and the condition of the contacts themselves. To adjust the VAZ 2107 distributor, you must perform the following operations:
- unclip the fastening brackets and remove the distributor cover;
- unscrew the screws securing the slider;
- remove the slider;
- Clean the breaker contacts with sandpaper (to avoid damaging the contacts, you must use sandpaper with a grain size no larger than 600).
- loosen the screw securing the breaker contacts;
- turn the adjusting screw to set the gap to 0.4 mm, using the appropriate feeler gauge;
- tighten the fixing screw;
- install and secure the slider;
- fix the distributor cover.
In addition to adjustment, repair of the VAZ 2107 distributor may be required. This consists of cleaning the contacts on the distributor cover or replacing the cover itself, replacing the slider, resistor or contact group.
The ignition system is one of the components of any gasoline engine. Incorrect ignition adjustment of the VAZ 2107 becomes a problem: the spark plugs flood, and the engine completely loses power. Let's look at what the advance angle is, what it affects, and how the ignition of a VAZ 2107 carburetor is installed.
Adjusting the ignition of a VAZ 2107 carburetor
Advantages of contactless systems
For an ignorant car enthusiast, the main argument in favor of BSZ is the fact that at the moment not a single manufacturer produces cars with a contact-cam spark generation system. Foreign brands abandoned it in the distant 80s of the last century, and in the Russian Federation mechanical ignition lasted until the 90s. The reasons for the refusal are quite clear:
- sparks constantly flashed across the contacts, causing them to burn and require frequent cleaning;
- the contact group wore out quite quickly, on average it was enough for 15-20 thousand kilometers, after which the element had to be replaced;
- the wear of the bearing on which the contacts were located made itself felt, which caused unstable operation of the power unit;
- the springs of the balance weights were stretched.
Non-contact ignition produces a powerful spark, which makes fuel burn better
All of the listed malfunctions appeared one by one, haunting the owner of the “classic” Zhiguli. Due to an imperfect design, the spark power of the spark plugs was constantly decreasing, engine performance was deteriorating, and fuel consumption was increasing. New BSZ systems are free of such disadvantages; they are characterized by durability and stable sparking. The spark power also increased, since the output pulse voltage increased from 16-18 kV to 24 kV, which contributes to better ignition of the fuel.
Note. At first, the weak point of domestic contactless systems was considered to be the switch, which quickly failed and could not be repaired. But later it was improved and the reliability of the BSZ increased.
What is ignition timing?
For the ignition to work correctly, the following condition must be met: sparking must occur at the moment when the piston is at TDC. This should be a compression stroke. This moment should be the flash point.
| Options | Units | Classical | Contactless |
| Spark energy | mJ | 20 | 60 |
| Secondary voltage rise time from 2 to 15 kV | mks | 30 | 20 |
| Secondary voltage max | kV | 26 | 29,5 |
| Spark duration | ms | 1,5 | 2 |
However, that's not all. The time it takes for the fuel mixture to completely burn must also be taken into account. Therefore, the spark plugs must create an impulse with some advance, which is called the advance angle. As a result, the mixture reaches the peak of combustion, and the cylinder begins to move downward.
If sparking occurs earlier, then such ignition is called earlier, and if late, then later. Early leads to detonation. This is why the engine quickly overheats and becomes inefficient, although fuel consumption can sometimes be greatly reduced. This can be determined by the spark plug electrodes, which are covered with a white coating. With late ignition, power is noticeably lost, and black smoke comes out of the exhaust pipe, which indicates that gasoline, without having time to burn in the cylinder, burns out in the exhaust system.
Selecting an electronic ignition kit
Since the “sixes” were equipped with three types of engines (volume 1.3, 1.5 and 1.6 liters), the BSZ kits for them differ in the design of the distributor. The engine has 1.3 liters. (model VAZ 21063) there is a distributor with a shortened shaft, and in 1.5 and 1.6 liter engines. (VAZ 21061 and 2106, respectively) this shaft is equally long. The electronic ignition kit contains the following:
- distributor with catalog number 38.3706–01 for a 1.3 liter power unit. or 38.37061 - for 1.5 and 1.6 liter engines;
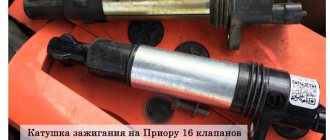
- high voltage coil marked 27.3705;
- electronic control unit, marking - 36.3734 or 3620.3734;
- connecting wires.
Attention! When buying a contactless kit for the “classic” Zhiguli, do not confuse it with products intended for the Niva VAZ 2121; the distributors are very similar in appearance. But the “Nivov” part differs in technical characteristics and is marked as follows: 3810.3706, 38.3706–10 or 038.3706–10. Setting it to “six” is strictly not recommended.
Kit for installing contactless ignition
Of the manufacturers selling their ignition kits in the Russian Federation, the most popular among motorists are spare parts from the SOATE company from Stary Oskol. It is worth noting that the new spark plugs of the A-17DVR brand, installed on classic VAZs with electronics, are not included in the delivery package; they will have to be purchased separately. To experience the full results of the replacement, it is also recommended to install new high-voltage wires if you have not replaced them in the recent past.
Despite the fact that the oil pump is one of the most reliable components in VAZ 2106-2107 cars, sometimes it also fails. In order to replace it, it is recommended to study this material:
Installation recommendations
It should be noted that electronic ignition for VAZ can be purchased either as a whole set or separately. Most car enthusiasts who have installed electronic ignition on their car recommend buying a kit for the VAZ 2106, which is produced in Stary Oskol. In this case, practically no problems arise.
If you decide to purchase parts separately, then you need to pay attention to the length of the ignition distributor shaft. The fact is that modifications of the VAZ 2106 car were equipped with different engines, so before purchasing you need to look at the markings on the cylinder block. For cylinder blocks marked 2103 and 2106, the distributor comes with a longer shaft than for blocks marked 2101 or 21011.
This is due to the different piston strokes of these engines and the different block heights. In some cases, car enthusiasts install a crankshaft from a VAZ 21213 Niva instead of the standard one and thus increase the piston stroke on blocks 2101 and 21011. Such tuning does not in any way affect the length of the ignition distributor shaft, which must be selected according to the markings on the cylinder block.
Preparing to replace the BSZ
The work of removing the old ignition and installing a new one does not require any special tools, devices or devices. An inspection ditch is not needed, and the entire operation can be carried out outdoors in good daylight. It is enough to have the following tools:
- a 13 mm open-end wrench for unscrewing the distributor fastening nut;
- using 10 and 8 mm wrenches, remove the coil;
- flat and Phillips screwdriver;
- pliers;
- electric or hand drill with a drill to match the diameters of the switch mounting screws.
Advice. To make the work easier, rent or from a friend a socket wrench with a long handle, which fits onto the ratchet nut and is used to rotate the crankshaft manually.
It is much more convenient to turn the crankshaft with this key
To get started, perform several preliminary disassembly steps:
- Open the hood and disconnect the negative battery terminal.
- Remove the high-voltage wires from the spark plugs and distributor cap.
- Unscrew the spark plugs.
- Place a screwdriver into the spark plug hole of cylinder 1 and turn the crankshaft until the piston reaches TDC. In this case, the mark on the shaft pulley will be opposite the longest mark marked on the cylinder block.
First thing you need to do is disconnect the battery
Advice. If you do not have a wrench for the ratchet nut, the crankshaft can be turned by rotating the suspended rear wheel of the car. Don't forget to secure the car with wheel chocks, release the handbrake and engage 4th or 5th gear.
When the 1st piston is at TDC, the marks on the pulley and block must match
Having matched the marks and prepared new parts, you can proceed to the main stage of work.
Details of setting up the ignition system on the VAZ 2107 are presented here:
What causes an incorrectly set ignition on a VAZ 2107
An incorrect lead angle causes the following problems:
Engine overheating. Early ignition causes detonation, which changes the temperature regime of the engine. At the same time, the load on the crank mechanism increases, reducing their service life.
Reduced vehicle dynamics. Early and late ignition of the VAZ 2107 leads to the fact that fuel energy is not optimally consumed. The explosion of the mixture must occur exactly when the piston is at TDC.
Burnout of valves. With late ignition, the mixture continues to burn throughout the exhaust phase, causing the valves to overheat and “popping” to occur in the exhaust manifold.
Procedure for installing electronic ignition
The first step is to dismantle the old system, performing operations in the following sequence:
- Disconnect the high-voltage wire coming from the coil, remove the distributor cover and note the position of the slider. For convenience, the direction can be marked with chalk on the engine valve cover.
- Disconnect the wires and vacuum tube coming from the carburetor from the distributor. Unscrew the fastening nut with a 13 mm wrench and remove the element from the cylinder block.
- Unscrew the contact nuts of the high-voltage coil and remove the wires, remembering where the wires from the ignition switch and tachometer relay were connected.
- Remove the coil and put it aside.
Advice. There is a gasket between the distributor and the seat of the cylinder block; do not lose it when removing the part from the car.
Connection diagram for electronic ignition elements
After disassembling, proceed to installation of the BSZ, following the following procedure:
- Replace the gasket from the old distributor to the new one and remove the cover from it. Having turned the slider in the desired direction, which you marked with chalk, insert the distributor shaft into the socket and secure its position with a nut. You should not tighten it too much, since you will still have to adjust the ignition and loosen the nut again.
- Screw in the spark plugs, having previously set the gap between the electrodes to 0.8-0.9 mm. Place the distributor cap in place and connect the high-voltage wires, observing the cylinder numbers (stamped on the top of the cover).
- Attach a new one in place of the old coil. If the contacts on it are located the other way around, then first loosen the fastening clamp, rotate the housing 180° and install the part on the car.
- Attach the commutator near the coil. After removing the washer reservoir, pre-drill 2 holes in the body side member and screw the block with self-tapping screws. Please note: the electronic element should not be lower than the tank, so that it does not flood with water in the event of a leak.
- Take the connecting wires and connect the electronic unit, distributor and coil according to the diagram (attached to the BSZ kit). It’s not difficult to understand: the connector from the switch is connected to the distributor block, and the wires are connected to contacts “B” and “K” of the high-voltage coil. Do not forget about the wires previously connected to the old coil (including from the tachometer), they need to be connected to the new element in the same way.
- Place the vacuum tube coming from the carburetor onto the fitting of the distributor membrane assembly. This completes the installation of the contactless system.
Reference. In the latest VAZ 2106 models, holes are already made for mounting the switch. Look carefully at the side member on the left side (in the direction of travel of the car).
Installation instructions in photographs
The runner must stand in this position before removing the distributor
The distributor cover is removed by releasing two latches
Using a 8 and 10 wrench you need to unscrew the wires from the distributor
The high-voltage wire is removed from the coil and the wires leading to the ignition switch and tachometer are unscrewed
Thus, the distributor is removed from the cylinder block
The wires to the new coil are connected in the same way as to the old one.
The switch is placed in a free space above the washer reservoir
Do not mix up the wires when connecting a new distributor
Video about installing an electronic system on a “classic”
How to set the ignition on a VAZ 2107
There is no need to adjust the ignition even in a garage. If you have the tools, you can set the lead angle literally on the street. The procedure is as follows:
- Allow the engine to cool (if it is hot). This will avoid burns during operation.
- Remove the high-voltage wires from the spark plugs.
- Unscrew the spark plugs (you can limit yourself to just the spark plug of the first cylinder, but with all the spark plugs unscrewed, there is no compression in the cylinders and it is much easier to rotate the crankshaft).
- Close the spark plug hole on the first cylinder with your finger (this will help determine the beginning of the compression stroke in the cylinder).
- Using a special key, rotate the crankshaft until the compression stroke begins (your finger should feel the air pressure).
- Continuing to rotate the crankshaft, align the mark on the pulley with the second mark on the front engine cover.
Starting the engine and setting the ignition
If during the process of replacing the elements you did not move the marks and connected the wiring correctly, then the “six” will start immediately. Let it warm up for a minute or two, manipulating the accelerator pedal, and then proceed to adjust the ignition. This is done in two ways:
- the most common method is “by ear”;
- using a special device - a strobe light.
Advice. If the car engine does not start and does not show signs of life when the starter rotates, then you should check that the high-voltage wires are connected correctly. Reason two: during installation, you turned the distributor cap 180°, causing the slider to transmit impulse to the 4th cylinder instead of the first and vice versa.
The ignition timing is adjusted by turning the distributor housing
Adjusting the ignition “by ear” is done as follows:
- With the engine running, loosen the distributor mounting nut.
- Slowly turn it clockwise and counterclockwise, achieving the most stable operation of the power unit. The rotation angle should not exceed 15°.
- Having grasped the position of clear engine operation, finally tighten the distributor nut.
With the help of a stroboscope, the ignition timing is set much more accurately. If you managed to get hold of this device or borrow it somewhere, then connect it to the battery terminals and the high-voltage wire of the first cylinder. Start the engine and carefully bring the flashing lamp to the marks on the block. A stroboscope will help you see the position of the mark stamped on the pulley while the engine is running. Now you can loosen the distributor nut and turn the housing to align this mark with the last, shortest mark.
Repairing a carburetor is not difficult if you know all the intricacies of the procedure:
This is what a strobe looks like for adjusting the advance angle
After adjustment, warm up the car to operating temperature and try driving it in different modes. If you hear a knocking noise from the piston pins when you press the gas pedal sharply, then you are dealing with detonation caused by too early ignition. Loosen the distributor fastening and turn it clockwise 1-2°, no more. The knocking should disappear.
Advice. After installing the BSZ, it often happens that the engine speed at idle increases due to better spark formation. The speed is reduced to 850-900 rpm using the fuel quantity screw. In Ozone carburetors, this is a large screw located on the right (in the direction of travel) at the bottom of the unit. In Solex carburetors, this is a plastic handle that protrudes from the rear and rests against the valve axis. It is not allowed to touch a “quality” screw without knowing the matter!
Ignition marks VAZ 2107
When adjusting the advance angle, you must focus on the marks marked on the crankshaft pulley and on the front engine cover.
There is a notch on the engine pulley that should align with one of three marks on the cover, depending on the fuel used.
The marks on the lid are of different lengths - short, medium and long. The first corresponds to an advance angle of 10 degrees, the second - 5 degrees, the third - 0 degrees (the mixture is ignited at TDC).
High octane fuel burns faster than low octane fuel. The VAZ 2107 is designed for gasoline with an octane number of 92-95, so the optimal advance for it is 5 degrees.
Video about setting up contactless ignition
If you removed the distributor and high-voltage wires with the cover without aligning the marks, then the following video material will help you correctly set the ignition again:
Operating a car with an electronic system is very different from driving with an old ignition. The engine runs much smoother and more stable, and cleaning the contact group is a thing of the past. But it wouldn’t hurt the owner of a VAZ 2106 to carry a Hall sensor in reserve in case the standard one breaks down. This part cannot be repaired, although it breaks quite rarely.
- Author: Sergey Sergeev
Rate this article:
- 5
- 4
- 3
- 2
- 1
(9 votes, average: 4.2 out of 5)
Share with your friends!
Checking the ignition angle while the vehicle is moving
It is best to check the functionality of the ignition system after any adjustment while driving. This is due to the design features of the distributor and the octane number of the gasoline used. It happens that the ignition angles set according to the marks do not provide sufficient dynamics and throttle response. Adjusting by ear according to the beginning of detonation will help:
- We accelerate the car to a speed of 45-50 km/h on a flat section of the road;
- We turn on direct transmission (fourth on the VAZ 2106) and press the gas pedal all the way;
- A characteristic ringing sound (detonation) should appear, which will disappear after 2-3 seconds, and the acceleration will be smooth and powerful without failures;
- If detonation does not disappear throughout the entire acceleration, then the ignition angle is “early”;
- The complete absence of ringing and sluggish dynamics indicate a delayed spark in the cylinders;
- We adjust the position of the distributor in place, turning it by 3-5 degrees;
- When the adjustment is completed, the position of the distributor body relative to the block is marked with a mark or paint.
Ignition adjustment work should be carried out regularly. The service interval for a simple contact ignition system is 15,000 km, for an electronic one - twice as long. The condition of the spark plugs and high-voltage wires is also regularly checked. All setup operations can be easily done independently; a garage is not needed for this. The skill of independently repairing the ignition of a VAZ 2106 will always come in handy on a long journey or in winter, when problems arise with starting.
Didn't find the information you are looking for? on our forum.
How to make adjustments
This process involves setting the ignition angle to the initial state. At VAZ this should be done as follows:
- The crankshaft pulley is installed.
- The distributor is installed.
- We start and warm up at a temperature that must be considered working.
- We try to start with a hot engine. If you perform this procedure at an early stage, the starter will not turn as it should.
This is interesting: How to adjust headlights with your own hands - instructions and adjustment diagram
After the VAZ 2107 contactless ignition has been installed, you should perform a test drive. In this case, it is recommended to pick up a speed of 30-40 kilometers per hour, and then engage the “fourth” gear. As soon as the gear has been engaged, it is necessary to give as much gas as possible. If the contactless ignition kit has been installed correctly, the driver will hear a small ringing sound after a few seconds. After this, the engine will begin to work as necessary, gradually gaining momentum. In the same case, if the ringing continues for more than three seconds, then you need to advance the ignition by turning the distributor. If there is no sound, this can be done a little earlier by turning the distributor.
What does BSZ consist of?
The BSZ system consists of the following components:
- Contactless distributor. The distributor acts as a distribution sensor for the entire contactless ignition system.
- Switch. The main function of this element is to interrupt the electrical flow of current to the ignition coil. Any type of switch is capable of turning off the current both when the engine is running and when the ignition is off.
- Coil, article number 273705. The main task of this element is to convert current, the value of which does not exceed 12 V. Using this element, the low voltage value can be raised to 20 kV.
- Set of wires.
- A set of spark plugs that will supply a spark to the contactless ignition system.
Examination
Having finished setting the ignition, proceed to check the functionality of this unit:
- get behind the wheel;
- start the engine;
- get out onto a straight section of the road;
- accelerate to 40 kilometers per hour;
- shift the car to fourth gear;
- quickly release the gas.
When everything is done correctly, detonation will occur, causing the fingers to rattle. The noise will disappear as you gain speed.
If the sound does not go away, then the adjustment was made incorrectly and the ignition started early. In this situation, the distributor rotor is turned by half or one division (clockwise). Delayed detonation indicates late ignition timing. Here you will have to turn the distributor in the opposite direction.
After setting the settings, repeat the test described above.
When the ignition is adjusted perfectly, mark the optimal position of the distributor relative to the cylinder block with a line (scratch it or use oil paint). This completes the ignition setting.
Malfunctions of the six ignition system
When operating a vehicle, the following malfunctions of the ignition system occur, which must be eliminated before further driving the vehicle.
| Malfunction | Remedy |
| The contact group has a coating of dirt, is oxidized or there are contact burn points, the distance between the contacts is increased | It is necessary to clean the contact group and adjust the gap |
| Weak fasteners or wiring caps in the low-voltage circuit have oxidized, a broken wire or a short circuit to the car body | Test the wiring and their connections, replace damaged sections of the circuit |
| Defective ignition switch (no contact closure) | Test the area, replace the defective contact element of the ignition switch |
| The capacitor is broken and does not hold capacity | Replace the product |
| There is no voltage in the primary type bobbin winding | Replace the product |
| Incorrect adjustment size in the distributor contact group | Set recommended size in contact group |
| Excessive wear of the PCB pad or increased diameter of the distributor lever bushing | Replace contact group |
| Defect in the bearing of the movable type distributor plate | Replace the bearing or the entire distributor |
| The ignition spark plug elements have an uncertain contact in the threaded part of the cylinder head, the spark plug caps from the insulated HV wires have broken or become oxidized; the insulated HV wires are dirty or their insulating layer is damaged | Test the contacts and, if necessary, restore the joints, clean or change the wiring |
| The corner of the distributor cover has undergone severe wear or has become defective and is in a non-contact state | Check the carbon of the distributor cap and, if necessary, replace it |
| Loss or loss of voltage through chips, through cracks or burnout points in the cover or rotor part of the distributor, as well as through a layer of soot or drops of moisture on the internal cavity of the distributor cover | Carry out a check, clean the cover from foreign layers of moisture and soot, replace the distributor elements (cover and rotor) if they are damaged |
| Failure of the resistance in the slider (distributor rotor) | Replace the slider resistance |
| The car bobbin has external or internal defects | Replace the car bobbin |
| The glow elements of the spark plugs (electrodes) are dirty with oil or the gap between the interacting elements is set incorrectly | Clean the spark plug elements and carry out adjustments to align the gap between the interacting elements |
| Ignition spark plug elements have external defects in the form of cracks and chips on the insulator element | It is necessary to replace spark plug elements with updated products |
| Incorrect connection of high-voltage wires to the contacts on the car distributor cover | Connect the high voltage wires according to the appropriate diagram (1-3-4-2) |
| Incorrect installation of the ignition in the vehicle | Test the installation of the MH and, if necessary, adjust it |
The table below will help you diagnose and troubleshoot problems that may arise.
Ignition coil device
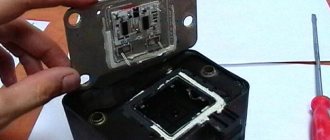
To test this system, you will need an electrical device such as a multimeter, as well as screwdrivers with different heads and insulated pliers for working under voltage. It is necessary to observe safety precautions when working with the ignition system, because... high voltage electric current flows in the circuit. It is recommended to have rubber gloves or insulated pliers.
The schematic diagram of the VAZ 2106 ignition coil is located here. The figure shows how the ignition coil is connected in the standard version.
The ignition coil, the price of which is acceptable for most Russian motorists, has the nomenclature code 8352.12. and is an oil-filled tank with an open-type magnetic wire.
The standard ignition coil of the “six”, which is easy to buy at any specialized auto parts store, is equipped with 3 contact terminals: “B”, “K” and an output for the central high voltage wire. The ignition coil is connected in the following way: the positive wire of the battery is connected to terminal “B” through the ignition switch contact. Output “K” is connected to the output contacts of both windings of the ignition coils and the negative wire of the battery through the switch.
The high voltage output is connected to another contact of the secondary winding and a high voltage wire contact leading to the breaker distribution element, which, with the rotational movement of the slider, distributes the high voltage current to the spark plugs.
Why is it necessary to set the ignition?
Correctly adjusted ignition timing allows the VAZ owner to both save fuel and improve the dynamic characteristics of the car and get rid of problems with starting the engine in the cold season.
The machine is supplied for sale with properly adjusted components and assemblies, but over time the adjustment gets lost. This fate does not bypass the ignition system either. In the latter case, the power plant ceases to operate in optimal mode, and too strong detonation often occurs in it, which, in turn, leads to accelerated wear of the main elements.
Accordingly, VAZ owners periodically have to independently set the ignition. Less experienced drivers are forced to turn to workshops for this, whose services are very expensive. Expenses can be avoided if you master all the subtleties of adjustment.
Currently, there are two main ways to configure the system in question. Let's say right away: each of them is correct. Some experienced drivers use the so-called experienced method, others prefer to make adjustments using a strobe light. Both options have both advantages and disadvantages, the sum of which does not allow us to clearly determine the most preferable one.
Regardless of the chosen method, with due diligence, it is possible to ensure that the ignition operation becomes stable and uninterrupted.