With the help of an additional pump for the VAZ stove, you can solve the problem with the low performance of the cooling system. This can be done on almost any domestic car. The stove functions normally under average operating conditions, but it may fail at extremely low or very high ambient temperatures. If the outside temperature is very high, the engine will begin to overheat. If the temperature is too low, the cabin will be very cold. This happens due to the fact that the heater does not work well and cannot provide normal air temperature in the car.
What is a pump?
A pump is a liquid pump that creates excess pressure in the cooling system. Using this pressure, the liquid circulates through all pipes of the system, evenly taking heat from all heated elements. On most vehicles, pumps are mechanically driven by timing belts or a generator.
As for the additional pumps, their design is approximately the same as the standard ones, except that they are driven by an electric motor. This is much better, since even at low crankshaft speeds (i.e., at idle), effective cooling can be achieved. All liquid will circulate through the channels at maximum speed, which will improve the operation of the entire system.
Please note that to this speed you still need to add the pressure that is created by the standard pump - no one removes it during modernization. After all, the task is not to replace the pump with another, but to improve performance.
Let's sum it up
Taking into account the above information, it becomes clear that an electric pump for a stove is a fairly simple and convenient solution that allows you to increase comfort and safety when operating a car.
In practice, after installing such a pump, it is possible to warm up the interior faster, which is important when making short trips over short distances or while driving fast on the highway in winter. The glass warms up faster and sweats less during a trip, it is easier and faster to remove snow and ice from them, etc.
As for the choice of the pump itself and its installation, the additional GAZelle pump is in demand, primarily due to its low cost. At the same time, we are not talking about quality.
Finally, we note that an additional pump in a VAZ 2109, 2114 or on a budget foreign car can significantly increase the level of comfort, save on warming up the car, etc. If the installation is done correctly and the pump is working properly, the interior will heat up faster compared to the standard heating system.
The only thing is that you should periodically check the tightness of the cooling system, since even standard elements can leak. If we are talking about additional non-standard elements, in this case the connection points require separate control.
Pump device. The operating principle of a centrifugal pump, an engine cooling system with two pumps and a switchable pump. Pump malfunctions and repairs.
What does water injection into an engine provide, the principle of operation, the main advantages and disadvantages. How to inject water into the engine yourself, available methods.
Checking the car cooling system pump. Main symptoms of malfunctions. Diagnostics of the water pump without removal, troubleshooting with removal from the engine.
How to replace the timing belt of a VAZ 2109, how to set the timing belt according to the marks. Checking belt tension, what to look for, tips and tricks.
When should you consider installing a second pump?
An additional pump for the VAZ-2114 stove can significantly improve comfort in the car in winter. It is often necessary to install an additional pump in the cooling system in the following cases:
- If the air temperature is more than 30 degrees, and the engine in such conditions overheats to critically high values. But only if the entire cooling system is in good condition. Therefore, before installing an additional pump, you need to make sure that the cooling system is working correctly.
- In the event that in cold weather the heater blows cold at idle, and the engine temperature, according to the dashboard indicator, is in the operating range.
But such problems do not always arise and not on all cars. The main criterion is the complete serviceability of all cooling elements. If the thermostat is faulty, then no additional pump will help in this case. First, you need to completely overhaul the system, install new pipes and clamps, and treat the joints with sealant. And only after that carry out the modernization.
Expected results
After all the necessary elements have been installed and connected, road tests should be carried out, during which the pump must run continuously for at least an hour. During this, it is necessary to carefully inspect all its connections to the cooling system to eliminate leaks.
After the inspection, you should check the car while driving. It may happen that a unit functioning properly at idle speed will fail when the pressure in the pipes increases.
If everything was done correctly, the heater begins to supply warmer air, and the engine is effectively cooled even under heavy loads.
What machines might have problems?
Very often such problems can be found in cars of the 9th family, as well as the 14th, “tens”, as well as “Gazelles” and “Volgas”. The only exception is the GAZ-31105 model. On this car, the listed malfunctions can manifest themselves even at normal temperatures. The problem is that there is a lot of liquid in the system, and the pump power is simply not enough.
Please note that there is no need to install an additional pump on the Gazelle stove if the engine is overheated or the stove fails to operate at normal temperatures. If the temperature ranges from -25 to 25 degrees, then a standard working cooling system will function normally in this case. If a failure occurs, then you need to look for a breakdown, which, as a rule, lies in the standard pump or thermostat. Sometimes radiators become clogged.
Purpose of the additional heater
The additional stove on the VAZ-2114 is most often of interest to motorists living in the northern regions of the country. However, recently there has been a trend that even cars “living” in the middle zone are equipped with it. As a rule, this type of car owner includes those who want to drive with greater comfort in a fully warmed-up car, and those who do not want to waste time optimizing the operation of a standard device.
The example will consider options for devices that will directly interact with the cooling system of the power unit. Maximizing the benefit of the device will be the built-in electric fan, through which the hot air flow is distributed throughout the vehicle interior. It is worth noting that such a device can be purchased at a car dealership or, if you have free time, you can make it yourself.
If a motorist does not know the required dimensions of the device and believes that absolutely any additional stove can fit into the interior of a VAZ-2114, then this is not so. It is preferable to choose a unit that will not be more than 33 cm in width, 20 cm in height, and 25 cm in depth. Therefore, it is best to opt for an oversized product that can fit between the front seats or under the passenger seat.
If you consider an additional stove, you can pay attention to the quality products of the companies TechnoMaster, Helios, Xeros and Eberspächer.
Pump selection
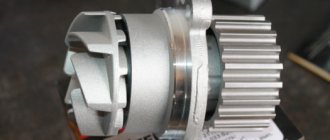
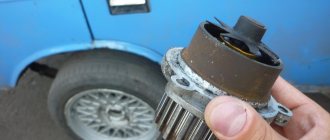
Standard pumps are driven by a timing belt, generator, and so on. But additional pumps for the 2114 stove are usually made on the basis of an electric pump. Motorists often use electric pumps that are installed on Gazelle cars. This unit has very high performance, but the build quality is not always very good. Therefore, before installing such a pump, you need to completely disassemble it, lubricate all the seals with sealant, then reassemble it and wait at least a day for all connections to dry.
Everything that was said above should only apply to old-style pumps. As for the new pumps on Gazelles, they are of fairly good quality. But after some time they can still leak.
A good alternative to the Gazelle pump is a similar one manufactured by Bosch. These units are of very high quality and also have slightly different functioning. The impeller rotates under the action of a magnetic coupling. The pumps use a DC electric motor. Since this scheme is used, it was possible to get rid of sealing connections. In this case, the possibility of leakage is completely eliminated.
But there are also disadvantages. First of all, this is a high price, as well as low performance. Let's compare the additional pump for the Bosch stove with the Gazelle unit. If the Gazelle pump has a capacity of about 1200 liters per 1 hour of operation, then the Bosch pump has only 700 liters.
How to choose an electric pump
Removing and replacing the heater radiator on a VAZ 2113/2114/2115 without removing the panel
It seems that we have figured out what the additional pump gives us. Now let's find out how to choose it:
The Gazelle electric pump is usually the most popular option. It will fit perfectly. This element is a conventional centrifugal pump. The disadvantage of this pump is that it cannot pump air due to the large gaps between the impeller and the housing.
VAZ 2109 electric pump from the old Gazelle
Note. Gazelle pumps are also different. Old and new pumps are known. As a rule, new electric pumps vibrate less and their use is more rational.
- “Advanced”, so to speak, motorists are advised to install, as a better option, an electric pump from Bosh.
- An option like a pump from Elara will also do. The manufacturer has recently significantly improved the element by introducing a new seal that does not leak. In addition, the cross-section of the fittings was increased, and this gave a double increase in productivity.
- A pump from Advers will also do.
The owner himself decides which pump to choose. There is practically no difference between the pump options, but you need to choose a pump that does not leak. In addition, by choosing a high-quality pump, the likelihood of it breaking or performing poorly will be reduced to zero.
How to install a pump
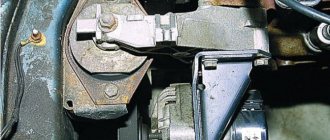
It is best to install an additional pump for the stove either in the engine compartment or under the dashboard. It is best, of course, to install it under the hood, since excess sound during operation will not penetrate into the cabin. In addition, you completely eliminate the risk of antifreeze getting inside the cabin if a leak suddenly occurs. The unit can be mounted using additional brackets. For all VAZ and GAZ cars, an additional pump is installed in the supply pipe of the stove. Consequently, you will be able to achieve the injection of coolant into the radiator, which significantly increases heat transfer.
Please note that in this case, during operation, the pressure in the cooling system will increase significantly. This can lead to loose pipes breaking off or the radiator breaking through. Therefore, before installing additional equipment, it is necessary to fully diagnose the cooling system, and be sure to eliminate all faults.
Working with a resistor
In order to be able to regulate the rate of heat entering the cabin, you can install an additional resistor for the VAZ-2107 heater. Typically the resistor has two spirals with a resistance of 0.23 and 0.82 Ohms.
The new resistor is installed under the gas pedal so that access to it is free. When the stove is turned on at first speed, the current will flow through 2 spirals. At the second speed, the current will flow through a spiral with a resistance of 0.23 Ohms. Current flows past the resistor when the third speed is turned on.
The resistor is located to the right of the accelerator pedal and is mounted on the rear of the air conditioning control unit.
Thus, the car will warm up much faster and better. An additional advantage is the reduction of glass fogging and air circulation in the cabin. In general, the heating of the air in the car will be more uniform.
Preparing to install the pump
Before installing an additional pump on the VAZ-2110 stove, it is necessary to completely drain the antifreeze from the system. After this, you need to use a blade to cut the pipe on which the pump is supposed to be installed. A pump is installed in the gap. Make sure that the arrow, which is drawn on one of the pump outputs, is looking at the heater radiator. It indicates the direction of fluid movement.
The pipes that are put on the outlets must be secured with reliable clamps. It is recommended to use Norma screw-type clamps, as they are more reliable than all others. On sale you can find products from lesser-known manufacturers, which have very sharp edges. When tightening, they simply cut the pipe, which causes a leak.
Connection diagrams
Please note that almost any electrical connection scheme can be used. It depends on what goals you set for yourself. If you are installing a pump to cool the engine more, it is recommended to connect it so that it always functions when the ignition is turned on. The pump can be powered directly from the battery. But you need to make sure that the circuit is closed only with the help of an electromagnetic relay, which will be activated only after turning the key in the ignition switch.
In the event that an additional pump is installed only to improve the operation of the stove in idle mode, it is best to connect the power through a button. In this case, it is necessary to include elements such as a fuse, relay, power button, and battery in the power circuit. Electricity can be supplied using a single-wire circuit. The “minus” is the car body. If you use such a scheme, then you will be able to turn on the pump when the need arises.
What to expect in the end?
When all the elements are installed and connected according to the diagram, it is necessary to perform operational tests. It is imperative to fill the system with antifreeze - starting the pump without it is strictly prohibited, as this will lead to its failure. The minimum operating time of the pump during testing is 1 hour. At the same time, be sure to inspect all joints and connections to identify leaks. If they are not detected, it is necessary to check the operation of the system on the fly. After all, it may be that the pump operates stably in idle mode, but when the pressure increases, it simply fails. If all work is done correctly, warmer air will enter the cabin. In addition, even under increased load, the motor will be cooled efficiently.
Hi all. Today I’ll tell you about a useful modification to the stove, which will improve the efficiency of the stove, and at the same time the interior climate. You will learn how to install an additional pump on a VAZ 2114 at home.
Owners of “fourteenth and fifteenth” are well aware of how there is not enough warmth in cold times, and we are not talking about global seasonal cooling, but about the climate inside the beloved swallow. While driving, the stove’s performance is quite sufficient, but as soon as you stop somewhere at a traffic light or in a traffic jam, the stove immediately begins to heat poorly, a lukewarm stream of air comes out of the air ducts, which makes it difficult to warm up. It was experimentally determined that the pump does not have enough power or speed to disperse hot antifreeze.
In fact, not many people know that the “jamb” with the stove and pump, which is observed in all “our” cars, can be eliminated quite easily, the main thing is to know the sequence of actions. As an option, some install an additional radiator, but a more effective option is to install an additional electric pump, which increases the performance of the stove and accelerates heat transfer.
For our “experiments”, it was decided to use an additional pump from the Gazelle; it was decided to install it on the “return” of the stove. In addition, we needed:
- A button (in my case “recirculation”) plus a connector;
- Four-pin relay, plus a connector for it;
- Several pipes plus clamps for them;
- Wiring;
- Fuse socket;
- Sealant;
- A bracket in the form of a metal corner plus a couple of bolts;
- Well, as I already said, the pump itself, in my case from the Gazelle.
When everything is available, you can transgress!
Additional pump in the car heating system
An additional pump for the stove is one of the options for solving the problem of low cooling system performance on domestic cars.
Functioning normally under average operating conditions, it malfunctions at high or low ambient temperatures. In the first case, the engine overheats, in the second, the heater works poorly and is unable to provide an acceptable air temperature in the cabin.
It is recommended to install an additional pump in the cooling system if:
- When the air temperature is above 28-30°C, the engine reaches a critically high temperature (provided that the cooling system is working properly);
- In cold weather, the heater blows cool air at idle speed at normal engine operating temperature.
Most often, the problems described above occur on the VAZ-2109, VAZ-2114, VAZ-2110, rear-wheel drive “classics”, all GAZ Volga models, except for the GAZ-31105. In the latter case, the malfunction may also occur under normal temperature conditions. This is due to the large volume of coolant in the system and an insufficiently powerful pump.
It is worth noting that there is no need to install an additional pump if overheating of the power unit or failure of the stove occurs at temperatures normal for central Russia (-25 - 25 ° C). The corrected standard system operates successfully in this thermal mode. Therefore, if it malfunctions, you should look for a malfunction.
Be sure to read
Which pump to choose
Unlike the standard VAZ and GAZ pump, which has a mechanical belt or chain drive, an electric pump is used as an additional driving force. Most often, motorists use an electric pump, which is standard equipment on the Gazelle car.
The unit has high performance, but the quality of its manufacture leaves much to be desired. Therefore, before installing such a pump, it is recommended to disassemble it, coat all seals with automotive sealant, reassemble it and let it dry for 24 hours.
Note: the above applies to old-style pumps. New GAZ pumps have good build quality. However, over time, they also begin to leak.
An alternative to GAZ products is to install an additional pump manufactured by Bosh. These units have high build quality and a different operating principle. The blade rotates under the action of a magnetic coupling, and not an electric motor, as in the first case.
The disadvantages of the imported unit include its high cost and relatively low productivity (700 liters versus 1200 liters per hour for the GAZ unit).
Installation of an additional pump on a VAZ stove can be done in the engine compartment or under the interior panel. The first option is preferable, since in this case the sound of the pump does not enter the interior, and there is also no risk of flooding the interior with antifreeze if it leaks. Depending on the installation location, the unit can be mounted at the mounting location of the standard engine compartment sound insulation or on additional brackets.
The installation of an additional water pump on the VAZ-2110 and other models of the domestic automobile industry is carried out on the heater supply pipe. In this way, it is possible to achieve a more active injection of coolant into the “furnace” radiator and increase heat transfer.
Note: increased pressure in the cooling system can lead to failure of poorly secured pipes or breakdown of the radiator. Therefore, before installing additional equipment, it is recommended to conduct a complete diagnostics of the CO.
Before installing an additional pump, the antifreeze is drained. After this, the pipe at the intended installation site is cut in half using a sharp blade, and the resulting ends are put on the pump outlets.
It is better to use Norma brand screw clamps, since products from lesser-known brands often have sharp edges and cut the pipe.
The connection diagram to the on-board electrical network may vary depending on what goals the car owner sets for himself. If the pump is installed for more efficient cooling, it makes sense to connect it in such a way that it runs constantly when the ignition is on. The unit can be connected directly from the battery, but the circuit must be closed using a relay, which is activated after turning the start key.
If you plan to install an additional pump in the heating system to improve the operation of the stove at XX, it is better to connect it through a button. In this case, the power circuit will include a relay, a fuse, a pump button and a battery. Electricity is supplied via a single-wire circuit. The “minus” in this case is the car body.
Note: it is better to install an additional pump using a second power supply connection scheme, since in extreme cold, its prolonged operation can lead to underheating of the motor and related malfunctions.
After all the necessary elements have been installed and connected, road tests should be carried out, during which the pump must run continuously for at least an hour. During this, it is necessary to carefully inspect all its connections to the cooling system to eliminate leaks.
After the inspection, you should check the car while driving. It may happen that a unit functioning properly at idle speed will fail when the pressure in the pipes increases.
If everything was done correctly, the heater begins to supply warmer air, and the engine is effectively cooled even under heavy loads.
In practice, one of the most effective and affordable methods is an additional pump for the stove. Next, we will look at what the specified heater pump is, how to choose an additional pump, and also how to install an additional pump.
So, if the stove initially works poorly, although it is fully operational, and also if the car is often operated in severe frost conditions, standard heating may not be enough even for a middle-class car.
In the case of a VAZ or old foreign cars, the problem is solved by gluing the dashboard, upgrading the heating system, installing tight dampers, replacing the heater radiator, the heater motor itself with a more efficient one, etc.
However, if all these actions are not enough, then an additional pump for the stove may be the solution. In a nutshell, the auxiliary heater pump is an electric pump that circulates the working fluid of the cooling system in a small circle even when the engine is not running.
This allows you to more actively warm up the interior when the internal combustion engine is running or when the warmed-up engine is turned off, but the driver and/or passengers are in the car (fuel savings and increased comfort).
By the way, the same thing happens when driving on the highway at high speed in the cold season, when oncoming air flows intensively cool the engine compartment, as well as the coolant in the cooling radiator, etc. In turn, the additional pump to the heater causes the coolant to circulate more actively and give off more heat.
Another advantage is ease of installation, which means minimal intervention and changes to the factory design. To put it simply, an additional pump is installed so that the coolant circulates in a small circle.
A simple connection of the pump to the vehicle's electrical network is also implemented. Usually, all the necessary fasteners, adapters, connectors, etc. are included with the pump.
First of all, the pump itself is the most important element. The GAZelle stove pump is in greatest demand on the market, as it is cheap and affordable. However, the solution has several serious drawbacks (noise during operation, high power consumption, average resource).
It turns out that even taking into account the fact that the Gazelle heater pump is inexpensive, experts recommend considering an additional BOSCH pump for a passenger car.
Depending on which pump was chosen and which car it is installed on, you may need to purchase a 4-pin relay, a 3-pin toggle switch, as well as wires, terminals, corrugation, hoses and clamps, bolts, fasteners and even sealants.
For example, a sealant is necessary if a Gazelle stove pump is installed on a VAZ 2114. Let’s also add that the GAZelle pump requires additional modernization, while installing an additional BOSCH pump is faster and easier.
When all the nuances are taken into account and a suitable electric pump is purchased, you will often also need to buy the additional elements and fasteners discussed above. Only after assembling the complete installation kit can you proceed to installation. Let's look in general terms at a simple installation of a BOSCH pump.
- At the initial stage, a structure is assembled from two hoses and a pump. Considering that the pump is a outlet for antifreeze or antifreeze, it is important to securely fasten the hoses to the fittings.
- Next, you need to put the car on the handbrake, remove the terminals from the battery and drain the antifreeze. Next, having studied the installation diagram, you should find two hoses from the stove. For example, on a VAZ 2114 you will need to remove the right hose.
- Then the assembled structure is installed in place of this hose, and the pump itself is fixed in a suitable place (for example, on a VAZ 2114 on the gearbox housing).
- In fact, the pump cuts into the gap in the antifreeze supply hose to the stove, and a 90-degree angle insert made of a copper tube of a suitable diameter (for example, 22mm) is also installed. The output from the thermostat is connected to the top pipe (input), and the side pipe (output) is connected to the stove.
- Next, having connected all the pipes, all that remains is to pour antifreeze into the system, apply power to the pump and check the operation of the device. At the same time, all connections should be inspected for leaks.
Installing an additional pump on a VAZ 2114 - step-by-step instructions
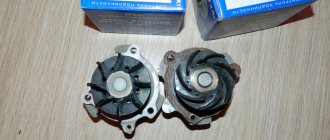
- The first step is to disassemble our add-on. pump, this is done in order to improve the tightness of the connections. Remove the rubber gasket and coat it generously with sealant. As many who have done this procedure write, over time the rubber gasket begins to leak, so it is necessary to “seat” everything with sealant. Instead of standard fasteners, I decided to use studs with nuts of suitable diameter.
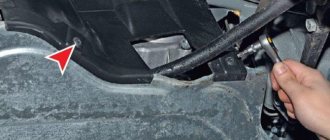
- Installation of an additional pump. In most cases, everyone recommends draining the antifreeze, but I was able to complete the installation without the need to drain the coolant. The connection looks like this: we take the “original” pipe that goes from the stove to the pump and connect it. The L-shaped part of the hose that goes to the block had to be cut off, and the pump outlet was connected with another hose. All hoses are secured with clamps, and the pump itself is conveniently located on one of the gearbox fasteners; all that was required was a curved bracket. You can see more clearly what it looks like in the photo.
Video: DIY water pump replacement procedure
It is necessary to change the rubber gasket even if it shows no signs of wear or damage. To ensure reliable sealing, it is recommended to coat both the pump mounting location and its junction with the cylinder block with a heat-resistant sealant.
How to change pipes on a pump
Replacing the pipe on the water pump is advisable in cases where the hose is swollen or has small cracks through which antifreeze leaks out. A significant disadvantage of changing the pipes is that they are located below the pump - that is, you will have to jack up the body and crawl underneath.
The old pipes are removed after the antifreeze has been drained and the pump itself has been dismantled. It is important to clean the landing site from dust, dirt and coolant leaks. Then connect new pipes to the new pump, installing a new gasket at the junction. It is recommended to use heat-resistant sealant to ensure reliable connections.
How to install an additional pump on a VAZ 2114, 2115
Experienced VAZ owners know that the “fourteenth” and “fifteenth” are ideal for conducting a variety of experiments on installing this or that equipment. For example, if the standard heating on a VAZ 2114 through the stove is not enough for the owner, then you can install a second (additional pump). The essence of this procedure is that the pump will pump antifreeze in a small circle, thus providing better engine cooling and maintaining the temperature in the cabin in winter.
Installing an additional pump takes a maximum of 10 minutes, but the procedure will increase slightly in time due to the fact that you will have to drain the antifreeze from the system.
You will need to purchase the following spare parts in advance:
- water pump (for models 2114 and 2115, the ideal solution is a pump manufactured by Bosch 0 392 020 034);
- elements of electrical equipment;
- several hoses of different lengths (depending on the diameter of the small circle) with clamps;
- fastening for the pump.
Assembling the structure
In this case, you will already need some experience in independently servicing a VAZ. So, to install an additional pump, you need to:
The final stage is pouring new antifreeze.
Replacing the pump on a VAZ 2114, VAZ 2115 (16 valves)
The procedure for replacing the water pump on 8 and 16 valve engines will be slightly different. The fact is that on a VAZ 2114 with 8 valves there is only one crankshaft pulley, and on cars with a 16-valve engine there are two. That is, the designs of cars with different types of engines are somewhat different from each other.
In this regard, you need to be extremely careful: pumps for VAZ with 8 or 16 valves cannot be considered interchangeable. That is, when purchasing a new water pump, you should make sure that it is suitable specifically for your type of VAZ engine.
Cooling system and its features
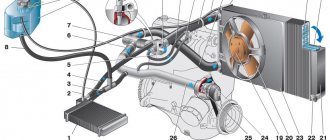
From thermostat 29 to tap 21 there is a “supply hose”. We are not interested in him! The pump is inserted into hose 19. It is connected to the pump supply pipe (part 20).
Everything here is trivial
If we look from under the bottom, we will see two hoses near the partition. We need the one that is fixed closer to the right wheel. And now, instead of hose 19, an assembly is installed: the same hose “21083-8101010-01”, an electric pump, hose “2101-8101204” (to pipe 20). That's all, actually.
Each hose is attached to the nozzles with two clamps. The article number of one clamp is “2108-1300080-10”.
Purchase parts in advance:
- BOSCH pump 0 392 020 034 or pump 32.3780-01 for Gazelle with 18 mm pipes (important);
- Electrical parts;
- All hoses and clamps;
- The BOSCH pump requires VAZ fasteners: a intake pipe clamp, as well as a bracket for this clamp (all from LADA-2101).
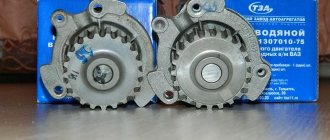
The pump from the Gazelle will have to be modified: the body is disassembled, degreased, the rubber gasket is lubricated with sealant...
GAZ pump after modification
When assembling, use screws with nuts instead of standard self-tapping screws (see photo).
By installing an additional pump on the VAZ-2114, you don’t even have to connect it. Everything will work as before. The main thing is that the pump does not leak, and we have already indicated the solution.
What components need to be purchased in advance?
Before you begin installing an additional pump, you should prepare several necessary components:
- Additional electric pump. Ideally, you need to buy a pump, which is recommended for installation on the Gazelle. It is this design that will perfectly cope with its main purpose, and it is most convenient to install it on the VAZ-2114.
- Ignition or starter relay, since the contacts in these components open perfectly.
- A small piece of aluminum or reinforced hose.
- Cooling liquid, at least 2 liters.
- Connecting clamps 6-8 pieces.
Once all the components have been assembled, you can begin installing the additional pump.
Approximate procedure for installing an additional pump
If all the necessary parts have been purchased, do the following:
- A “unit” consisting of three parts is assembled. The short hose is the “outlet”. Below is an example with a BOSCH pump.
Antifreeze drainage unit
External outlet hose
BOSCH pump mounting method
Be aware that the plug from the knock sensor will fit into the pump connector (you need to buy it). The connection diagram is discussed below.
Example with a GAZ pump
Clarifications for the domestic pump:
- Do the “assembly” as in step 1 (see above);
- The “assembly” is assembled;
- The pump mounting location is the upper corner of the manual transmission housing (see photo). Without the details of an iron constructor about here .
GAZ pump mounting method
Variant of the scheme for the VAZ-2114
We connect the motor through a fuse and a relay rated at 10 Amps. The relay will be turned on by a button attached to the device.
Scheme (simple version)
The “+” voltage was taken directly from the battery, but this can be done - a sealed holder “hangs” on the wire, where the fuse (5A) is located. Installing a button looks simple:
- Remove all the handles;
- Move the plastic panel towards you;
- We install a new button and connect the wires.
As a result, you can see what is shown in the photo.
Circulation button
What can be improved
- A diode is connected in parallel with the relay winding in the “back to front” direction, thereby extending the service life of the button;
- Connecting to the battery directly is bad. It’s better to find another point with a “plus”;
What we got
Installing a button
If you decide to acquire additional control for this modification, you will have to fool yourself further.
Voltage + can be taken directly from the battery, but we must not forget about the fuse on the wire where the sealed holder hangs.
In short, the installation is simple:
- remove the panel;
- disassemble it and remove the backlight button;
- we replace its contents with what we need and collect it back.
But in practice, everything is not so simple and this algorithm requires several clarifications:
- We remove the rheostat (in principle, you can throw it away, it is no longer needed).
- The wiring is heat-shrinkable and attached for convenience to the rest of the wire bundle.
- We prepare the negative (we look for it in the area of the dashboard) and positive (you can take it from the ignition) terminals.
- We find a vacuum booster, install a relay in its area, and then pull the wire from it into the interior to the button.
- The electrics are connected, we connect everything on the button, and then we put the dashboard back together.
There are examples of craftsmen who do not drain the antifreeze, they simply plug the pipe during the work, the latter’s costs are only 1.5-2 liters.