The Priora has three brake lights: two in the rear lights and an additional one installed in the spoiler. Their purpose is to warn drivers of cars moving behind about braking. Operating a vehicle with non-functioning brake lights is prohibited. If the lights on the Priora do not light up, you need to contact an auto electrician or fix the problem yourself. In the latter case, the driver needs to have a minimum set of tools to find and eliminate the causes of the malfunction.
Removing and installing the flashlight
The rear light is accessible from the luggage compartment of the Priora. To directly get to the lamp, you need to pull back the trunk trim.
The process of removing the rear light
- We open the trunk and fold back the upholstery in the rear part of the wing.
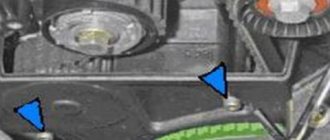
- Then you can see 3 wing nuts that hold the flashlight on. We unscrew them while holding it on the other side.
- Next, pull the flashlight towards you and remove it from the rear fender.
- Removing the lamp socket is done by turning it counterclockwise and pulling it towards you.
- Installation is carried out in reverse order.
The principle of operation of the headlight range control and options for its implementation
In its simplest form, the principle or description of the work will be as follows: the car has the ability to adjust the light directly from the interior. If the loading of the car has changed, for example, additional passengers have boarded, or the trunk is loaded, then the light will be shifted upward, which will lead to blinding oncoming drivers. To avoid this, it is possible to configure its direction, which allows you to move the light beam down or up to return normal lighting.
The described principle, which forms the basis of the corrector’s operation, is implemented using different methods. Today the adjustment could be:
forced action or automatic, in two versions, when used:
Forced adjustment
With this approach, the light flux is controlled manually, which is why a special switch is used in the car interior. Changing its position leads to a change in the position of the lighting fixtures.
Priora light control module
and Kalina.
Depending on the type of drive used in such a device, there are:
- electromechanical headlight range control;
- mechanical headlight range control;
- hydraulic;
- pneumatic, etc.
As an example of how any of the devices mentioned works, consider an electrical corrector
headlights It would be more correct to call it not electrical, but electromechanical. It includes:
- position switch;
- electric gear motor located on each headlight;
- connecting wires.
The principle by which such a device works is quite simple. When the position of the switch in the car is changed, an electrical signal (voltage) is supplied to the gearmotor. Its rod, one end of which is located on the headlight reflector, moves. This movement of the rod leads to a change in the position of the associated reflector and, ultimately, in the luminous flux.
Automatic luminous flux correction
When an automatic headlight leveler is installed on a car, the driver does not need to do anything additional; in this case, the automation works for him.
It includes:
- device control unit;
- ride height sensors;
- actuators.
As already mentioned, its operation can occur in static and dynamic mode. In static mode, the automation controls the vehicle's ground clearance, and when it changes, due to additional loading of the vehicle, the control unit
sends an electrical signal to the actuators to adjust the position of the lighting fixtures.
However, this mode of operation, with the beginning of the use of xenon lamps, turned out to be insufficient. The luminous flux they generate
so powerful that even its short-term impact can blind oncoming drivers. Therefore, to prevent such a phenomenon, a dynamic corrector appeared.
Its main difference is speed. The operation of such a corrector is capable of changing the direction of the light flux in a fraction of a second. This allows you to keep the luminous flux within specified limits when accelerating the car, braking it, cornering and on uneven roads. Thanks to this, when adjusted correctly, even bright headlights do not blind oncoming drivers when making maneuvers.
Corrector
headlights have become an essential element of car design. Its use improves driving safety at night by ensuring constant illumination of the road surface and reducing the possibility of dazzling other drivers.
Replacing lamps
After the lamp is removed, you can begin replacing the lamps.
- To do this, unscrew the lamp socket by turning it counterclockwise.
- We take out the cartridge. The lamp should be removed from the socket by slightly pressing it and turning it counterclockwise 90 degrees. After this, the lamp should come out of its seat.
- Install new lamps in reverse order.
How to disassemble a headlight, rules for performing the procedure
Pinout of Lada Priora comfort block
No matter what car the headlight on is broken (on Kalina, on Priora or another vehicle), the rules for disassembling the mentioned device look like this:
- The sealing compound should be heated evenly, relative to the entire perimeter of the lighting fixture. At the same time, the maximum heating temperature of the sealant is 3000 degrees. Otherwise, the device may be damaged.
The distance between the hair dryer and the headlight housing should be 20 millimeters. This value is considered optimal.
Avoid applying significant force when working with a car light. This is due to the comparative fragility of the material from which the device is made. When removing the headlight, you must turn off the power supply to the vehicle. Such actions will prevent a short circuit.
At the same time, you should be guided by the information contained in the instructions for the vehicle.
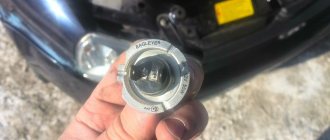
What kind of lamps are installed in the Priora headlamp?
The Priora's rear light has 4 lamps, which are responsible for turning on the turn signal, dimensions, reverse, brake light and PTF. They are almost the same, but have some differences.
- The turn signal lamp is marked PY21W and is orange; when installing a regular white lamp, the turn signal will blink white.
- The size and brake lamp has two spirals, which are responsible separately for braking and illumination.
- The reverse lamps and PTF lamps are the same.
Tail light lamp marking table
| Purpose of lamps | Marking | Peculiarities |
| Reverse | P21W | White |
| Turn signal | PY21W | Orange color |
| Brake light and dimensions | P21/5W | Two spirals for dimensions and a brake signal |
| Rear PTF | P21W | White |
How does the Priora headlight circuit work?
Let's consider the operation of the Priora headlight circuit in manual control mode. When you turn the lighting control knob of the lighting control unit to the position of turning on the headlights, power from its pin XZ is supplied to pin 56. In this case, power is supplied to fuses F6 and F7, and through them through the connectors to the low beam lamps of the Priora headlights. In addition, power is supplied to the headlight electric corrector, and when you turn the regulator of the lighting control unit, it will work. Power is also supplied to the steering column switch for low and high beam. If the switch is moved to the position corresponding to the high beam, the high beam relay K7 in the fuse and relay box will turn on. In this case, fuses F3 and F4 will receive power, and through them the high beam lamps in the headlights. Accordingly, the Priora low and high beam headlight lamps will light up simultaneously.
The Priora headlight circuit in automatic mode differs only in the supply of voltage to the low beam fuses and the steering column switch. Let's take a closer look. When you turn on the ignition and the automatic lighting control button, the automatic lighting control unit turns on. If the lighting on the street is not sufficient, it will receive a signal from the light sensor located on the windshield along with the rain sensor. Having received such a signal, the control unit connects the coil of the electromagnetic relay K1, powered by it from the ignition switch, with a minus. An electric current passes through the coil; the armature of the electromagnet is attracted and closes the contacts. In this case, the same wire will receive power as when turning on the headlights in manual mode. The further passage of current in the Priora headlight circuit is similar to that described earlier.
Replacing brake light bulbs and parking lights
With the release of the restyling of Priora 2, a large number of details have changed in it. The rear lights are especially noticeable; they have become LED. Now the dimensions have become lower, which gives the car a wider appearance in the dark. To achieve this effect, it is not at all necessary to buy and install LED lights.
To do this, just swap the backlight from the top position to the bottom. We don’t touch reverse and turns!
After such a replacement, when you press the brake pedal, the brakes will light up where the side lights and fog lights were previously illuminated. And the dimensions and rear PTFs will glow from the bottom of the lamp.
Features of headlight adjustment
About the design and operation of the car What is better than Lada Priora or 2112. What is better than VAZ2112 or Priora. Calculations and miscalculations
It is advisable to place an assistant in the driver's seat or place a load weighing about 75 kg. The vehicle's tires should be well inflated and the tank at least half full to bring its weight closer to the weight at which it is driven daily.
The adjustment is carried out on a vertical wall or stand on which markings are applied. To correctly adjust the optics, it should be possible to move away from the wall at a distance of 5-10 meters. This makes it possible to create an imitation of lighting on the road.
Wall marking scheme
To apply markings, you need to place the car closer to the wall and turn on the low beam. Then you need to alternately mark the center of the trace from each headlight and the centers of their symmetry. By connecting these points, we get a horizontal line. Then, below, two more lines should be drawn in parallel. The second is at a distance of 5-12 cm, and the third is at a distance of 22 cm from the first. In addition, you need to draw vertical lines through the center points of the car and the lights.
After turning on the light, you need to ensure that the top point of the light is on the second line. The adjustment is made using an electric headlight adjuster. The adjusted light will illuminate the road well and will not blind oncoming drivers.
Do-it-yourself Lada Priora headlight adjustment video instructions
Any car must have its headlights adjusted correctly. If a car has problems with its headlights, it can blind the driver driving oncoming vehicles, leading to serious traffic accidents. At best, such a problem will significantly reduce visibility on the road.
It is recommended to check the correct adjustment of the headlights once a year or every time when replacing a light bulb or repairing the front body part. It is worth noting that self-adjustment of the car’s headlights is considered temporary and can be carried out until the car is serviced in a specially equipped workshop.
If your vehicle's headlights are not adjusted correctly, this can pose a serious safety hazard at night.
This especially applies to cars that have xenon installed. In order to prevent an emergency and not disturb other road users, the headlights should be adjusted correctly in a timely manner. Let’s look at how to do this yourself using the Lada Priora car as an example.
Necessary tool
To adjust the headlights on a Lada Priora you will need:
- hex bit 6 mm;
- plywood;
- chalk;
- roulette;
- pressure gauge
Progress
- First of all, we park the Priora car on a flat area five meters from a flat wall. Fill the tank with fuel until it is full and use a pressure gauge to equalize the pressure in the wheels. After inspecting the headlights, thoroughly wash them from contamination. We check that the headlight bulbs are working properly. If necessary, we install new ones.
- After the preparatory procedures, we proceed to adjustment. We move the lighting width control lever to position “0”. This position corresponds to the load of the vehicle with the driver. Turn off the lights and rock the car from side to side. Thanks to the rocking, all suspension elements will take a standard position. We ask a colleague (about the same weight as you) to sit in the driver’s seat of the car.
- For further adjustment, draw a special marking on a flat wall. The center line should be drawn so that the distance from the center of each headlight to the axle is identical. We mark the centers of each headlight with dots on the wall and draw two lines vertically through them. Draw a straight line between the lines and mark it with the letter “A”. Below, at a distance of 12 and 22 centimeters, draw two more lines in parallel.
- With the low beam on, close one of the headlights. The top point of the light spot from the headlight should coincide no higher than the horizontal center line. Also, the boundaries of the light beam of the fog lights are located along the same line.
- We make sure that the intersection of the inclined and horizontal sections of the boundaries of the light fluxes (at the point where the light beam breaks) coincides with a line that is drawn vertically and passes through the point marked as the center of the headlight. If deviations in the luminous flux are detected, we adjust the headlights with a hexagon of 6 millimeters by rotating the horizontal and vertical position screws. These screws are located under the hood in the headlights.