Windshield on Kalina
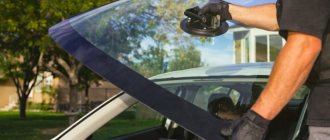
How to replace the windshield for Lada Kalina? This work is no different from replacing glass on other cars. It should generally be replaced when chips or cracks obstruct vision and make repair impossible. You also need to replace the glass if it has any mechanical or natural deformations.
How to do this - on your own or by contacting a car service? Everyone decides for themselves, but personal experience is always invaluable. Therefore, it is never too late to discover something new in car repair, for example, replacing Kalina glass.
We replace the windshield on a Kalina car
Windshield on Kalina
How to replace the windshield for Lada Kalina? This work is no different from replacing glass on other cars. It should generally be replaced when chips or cracks obstruct vision and make repair impossible. You also need to replace the glass if it has any mechanical or natural deformations.
How to do this - on your own or by contacting a car service? Everyone decides for themselves, but personal experience is always invaluable. Therefore, it is never too late to discover something new in car repair, for example, replacing Kalina glass.
What is this?
By windshield, motorists understand a transparent shield that is installed in a hole located in the front of the cab. Auto glass performs the function of protecting the driver and passengers from insects flying ahead, wind, dirt, dust, and precipitation.
You may need to purchase a protective windshield in the following cases:
- A crack appeared on the coating.
- The product was broken due to vandals.
- There are minor manufacturing defects.
- I would like to install a more reliable option.
The presence of chips, cracks, and holes in the windshield can impair the driver’s visibility of the roadway. This increases the likelihood of an accident on the road. The coating can be restored if it has a small scratch or chip. But if there is more significant damage, it must be replaced. High demands are placed on the windshield. Therefore, when purchasing, it is better to give preference to well-known brands that produce high-quality spare parts for cars.
Materials and tools
All necessary tools and materials are available for sale both as a set and separately. Only high-quality materials made in Europe should be used. You can purchase a special glass adhesive kit, but make sure it has everything you need to do the job. So, to replace you will need:
- the car glass itself;
- string (there is a set of string with a needle), you can use a knife;
- primer for preparation for sealant;
- a retractable construction knife to remove the remains of dried sealant;
- sealed glue with a gun specifically for gluing car windows;
- liquid for degreasing surfaces;
- masking or craft tape to secure the new windshield.
You need to purchase a molding; it provides good fastening and does not allow noise and moisture to penetrate into the car interior. We buy the windshield along with it.
It is better to carry out the work in a ventilated area, since the chemicals that will have to be used have their effect on the body. You should work with gloves, preferably made of cotton, so as not to damage the skin.
Preparatory work
We have purchased everything we need, now we need to prepare the car for work.
- Remove the wiper arms.
- Remove the air duct grilles.
- Remove the interior rear view mirror.
- Remove the stripes of the drive pillars and the front trim of the instrument panel.
- With the front doors open on each side of the car, remove the outer door seals just above the windshield.
- Remove the packer (seal) from the outer boundary of the glass.
- Delete two adjustment clips.
A little effort and preparation will help the car enthusiast easily change the windshield on Kalina. If you go to a car dealership, such work will be quite expensive. Therefore, if you have free time and skills, you can replace the glass in your car yourself.
Varieties
The following types of auto glass are distinguished:
- Stalinite . This is single layer tempered glass. Has high mechanical strength and heat resistance. When destroyed, it breaks up into many small fragments with blunt edges. Therefore, this type of product can be called safe.
- Duplex . It is distinguished by the presence of a layer of transparent plastic. This gives the product strength and keeps fragments from breaking.
- Triplex . It consists of two sheets of glass connected by a layer of polyvinyl butyral film. The product is characterized by increased strength. When destroyed, the fragments remain glued to the film layer.
It is better to choose the latter option as a windshield for the Lada Kalina. It will cost more, but it guarantees a long service life, safety and durability.
Based on quality and price, the protective element is divided into three classes:
- Premium
- Business.
- Economy
The last option is the least expensive. Premium glass will be more expensive, but of better quality.
Depending on the marking there are glasses:
- With American type of marking.
- With Russian.
- With European.
Depending on the manufacturer, the spare part may be of the following brands:
- Pilkington.
- P.P.G.
- Saint Gobain Securit.
- AGC.
- C.S.G.
- Tamglass.
- Shatterprufe.
- Guardian.
- JAAN.
- KMK.
- Glass-Lux.
- Starglass.
- FYG.
- XYG.
Glass included in the package:
- Regular.
- With rain sensor.
- With seal.
- Heated.
There are products by color:
- Transparent.
- Tinted.
At the place of purchase there are glasses for the Lada Kalina:
- From the online store.
- From the car market.
- From a store that specializes in selling spare parts for Lada cars.
- Purchased based on an advertisement from car owners.
Instructions for replacing the windshield on Kalina
How to remove glass correctly
- We take the string in our hands and pierce it with glue-sealant. One side of the string is inserted into the interior of the car, its ends are put on special handles, which are usually included in the kit. To make it easier to hold, the string can be wound around a screwdriver. Using a string or knife, cut off the old sealant over the entire area of the glass. An assistant is needed for this operation. The string needs to be worked inside and out. Carefully remove the glass.
- Using a construction knife, we get rid of the old sealant. Don't leave any pieces behind, clean everything out, even small particles. This way we prepare a place for new glass. The old molding is already damaged and will not be useful, so we install a new one.
- We try on the new windshield at the installation site. You can make the necessary notes using a marker or felt-tip pen, this will allow you to achieve maximum accuracy when installing the glass. Many car models already have marks for installing glass, which greatly facilitates the work.
- We degrease the glass groove with a special liquid. Be sure to read how to use it. Improper use can affect both health and future work. It should be noted that the liquid should not contain silicone. If there is corrosion where the glass is installed, it must be removed with an anti-corrosion agent until it is completely shiny.
- Prime the surface. Prime the area where the windshield is glued in and where it contacts the groove with a brush once. Remove excess sealant. You can use an activator to treat dried sealant.
- We take the sealant and an air gun and very carefully apply the glue in a uniform, continuous strip. This is the most important process in replacing glass.
- Attach the windshield. This should be done no later than 5 minutes after applying the glue. We monitor the coincidence with the marker marks. Very carefully, but firmly press the glass along the entire perimeter. The sealant is evenly distributed, ensuring contact between the glass and the groove. If some of the sealant comes out, do not rush to remove it, let it dry. Once dry, you can easily clean it off.
- Now you need to fix the glass. To do this you will need masking or stationery tape. Painting is better because it is easier to remove later. You can additionally use special attachments on the outside of the window opening for better glass fastening. We first glue the tape onto the glass, then tighten it a little and glue it to the body.
Removing the power windows
Let's start with the front mechanisms
Before proceeding with repairs, it is necessary to dismantle the defective device. But in order to remove the window regulator, you will first have to remove the door trim.
So, for work we need:
Now let's get down to business.
- The first step is to lift the glass all the way and secure it at the highest point with tape.
- Then, using a wrench, remove the two bolts that hold the glass in place (1 in the picture). Also, you need to unscrew the bolt of the inner handle of the lock.
- The next step is to disconnect the device motor and wires (2 in the figure).
- We unscrew all the nuts on the device (there are 11 of them in total) and remove the window regulator (2 in the figure).
The front window lifters have been removed, let's proceed to dismantling the rear ones (if the problem lies in them too).
Here we need:
- two keys, 10 and 8
- masking tape.
- Just as in the case of the front window lifters, raise the glass all the way and secure it with tape.
- Using a size 8 wrench, unscrew the three nuts securing the mechanism.
- Take a 10mm wrench and remove 2 bolts and 3 nuts.
- Now it will be easy to pull the device out through the hole at the bottom of the rear door.
Dismantling has been completed. Carefully examine the condition of the device; if it cannot be repaired, replace it with a new one.
Changing the lobovukha
Replacing the windshield on a Lada Kalina requires some preparation. To do this, you need tools and consumables:
- set of Phillips and flat head screwdrivers;
- set of wrenches, heads No. 8, 10, 13;
- stationery knife for removing sealant;
- a thin drill for making a hole in the old sealant for pulling the saw through - if necessary;
- special cord saw for cutting glass;
- directly sealing composition (you can buy glass sealant from your favorite manufacturer);
- instead of glue, saws and degreasers, you can also buy a kit for gluing glass - everything is already there;
- suction cup handles for lifting the window from the groove (if not, you can do without them);
- a bottle of solvent for cleaning the seat;
- rags.
Pricing factors
The choice of windshield for the Lada Kalina should be approached responsibly. Motorists who are accustomed to shopping wisely visit several points of sale and compare the characteristics and cost of the product. The price range for such spare parts is quite large. This is due to the influence of the following pricing factors:
- Type.
- Quality.
- Thickness.
- Strength.
- Manufacturer.
- Requires additional purchase of sealant.
- Originality.
- State.
- Place of purchase.
- The fame of the implementer.
- Purchase method.
- Delivery required.
How to change a rear window
On Lada Kalina, replacing the rear window is carried out in the same way as the front part. There is no fundamental difference in the sequence of actions and the required tools. The only caveat is that you need to remember to turn off the rear brake light and the contact of the heating element. If this is not done, during removal you can tear off the heater line from the fasteners on the car body.
It is noteworthy that some motorists use brake cables from a bicycle or motorcycle as a saw. Users insist that such a “string” does not break and cuts glue better. The only negative is that if the window being replaced is planned to be used further, the edges of the glass may be severely deformed.
Approximate prices
In Russia, you can buy a high-quality windshield for a Lada Kalina for approximately the same amount of money:
- KMK - about 2500 rubles .
- AvtoVAZ - from 2400 rubles .
- Glass-Lux - about 2300 rubles.
Approximate prices for different types of glass:
- Regular - from 2300 rubles .
- Tinted - from 2600 rubles .
- With a rain sensor - from 2600 rubles .
- Heated - from 3000 to 7000 rubles .
How to repair headlights
Replacing the headlight glass of a Lada Kalina will force the technician to work more. For high-quality repairs, you will need to remove the unit itself. Actually there is no problem here, but to gain access you will need to disassemble half of the front fascia of the vehicle.
- Set the car to the handbrake. For the convenience of the master, you can drive the car onto a viewing hole or a special lift - this will make it convenient to work.
- Remove the positive terminal from the battery.
- Unscrew the front fastenings of the crankcase compartment protection. In principle, it can be dismantled entirely. If the panel is not in the way, you can simply move it away.
- Remove the license plate and radiator trim. All fastening elements are not durable. Use a screwdriver and wrenches carefully.
- Unscrew the bumper and its amplifiers. In this case, you will need to apply force - the bolts often stick.
- Next, use key No. 10 to unscrew the headlight from its mount and pull the module out of the socket.
- The glass in the block is attached to 8 plastic clips. The latches are pryed off with a flat screwdriver or similar tool and the part is completely released.
- Next, you will have to use a stationery knife, a special blade - the glass is seated on the sealant, it needs to be cut off.
- Installation is carried out in reverse order.
As a recommendation, some experts use a household hair dryer when cutting the sealant. The heated composition is easier to remove and the procedure is completed faster. Also, during repairs, you must act carefully - the parts around the headlight are tightly fitted to each other. Therefore, it must be pulled out carefully.
Replacing glass on Kalina-2
Replacing Lada Kalina glass of the 2nd generation and the first type on the doors is performed in approximately the same way.
- It is recommended to lower the window completely to avoid it falling out.
- Next, the door itself is disassembled. The panels are unscrewed and the armrest is removed.
- Unscrew the door guides. Typically the screws are located inside the glass slides. Depending on the modification and year of manufacture, the location of the elements may differ.
- Next, unscrew the inner guide lock on the side of the door. To do this you will need a #8 head. Due to the poor location, the bolts often become stuck due to moisture ingress. Before unscrewing, it is recommended to treat them with proppant type VD40.
- After the window is freed from the slats, you will need to unscrew its fastenings to the window regulator. To do this, the position regulator is moved to the middle or upper position. Next you need to use a No. 8 wrench to loosen the fastening screws.
- Pull out the old glass through the top of the door and install new glass in its place. Dismantling is carried out with extreme caution - there are a large number of sharp elements inside the door that can damage the part.
- The assembly procedure is performed in reverse order. The last thing to install is the seal.
