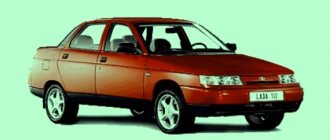
01/26/2022 17,097 VAZ 2110
Author: Ivan Baranov
Every car must have a working horn. Thanks to the horn, the driver can prevent an emergency situation on the road and avoid a possible collision. But it often happens that the horn refuses to work. For what reasons does the sound signal on the VAZ 2110 not work and how to fix this problem - read below.
[Hide]
Why did the horn stop working?
You can identify the cause of the malfunction and eliminate it yourself, taking into account the advice of professional technicians.
Most often, the signal may stop working due to the following reasons:
- A fuse that has become unusable. To fix the problem, you will need to replace the burnt element, which must match the color and value of the previous one. This procedure does not take much time; it can be completed in just a couple of minutes. But if after a short time the new fuse blows again, this problem needs to be solved at a service station.
- If after replacement the sound signal does not appear, this will indicate a short circuit in the electrical network. To eliminate the cause of the problem, the owner’s experience is rarely enough, so the right decision would be to seek help from experienced professionals.
- The sound signal stopped working due to a breakdown of the horn itself. If replacing the fuse did not produce any result, and the audible brake light still does not work, then most likely the horn itself is broken. It will be difficult even for an experienced car enthusiast to cope with the problem on his own, since in order to identify the cause of the breakdown, you need to connect the part to the battery. If you decide to check the signal yourself and the element does not start functioning after connecting to the battery, the easiest way is to buy a new horn and install it.
The feasibility of self-repair
So does it make sense to repair the horn yourself? If we take into account the recommendations described above, then the repair is advisable only if the car owner is as careful as possible when performing it. After all, during the repair work, there is a high probability that an inexperienced car enthusiast will damage the wiring in the unit or connect the contacts incorrectly. Therefore, if you have never encountered a repair procedure before, it is better to entrust this matter to specialists or simply replace the horn assembly.
Wiring test for non-working brake lights (ground test)
Let's look at the basic diagram: the brake lights and the reversing lamps have a common ground pin. If contact with this pin is broken, the reverse lamps will not turn on. Well, brake lights too.
Connector for connecting “internal” lights. On the left side there is a connector through which the wiring goes to the fifth door. The connector has black and reddish wires. Check the voltages on them. In most cases, the ground on the black wire does not ring. But it may be necessary to clean the connector itself.
Usually, if the ground breaks, another pin is used - the one that is connected to the glass heating coil. If the “plus” does not come to the reddish wire, we check the “frog”. It's simple here:
- Disconnect the connector with 2 wires from the limit switch;
- Using 17mm wrenches, loosen the two nuts: holding the bottom nut, rotate the top one;
None If all the steps fail, there is only one thing left to do: contact a qualified electrician. We want success.
- carfrance.ru
- ladaautos.ru
- www.drive2.ru
- vivauto.ru
We diagnose the sound signal
It all starts with the connector pins:
- Let's say the voltage “+12” is not caused on both contacts. Then look for a short circuit or break point, starting from terminal 6-Ш5 (diagram above).
- If positive voltage is received, check the second terminal. It will contact ground when you press the horn button. During this check, the battery must be disconnected.
- If the previous two steps are completed successfully, then voltage is supplied to the horn. It may need to be replaced or the contacts cleaned.
By the way, in “step 2” it is recommended to rotate the steering wheel - contact may be broken at certain angles of rotation.
Debugg
Having become familiar with the reasons why the horn usually does not work, you need to begin troubleshooting.
For signal restoration to function, first of all, the location is examined. It is a fuse in the mounting block and is designated F7. fusible If the insert is damaged, then a new one is installed in parallel. The device is checked and its connectors are cleaned if necessary.
If a new fuse blows immediately or the described trouble occurs to it after a short period of time, then perhaps the root cause of the surge is voltage. Here you will have to inspect the entire on-board network.
When it turns out that the VAZ-2110 signal itself has failed (we described how to check above), then it will have to be replaced with a new one. It will cost about 350-550 If.
rubles there is reason to suspect the occurrence of a short circuit, then arm yourself with a multimeter and start diagnosing. The problem named is indicated by the absence of voltage on both when the wires are pressed
Pay attention to the diagrams of the peculiarity of connecting the horn - the circuit is constantly connected to the plus, but the minus is broken by the horn
The failure of the ring and clamping contacts means that you will have to buy a new button, since these elements cannot be purchased separately. When they generally look decent, then the signal can be restored to functionality if it is possible to clean them. In any case, you will have to disassemble the steering column of the car.
Methods for troubleshooting
If the horn circuit is broken and the horn stops working, then there are several options for solving the problem:
If you are faced with the problem of a non-working horn, then you will probably be wondering how to replace it:
- First of all, you need to remove the steering wheel. To do this, remove the trim and unscrew the bolts that secure the steering wheel.
- After the steering wheel is removed, you can clean the contact tracks, perhaps this will help solve the problem. Make sure that the wire contacts in the column are as clean as possible.
- Unscrew the two screws located under the plastic cover. After dismantling the cover, you will be able to see the contact plate; there is a possibility that the problem lies there. Clean the contacts and check the signal functionality. If the horn does not work, then using a 24mm wrench you will need to unscrew the nut, but you do not need to unscrew it all the way.
- Next, the steering wheel itself must be pulled towards you; this will require some effort. You can try to move the wheel by tapping it from different sides. When you feel that the steering wheel has given way, the nut is unscrewed completely.
- After dismantling the steering wheel, we proceed to removing the horn. There is a module located under the grille of the radiator unit; it must be removed; to do this, unscrew the nut to 13 and disconnect the connector.
- Install a new one, replace the steering wheel and check the operation of the horn.
Photo gallery “Removing the steering wheel and replacing the horn”
Possible causes of signal failure
1) Fuse blown
A voltage surge in the vehicle's on-board network can damage any electronic element, therefore, to avoid such a problem, fuses are provided, incl. and on the sound element. A blown fuse is a common situation, so when attempting to carry out repairs on your own, you should first check its condition. The fuse responsible for the sound supply in the VAZ 2114 is located in the mounting block. You can study the exact location of the element in the diagram of the new-style mounting block presented below. The fuse for monitoring and turning on the sound signal in the new-style mounting block is indicated by the combination F5 and is located in the left column of fuses (the fifth in a row). The fuse current installed in the block socket should be 20 Amperes. Almost any car store or gas station sells kits, including 20 Ampere fuses.
2) Failure of the electrical relay
The second most common problem is the burnout of the main relay, which is responsible for the operation of the car’s horn. This relay is located in the same mounting block along with the fuses. Unlike fuses, relays can be replaced without using a paperclip. The diagram below shows the relay responsible for the signal. To select a new relay, just visit any spare parts store for domestic cars, where they will provide you with a suitable relay. For self-checking, you can replace the failed switching device with an adjacent heated rear window relay, marked in the diagram with the combination K7.
3) Signal button failure
In addition to electrical elements, the circuit of the entire signal structure also contains mechanical parts, which over time can break or completely wear out. A button is just one such element. In the design of the VAZ 2114, this button is a plate that, when the steering pad is pressed, closes and voltage is sent to the signal itself under the hood.
Periodically checking these elements for contamination can save you from sticking of the plates and their premature wear. It is worth noting that the steering pad on the VAZ 2114 can be removed quite easily using a Phillips screwdriver.
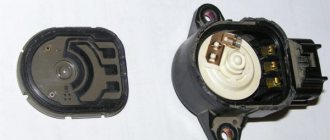
4) Wear of the slip ring
The problem due to slip ring wear occurs on cars with high mileage, or on cars where low-quality structural parts were installed. The photo below shows two slip rings, one of which is worn out. Even from the photograph you can see that the ring on the left has a large hole, due to which the sound supply may work every once in a while or not work at all. This problem is solved by replacing the ring with a new one.
5) Oxidation of contacts on the steering wheel
Moisture getting into the steering wheel housing or the age of the car are the two main reasons why the contacts on the steering wheel become oxidized. Poor contact at the junction of the wires and the plate may cause the signal to fail. To solve the problem, remove the steering wheel pad and the top plate, then clean the wires from oxides. Lubricants can also be used to seal out moisture.
6) Horn failure
Failure due to wear or sticking of the membrane is rare, but still possible.
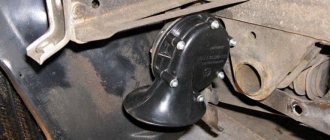
The design of the VAZ 2114 signal itself is quite reliable, but it also periodically fails. This “snail” is located right under the hood near the car’s radiator. Sometimes, to “unstick” the membrane, it is enough to hit the body. If this does not help, you can always disassemble the case and clean the mechanism. As a last resort, you can buy a new “snail”, since its cost is 300-400 rubles.
7) Broken wiring
The last reason for a possible failure of the mechanism is a broken wiring. Often this problem occurs after work has been carried out to install an alarm system, additional devices or other implementation into the standard wiring of the machine. Wiring rotting is also a common situation. The problem is solved by completely replacing the wiring of the electrical circuit.
In general, almost any reason for a non-working signal from the list above can be eliminated quite easily (and on your own), so you should not worry and look for all the design elements in the store.
Horn relay or wiring failure
The next group of reasons for a malfunctioning sound signal is broken wiring or a failed relay. The wires in the signal power circuit can be simply broken, pinched, or even disconnected during major repairs. Often during reassembly, the wires are connected incorrectly or not connected at all. Make sure that all wires responsible for the signal are connected correctly. On a number of cars, the horn is located too low, which is why it ends up in slush and water during transitional seasons. Mixtures that are used to sprinkle roads against ice in winter are also added here. Under such conditions, the terminals on the signal itself can oxidize and even rot the wires. Check this place out.
If your car has a horn relay, then it is worth checking it. Find where this relay is located using your car's complete wiring diagram and do an experiment: press the horn button and listen. If the relay clicks, it means it is probably working properly. Silent - you need to check the presence of voltage at the relay control contacts when the button is pressed.
[custom_ads_shortcode1]
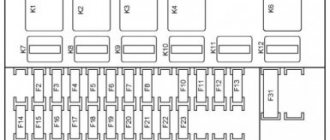
recommendations fuse block VAZ family tenth
| The mounting block (fuse block), also called a black box. If your car's electrical system suddenly stops working, then the first thing to do is check the fuses and relays. |
block fuse diagram
- high beam relay relay (K5);
- low beam headlights (K4);
- relay for checking and monitoring the health of lamps (K1);
- tweezers for extraction guards;
- door power window relay;
- turning on the turn signal and hazard warning relay (K3);
- turning on the starter relay;
- spare fuses;
- location of the fog lamp installation relay;
- relay for switching on windshield washers and wipers (K2);
- relay for turning on the rear additional heating (K7);
- relay glass (K6);
- top row of fuses (F1 - F10 installed in numerical order from left to right);
- row of lower fuses (F11-F20 are installed in numerical order from left to right)
- F1 5A License plate light lamps Instrument lighting lamps Indicator side light lamp Trunk marker light lamp Left side light lamps
- F2 7.5A Left low (headlight light)
- F3 10A Left headlight (high beam)
- F4 10A Right fog lamp
- F5 Electric drive 30A for door windows
- F6 15A Portable lamp socket Cigarette lighter
- F7 20A Electric fan system Sound cooling signal
- F8 20A Rear window heating element. Relay (contacts) for turning on the heated rear window
- F9 20A Cleaners and washers for windshields, rear windows and headlights. Relay (coil) for turning on the rear window heating.
- F10 20A Reserve
- Lamps 5A F11 left side marker light
- Right 7.5A F12 headlight (low beam)
- F13 Right 10A headlight (high beam)
- F14 Left 10A fog lamp
- F15 20A seats Electric heating Trunk lock lock
- F16 Relay 10A-breaker for direction indicators and emergency mode (in hazard warning lights) Warning lamp for hazard warning lights
- F17 7.5A Interior lighting lamp. individual backlight lamp. Lamp switch illumination lamp.
- ignition of the brake signal. Watch (or route computer).
- F18 25A Glove box lighting lamp. Heating and ventilation control unit.
- 10A F19 Door locking (central Relay) lock for monitoring the serviceability of side and brake signal lamps Turn indicators with control lamps Reversing light lamps Excitation generator winding On-board system display unit Instrument control panel
- F20 7.5A Rear fog lamps
xn--2111-43da1a8c.xn--p1ai
Probable Causes
Based on the nature of the signal malfunction in the VAZ-2110, it can be divided into two groups.
In the first case, the horn does not operate at all, no matter how the driver presses the button located in the center of the steering wheel.
The second option is that the sound is intermittent, that is, the signal begins to work unstable.
Among the most obvious and easily remediable causes, the main one is a blown fuse. A break in the fuse link de-energizes the entire electrical circuit, and, accordingly, the horn does not function at all. To check, just turn on the heater fan. It is connected to the same protective device.
Also, the horn itself often breaks on the 2110 model. This version is accepted as the main one if installing a working fuse does not lead to a positive result. Here you will have to tinker longer:
- the signal is removed (it is located behind the radiator grille);
- connect directly to a battery or other 12-volt power source (the white wire is “plus” and the black wire is “minus”);
- If the device itself is faulty, then it will not produce a characteristic sound.
When everything is in order with the node, then you should suspect a break that occurred somewhere in the circuit.
The next possibility is abrasion of the clamping contacts installed directly in the steering column. This is more likely the older the “ten” is. By the way, it is not difficult to extend their service life - it is enough to regularly treat the contacts with graphite-based lubricant.
Also, sometimes the problem lies in the oxidized terminals of the pads. Inspect the one located in the steering column, and the second one in the engine compartment. At the same time, make sure that all wiring is securely fastened.
The slip ring is less often to blame for the sound signal not working. It is located directly in the steering wheel. This element of the 2110th model also wears out over time and ceases to perform its intended function.
Other common causes
Quite often you can find the following causes of problems:
- The sound signal may disappear due to worn-out clamping contacts located on the steering column. To prevent rapid wear of the wires, experts recommend periodically lubricating them with graphite lubricant, after removing the steering wheel of the car. Such treatment will help not only prevent wear of the element, but will also extend their performance;
- Worn contact steering ring can also cause the horn to fail. To eliminate it, you will need to carry out similar measures that were described in the previous paragraph;
- Quite often the signal on the VAZ-2110 stops functioning due to oxidation of the steering internal contacts. Since a lot of deposits accumulate on the elements, they become an obstacle to the sound signal, so the car horn stops working. To eliminate the breakdown, it will be enough to disassemble the car’s steering wheel, carefully clean the internal contacts and correctly assemble the steering wheel.
Stories from our readers
“Fucking basin. "
Hi all! My name is Mikhail, now I’ll tell you a story about how I managed to exchange my two-wheeler for a 2010 Camry. It all started with the fact that I began to be wildly irritated by the breakdowns of the two-wheeler, it seemed like nothing serious was broken, but damn it, there were so many little things that really started to irritate me. This is where the idea arose that it was time to change the car to a foreign car. The choice fell on the melting Camry of the tenth years.
Yes, I had matured morally, but financially I just couldn’t handle it. I’ll say right away that I am against loans and taking a car, especially not a new one, on credit is unreasonable. My salary is 24k a month, so collecting 600-700 thousand is almost impossible for me. I started looking for different ways to make money on the Internet. You can’t imagine how many scams there are, what I haven’t tried: sports betting, network marketing, and even the volcano casino, where I successfully lost about 10 thousand ((The only direction in which it seemed to me that I could make money was currency trading on the stock exchange, they call it Forex. But when I started delving into it, I realized that it was very difficult for me. I continued to dig further and came across binary options. The essence is the same as in Forex, but it’s much easier to understand. I started reading forums, studying trading strategies. I tried it on a demo account, then opened a real account. To be honest, I didn’t manage to start earning money right away, until I understood all the mechanics of options, I lost about 3,000 rubles, but as it turned out, it was a precious experience. Now I earn 5-7 thousand rubles a day. I managed to get the car buy after half a year, but in my opinion this is a good result, and it’s not about the car, my life has changed, I naturally quit my job, I have more free time for myself and my family. You’ll laugh, but I work directly on the phone)) If If you want to change your life like me, then here’s what I advise you to do right now: 1. Register on the site 2. Practice on a Demo account (it’s free). 3. As soon as you get something on the Demo account, top up your REAL ACCOUNT and go to REAL MONEY! I also advise you to download the application to your phone, it’s much more convenient to work from your phone. Download here.
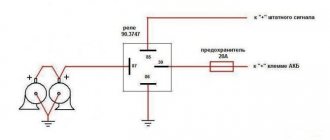
Installing Volgov signals in a VAZ 2110 with a simple replacement will not work. The thing is that there are two wires going to the standard signal: “Minus”, which is supplied from the button on the steering wheel, and “Plus”, which is constantly coming up (which also powers the radiator fan). And for the Volgov signals to work, only one wire is needed - “Plus”, since “Ground” is supplied through the body (from attaching them to the car body).
In addition, we are talking about different current consumption:
- Standard signals according to the passport consume no more than 5A (in measurements no more than 3.5A)
- Volgov signals 8A each (Total 16A)
That is why, in order to connect signals from the Volga to the top ten, you need to use a 4-pin relay (for example, 904.3747-10)
The relay can be installed:
- Inside the cabin in the fuse box.
- Under the hood (in this case the relay must be insulated to prevent moisture from entering)
Let's look at both connection options using an example:
We turn on the brake lights forcibly
Relay K1 is successfully replaced with a pad with jumpers. In Fig. 1 just shows its diagram. If there is no such platform, you can temporarily close contacts 4-5. First, check everything mentioned above.
Have an observer watch what happens to the lamps. Press the pedal with one touch and release it. If the lamps do not turn on, check that the fuse is working properly. It's burned out, which means you're looking for a short circuit.
How to and how not to check the “0 Volt” potential
Let’s agree right away that we only work with a voltmeter. Voltage “+12” is caused by connecting one probe to ground. The presence of potential “zero” is checked differently: any of the probes is connected to a terminal with positive voltage, and then the second probe is connected to the wire being tested.
Consider the error: one probe is connected to ground, the second to the terminal being tested, and vol. Here they conclude that there is a “mass” potential, but this is wrong! If the contact with ground is broken, the device will also show “0”. That is, the number “0” does not contain information.
Features of the VAZ-2112 electrical circuit
The owners of cars of the “tenth” family are to some extent lucky: there is no relay in the horn circuit, but only a switch. The proof is given below.
Standard wiring diagram
The first step is to check fuse F7. In the mounting block it is in the top row (seventh from the left).
Voltage “+12” is applied to one of the fuse terminals. Check it out!
If the fuse is good, potential “+12” should be at one of the horn terminals. Let's take a look under the hood...
Audio module connector
Disconnect the connector and check both terminals with a tester. We connect the second probe of the voltmeter to the negative of the battery.
The standard reason why the signal does not work on the VAZ-2112 is this: the “positive” voltage is connected, but the contact with the “ground” is broken. Most often the problem lies in the switch.
What to do if the brake lights on a 2110 VAZ don’t light up and repairs
Let's look at the causes and possible solutions to problems with brake lights in the 2110-VAZ car. It is worth noting that this solution to the problem will only require knowledge, a little time and experience, so before contacting a service station, you can try to solve everything on your own.
Advantages of brake lights 2110-VAZ
Unlike old VAZ models, the sensor where, turning on the “stopak”, was closed from pressure, or gas liquid, directly when the model was triggered, on the 2110 block the sensor is on the pedal in this way, and the brake lights come on when you press the slightest on the pedal even before the start braking, giving road users a little warning in advance.
Common problems with brake lights
There may be several reasons:
- blown fuse;
- faulty sensor;
- or a frayed broken power cord.
The most common reason is a blown fuse responsible for the protection circuit of the signal lamps. This block is located on the fuse, built to the left of the steering column. This capacitor can withstand a current of 7.5 amperes, as evidenced by the inscription on it. It is located in the bottom row to the right from the fourth edge.
If after replacing an element of this circuit the problem has not been eliminated, other possible causes of the breakdown should be considered.
The next point in troubleshooting will be checking the stop signal sensor. To do this, you need to check whether the voltage is going to the sensor and whether it is coming out of it. In this case, you need to use a test lamp. If the lamp does not light up when connected in front of the problem, then the sensor may be in the wires going to the sensor. sensor before If the lamp works, and then there is a problem, then no it lies in this part. You can also simply disconnect the input and output and close the sensor “directly” using a copper wire, after these manipulations the lights in the brake lights light up, then the reason is precisely in the sensor. The sensor cannot be repaired, and the only way out is to replace this part with a new one.
Damaged wires may also be the cause, this will be especially noticeable if the fuse that has just been replaced blows out - this means that the wire is there and the contact to ground has frayed. If the brake pedal is pressed without a fuse, the sensor before the wire is damaged, and if it burns out after pressing, the wire after the sensor is damaged. If there is possibly no voltage, the wire is simply broken and does not close to
When troubleshooting, you should pay special attention to bends and possible areas of damaged wires
The next cause of problems is the LEDs burned out in the brake light; there have been times when both burned out at once. To replace the bulbs, you need to remove the flashlight board, squeezing it from the sides and pulling it slightly towards you. Next, you should visually inspect the light bulbs; perhaps a visual inspection will already answer the question about the reason for the non-working stop signal. After this, you should replace the old lamps with new ones.
Horn from Volga - is it really possible to install it on a VAZ?
For those who want to increase the volume of the VAZ-2110 signal, it makes sense to replace the standard one with a product intended for the Volga.
You can take either an old type element or a new one - there is no difference between them. However, it is worth considering one nuance - the device for Lada has two wires: minus and plus, while the GAZ horn is equipped with only one cable (positive). Simply put, in the Volga the circuit is closed to the total mass of the car, that is, its body.
There is one more circumstance. The “tens” horn consumes only 5 amperes, and the gas analog – 8. Since they are installed as a set (2 pieces), the output will be 16 A. That is, a stronger fuse will be needed in the electrical circuit.
Additionally, the native circuit of the VAZ-2110 will have to be complicated by installing a relay designed for four contact groups. It is permissible to install the relay where it is convenient. Choose:
- interior mounting block;
- engine compartment (here it is isolated from moisture).
The work is performed as follows:
- remove the radiator grille;
- disconnect the connector from the signal;
- cut off the block remaining on the car;
- a relay is connected to the wire (contacts 85 minus and 86 plus, a jumper is placed on the latter leading to 87);
- two beeps are attached in series to pin 30;
- then they are fixed with bolts on the frame in pre-drilled holes;
- the radiator grille is put in place.
It remains to check the functionality of the signal.
Removing the steering wheel
If “step 2” is not successful, you need to remove the steering wheel. The two copper strips should “close” when pressed - everything is clear here. The test is carried out with an ohmmeter, and if necessary, the switch is replaced.
Steering wheel after dismantling
When the steering wheel is removed, you can clean the contact tracks. The wire contacts in the column must also be clean.
Dismantling from start to finish
First you need to unscrew the two screws under the trim. Having removed the plastic, you can see the contact plate - perhaps that was the problem.
First step in dismantling
Try cleaning the contacts and performing “step 2” again. If there is no result, take a 24mm wrench and unscrew one nut (not all the way).
The steering wheel needs to be knocked off its splines
The steering wheel is pushed towards itself. And then the nut can be unscrewed completely.
When installing, follow one rule. The protrusion on the bracket should fit into the slot made in the plastic ring (see photo).
Steering wheel installation (first step)
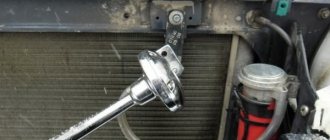
How to remove a faulty signal (horn)
There is a single module mounted under the radiator grille. To remove it, unscrew one nut (key “13”). First disconnect the connector.
Dismantling, adjustment before installation
It will be necessary to remove the grille. This action is difficult to perform on both the “Ten” and even on the VAZ-2112, and the signal may not work due to faulty wiring. First achieve what was discussed in “step 3”. And only then, if necessary, proceed with replacement.
One adjusting screw is fixed to the horn body. Set it to the middle position and check.
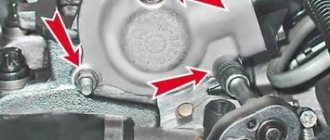
Removing the radiator grille
- Taking the “10” key, unscrew the two screws on top (as in the photo). You can't remove the grill right away.
Self-tapping screw for radiator grille fastening
An important fastening element is the clamp.
The article number of the new radiator grille is 2110-8401014 (or 8401614, or 8401714).
I just bought a moped... Now I’m repairing it... Why doesn’t the horn work? The relay clicks when pressed.
I checked: - the fuse (switched places with another, I didn’t have a tester at hand) - I connected it directly to the battery - it works - I cleaned the contacts on the steering wheel
Thanks for any tips! I'll attach photos just in case.
Sound signal with compressor on VAZ 2110
Pneumatic signals are a whole system consisting of:
- compressor (air blower)
- receiver (compressed air container)
- signals (pipes), into which, when the signal is operating, compressed air is supplied from the receiver under pressure.
This type of car horn is the most powerful in terms of sound pressure of all possible options.
But compressor sound signals also have disadvantages:
- The pneumatic signal is triggered with a slight delay until the compressor reaches the required pressure.
- The compressor needs to be maintained, that is, periodically lubricated, etc.
- Plastic parts must be placed as far as possible from objects that are very hot, otherwise the plastic will crack.
- Pneumatics, like any other compressor, when pumping air, condenses moisture on the working surfaces, which freezes overnight. That is, until it warms up, the signal will not work.
- It is better to protect the compressor suction port from dust and dirt (for example, wear a stocking)
- The price of compressor sound signals is much higher.
Cheap versions of such signals, as a rule, do not last long, and over time their sound is compared with signals from the same Volga. In addition, in order to undergo maintenance, you need to leave the standard signals.
Example, installation of compressor sound signals in a VAZ 2110 Video: loud horn on a VAZ 2110 (compressor sound signal)
Possible causes of the problem
If your Tricolor TV does not work, it says “No signal”, today we can distinguish several directions for the malfunction:
- software. Scheduled updates, independent attempts to install third-party software and failures may make it impossible to watch your favorite programs;
- Technical equipment. Incorrect installation, setup or connection of the dish, damage to the cable or set-top box are also common reasons;
- external reasons. Bad weather conditions, heavy snow and maintenance work by the operator can also cause problems.
The location system of the additional fuse box in the VAZ-2110
This block is located directly in line with the injector and to the right of the centrally located instrument panel. To remove the unit, you do not need to take the machine diagram and look for secret compartments - you just need to tighten the screws on the panel and easily remove the cover.
The photo below shows a diagram of the location of the fuses themselves, of which there are 6 in total, and their current strength is the same - 15A each fuse.
The diagram shows the location of the fuses responsible for:
- Operation of the ignition system controller.
- Regulation of current in oxygen sensors, air flow system and machine speed calculation.
- Correct fuel supply to the pump, relay and injectors.
- Fan operation when cooling the engine.
- Fuel pump operation.
- Direct ignition of all vehicle systems.
Despite the release date of the Lada Vesta Cross. in a VAZ-2110 car it is unlikely that the location of the main blocks will change. Thanks to the above diagrams, you will now be able to pre-calculate the problem of the machine simply by checking the condition of the fuses and relays.
Replacement and repair of VAZ sound signal
The most common reason for the absence of a sound signal lies in the signals themselves. The reason is mechanical, moisture and oxidation lead to blocking of the sound membrane and, as a result, the absence of vibrations and sound effect. Sometimes you can restore functionality by spraying the signal with WD-40 or a similar composition.
Video:
On cars, where two signals are installed, as a rule, they are of different tones, low and high. If one signal fails, the second will not be able to fully provide the required power, and therefore requires replacement. As a rule, many signals are equipped with a tone adjustment screw, and if there are wheezing, grinding and other unwanted sound effects, you can use the adjustment to achieve a suitable sound. Also, with their help, you can move the “soured” membrane, thereby restoring the functionality of the signal.