Published on August 29, 2016
Car body repair in the garage.
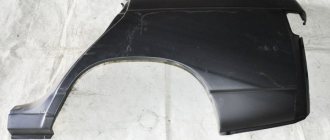
VAZ 2114, changing the rear wing #2. Body repair. Details on my website. I will delete comments with obscenities and insults. Questions about price will remain unanswered. A channel about car repairs and more. There were exactly the same problems with the same wing. I danced with all my heart, I remember. We have for sale complete 2109 rear quarters complete with arch, fender and all the internals. It seemed to me that they had a better quality stamp on them. And the metal itself. True, the cost is certainly higher than that of such a wing.
Andrey, thanks for the video!
Can't you buy another one?
wing I mean
Why do you need these problems? Let the owner think about what to do with the wing
Thank you, good video about a good repair)))))
Great job. Anyone else would not have remade it; they would have welded the spare part as is. I wish there were more such masters!
Decent job. Like
Two weeks ago. a similar situation with the wing. the edge was bent, it was wider. spare parts are not substandard.
How I envy those painters who receive cars after your work. All they have to do is just paint, without any effort on putty))) LIKE as always.
Is it possible to replace the wing with a similar one? give out the sizes, show where to measure.. let them look, right?
Yes, it's already stretched into two parts
Good work, although such body work is a big pain in the ass. Which contact is used, 220 or 380?
what company is your resistance welding please show in the next video very interesting thank you in advance
Excellent, in fact, as always!
It's a pain in the ass, but as always you found the right solution, thank you!
Even the great masters Andrey and Vitalya learn from each other! Just victories for everyone.
The work is excellent. (and Andryukha doesn’t have it any other way) it’s nice to see, considering that every day you have to do the same thing yourself. In Ukraine, almost all VAZ auto body work is like this, and that’s how we work all the time. And this despite the fact that suppliers assure that these parts were removed yesterday, through great influence, directly from the assembly line. It’s especially fun to listen to such nonsense when the client is sold trinkets for a penny and similar cars.
Andrey, Super! As always on top! I would call the second part: “Collect what cannot be collected. ".
It’s not surprising that the trunk lid rotates so much, it still doesn’t have glass. Although I don’t feel like this on my cadet, the metal there is noticeably thicker; in 1983 they didn’t spare iron.
Well done . EVERYTHING IS EXCELLENT AS ALWAYS
Replacing the rear wing on a VAZ 2113, VAZ 2114, VAZ 2115
Welcome! The rear wing is an exterior detail (the exterior is what is on the outside, it includes various kinds of bumpers, sills, etc.) and a very important detail, besides the fact that it gives the car an appearance, it is also the internal metal from protects against corrosion, so first of all the fenders, sills, etc. rot, and only then, everything that is located under them.
Note! To change the rear fender on a car, you will have to stock up on: A grinder or a reciprocating saw will be even more convenient and there is less chance that the body will be damaged, and you will also need a good welder, or if you know how to weld parts yourself, then you can do without a welder, in addition You will need gloves to work with a saw and especially welding, and you will also need self-tapping screws!
Summary:
When should you replace your rear fender? Unfortunately, the rear fenders are one of the most difficult to replace parts, for example, if you take the front fenders, they are attached with just a couple of bolts, after unscrewing them, the wings can be very easily removed from the car, but in order to change the rear fenders, you need a lot of time and nerves, but more on that a little later, and now we’ll answer the question itself, the rear wing of a car is changed only in case of severe deformation, although many people drive with deformed wings, it’s just that if the wing is not touched too much, then the dent is simply not possible straighten, this is done using special tools that come in a dent removal kit (This kit can be bought at a car store), for more details on how this is all done, see the video clip located just below:
Repair process
VAZ 2110 rear right fender
- Raise the car on a jack.
- Press out the wing.
- You need to level the surface using a heavy tool (this could be a hammer). Take a nozzle with a sharp flat end and apply it to the other side of the dent.
After this, hit the flat surface of the nozzle with a hammer. A slight leveling will be noticeable.
The outside needs to be straightened with a flat object.
Note: it is better to straighten using an iron tool, since aluminum will not work. All actions must be performed quickly.
However, you should not hit too hard. This can cause the metal to stretch, causing the wing to expand slightly.
The edges need to be knocked out very carefully, along one line.
Complete rear fender replacement
VAZ 2110 right rear fender
In some cases, it is necessary to completely replace the rear fender. For example, if it is damaged to such an extent that there is no point in even trying to repair it.
Usually it is changed if:
- It was significantly deformed upon impact.
- It has small tears.
- Penetrating corrosion is observed.
VAZ 2110 rear right wing
Replacing a wing is a rather labor-intensive process, but it can be done at home by following the instructions:
- You need to completely empty the trunk, remove the bumper, headlights (see Replacing headlights on a VAZ 2110: we do it ourselves), the fuel tank, and also the trunk mat.
- Remove the rear fender.
Note: You can use a thin chisel for this. Using careful movements, you need to slightly squeeze out the rear wing, but try not to damage the car body.
- It is necessary to drill points at the junction of the wing with the transverse rear window frame. Now you can remove the rear wing.
- Carefully remove any strips of metal that remain on the wing. Nippers and a chisel will help with this. The edges need to be straightened and sanded.
Rear right wing of VAZ 2110
- If there is dirt under the wing, it needs to be removed. This surface must be thoroughly degreased.
- Attach the new wing by welding.
Replacing the rear wing 2110
VAZ 2110 rear wing replacement
,
rear
panel. Painting will be done later. Sorry for the long video.
How to replace the rear wing on a VAZ 2113-VAZ 2115?
Removal: It is removed, as you already understood, it is not as easy as the front one, for example, because the rear wing is held on by welding, you will only need to cut off part of the wing in any place convenient for you and put a new wing in the same place (Usually the rear wings are sold in different sizes, that is, you can find a whole wing from top to bottom, or you can just find a wing that you insert into the middle and it won’t reach the very bottom, but it’s better to take the entire wing and then it adjust, cutting off not much at a time), it is best to cut off as we mentioned earlier, either with a grinder or with a reciprocating saw, as soon as the wing is cut off, remove it from the car and take sandpaper in your hands and if you find rust on the body, then remove as much of it as you can using sandpaper and another primer, and then apply paint so that the body rots less.
Note! When replacing a wing, remove all parts that interfere with its cutting, for example, remove the mirror from this wing so as not to damage it (The mirror at the rear wing can be removed like a windshield, so read the article on replacing the windshield and study it in detail, after studying you and the glass in exactly the same way, remove from the wing: “Replacing the windshield on a VAZ”), also if the rear light is in the way, then remove it too (For information on how to remove the light, read the article: “Replacing the rear light on a car”) and You will also have to remove the trim from the trunk, you can simply burn it when you weld the wing to the car body!
Installation: The wing is installed using the fitting method, that is, at the beginning it is fixed with screws and looks from the side to see if the wing fits or does not fit smoothly (pay special attention to the gaps), the excess part from the wing always needs to be cut off and as soon as it gets to the point where the wing is all straight, start welding it, as soon as the work of welding the wing is completed, clean all those places where the welding is visible and level these places (you can use the same sandpaper to level the welding place), then prime the wing (Primer is like paint if you don’t know yet, it should be applied first and only after that, the paint itself should lie on it) and paint it in the color you want, for clarity, the rear wing welded to the body can be seen in two photographs below, they even show the places where the wing is welded to the body.
Additional video clip: You can clearly see the process of replacing the rear wing in the video located just below, it doesn’t show much of everything, but the process of replacing the rear wing with a new one is explained in detail.
Replacing the front wing: algorithm of actions
To ensure that removing the wing of the VAZ 2114 does not cause any special problems, you should perform all the steps following the following sequence:
- Remove the front fender liner from the desired side.
Now the front wing of the VAZ 2114 can be easily removed.
Please note that it is advisable to install new insulating gaskets when replacing the front fender.
During the installation of the wing, it is necessary (before the final tightening of the screws) to set horizontal and vertical gaps around the wing relative to the hood and door.
Experts recommend treating the replacement area with an anti-corrosion compound. This will make the joint durable, and, as a result, will protect car parts from premature wear. It is also advisable to treat the entire inner surface of the newly installed wing with a special anti-corrosion compound.
As can be seen from the information presented here, the entire process of replacing the wing on a VAZ 2114 cannot be called complicated. If desired, each car enthusiast can independently cope with this task, significantly saving on contacting specialists.
How to hide rust on the arches of VAZ 2113, 2114, 2115
If installing a completely new body kit seems very expensive, then we can offer to buy arch trims for VAZ 2113, 2114, 2115.
The covers will hide imperfections (for example, damage to the edge of the fender due to rust) and give the car a finished appearance. These linings are made of ABS plastic, and therefore they are not afraid of rust and rotting. Plastic arches of VAZ 2113, 2114, 2115 are sold unpainted; you can paint them yourself in any color.
We would like to note that you must first adjust the linings and then paint them. Since plastic molding is not always accurate, it is necessary to adjust it “on site”.
Another important factor will be the treatment of places where there will be rust at the fastening point. It is best to do this with a rust converter, such as Tsinkar, as it removes rust well. But, if the rust cannot be removed with this liquid, then you can use sandpaper.
Do not leave rust under the trim! Under the trim it will spread across the entire wing. Therefore, it is better to process everything and secure the overlay. This is done very simply using sealant. But there are some subtleties:
- Before applying the sealant, it is better, of course, to apply the trim evenly and trace it along the contour with pencils. Do not press too hard on the pencil, but so that a barely noticeable mark remains, and not a scratch. This will allow you to set the trim level and not move it when the sealant is applied to it;
- Before fixing the cover, thoroughly clean the area from dirt and degrease.
- now, after applying the sealant to the edges of the lining, lean it along the line that you made with a pencil;
- Now you will need mounting tape to secure the trim until the sealant sets;
- It is advisable not to drive a car for at least 12 hours;
- Carry out the same manipulations with the remaining 3 overlays.
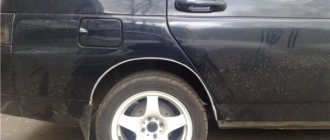
If the rear wing arch begins to rot
Rear right wing for VAZ 2110
Iron very quickly undergoes corrosion, which, as it grows, can harm the entire car. It is advisable to start repairs when the rust has not yet seeped into the solon, as the consequences will be much worse.
The arch of the front or rear wing is most often affected by this problem.
To fix this problem you need to do the following:
- Disconnect the ground so that any welding work can be carried out without difficulty.
- The damaged part must be cut off, and the remaining parts must be cleaned properly.
- To seal the resulting hole, you need to attach a patch on the “wrong” side. This must be done by welding.
Note: before this, you need to treat the damaged area with acid to get rid of corrosion. And in order to make it easier to process this part in the future, you need to drill a small hole in it (preferably from the inside).
The patch must be cut from stainless steel to prevent rust from appearing in the future.
Note: to make it easier to cut out the patch, you need to take a piece of cardboard, place it on the damaged part and press it so that its dimensions are transferred to the cardboard.
You will get a “fingerprint”. You need to cut a patch along it, slightly larger than it. Transfer it to the metal and cut it out.
Now the edges of the patch need to be welded to the wing so that it holds well.
Rear right wing for VAZ 2110
- Of course, all this will not look very nice, so you will need to clean it up.
- Now you need to remove everything inside the seams. To do this you need to use a special tool.
- Spray with zinc.
- You need to take sandpaper and smooth the entire surface. After this you need to degrease well. Remove the remaining zinc.
Note: it can be removed with a solution of baking soda and water.
- You need to wait a bit for the degreaser to evaporate.
- Cover with bauxite primer and allow to dry.
- After this, smooth the surface again with sandpaper.
- Now you need to make sure that the seams are not visible. Putty will help with this. First you need to apply it to the seams so that they fill.
There is no need to level it completely right away, as air bubbles may appear. After this, you can apply putty to the entire area.
All that remains is to paint.
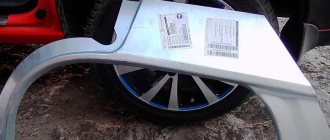
Linings for wing arches of VAZ 2115
Tuning... and a wide smile... :))
Blog... come on. I moved it from the blog to the logbook, that’s more accurate.
I decided to share my experience of installing linings on the wing arches. When I decided to do it, I couldn’t find almost anything useful for myself on the Internet (I didn’t search well), hence some difficulties.
For the story and for the seemingly technical solutions, don’t blame me, I’m not a pro and not even an amateur :))
My wing arches are quite, that is, in decent condition, except for the driver's front (the edge to which the fender liner is attached has practically fallen off). Immediately after purchase, the machine was very well processed. I bought it in January 2005, in the showroom :))
But, in a circle, although not much, the paint swells (only around the fender liners). My opinion: these protective fender liners are the cause of corrosion, which starts from the attachment points, IMHO.
In general, we clean the farm from dirt and rust. Used: skins, rust converter, applied epoxy primer, Movil
I bought it for my 14, something like in the photo from the Internet,
the pads are something like this
At the car market for 400 rubles, for painting. Retreat.
I will write - as I would do now, having some experience, but with a commentary - as it really was.
- First. Why the main problems are the GEOMETRY and SIZES of the overlays, Therefore, try on and try on so that they fit according to the max, But this is not always possible (for example, the seller will not allow you to choose) I took the first ones I came across, tightly wrapped in tape... Not a single one hit the mark place. Let me note that you can make a mistake and confuse the left with the right, especially considering that the geometry and dimensions turned out to be INCORRECT.
- Second. CUSTOMIZE first and then PAINT. Your humble servant did the opposite. First I painted it. About painting. I used a can of HOLEX - 220 rubles (after painting there was a lot left), instead of primer, gray paint for HI-Gear bumpers (was), KUDO varnish - 150 rubles (easy to apply, hard to put on the snot) There are no plans to polish. I adjusted the already painted ones to the place. The rear ones were sawed out and ground down (they turned out to be somehow much shorter and the bend was steeper) The front ones: the left one is longer, the right one is shorter, the bend is normal (almost)
- Third. Main. We have painted and fitted overlays. Need to glue...
What I found on the Internet is that polyurethane adhesive-sealant is well suited for these purposes; I bought KRASS glue at a hardware store for about 500 rubles.
What are universal wheel arch covers?
Wheel arches are often considered by most drivers to be the inner parts of the wings, although they are different parts of the car body. The wheels of the car are “hidden” in the arches; they protect the remaining elements of the body from impacts from stones and the adhesion of dirt.
The arches themselves are subject to aggressive environmental influences; the edges of the part are the first to be destroyed, and over time they rust and become deformed. There are special parts for protection. Their second name is wheel arch extensions or fenders.
Arch extensions are classified into three groups:
- Original spare parts. Parts are intended only for a certain brand of car, for example, standard fender flares for the VAZ 2114 and their replicas.
- Homemade, made with your own hands.
- Universal. Suitable for almost any car, not only the VAZ model range. Replicas are made to a specific shape from plastic or rubber.
- Protection of wheel arches from corrosion.
- Preventing small chips and scratches of the paintwork resulting from the ejection of dirt and stones from under the wheels. Due to the peculiarities of the configuration, the modifications most susceptible to damage are the VAZ 2109 and the restyled version 21099.
- Protection of thresholds, fenders, car doors from dirt.
- Improved appearance. Fenders give the car a more brutal look. For example, for the VAZ 2115, the fender arches of an exclusive design have an additional extension that is connected to the body kit.
Universal rubber expanders are a budget-friendly, easy-to-install option. They are produced in rolls of 5, 10 or more meters, the price for 1 meter starts from 50 rubles. They are very easy to install - just measure, cut the required length, and glue.
Rubber fenders do not improve the appearance of the car. Their only function is to protect car body elements from aggressive environmental influences. You can install a spare part in 20 minutes by gluing the part with special glue.
Plastic lining for the arches of the VAZ 2114 is also a budget option, but more labor-intensive. The elements are made of ABC plastic, polystyrene with the addition of hardeners, and have different thicknesses and arc shapes.
Unlike rubber fenders, plastic fenders, in addition to protection, serve as tuning elements and improve the appearance of the car.
Useful video
You can get additional interesting information from the video below:
Use our recommendations, step by step repeating all the points in the instructions for replacing the wing, and you will be pleasantly surprised that the whole job will take you no more than a few hours.
1200 rub. for the photo report
We pay for photo reports on car repairs. Earnings from 10,000 rubles/month.
Write:
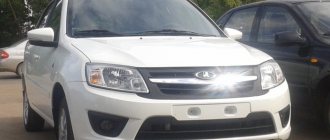
The VAZ 2114 car of the Samara 2 family is a restyled version of the VAZ 2109. The model differs from its predecessor in the original design of the front part of the body, headlights, hood, design of bumpers and moldings. During the operation of the car, damage to the body occurs, this is facilitated by corrosion, minor accidents, and the external environment. Wings are also susceptible to these negative influences, which is why they sometimes require replacement. This photo report shows how the front wing of a VAZ 2114 is replaced.
Manufacturers
The wing trim for VAZ 2114, 2110, 2111, 2112 remains a frequent consumable; on average, the part is replaced every 10-15,000 km. In addition, every year more and more drivers seek to protect or decorate their car with the help of fenders. There are more than 30 companies and small firms on the market, not all of them produce high-quality spare parts. We list the most popular and reliable of them:
- "Russian Artel" (RA). The material used is ABS plastic (acrylonitrile butadiene styrene), it is suitable for making fenders. The arches have a smooth surface and are intended for painting only. The complete kit includes products for all wheels, fasteners, primer, and in some kits a bottle of anti-gravel. The cost of a set of 4 extenders starts from 700 rubles, the part can be attached either with bolts or with auto glue.
- "A hundred times." Along with other parts for cars, it also produces universal wheel arch covers for VAZ models. The main material is high-quality black rubber. In addition to the linings themselves, the kit includes self-tapping screws and mounting plates. The price of the set is 100 rubles.
- Lapter. It produces power wheel arch extensions for SUVs, including for the VAZ 2121. The manufacturing material is high-density polyethylene with special additives, the composition of which was developed by specialists of this company and is kept secret.
Replacing the wing of a VAZ 2114: how to prepare the car and what tools are needed
Before removing the wing of the VAZ 2114, you should prepare the car and collect the necessary tools.
The car needs to be driven into a technical pit/overpass, and if this is not possible, jacked up on the side from which you are going to change the wing.
The car should be securely fixed in this position.
After this, you can remove the wheel and all parts that may interfere with the process, namely:
- front bumper;
- facing linings;
- wheel arch liners;
- thresholds.
Before removing the bumper, be sure to disconnect the contacts of the fog lights. To avoid damaging the car’s electronics, remove the “-” terminal on the battery.
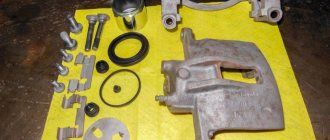
Of the tools that you will need to quickly replace the front fender, you will need the following:
- Set of wrenches.
- Set of spanners.
- Extension.
- Phillips screwdriver.
- Pliers.
- Knife.
It should be noted that in the process of replacing a wing, not all of the above tools may be needed. It will be enough for an experienced master to have only a few of them on hand. However, if this is your first time deciding to remove the wing yourself, then it is better to prepare the entire kit so that during the work you will not be distracted by searching for the missing tools.
Installation
Installing linings on the rear or front arches of a car is quite simple; reinstalling one panel takes about 40 minutes. Let us consider, as an example, the procedure for installing “Russian Artel” plastic overlays on the front arch of a VAZ 2120 Lada Largus.
Required tools and materials:
- T20 key;
- screwdriver or electric drill;
- sharp knife;
- pushsalo, paraffin anticorrosive for treating the inner surface of the arch.
- Wash and dry the car to make it easier to reach the hidden arch pockets, use a Karcher. Each trim is marked on the inside indicating where each panel will be installed.
- Apply primer to the inner edge of the fender; plastic primer is included in the kit.
- Glue the sealing profile to the upper parts of the expander parts.
- Degrease with alcohol wipes the areas where the profile contacts the double-sided tape.
- Bend back 3–4 cm of the adhesive tape attached to the profile.
- Pressing the profile against the expander, gradually pull out the protective film along the entire length of the expander.
- Cut off excess seal.
- Repeat this operation for all parts.
- Using a T20 wrench, unscrew the two self-tapping screws of the front wheel fender liner.
- Remove the standard front wheel arch trim.
- Unscrew the three screws and remove the mudguard.
- Remove the remainder of the old double-sided tape from the car fender.
- Attach a new cover and screw it with standard self-tapping screws through the technical holes.
Before screwing them in, they should be treated with pushsal, this will prevent electrochemical corrosion at the joints.
How to remove the front wing of a VAZ 2115
If your old fender is damaged and you want to install a new one, you don’t have to go to a service station; you can replace it at home.
To remove the wing, remove the socket with the turn signal lamp. Remove the self-tapping screws securing the wing to the body: four screws 2 along the top flange, one screw 1 each at the front bottom and rear bottom, two screws 3 fastening to the front pillar (under the wing). If it is impossible to unscrew the front screw, first unscrew the two screws securing the corresponding side of the bumper to the body and to access the specified fender mounting screw, lift the bumper and move the bumper trim slightly to the side (see the article on how to remove the front bumper of a VAZ 2115).
Carefully disconnect the fender and remove the insulating gaskets from the areas where the fender contacts the mudguard. Remove the turn signal from the fender.
Install the front fender in reverse order. It is recommended to install new insulating gaskets. Before final tightening the screws using the enlarged holes, adjust the fender to fit the gaps and protrusion with other body parts.
After replacing the fender, apply an anti-corrosion coating to the inner surface of the fender. If you have free time, read the article about removing the VAZ 2115 gearbox yourself.
Front fender of VAZ 21099: removal and installation This is not the first time I have been hit in a parking lot, so I already know how to replace the front fender with my own hands on a VAZ 21099. If you have the same problem, don’t rush to panic, repairs won’t cost much at all. You will need to give the new wing to
Replacing the front wing of a VAZ 2101 There are different situations in life, maybe the front wing already requires replacement, or you got into a minor accident where you got a couple of dents. Here you can learn how to remove the front wing on a VAZ 2101 car and install a new one.
If your old fender is damaged and you want to install a new one, you don’t have to go to a service station; you can replace it at home.
To remove the wing, remove the socket with the turn signal lamp. Remove the self-tapping screws securing the wing to the body: four screws 2 along the top flange, one screw 1 each at the front bottom and rear bottom, two screws 3 fastening to the front pillar (under the wing). If it is impossible to unscrew the front screw, first unscrew the two screws securing the corresponding side of the bumper to the body and to access the specified fender mounting screw, lift the bumper and move the bumper trim slightly to the side (see the article on how to remove the front bumper of a VAZ 2115).
Carefully disconnect the fender and remove the insulating gaskets from the areas where the fender contacts the mudguard. Remove the turn signal from the fender.
Install the front fender in reverse order. It is recommended to install new insulating gaskets. Before final tightening the screws using the enlarged holes, adjust the fender to fit the gaps and protrusion with other body parts.
After replacing the fender, apply an anti-corrosion coating to the inner surface of the fender. If you have free time, read the article about removing the VAZ 2115 gearbox yourself.
Features of the material
One of the main materials from which fender linings for VAZ cars are made is ABS plastic. It is used due to its optimal characteristics:
- Plastic. A product made of ABS plastic can change its shape when heated without changing its performance properties. For example, if the expander does not fit tightly to the wing due to some kind of defect (convexity, concavity), then it is enough to heat it with a hair dryer so that it takes the desired shape.
- Flexibility. A fender made of ABS plastic or polystyrene can be bent without fear of it breaking. The universal trim is easy to install on wheel arches of any diameter.
- Softness. In many cases, when installing the lining, it is necessary to adjust the length, i.e., cut it. This can be easily done with a simple knife or hacksaw. To make the cut area look neat, just wipe it with a piece of waffle towel soaked in acetone.
Metal extensions on VAZs are used quite rarely; they are made to order for a specific model and are not produced as standard.
Source