Home » Domestic auto industry
1 minute to read. Updated 08/04/2019
1200 rub. for the photo report
We pay for photo reports on car repairs. Earnings from 10,000 rubles/month.
Write:
A breakdown of the cylinder head gasket leads to such unpleasant consequences as engine overheating, poor operation of the stove, the appearance of exhaust gases from under the hood of the car, the appearance of an emulsion in the engine oil, the appearance of white smoke from the exhaust pipe and some others. If the above symptoms or one of them appear, you need to check the cylinder head gasket. There are several ways to do this. Next, we will look at why the cylinder head gasket breaks, what consequences this leads to, and what to do if this trouble happens to your car’s engine.
Signs that the cylinder head gasket has blown
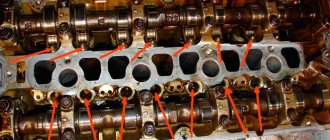
The purpose of the cylinder head gasket is to ensure tightness and prevent gases from penetrating from the cylinders back up into the engine compartment, as well as mixing coolant, engine oil and fuel with each other. In a situation where the cylinder head gasket is punctured, the seal of the block is compromised. The following signs will tell the car owner about this:
Signs of a burnt cylinder head gasket
- Exhaust gases coming out from under the cylinder head . This is the simplest and most obvious sign. When the gasket burns out, it begins to let in exhaust gases that will escape into the engine compartment. This will be visible visually, as well as audibly - loud sounds will be heard from under the hood that are simply impossible not to notice. However, if the burnout is small, then you need to pay attention to other signs.
- Shot between cylinders . External signs will resemble those that occur when the engine “troubles.” The fuel mixture from one cylinder is mixed with exhaust gases in the other. As a rule, in this case it is difficult to start the engine, but after warming up it continues to run steadily. To determine the breakdown, it is necessary to measure the compression of the cylinders. If the mentioned mixing occurs, the compression value in different cylinders will differ significantly.
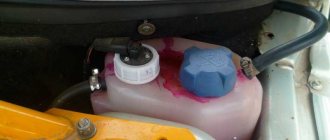
Emulsion from under the expansion tank cap
Foam in the expansion tank
A clear sign of engine overheating is the presence of condensation on its surface. This is also an indirect sign of a burnt-out cylinder head gasket or a crack in the cylinder block. First of all, it is necessary to conduct computer diagnostics of the engine. The presence of errors will indicate the direction and possible additional faults. As a rule, these errors are associated with problems in the ignition system.
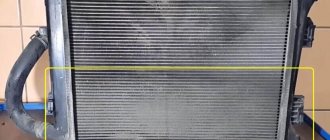
Antifreeze in the cylinder
Let's look again at mixing antifreeze and oil. As mentioned above, as a result of mixing them, an emulsion of a yellowish (most often) color is formed. If it appears, then simply replacing the cylinder head gasket will not be enough to repair. It is imperative to flush the system of this composition. Including pan and oil channels. And this may cost you additional costs, sometimes comparable to a major engine overhaul.
We have dealt with the symptoms that occur when the cylinder head gasket is broken. Next, let's move on to considering the reasons why its burnout can occur.
Device and principle of operation
All types of expansion tanks have the same design. Inside the metal case there are two rolled compartments. On one side there is a nipple, and on the other there is a neck for connecting to the pipeline. There is a diaphragm inside the body. In an empty container, it will occupy most of the volume, while the rest of the space is filled with air.
During operation of the system, the coolant heats up, increases in volume, and its excess enters the cavity between the housing and the diaphragm. When the temperature of the water in the system decreases, its volume decreases, and the pumped air squeezes it back into the pipeline.
Why does the cylinder head gasket break?
In most cases, the reason why problems arise with the cylinder head gasket is simple overheating . Because of it, the block cover may “lead”, and the plane along which the gasket adheres to two contacting surfaces will be disrupted. As a result, depressurization of the internal cavity occurs with all the ensuing consequences. It is mainly aluminum heads that change their geometry. Cast iron is not subject to such malfunctions; they are more likely to crack than to bend, and only in the most extreme cases.
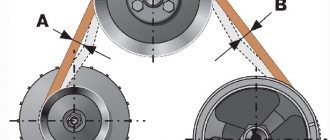
Scheme for pulling cylinder head bolts on VAZ “classics”
Also, due to overheating, the gasket can heat up to temperatures at which it changes its geometry. Naturally, in this case depressurization will also occur. This is especially true for iron-asbestos gaskets.
Another reason is a violation of the bolt tightening torque . Both very large and small torque values have a detrimental effect. In the first case, the gasket may collapse, especially if it is made of low-quality materials. And in the second, exhaust gases pass out without obstructing them. In this case, gases together with atmospheric air will have a detrimental effect on the gasket material, gradually destroying it. Ideally, the bolts should be tightened using a dynamometer that shows the torque value; in addition, the sequence of their tightening should be observed. Help information about this can be found in the manual.
Expansion tank boiling
Boiling of the coolant located in the expansion tank is one of the most common problems with open-type heating systems. This malfunction is a consequence of insufficient speed or stoppage of coolant circulation.
The reasons for the disruption of coolant circulation may be insufficient diameter of the pipeline or lack of the required slope of the heating circuit. The solution to these problems is provided by installing a circulation pump on the return line, in front of the heating boiler.
The expansion tank is an important component of any heating system. The functionality of the expansion tank allows you to regulate the volume of coolant and the pressure level in the system
For an open heating system, it is possible to manufacture an expansion tank in-house. For other types of heating systems, it is advisable to purchase a ready-made expansion tank.
Learn about the principle of operation and the correct selection of an expansion tank from the video:
How to find out if the cylinder head gasket is blown
You can determine whether the cylinder head gasket is blown by using one of several methods. In this case, diagnostics are simple and can be done by anyone, even a novice and inexperienced driver.
To check the integrity of the gasket, you must do one of the following:
- With the engine running, visually inspect whether smoke is coming from the gap between the cylinder head and the cylinder head . Also listen to see if there are loud ringing sounds coming from there that were not there before.
- Inspect the surfaces of the radiator caps and expansion tank of the cooling system, as well as the neck for filling oil into the engine. To do this, you just need to unscrew them and visually inspect them. If antifreeze gets into the engine, there will be a reddish emulsion on the oil filler cap. If oil gets into the antifreeze, then there will be oily deposits on the radiator or expansion tank caps.
White smoke from the exhaust pipe
How to check a cylinder head gasket using a condom
One of the effective and popular testing methods is the method using a balloon or a condom. It is put on the neck of the expansion tank, having first unscrewed the cap. The main thing is that the condom sits tightly on the neck and provides a tight seal (instead of a condom, you can use a bag or a balloon, but the diameter of the condom is usually ideal for the neck of the tank). After you put it on the reservoir, you need to start the engine and let it run for a few minutes at 3.5 thousand rpm. Depending on the level of depressurization, the condom will fill with gases quickly or slowly. It depends on the specific situation. In any case, if it begins to fill with exhaust gases, this means that the cylinder head gasket is broken.
Why do you need to maintain pressure in the system?
Both antifreeze and antifreeze at normal (atmospheric) pressure boil when heated to 100 0 C. But as we have already said, in the cooling system the operating pressure is 1.1-1.5 kgf/cm2. Under such conditions, the coolant will boil at no less than 130 0 C. It is to ensure that the coolant does not overheat before the radiator fan turns on that a cap with a valve is needed. So if the expansion tank of a VAZ-2110 boils at normal engine temperature, you can be sure: it is definitely to blame. Naturally, if the refrigerant temperature sensor is working properly.
What to do if the cylinder head gasket is blown
Many drivers are interested in the question: is it possible to drive with a broken cylinder head gasket ? The answer is simple - it is possible, but not advisable, and only for short distances, in particular, to a garage or car service for repair work. Otherwise, the consequences of a blown cylinder head gasket can be very dire.
If, as a result of the diagnostics, it turns out that the gasket has broken, then nothing can be done about it except to replace it. It is also worth inspecting the adjacent surfaces, and most importantly, try to find out the true cause of the burnout... The price of the gasket can be different and depends on the brand of the car and the manufacturer of the spare part itself. However, compared to other nodes it is low. Repair work may cost you a little more than simply buying a gasket. The point is that the following points must be taken into account:
- If during the process of dismantling the cylinder head it is discovered that the mounting bolts have become loose and do not meet the technical parameters, they will need to be replaced. And sometimes situations happen when, due to a change in the geometry of the cylinder head, the bolt cannot be unscrewed, and you simply have to tear it off. There is appropriate equipment to carry out this unpleasant procedure. Often modern engines are equipped with bolts that operate at their yield limit. This means that after removing the cylinder head (to replace the gasket or for other reasons), it is necessary to buy and install similar new ones.
- If the plane of the cylinder head is damaged, it will be necessary to grind it. To do this, they use special machines, the work of which will also cost money. However, the working plane of the cylinder head “leads” not so often, but it is still worth checking this parameter. If the surface has been ground, a new gasket must be purchased, taking into account the thickness of the removed metal layer.
Before replacing the gasket yourself, you must clean the head of carbon deposits, scale and pieces of the old gasket. Next, you need to inspect its surface. To do this, use a special measuring tool, usually a ruler. It is passed along the surface, revealing the presence of gaps. The size of the gaps should not be more than 0.5. 1 mm . Otherwise, the surface of the head must be sanded or completely replaced with a new one. Instead of a ruler, you can use a thick sheet of glass (for example, 5 mm thick). It is placed on top of the surface of the head and looked for for possible air spots. To do this, you can lightly lubricate the surface of the head with oil.
Checking the cylinder head surface
When replacing the gasket, it is recommended to lubricate its surface with graphite lubricant. This way it will become softer and easier to find “its” place on the surface of the cylinder head. In addition, it will be easier to remove when dismantling. The advantage of graphite lubricant in this case is that graphite is not squeezed out during operation, turning into ash.
After repair work, the car owner must monitor the behavior of the engine. Do the malfunctions described above reappear (white smoke from the exhaust pipe, emulsion or greasy spots in the coolant, oil at the junction of the cylinder head and cylinder head, no engine overheating, and so on). Moreover, immediately after replacement, you should not operate the engine at maximum power. It is better for the gasket to “settle” and take its place.
Algorithm of work when sealing cracks in a tank with your own hands
Many car owners are interested in how to seal cracks and crevices in a plastic container. To repair the resulting defect, the following operations must be performed:
- thoroughly clean the plastic from any remaining antifreeze at the crack site using a napkin;
- degrease the welding site with solvent or acetone and dry;
- cut a strip of metal mesh made of brass, consisting of small cells, at least 10 mm wide of the corresponding length;
- apply a mesh patch to the joint being sealed;
- evenly, in several approaches, solder the mesh to each edge of the joint, fusing the plastic with the metal and forming a reinforced layer over the entire area of the patch;
- grinding the resulting connecting seam;
- putty, primer and painting of the welding area.
To carry out soldering, use a soldering iron with a flat tip with a power of at least 40 W. Precise execution of each item of repair measures allows you to completely restore the strength and reliability of the body part.
This product has high heat resistance and resistance to oily liquids. Before applying the polyadhesive to the defect site in the plastic case, it is necessary to carry out careful preparatory operations to clean, degrease and remove traces of substances used previously.
First way
The procedure that has become widespread among domestic motorists determines the following procedure:
- Remove the protection from the engine.
- We provide unobstructed access to the expansion tank.
- Disconnect the pipe responsible for heating the throttle assembly.
- Remove the lid from the tank and cover the hole with a soft cloth.
- We blow inside the tank, creating additional pressure, which is enough for the air to escape.
- As soon as antifreeze appears, we immediately put the pipe in place and secure it with a clamp.
- Then we reinstall the cover and the dismantled engine elements.
Let's sum it up
Air entering the vehicle heater can negatively affect not only the functionality of the heater and comfort in the cabin, but also affect the operation of more significant units and parts in the car. Timely detection and elimination of the problem will help you save on the purchase of expensive heater components and repairs to the car’s power unit.
Be very attentive to even seemingly frivolous problems in the operation of your vehicle. Simple preventive measures to care for the interior heating elements will have a positive impact on the functionality of the vehicle as a whole.
Source
Electrical equipment
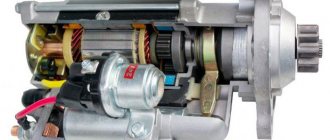
Electrical equipment of VAZ The car is provided with electrical energy by a generator. VAZ 2199 cars are equipped with an alternating current generator. The main requirements that the generator must fulfill are as follows: the generator provides an uninterrupted supply of current and has sufficient power. To operate effectively, a generator must be durable, have a significant resource, and at the same time its weight and dimensions must be small.
It is also desirable that the generator have a low level of noise and radio interference. The generator operates on the principle of electromagnetic induction. Fuses are very important in the electrical equipment of a car. Often, a car not running can be resolved by replacing the fuses. You can find out how the fuses are located in your car in the diagram in the instructions.
The wiring to the Solex carburetor is distinguished by the presence of additional sensors and a different arrangement of indicators.
Second way
Owners of imported cars can use either the first method or the second method:
- We start the power unit and warm it up until it reaches operating temperature.
- After 10-15 minutes of engine operation, turn it off.
- We dismantle the elements that prevent free access to the expansion tank.
- We disconnect one of the tank pipes without unscrewing the cap. If there is an accumulation of air in the system, then the release of air can be identified by a characteristic hissing sound.
- As soon as the coolant appears, install and fix the pipe in its proper place.
Speed and attentiveness are also important here. Be careful, because the antifreeze temperature can reach 80 degrees Celsius. This should be taken into account during the entire operation.