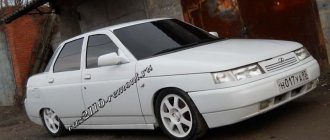
Lada 2114 ☝ GrApHiTe MeTaLLic › Logbook › Proper lowering, complete suspension replacement.
Hi all.
I finally got around to hanging it, how long have I been waiting for this moment, but I debated even longer whether it was worth taking it or maybe not, but I took it anyway, then I had doubts about whether to install it or not, I was embarrassed by the fact that the whole Internet was just talking about from June 1, they will be fined for understating, but despite all my doubts, I still installed what I had been dreaming about for so long) As soon as I bought the car, the idea immediately came to understate it, because she was just an unreal jeep =) and then I firmly decided that . . .
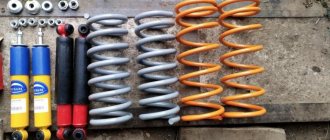
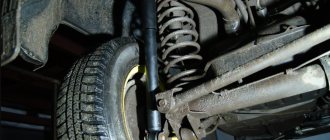
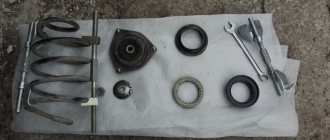
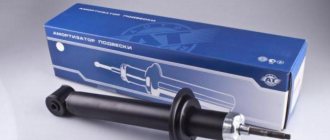
Then a long and painful search began for the suspension; I wanted it to be moderately low and soft, and opted for short-travel struts from ASTON.
The racks are oil, there are a lot of positive reviews about them, everyone wrote that they are very comfortable and soft on them, that’s why I chose this model. Next, I chose which springs to install, someone advised to saw stock ones, then it would be generally soft, and someone advised to buy ready-made ones and not suffer, I followed the second advice and bought ready-made springs.
There are also a lot of positive reviews about these springs, not oak but not soft either, in general the best option.
The next stage was the choice of support bearings, I didn’t think too much about this, and chose SEVI EXTREME support bearings, which for me are the best option in terms of price and quality ratio.
then I took the suspension components: 1) Sound insulators front and rear SS20 2) Strut boots, front and rear 3) Polyurethane silent blocks 4) Bump stops 5) All new bolts and nuts. Everything else was changed quite recently, and therefore I did not buy anything else.
Well, then the installation process began) I was very afraid that what was written in the picture would happen, because... problems would increase significantly =)
But surprisingly, everything came off very easily and well) they started changing the front struts first) I left 2 bump stop divisions at the front)
Then the rear part) I also left 2 bump stop divisions at the rear)
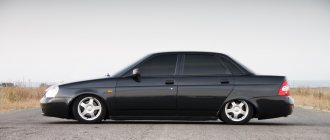
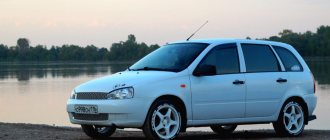
After all the manipulations with the suspension I went to the alignment) Well, after the alignment I drove around and enjoyed the suspension) What I want to say about these struts, these guys are really worth the money, I don’t regret one bit that I took them, the ride is very comfortable and soft, considering that that the wheels are R15, on wheels of a smaller diameter it will be generally ideal, the car does not jump, does not throw to the sides, unevenness handles perfectly, to be honest, it has even become much softer if you compare your STOCK struts, in general I am very pleased with them so far)) I think that I can’t find a better option, I don’t take the pneuma into account)) Well, a couple of photos of how the car sat on these racks)
I didn’t need a strong understatement, because... We have obvious problems with the roads =)
The weather in our region is still not adjustable, it rains every day, as soon as the weather gets better I’ll immediately wash the car and take a photo shoot on the new suspension) Well, that’s probably all I wanted to tell you in this blog) Good luck to everyone on the roads and have a great mood this summer =)
Disassembly and replacement
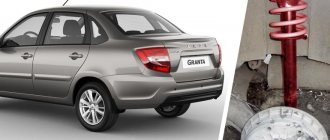
Many VAZ 2114 owners dream of installing air suspension . These are completely feasible fantasies, which, however, will require serious financial investments from you.
clamp
Therefore, until you have saved up enough money for pneumatics, there is a knock on the front suspension
The VAZ 2114 haunts you; you will need to disassemble it, determine the causes of the malfunctions and put the entire structure back together. How to do it? Now tell me.
- The car can be lifted with a lift or simply placed in an observation pit. It all depends on what resources you have. Be sure to apply the handbrake, remove the wheel covers, loosen the bolts and remove the hub nuts. The front end must be effectively secured for wheel removal.
- Now remove the ball joint pin. It is located in the swing arm on the A-pillar. After this, the front stabilizer rod is removed. It must be disconnected from the front suspension arm. Only now can you remove the stretch from the body. The next step is to remove the ball joint. If you forget, it is located and attached to the rod.
- Now we start removing the front control arm. To do the job as smartly as possible, unscrew the bracket attached to the case. Now remove the lever along with the extension and bracket. Don't forget to remove the bolts securing the spacers to the hinge.
- Well, now in front of you is a caliper that is completely assembled. It is not recommended to remove it completely, because reassembling it can lead to unpleasant consequences and unnecessary financial costs. It is better to take a hook and hang it so that the main hose does not work. Next, you can squeeze the splined shank away from the hub.
- Go to the engine compartment and remove the protective fist from there. For this operation, you need to unscrew the nuts on the telescopic strut, and then remove the strut from the suspension of the front of the car. He walks right along with the hub and turns his fists. Likewise, the second front suspension strut is removed and the struts are then removed from the rod.
- When removing the ball joint and steering knuckle bolts, be sure to use only a socket wrench. If you ignore this rule, you risk damaging the hinge protection cover. By doing this, you will incur additional financial costs yourself.
- During dismantling, check the condition of some suspension elements and, if necessary, replace them.
- The assembly process is carried out almost completely by analogy with disassembly. But there are a couple of nuances. Firstly. When installing the bracket fasteners onto the body, be careful not to damage the thread, so be careful. Second. When installing the anti-roll bar, try not to cause longitudinal displacement of the cushion on the rod.
Communities › DRIVE2 Krasnodar › Forum › Help with advice! What is the best way to lower a VAZ 2114?
Please don’t scold me, I’m not from BPAN and I don’t profess their religion :) I drive a stock car, with the exception of the 15 casting, I would like to give the car a more aesthetic appearance (lower it to the arches, no more) and get rid of rolls and dives. I've read a bunch of forums, but I'm completely confused! So there you go! What is the best way to proceed: 1) buy lowered springs (if so, which ones) 2) buy lowered springs and short-stroke struts (if yes, then which ones) 3) cut bluntly i024.radikal.ru/1402/6c/da4b26baf71d.jpg
If right up to the arches, then -50mm, no more. According to the first, the spring is a budget “Techno Spring -50mm”. Well, what’s better than eibach, well, etc. Well, no more than -50mm, otherwise the suspension will be killed soon. Here is the second option - this is the Bpan option. The hat is better to buy ready-made at a discount, like Demfi or SS20. The third one didn’t do it better, but did it like the first one.
That's what I meant about ready-made racks! Well, if you buy springs of -50mm, then do you need struts of -50? They just write everywhere that standard struts can have a maximum of -40 springs!
If everything is done correctly, then -50mm racks are needed. Well, at my native construction sites it’s -50mm. According to the standard -30 mm, which was all right according to the standard.
So why doesn't the car jump? I just drove a lowered four with standard struts, it was a star!
Well, at -50 mm, it doesn’t jump, but if it’s more, it will jump. The suspension has become stiffer and more stable.
Better yet, set the suspension to normal, the rolls will go away on their own... it wasn’t fools who came up with this... better not touch anything)
What kind of normal is this? stock? The stock from the factory is tilting, if initially our “not fools” had made it properly, then people would not have bothered to improve it...
Everything can be solved by replacing the salenblocks and levers)) You think if you lower it a couple of turns it will ride like it’s on rails))) And there won’t be any rolls... It’s easier to just put it on the cushions and throw out the chassis.
no, not straight on the rails)))) the center of gravity will be lower, which will already have an effect)
There won’t be any rolls, but when you skid… on stock you’ll sway back and forth in different directions and everything will be fine. and on this one it will simply throw you off the road
so that’s the point, I want the best option, a moderately comfortable, not very stiff suspension with a minimum of roll! Well, so that there is safety! does this happen on our cars? :)
))) Anything is possible))) I began to experience severe rolls when the bushings and stabilizer struts died)))
Better yet, set the suspension to normal, the rolls will go away on their own... it wasn’t fools who came up with this... better not touch anything)
He's on the Vase. There you just need to redo it yourself.
What's the budget? What is the pendant for?
Well, according to the budget, let’s say it’s as optimal as possible in terms of price/quality ratio! I mean, why pay for 20,000 if it’s no worse for 10,000 :) What is the suspension for? I’m not a racing driver, but I want confidence and comfort when performing maneuvers, the rolls are very annoying! Well, improve the appearance a little, otherwise it’s just a jeep)))
There was no roll and understatement is not exactly the same thing. Rolls are removed by the front stub and the rigidity of the beam (crossbar to beam) For the suspension... Demfi Premium Gas (-30 or -50) and Tehnoressor springs - 30 or -50
Here is my advice for the optimal ratio.
Thanks for the advice!)
if you don’t mind the money, then install the pneuma for about 60 guilders
No... I don’t earn money)))) If I could afford pneuma, I wouldn’t drive a Russian car at all))))
logical) but I know guys who have Soviet pneuma)
You know, personally, I want an old one, but damn I can’t afford to maintain it yet, and I need more or less reliable wheels for an affordable price, so I drive a four! I’m not a fan of the Russian automobile industry and I don’t see the point in investing heavily, but I want to drive and feel confident in the car, so modifications to the suspension are more or less budget-friendly!
I even look at our roads after the frost and want to buy a jeep all-terrain vehicle))))
Eh... This is also true!(
I also bought the 11th, and immediately installed the 15th slippers on 50mm tires. I drove on our roads for a month and put back the 14th wheels on 65th tires. Maybe because I carry very fragile cargo on it (aquariums)…
I even look at our roads after the frost and want to buy a jeep all-terrain vehicle))))
Stories from our readers
“Fucking basin. "
Hi all! My name is Mikhail, now I’ll tell you a story about how I managed to exchange my two-wheeler for a 2010 Camry. It all started with the fact that I began to be wildly irritated by the breakdowns of the two-wheeler, it seemed like nothing serious was broken, but damn it, there were so many little things that really started to irritate me. This is where the idea arose that it was time to change the car to a foreign car. The choice fell on the melting Camry of the tenth years.
Yes, I had matured morally, but financially I just couldn’t handle it. I’ll say right away that I am against loans and taking a car, especially not a new one, on credit is unreasonable. My salary is 24k a month, so collecting 600-700 thousand is almost impossible for me. I started looking for different ways to make money on the Internet. You can’t imagine how many scams there are, what I haven’t tried: sports betting, network marketing, and even the volcano casino, where I successfully lost about 10 thousand ((The only direction in which it seemed to me that I could make money was currency trading on the stock exchange, they call it Forex. But when I started delving into it, I realized that it was very difficult for me. I continued to dig further and came across binary options. The essence is the same as in Forex, but it’s much easier to understand. I started reading forums, studying trading strategies. I tried it on a demo account, then opened a real account. To be honest, I didn’t manage to start earning money right away, until I understood all the mechanics of options, I lost about 3,000 rubles, but as it turned out, it was a precious experience. Now I earn 5-7 thousand rubles a day. I managed to get the car buy after half a year, but in my opinion this is a good result, and it’s not about the car, my life has changed, I naturally quit my job, I have more free time for myself and my family. You’ll laugh, but I work directly on the phone)) If If you want to change your life like me, then here’s what I advise you to do right now: 1. Register on the site 2. Practice on a Demo account (it’s free). 3. As soon as you get something on the Demo account, top up your REAL ACCOUNT and go to REAL MONEY! I also advise you to download the application to your phone, it’s much more convenient to work from your phone. Download here.
| Lowered suspension kit . It includes shock absorbers and springs. This is a cheaper option for lowering a car, in which it is not possible to change the ground clearance as needed. If we talk about VAZ, then suspension kits with lowering Acomi (SPORT series) are popular. |
Low profile tires . If you replace the tires with lower ones, this will lower the car by some amount. The main thing is to install only those tires and wheels that are suitable for your car. (Acceptable tire and wheel sizes for VAZ size ten)
Other ways to lower your suspension
These methods of lowering the car require significantly less time and money, but experts do not recommend resorting to them.
Lowered springs . Buy lower springs and leave the shock absorbers the same. As practice has shown, this method has many disadvantages and only one advantage - budget.
Trim the springs . Those who are not going to spend money on buying lowered springs decide to saw off the coils of the springs (from 1.5 to 3 coils). The springs are trimmed with a grinder or a metal file. After the machine has fallen, the coils are cut in half so that they can be removed. Then the bumper is cut and the spring is secured with a clamp through the drilled hole. For comparison:
- standard suspension height of VAZ 2110
- sawed off 1.5-2 turns of springs
- sawed off 2.5-2.75 coils of springs
A bag of potatoes in the trunk . Jokes aside, this method was previously used by many on spring-loaded vehicles, after excessively increasing the ground clearance. When straightening springs, it is very difficult to calculate the required size. And nowadays, you can find cars where a bag of cement serves as a weight for super-fast lowering of the rear suspension. By the way, about springs...
Remove the spring leaf . Most often used on VAZ cars, where the rear suspension is leaf spring. Removing the sheets will reduce the rigidity, causing the car to lower.
Understatement on VAZ 2114 -70 or -90 pros and cons
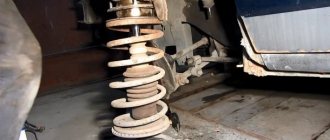
Let me start with the fact that before the winter, my 14 had homemade KH (oil) installed with a lowering of -90 mm. however, I didn’t go on them for long. Until the first snow. Probably the fear of snow-covered courtyards, which, as it seemed to me, could not be driven through with such ground clearance, played a role here. Oh how wrong I was. I regretted 1000 times that I installed the original suspension. But the job is done and there is nowhere to retreat.
And now the long-awaited spring is on the doorstep, it’s time to drop the car. I thought for a long time about what to take: a new -90 mm suspension. (gas-oil from the Demfi company) or -70 springs and combine them with the original struts, which are moderately worn. The Jew in me won and it was decided to buy springs. We found a used Phobos -70 in front, and had to buy new Techno Springs -70 in the rear. One, in fact, a good person installed these springs for me. Fast and smart.
As for comfort, nothing has changed globally. The car did not become much stiffer, although it began to sway a little on various types of uneven surfaces. No problem! The unpleasant sounds from the racks that have seen life are drowned out by the music, which I will talk about in another topic. In general, I can assure you that -70 springs and the original struts get along quite well!
But in the future I will still purchase short-stroke struts. I can't decide whether it's just gas-oil or oil-powered. Controllability or relative comfort... I think we’ll decide this issue later, in the summer. In general, what happened can be seen in the photo. The car did not become much lower, but retained its mobility. Although -90 is still cooler both in appearance and in feel.
For comparison, I also inserted a photo of my car, but on KKh -90, stock springs, 2.5 sawn panels, 4. (autumn 2014) I can add from myself that the car behaves simply amazing on the road. Doesn’t “fall” into turns, doesn’t sway on uneven surfaces.
Let me sum it up. In my opinion, the most optimal is still -90 on short-stroke struts (I like oiled ones) and original springs 2.5 by 4. However, if you want to simplify your life, that is, not be afraid of rough terrain and other delights of our vast country, you can feel free to underestimate -70. Since I already made a stupid mistake when I sold the KKH-90 and bought -70 springs, I will complete it by buying KKH-70 (gas-oil). I think this pendant is ideal for both winter and summer.
Understatement -90 in a circle. Aston struts
Good afternoon. This is my first car. I always wanted a lowered 14 with loud music. The snow has melted, it's time to drop)))
They sent me from work to quarantine. Somehow I found and bought myself a KX ASTON -90 front and rear, boots and bump stops, also technospring springs -90 front and rear (I should have taken -120, I’ll tell you later).
So. My friend came to my aid, whose Priora is simply in perfect condition. Also understated, that's all. We started removing the rear shock absorbers (how lucky we were that we didn’t have to work with the Bulgarian’s wife, everything came off easily). After replacing the rear (it took about an hour and a half), we started working on the front.
And this is where we ran into some small problems. We assembled the stand, screwed it onto the lever and tried to get the rod into a small hole in the glass. Ooooh, nothing worked for us for 2 or 3 hours. Since we didn’t have special ties, we placed the spring under the car and lowered it on a jack, then tied it together with wire.
Method one: Sawn springs
This method of underestimation has found popularity among young people. This is due to the fact that most young people do not have large sums of money to spend on tuning their cars. This method of lowering a car is the cheapest and fastest, but far from the most reliable and safe.
So, let's take a closer look at how to cut springs on the Lada Priora and VAZ 2110.
Washed down the springs on the VAZ 2110
The suspension of the Priora and 2110 cars is slightly different in the design of the shock absorber strut. The Priora uses a barrel spring, while the VAZ 2110 uses a coil spring.
Coil spring VAZ 2110
In order to lower the car using the spring method, you need to decide on the amount of lowering of the car. It is not recommended to cut the springs more than 3 turns at the front, since the strut will compress and the upper cup of the shock absorber will rest against the bump stop, therefore, the shock absorber may not function properly.
The springs of the rear shock absorbers can be sawed up to 5 turns, after which the same thing awaits you as with the front shock absorbers, the bump stop will rest against the rear spar. It follows that the shock absorber will not work correctly and there can be no talk of any driving comfort.
Washed down the springs on the Lada Priora
You can file the spring on a Priora, but it is not recommended to saw the front springs. The front spring of the Priora, as described above, has a barrel shape, therefore, after washing it down, it will lose its shape and will not fit into the groove of the shock absorber cup. Some craftsmen, after washing down such a spring, heat it up and give it a similar shape.
It is strongly not recommended to use this method, since when heated, the spring loses its properties and elasticity, becomes more fragile and susceptible to rupture or breakage, which can lead to dire consequences.
Sawed barrel spring
The rear springs of the Priora can be cut in exactly the same way as the springs of the VAZ 2110, because they are absolutely the same.
Step-by-step instructions for cutting down a spring
In order to safely file down the spring, the strut must be removed from the vehicle.
The first step is to prepare the necessary tool. It's better to use a key set
Removing the front struts
To remove the front struts you will need the following tools:
- Open-end wrenches for “13”, “17”, “19”, “22”;
- Hexagon at "6";
- Socket heads or wrenches for “13”, “17”, “19”, “22”;
- Anti-rust liquid WD-40, etc. (by the way, if you don’t have WD-40, you can use kerosene, antifreeze or diesel fuel)
- Hammer, pry bar and pliers
- Steering wheel end remover.
Tie Rod Remover
So, let's start disassembling the car.
- 1. It is necessary to jack up the side on which the spring will be washed down, having previously loosened the wheel mounting bolts 4 pcs. Do not forget to put chocks under the rear wheels of the car so that it does not roll forward or backward.
- 2. Remove the wheel from the car and place it under the threshold of the car. This action will help prevent damage to parts of the machine if it falls from the jack.
- 3. Next, you should loosen the nut securing the rod to the front shock absorber support in advance; for this you will need a hex socket set to “6” and a wrench set to “22”.
- 4. Unscrew the steering end mount with the head on “17”, having first pulled out the cotter pin. And we press it out of the rack axle using a puller or a hammer and a pry bar.
- 5. Pull out the brake hose and ABS wire from the seats in the rack.
- 6. Unscrew the bolts securing the strut to the steering knuckle using keys “17” and “19”.
- 7. Unscrew the three bolts securing the shock absorber support to the strut with a head set to “13”.
- 8. Take out the stand.
Next we should proceed directly to disassembling the shock absorber, here we will need spring ties
- 9. We tighten the spring with ties on both sides.
- 10. Unscrew the nut securing the support and remove it, then remove the spring and the bump stop with the boot.
The stand is disassembled, you can start cutting. The number of turns must be measured from the beginning of the turn on the spring. We saw the spring with a grinder.
We assemble the rack in the reverse order. You should pay attention to the washers under the rack support and install them in the correct sequence as shown in the photo.
The sawn spring must be installed with the cut coil down.
We carry out exactly the same action with the opposite side.
Removing the rear struts
To remove the rear struts you will need much less tools than to remove the front ones.
Tools required to remove rear struts:
- Keys to "17", "19"
- A special key for unscrewing the rear shock absorber rod.
Wrench for unscrewing the rear shock absorber rod
Step-by-step instructions for removing the rear shock absorber of Lada Priora and 2110
There is no need to use zip ties to replace rear shock absorbers
- Loosen the bolts securing the wheel to the hub.
- In the luggage compartment of the car, bend (unscrew if necessary) the trunk lining so that access to the rear spar is free. Loosen the nut securing the rear shock absorber rod to the spar.
- Jack up the side on which the spring will be cut. Do not forget to put chocks under the front wheels of the car so that it does not roll forward or backward. Remove the wheel from the car and place it under the threshold of the car. This action will help prevent damage to parts of the machine if it falls from the jack.
- Unscrew the bolt securing the shock absorber to the rear beam of the car.
- Unscrew the shock absorber rod from the rear side member of the vehicle.
- We take out the strut, you need to lower the strut all the way down, squeeze the shock absorber rod, pull out the spring with the boot and bump stop, and then the shock absorber itself.
That's it, the rear strut has been removed from the car, you can start cutting down the spring.
It is necessary to count the number of turns and cut the spring exactly opposite the beginning of the spring turn.
Reassembly of the rear shock absorber should be done in reverse order..
Examples of cars with sawn springs
Sawn springs front 3 turns rear 5 turns
Sawn springs front 2 turns rear 3 turns
Advantages and disadvantages of sawn springs
Disadvantages of lowering a car by filing down the springs:
- There is no comfort when driving such a car.
- There is no way to travel on a country road.
- The spring may fly out of the shock absorber cup.
- Immediate failure of shock absorbers.
Advantages of lowering a car by filing springs:
- Cheap and easy to use.
Suspension kit VAZ 2108 – 2115 assembled (lowering -90 mm)
Lowering 90 mm. For VAZ 2108-2115 cars and their modifications. Maximum lowering with the greatest possible comfort at this lowering. Excellent handling and steering response.
The kit includes:
- Telescopic stand – 2 pcs.
- Shock absorber – 2 pcs.
- Front spring – 2 pcs.
- Rear spring – 2 pcs.
- Telescopic stand support – 2 pcs.
- Rack rebound buffer – 2 pcs.
- Shock absorber rebound buffer – 2 pcs.
- Upper stand cup – 2 pcs.
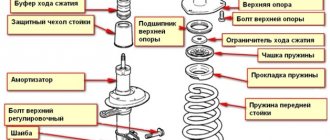
Rear suspension
The diagram of this node includes a total of 16 elements:
- Rubber-metal hinge (it serves as the main fastener for the body);
- Bracket. It secures the rear suspension arm to the body;
- Shock absorber housing;
- Compression load buffer;
- Housing cover;
- Washing machine support;
- Amortpodushka;
- Spacer sleeve;
- Solid spring;
- Shock absorber;
- Beam lever;
- Insulation gasket;
- Lever connection element;
- Flange;
- Rack bracket;
- Lever handle.
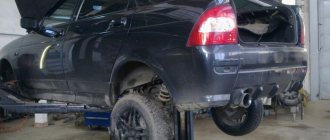
Lowering VAZ 2114
Lowering of VAZ 2114 front -50, rear -70 mm. Apparently it won't be short. Probably 70-80% of 2108-2114 owners have thoughts of lowering the car. I also wanted the car to look better, but not to shake. Understating the BPAN is still not my thing, especially since there is a need to drive not only around the city.
The situation was complicated by the fact that I had no experience in working with/changing the suspension. For a whole year I thought and decided what and how to do. Just sawing is not my thing, I drove such cars, not very well. As a result, I found a person who has sufficient experience to advise me on a worthwhile understatement. And I brought life together with this man. So, I explained to him what and how I wanted in the end. He proposed a compromise option: lowering -50/-70, and then, he said, this is close and even a lot for the suspension to work well. Deep down I disagreed because... I wanted either -70 around, or -70/-90, but I listened to him, because... I have a lot of experience, but I am guided 80-90% by emotion and desire for appearance. Among other things, he had contacts in Togliatti at Demfi, the opportunity to order racks specifically for springs from the local Kulibin and assemble them manually. So, we decided together (he advised, and I wisely agreed): 1) Demfi Premium struts, manual lowering -50/-70 2) Evolex supports 3) Springs I bought earlier - Tehnoressor -50/-70 4) SS20 bump stops Struts and the supports arrived from Tolyatti in about a month and a half, bought additional boots and bumpers, and went to install them (also on recommendation). After installation, I went to the breakdown. The result is that it has become tougher, but not critical. The car does not chatter, does not shake, the suspension works as it should. I also sometimes travel as a passenger in a Note, Teana, Passat CC, Corolla - of course, it cannot be compared with the softness, but these are other cars. Moreover, there was a contrast, because On the day of changing the suspension, I changed the winter R-14 to the summer R-15. The car has become more stable in turns; I can consistently take the same turns in a higher gear. The only “BUT” is that it was just a little short of the lowering that I wanted. Ideally, it would be even lower by -40/-20 mm, I think this would not affect the pragmatics (I wouldn’t start scraping the asphalt with my belly), but it would look very cool. If this desire does not go away further, I will think about something.
When I first bought the car, it had spacers on the back for the rear shock absorbers. But it didn’t bother me then. Then I wanted to lower it, a year later I did it, I lowered it primarily so that the car would steer, I didn’t want to spend 15 thousand on short-stroke struts and springs (as well as 15 thousand themselves)), so I cut 2 by 2 turns, but the back turned out to be high, and then another turn at the back, for a total of 2 by 3.
But the struts were damaged, and after about 5 months the car began to rock on bumps, and on potholes, due to the short stroke, the suspension was punched, and all these blows go wherever you think, right, on the body and on your back, the panel keeps rattling, the radio I failed once, and the hard blows to the back made me sick. And by winter the landing was over, I bought new standard struts and springs.
I immediately began to notice that there was a lack of controllability, and I’ll tell you why now. The fact that the center of gravity is high is already understandable, but the main bullshit is that the ass is higher than the front, plus the entire mass of the car in front, it turns out that the front is overloaded, and when you go into a turn, the car leans on the front wheel on the outer side of the turn and the ass in the back dangles slightly when there's shit in the hole, there's no grip. The castor also turns out to be small or even negative. Also, there is no comfort, again due to incorrect weight distribution.
Well, now the main thing is how to solve this problem. Well, yes, lower your ass. 2 turns will be just right. It’s better not to touch the front because the suspension travel decreases, and with it comfort and ground clearance, which is necessary to leave the yard in winter, or when driving on a snow-covered road on which an obstacle may arise in the middle of the road that will not be possible to get around; such situations have happened to me, In general, lowering the front will only worsen the properties of the car.
By lowering the rear, we get advantages in the form of better weight distribution, and this is always very much appreciated in cars. Now the ass is more confident in turns, there is no roll on the front wheel, the load is distributed more evenly between the front and rear. Comfort has increased, again due to weight distribution, because the front wheels are not overloaded. The castor has increased, which means the car turns better and easier, and also drives straight when accelerating, rather than throwing it in all directions as before. The car tilted back and even sitting in the chair became more comfortable. Regarding the transportation of bags of potatoes and other things, don’t worry, nothing will be rubbed. That’s actually all that I planned to talk about on this topic, I was convinced from my own experience that this understatement is the best solution and comfortable for everyday use.
Lowering options
1. Buy a ready-made suspension kit. It includes: springs, struts, etc. This is the simplest, most convenient and expensive option, replacing almost the entire suspension at once. It will cost from 12,000+ rubles. This is the safest option, especially if you get quality parts and install everything correctly. If you choose this option, then do not forget about the wheel alignment.
2. The best option is to replace only springs with a smaller turn stroke. This will lower your car and add rigidity, without any harmful consequences for the car. You can also just buy a regular spring, but stiffer and lower. The range of prices is huge, but from about 3k rubles.
3. There is an option to move the spring cup down. But here you are playing the lottery, since it is very dangerous to do it yourself. - You may weld poorly - The stand is not guaranteed to be able to withstand high temperatures during welding. But don’t be discouraged, such racks are sold ready-made.
4. Cutting springs. Most people simply cut the coils off the spring. And this should not be done under any circumstances! In this case, the stroke of the rod decreases and when it gets into a hole, the strut does not have enough free play and it hits the body. Also, a sawn spring can become warped and it will also hit the body and spoil the suspension. Has proven itself to be excellent.
Answers (2)
It's quite simple. Topics such as how to lower or tune a VAZ 2113, 2114 or any other Russian car have long been known and a lot has been done and written. But nevertheless, you can give some recommendations and give ways on how to do this.
1) Wheels and tires. Choose those wheels that you like and that visually match the color and design of the car
But the most important thing is to comply with the standard parameters, in particular the bolt pattern, which in the VAZ 2113, like other Ladas, is 4X98, the approximate width is up to 6.0 J - otherwise the wheels will stick out, the offset is ET30-40 - if less, then the wheels can also stick out a lot or touch the arches or calipers. Centering hole - TsO 58.5 - if it doesn’t fit, it can be easily solved with spacer rings
In general, there are a lot of rims for the R15 for the VAZ, and inexpensive ones, on average 2500 rubles per rim costs. Rubber is more expensive. For 15-inch wheels, you need to look for tires with parameters - 195/50 R15 - such summer tires - cost an average of 3,000 rubles. So calculate how much it will turn out: 10,000 rubles wheels + 12,0000 tires + 22,000 rubles. But you can, of course, find used options that will cost much less.
2) Let's move on to the second point, which is important - this is an underestimation. There are many ways to lower it, even to the point of carrying bags of cement in the trunk and in the back row of seats.
But let's list the simplest ways:
1) Cut off a couple of turns from the spring. You can easily do such tuning yourself, or in any normal service - they will do such a service for you for 500-1000 rubles. The disadvantages of this method are that you will feel all the bumps very strongly, and stability will not improve
2) Replace the standard springs with sports, shortened ones, which themselves are stiffer, and at the same time, the car will be more stable when cornering and on a straight line. The cost of this approach will be on average 5000-6000 rubles + labor.
3) The most interesting way to lower vases or cans is to install air suspension. It’s expensive, around 20,000 rubles including work, but in your area, and just in the city, you will become the coolest guy thanks to the Vase with air suspension. You can adjust the ground clearance, etc.
As for tinting, everything is simple. You stop by any tinting shop and for 2000-2500 rubles they will tint your windows. I do not recommend tinting the windshield and front side windows, as this may result in a fine and removal of license plates. Oh, and by the way, recently it has become fashionable among fans of the Russian automobile industry not to tint the windows at all - to drive like in an aquarium.
Method three: Air suspension.
Lada Priora with air suspension.
This method is the most expensive and difficult to install. To install the air suspension, the car must be completely disassembled. Install special equipment; besides, air suspension is not suitable for cold seasons. Quite often it happens that condensation appears in the tubes, which in cold weather can lead to a blockage in the air channel.
To install this method of understatement, qualified specialists will be required. Large set of tools and equipment. To install the air suspension you will need: a receiver, a compressor, hoses, pipes, special racks, sleeves, etc.
The installation of air suspension has not found much popularity due to its high cost and capriciousness. Due to the large amount of reagents on the road, air leaks often appear in the system, which makes it impossible to drive a car. Also, using a car in winter is quite problematic.
Advantages and disadvantages of air suspension
Pros of air suspension:
- Possibility of changing clearance
Disadvantages of air suspension:
- High cost and complexity of installation;
- Inability to move in cold weather;
- Taking away useful space in the trunk;