Where is
After the first unsuccessful attempts to start the car engine with the ignition key, without hearing the usual sounds of the starter, most car enthusiasts look for the cause of the malfunction in its breakdown. However, more often the cause is the ignition relay.
Where is the VAZ-2115 ignition relay located? It is located in the car interior, to the left of the steering column, under the instrument panel. In order to see it, you need to dismantle the instrument panel. Nearby, to the left of it, there is a relay for turning on the rear fog lights. They are screwed onto the car body stud with a “10” nut and located in special blocks.
The relay also controls the vehicle's washer, heater, rear window defroster, and some other low-current electrical circuits. If these vehicle components are not operating properly, the serviceability of this part should be checked.
The type of electric ignition relay is 90.3777-10, it has four contacts, the control voltage is 12 volts. When buying a new relay, be careful: five-pin analogs designed for 24 volts have a similar appearance. Self-repair of this part is unprofitable due to its low cost.
Overheating of the engine leads to serious problems: the pistons may jam, the cylinder block gasket may break, which leads to the need to overhaul the engine. To protect the power unit from overheating, it is important to maintain stable operation of the cooling fan.
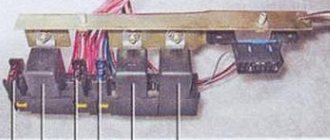
It is located in an additional block.
4 – electric fan relay;
5 – electric fuel pump;
6 – ignition relay.
Relays and fuses may have a different order. Therefore, you need to focus on the color of the wires. The main relay is always located at the bottom. Find the relay that has a thin pink wire with a black stripe coming from it. It comes from the main relay through pin 85. Be careful! Do not confuse this with the red thin wire, which also has a black stripe and extends from the controller.
A fairly common type of breakdown in cars is the shutdown of the vehicle's electrical equipment. Quite often this is due to a blown fuse. To quickly fix such a problem, you need to know exactly where the fuse is located, which is responsible for the disabled electronic component of the car, as well as how to replace it.
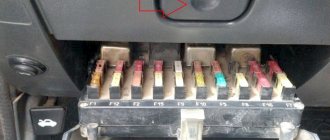
Where are the fuses located?
No vehicle is designed to have fuses scattered in different places. In every car, including the VAZ 2115, all fuses are located in a special block called a fuse block.
Like most cars, the VAZ 2115 has two fuse blocks. One of them is located in the car's interior, under the dashboard, and the second in the engine compartment, near the left glass.
What fuses are located on the VAZ 2115
Let us recall that in the previous article we looked at malfunctions of the ignition module on the VAZ 2115, its repair and replacement with our own hands.
1. “K1” – this element of the fuse block is responsible for the headlight cleaning system relay.2. “K2” - that element of the fuse block is responsible for the relay of the system for switching turning lights, as well as for the alarm system.3. “K3” – is responsible for the windshield cleaning system.4.
“K4” – is responsible for monitoring the performance of the lamps.5. “K5” – is responsible for the electric window system.6. “K6” – is responsible for sound signals.7. “K7” – is responsible for the rear window heating system.8. “K8” – is responsible for illuminating the roadway in high beam mode.9. “K9” – is responsible for illuminating the roadway in low beam mode.10. "F1" - "F20" are special fuses.
The design of the fuse box on the VAZ 2115
The interior fuse box has a slightly different structure than the one located under the hood. It includes an electronic control unit, three fuses, and three relays.
Just like in the fuse box located in the engine compartment, here each fuse has its own purpose.
1. The fuse that controls the fuel pump. Its current strength is 15 amperes.2. The fuse is responsible for the electric radiator fan relay, the valve located on the adsorber purge, as well as for the mass air flow sensor, DC and DC. The amperage of this fuse is 7.5 amps. 3.
Also, in order to fully understand fuse blocks, you should know about the relays that are located in the interior fuse block.
1. Relay, which is responsible for turning on the fuel pump.2. A relay that is responsible for turning on the electric radiator fan of the cooling system.3. Main relay.
How to identify a blown fuse and replace it?
As we said above, each fuse that is located in the car is responsible for its own electrical equipment. In this regard, you only need to look at the cover of the fuse box, and according to the diagram that is printed on it, determine the location of the required fuse.
To get to the fuses themselves, just press the latch with one hand and open the fuse box cover with the other.
How can I be sure the fuse is blown?
There are two main ways to evaluate the performance of a fuse. The first, simpler, but less reliable - “by eye”. To do this, pull out the fuse and see if its middle part is intact.
The second method of checking the fuse is better. You need to turn on the ignition and measure the voltage at the fuse contacts one by one. If one has it, but the other does not, then the fuse has blown.
In conclusion, I would like to note that if your fuses blow quite often, then you should check all the wiring of the vehicle. This requires serious experience and specific knowledge. If you do not have them, then it is better to contact an experienced specialist at a service station.
Miscellaneous Ignition fuse for VAZ 2114
Car: VAZ-2114. Asked by: Viktor Gubanov. The essence of the question: Where is the ignition relay located on the VAZ-2114
Hello to all car enthusiasts! Strange things started happening to my VAZ-2114 car. It all started when the heater fan began to work intermittently (sometimes it works, sometimes it doesn’t), after which the windshield wipers and heated rear window began to malfunction similarly. Now it’s even better, the engine stopped starting, and when you turn the key in the ignition before turning on the starter, the entire dashboard goes out.
At first I thought it was the starter. I had a new one in stock, so I took it and changed it. As a result, when you turn the key, the starter fires, but the engine does not start, at best about 10 times. I tried to start it with the key fob - half a turn without any problems. What is the problem anyway? Has anyone encountered this?
I already described my problem on many forums, they advised me to check the ignition relay first. But unfortunately, I have no idea where this relay is located, since I have never changed it.
Guys, tell me where the ignition relay is located on 2114?
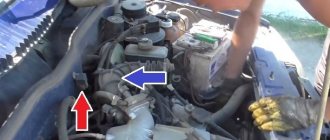
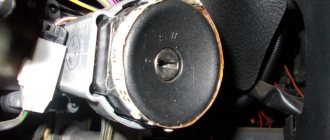
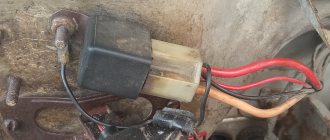
The location of the ignition relay is marked with an arrow
The ignition relay on the VAZ-2114 is located to the left of the steering wheel under a decorative cover. There is no need to remove it. You need to crawl under the steering wheel and find the relay.
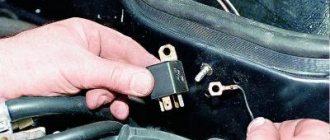
The ignition relay looks like this
Remember one important thing, before you start disassembling the stove, wiper, headlight or anything else - make sure that the fuse responsible for this circuit has not blown. And in addition to the fuse, make sure that power is supplied to the non-working unit, because the mounting block and wiring of the car Over time, subject to external factors and influences, it may fail.
By the way, it’s not for nothing that we focus on the latter - the location of the fuse box in the “chisel-samara” family is not entirely successful, water often gets on it, and due to the design features and its poor protection from moisture, various troubles are practically “guaranteed” by the manufacturer.
Today we will look at the diagram and location of fuses and relays VAZ 2113, 2114, 2115
The fuse box in the VAZ-2114 is located under the hood, to the left in the direction of travel of the car, on the edge under the left wiper you will see a black box. To open it, you need to move two latches on the left. We remove the cover, there are relays and fuses.
There is a marking on the inside of the cover indicating the purpose of the relays and fuses.
Below is the purpose of all relays and fuses in the VAZ-2113 and 2114
K1 Relay for turning on the electric fan K2 Relay-breaker for direction indicators and hazard lights K3 Relay for windshield wipers K4 Relay for monitoring the health of brake light lamps and side lights K5 Relay for turning on the power windows K6 Relay for turning on the sound signal K7 Relay for turning on the heated rear window K8 Relay for turning on the high beam headlights K9 Relay for turning on the low beam headlights
Circuits protected by fuses
Fuse No. Protected circuits F1 (20A) Relay for turning on rear fog lights. Rear fog lamps. Rear fog lamp activation indicator F2(10A) Turn signal lamps. Relay-breaker for direction indicators and hazard warning lights (in hazard warning mode). Hazard warning lamp F3(10A) Interior lamp. Individual interior lighting lamp. Ignition switch illumination lamp. Brake light bulbs. Trip computer F4(20A) F5(20A) Sound signal. Relay for turning on the sound signal (winding). Relay for switching on the sound signal (contacts), Relay switching on the electric fan (contacts). Cooling system fan electric motor F6 (30A) Power window switches. Electric windows. Power window relay (contacts) F7 (20A) Heater motor. Washer motor. Rear window washer motor. Rear window wiper motor. Electric windshield wiper relay (winding). Glove compartment lamp F8(7.5A)Right fog lamp F9(7.5A)Left fog lamp. Relay for turning on fog lights (contacts) F10 (7.5A) Turn indicators in turn indication mode and the corresponding warning lamp. Fan motor activation relay (winding). Indicator lamp for fuel reserve, oil pressure, parking brake, brake fluid level. Battery charge indicator lamp. Instrument cluster.Voltmeter. Carburetor electro-pneumatic valve control system. Parking brake warning light relay breaker F11(7.5A) Side light bulbs on starboard side F12(7.5A) Right headlight (low beam) F13(7.5A) Left headlight (low beam) F14(7.5A) Left headlight (high beam) ). Indicator lamp for turning on the headlight high beam. F15 (7.5A) Right headlight (high beam). F16 (15A) Relay-breaker for turn signals and hazard warning lights (in turn signal mode).
CHECKING THE FUSE
This is the final stage of diagnosis.
For those who do not know where the VAZ-2114 fuel pump fuse is located, it is located in the same place as the relay. You can see it from the salon. The best way to get to it is through the hood.
So, under the hood, near the windshield, there is a box. You need to open it and find the top fuse. Its current strength is 15 A. It is also written on it that it is for the fuel rail. If the fuse contact is intact, it means it is alive. If the contact is not OK, the fuse must be replaced.
These are the typical faults this unit has, and in the manner described above you can diagnose it.
The mass of the pump (and fuel level sensor) is attached to the stud securing the handbrake to the body under the carpet. To get to it you need to remove the vestibule between the passenger and driver seats. There are 3 wires coming to the fuel pump: the first, the second is negative, and the third is the fuel level sensor.
Table of contents
TRIGGER DEVICE
The starter on a VAZ is an electric motor with a mechanical drive for engagement with the flywheel of an internal combustion engine (ICE). The device itself consists of the following parts:
- Main building. It is a metal hollow cylinder, inside of which the electric motor parts are located;
- Stator. The stator is a winding made of thick copper wire, between the turns of which steel cores are placed. The winding is located inside the housing along its walls;
- Rotor. The rotating part of the mechanism, steel plates made of electrical steel are assembled on the shaft, and a winding is located inside the plates. It is also called “anchor”. The armature rotates in the housing bushings - front and intermediate; the rear support of the entire shaft is a bushing in the gearbox housing. There is also a collector on the rotor, which is a set of plates. A magnetic field is created on the collector, which sets the armature in motion;
- Bendix. A gear device that meshes with the flywheel of an internal combustion engine and ensures engine rotation. Placed on the rear of the rotor shaft;
- Brush unit. In model 2114, there are 4 brushes in the assembly. The brushes interact with the rotor commutator, and it is they who create the electromagnetic field;
- Solenoid relay. Unlike a conventional relay, the solenoid relay performs two functions at once - it closes and opens the contacts of the electrical circuit, and with the help of the core it moves the bendix gear to engage with the flywheel of the internal combustion engine.
FAULTS
Sometimes during the operation of the car, the driver may notice that the electronics in it have begun to act up, the heater and windshield wipers have begun to work intermittently, and the engine has difficulty starting. The cause of such problems, in most cases, is the small ignition relay 2114. In today’s article we will talk about what it is responsible for, where it is located and how to properly replace it.
Operating principle
[flat_ab id=»3"]
The VAZ 2114 ignition relay is structurally close in its design to other electronic relays.
Its main purpose is to start the starter and, as a result, initiate the start of the engine itself. At the same time, the relay is responsible for other equally important tasks, for example, for protecting the starter from too high voltage or, on the contrary, for starting the engine when the battery is dead (thus, it corrects the voltage in the power circuit going to the starter) .
In addition, by breaking the electrical circuit after starting the engine, the main relay thereby protects the ignition switch contacts from burning or even melting.
Location of the ignition relay VAZ 2114
Sure signs that the relay has failed may include:
- interruptions in the operation of the stove fan;
- problems with turning on the windshield wipers and heated windows;
- failures to start the engine.
All these factors, and especially their combination, directly indicate that the device is broken and should be replaced. But before you begin the repair, you should find out where the ignition relay is located on the VAZ 2114? You should look for this electronic element under the decorative trim-casing, to the left of the steering wheel. In order to gain access to the relay, this casing must be removed.
In some cases, you can try to remove the relay without removing the casing. This can be done by carefully placing your hand underneath the casing. True, this method requires a certain skill and an accurate understanding of the location and method of attaching the relay. For this reason, when replacing the device for the first time, it is recommended to dismantle the casing.
Ignition relay VAZ 2114 under a protective cover
Another, although less rare, but still common problem is overheating of the ignition relay. So, if after a long trip (during which many consumers were turned on, the operation of which is controlled by this relay - windshield wipers, glass heaters) it became very hot, then you should immediately begin searching for the cause, without waiting for the device to burn out or other problems in the on-board network.
If the relay remains cold, then the reason for overheating lies precisely in its low power. To solve this problem, you should install a new relay of a similar design, but designed for a higher current.
Since the ignition relay is an absolutely irreparable device, the only option for eliminating problems with it is replacement.
In order to replace the failed main relay of a VAZ 2114 with a new one (necessarily of a similar model), you will need the following set of tools:
- key to 10;
- crosshead screwdriver;
- slotted screwdriver with a thin narrow blade.
The relay replacement itself is performed in the following order:
- Disconnect the negative terminal from the battery.
- Unscrew the screws securing the protective cover of the steering column.
- Remove the casing.
- Carefully disconnect the old relay from the block with wires.
- Connect the new relay to the block.
- Replace the protective cover and secure it.
Ignition relay in the electrical circuit
It is worth noting that in some cases the installation location of the ignition relay may differ slightly. Sometimes, in order to get to this part, it may be necessary to dismantle not only the casing, but the entire dashboard.
Sometimes (especially if there is doubt about the relay malfunction and the causes of electronic problems), you can check this device using a multimeter. To do this, the device should be set to ohmmeter mode and one of its probes should be connected to the control output of the relay, and the other to the exciting winding of the starter.
If the relay is working properly, then the device will show the presence of resistance (its specific value is not so important). Otherwise, we can conclude that the relay is guaranteed to be broken and requires replacement.
That is why, if after replacing the old relay with a new one, problems in the operation of electrical appliances and the engine continue, do not rush to conclusions and look for the cause elsewhere - it is enough to simply check the newly installed relay according to the diagram above.
There are various signs of a starter malfunction on a VAZ 2114:
- The starter does not work at all, that is, it does not show any signs of life. The stator or rotor winding may burn out and power may not be supplied to the electrical part of the device;
- The starter turns, but does not engage; often the Bendix idles, not engaging with the flywheel. Usually the cause is the bendix itself - it should only rotate in one direction on its axis;
- The starter does not operate when the VAZ 2114 key is turned. If dry, quiet clicks occur, then both the VR solenoid relay and the relay responsible for turning on the circuit by turning the key in the ignition switch may be faulty. If the VR is faulty, the clicks are usually louder;
- The starter turns slowly, but can stop quickly. The stator or armature winding is short-circuited, the rotor has play in the bushings. There may also be a bad weight of the internal combustion engine with the body or a weak battery, but this does not apply to the starter;
- The engine starts with a grinding or crunching sound. Most often, such a start indicates wear of the teeth on the Bendix gear or the teeth of the engine flywheel.
If, when you turn the ignition key, the electric starter does not spin, but you can hear soft clicks of the relay contacts operating, then the cause of the car malfunction is the starter. You can verify this by connecting it directly to the battery, bypassing this electric relay. If clicks are not heard, and the starter is working properly, then it’s time to change it.
Signs of malfunction of the main relay and electric fuel pump relay circuits of the UAZ Hunter, their error codes.
In the previous material, we examined in detail where the main relay, the electric fuel pump relay and the fuses of the power circuits of the electronic engine control unit (ECU) in the UAZ Hunter are located, and also justified the need for their protection and periodic inspection with maintenance.
Now let’s look at why and for what reasons the UAZ Hunter engine may not start related to these relays or fuses, as well as signs of malfunction of the main relay and electric fuel pump relay circuits. At the end of the materials, analogues and options for replacing the main ECU relay and the electric fuel pump relay will be given.
Error codes for the engine management system with the Mikas 7.2 ECU associated with the main relay and the electric fuel pump relay.
If you have an on-board computer installed in your car with the ability to voice or digital error notification, then if there is a malfunction in the electrical circuits of the main computer relay or the electric fuel pump relay, it may display the following:
Error code 167 - short circuit in the electric fuel pump relay circuit. Error code 168 - open circuit in the electric fuel pump. Error code 169 - short circuit to ground in the electric fuel pump relay circuit. Error code 177 - short circuit of the main relay circuit. Error code 178 - main relay target open. Error code 179 - short circuit to ground in the main relay circuit.
These errors indicate malfunctions in the electrical control circuits of the electric fuel pump or main relay, including blown fuses, disconnection of the wiring harness from the terminals of the corresponding relay, malfunction of the relays themselves, or a short circuit in their wiring.
If there is no on-board computer, then in the field you can put the controller (ECU) into self-diagnosis mode and determine the digital error code by the number of lights (flashes) of the Check Engine warning lamp.
Other external signs of malfunction of the main relay and electric fuel pump relay circuits and methods for eliminating them.
After turning on the ignition, the Check Engine warning light does not light up and the electric fuel pump does not work.
The turning on of the Check Engine lamp is noticeable visually, and the operation of the electric fuel pump after turning on the ignition is clearly audible. If none of this is present, then you need to check the serviceability of the main relay and the yellow 20-amp fuse, and replace if necessary. If after replacement the fault does not disappear, then most likely the problem is in the electronic engine control unit itself.
After turning on the ignition, the Check Engine indicator light is on, but the electric fuel pump does not work.
This means the ECU is working properly and you need to look at the electric fuel pump relay, plus the same yellow 20 amp fuse. If after replacing the relay and fuse the fault does not disappear, then you need to deal with the electric fuel pump itself and its serviceability.
Analogues and options for replacing the main relay and electric fuel pump relay of the UAZ Hunter.
The main relay and the electric fuel pump relay are completely of the same type and interchangeable, so in order to avoid wasting time and unnecessary hassle, it is advisable to always have one or two 90.3747-10 relays in stock, but always four-pin ones. Instead of relay 90.3747-10, you can install relay 90.3747-11, their only difference is that the latter does not have a mounting bracket on the body. Direct analogs of these relays are 75.3777-10 and 75.3777-11, respectively.
If it suddenly happens that there is no relay in stock at all to replace the faulty one, then there is no need to be upset. In the UAZ Hunter, three of the same type of relay 90.3747-10 (11) or 75.3777-10 (11) are located on the bottom left side of the front panel on the driver’s side and are responsible for turning on the front fog lights, low and high beams. Remove one of them, for example the high beam, and change the faulty main relay or electric fuel pump relay.
Operating principle
Firework! Thank you for reading this post! An entry on how to change the ignition relay in a VAZ 2114. This relay haunted me in the form of either the stove (heater) fan working or not, and the windshield wipers and rear window heating did not work normally either. After replacement everything works as it should. The previous relay was from the factory and worked for almost 7 years. This surprised me.
Price: 50 ₽ Mileage: 118,000 km
A fan is a device that allows you to increase the efficiency of a cooling radiator. The radiator takes heat from the engine and releases it into the air. This process is accelerated by blowing through the blades of an electric fan.
The coolant flows through a closed, sealed system. Its task is to remove excess heat from overheated engine parts. Hot antifreeze flows into the radiator, is cooled here and returns back. While in the radiator, the coolant passes through a system of thin tubes. The incoming air flow while the car is moving helps to quickly remove excess heat from the engine compartment.
But when the car is stuck in traffic or idling, the air flow stops cooling it. In this case, the cooling system may not cope with its task. An electric radiator fan is designed to create air flow artificially. The temperature for turning on the fan on a VAZ 2114 is 85 degrees Celsius.
Having received a signal that the permissible temperature value has been exceeded, the sensor starts the device’s operating mechanism. An artificial air flow is created that removes heat from the radiator. The mechanism operates until the temperature level drops to an optimal state.
The thermal switch then receives a signal that the normal temperature has been reached and turns off the fan.
The device consists of four plastic blades that are mounted on the EDF shaft. A special controller regulates the automatic operating mode. The thermostat is equipped with a solid filler that is sensitive to temperature changes.
There are main and additional valves. When the temperature reaches 85 degrees Celsius, the main valve opens.
If you are convinced that the cause of the malfunction lies in the fan motor, then the easiest way to carry out repairs is to completely replace the device. In this case, there is no point in spending money on a new casing. It will be cheaper to just buy a new electric motor.
No special tool is needed. The work is carried out simply using 8 and 10 socket wrenches and a Phillips screwdriver.
You can replace the cooling fan motor without removing the radiator.
- Disconnect the connector and device wiring harness from the casing.
- Unscrew the mounting bolts using a 10mm wrench.
- Unscrew the lower fastening nut.
- Using a 10 mm socket wrench, unscrew the mounting nut from the radiator.
- Using a size 8 socket wrench, unscrew the two pressure plate nuts.
- Remove the plate.
- Remove the electric fan along with the casing.
- Let's start dismantling the electric motor. Using a 10 mm wrench, unscrew the three mounting nuts and remove the engine along with the blades.
- Using a screwdriver, pry up the lock washer.
- And take it off.
- Remove the impeller.
- Put the impeller on the new motor. Make sure that the shaft pin fits into the impeller groove.
- Reassemble in reverse order.
Operating principle
[f[flat_ab id="3"]/p>
PRICES AND MANUFACTURERS
Prices for starting devices may vary depending on the manufacturer and the design of the device itself. Among the product manufacturers we can note such companies as Pramo Iskra (a Russian-Slovenian joint venture), STARTVOLT, LKD (China), BATE (Belarus), PEKAR (St. Petersburg), KZATE (Samara), Avtopribor (Vladimir).
Starter manufacturer price table
At the VAZ plant they install a KZATE 5712.3708 starter manufactured in Samara. It is difficult to say whether it is the best in quality, but you can always buy spare parts for it. Many people praise Belarusian products, but problems often arise with spare parts - most often in stores only Bendix is sold as spare parts for it. It should be noted that the starters of VAZ 2108, VAZ 2109, VAZ 2113, VAZ 2114 and VAZ 2115 are no different from each other and are completely interchangeable.
If you installed it yourself
The previous owner of the car, in the absence of such a standard part, could install it himself. Such installation kits are sold in car dealerships. In this case, the electric relay can be located not only in the “standard” location. Finding it without calling the previous owner will not be so easy.
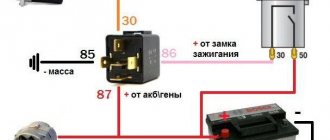
If a breakdown of this part occurs on the way, then you can start the car by closing contacts 87 and 30 (the location and circuit diagram are printed on the top of the relay housing). In this case, you are allowed to use the machine without any restrictions. But at the first opportunity, be sure to fix the breakdown. The operation of the VAZ-2115 ignition system directly depends on the relay.
IF THE STARTER DOESN'T CRANK
If nothing happens at all when you turn the key in the ignition, and at best you can only hear a quiet crackling sound, then the reasons may be:
- The additional starter relay is faulty.
- The battery is completely discharged.
- There is no electrical circuit between the ignition switch and the VR.
- The stator or rotor windings in the starting device have burned out.
In the first three cases, repair of the starter is not required; it is necessary to deal with the battery and electrical circuit.
The additional relay performs the following functions:
- Cuts off power to the starter when the engine has already started, and the ignition key for some reason remains in the extreme clockwise position;
- If you try to start for a long time (more than 20 seconds), it breaks the circuit due to the signal sent to the engine control unit;
- Prevents the starter from turning on while the engine is running;
- Protects the ignition switch contacts from overheating and burning.
Write in the comments how much my story helped you??
How to change the fuse?
Now that we have figured out the location of the protective devices in the module, let's try to figure out how to troubleshoot a silent signaling device. When the VAZ 2114 signal fuse burns out, a thin copper thread inside melts and breaks, and the electrical circuit is broken. To restore the operation of the electrical device, this miniature part must be replaced. The work is performed in the following sequence:
- Find the main module in the engine compartment.
- Disconnect the block with the bundle of wires from it, and remove the module.
- The module cover is closed with latches. Remove them and open the lid.
- In the old and new modules, there is a plastic clothespin. Carefully grab the fuse with a clothespin and remove it from the socket.
If the relay is faulty
You know where the relay is located in the mounting block. This item cannot be repaired. If you find out that the problem is in the relay, change it without hesitation. The price of this part is around 150 rubles.
What to do if the fan on the VAZ 2114 (2115,2113) does not work?
6 – ignition relay.
If signals appear on the dashboard indicating that the permissible temperature level in the cooling system has been exceeded, this may indicate that the fan on the VAZ 2114 is not working. The main symptom of the malfunction is that the mechanism does not start even with a significant increase in temperature. It is urgent to turn off the engine to prevent its elements from overheating.
The engine should not be operated with a faulty electric cooling fan. This may damage the cylinder head.
If the cooling fan on a VAZ 2114 does not work, the following malfunctions may be the cause of the breakdown:
- The fan switch sensor on a VAZ 2114 has failed.
- Lack of contact at the sensor connector.
- The wiring has broken.
- Electric fan relay faulty.
- The fuse has blown.
- Damage to the device's electric motor drive.
Unplug the device. Connect it to the battery terminal. Maintaining polarity. If a direct connection to an energy source starts the electric motor, then the drive is working. There may be problems with the wiring, the fuse, or the temperature sensor.
Now it’s time to diagnose the fuse. You don't even have to open the plastic box to do this. If the relay malfunctions, the horn stops working at the same time as the fan. Therefore, if you notice the loss of the sound signal, it means that the fuse has definitely blown. You can find it in the engine compartment in a small plastic box. We release the cover, pressed by two latches, take out the burnt fuse with tweezers and replace it with a new one.
To diagnose the temperature sensor that supplies a signal to the radiator, you need to disconnect the connector from the sensor and start the ignition. The emergency mode will start, in which the electric fan will start blowing. If the fan starts late when the connector is disconnected, the sensor is most likely faulty. Replacing it will take no more than five minutes. You just need to unscrew two bolts using a Phillips screwdriver and install a new device in its place.
Even if a malfunction has occurred in the VAZ 2114 fan itself, this does not mean that it is time to change it. Sometimes you can simply replace a damaged bearing or brushes. But if the electric motor is faulty, it is much easier to purchase a new mechanism.
Sometimes another problem arises. Many car enthusiasts are interested in why the fan on the VAZ 2114 is constantly running?
There are four possible causes of the malfunction:
- a short circuit has occurred in the electrical circuit;
- the electric fan relay has broken down;
- The temperature sensor needs to be replaced;
- The electronic unit is broken.
Most often, the fan starts to work continuously as a result of a shorted wire. The electrical circuit remains on regardless of the signals from the temperature sensor and relay.
To troubleshoot the problem, you need to ring each wire and find the fusion point. Sometimes it is noticeable even upon visual inspection.
If ringing does not help identify the malfunction, you need to check and replace the fan relay. The cost of the device is low. Therefore, for diagnostics it is easier to buy a new relay and install it in place of the old one.
If this does not help, then you need to check the operation of the temperature sensor. After all, it is he who is responsible for turning on and off the electric motor of the VAZ 2114 fan.
If all other elements of the system are working properly, you need to check the electronic module. It rarely fails. If the problem still occurs there, you will have to perform a complete error reset. Sometimes only a complete flashing helps. Not everyone can do this work on their own. Therefore, it is better to seek help from a car service center.
It would also be useful to install a button to force the fan to start and turn off on the VAZ 2114.
This solution can be very useful if the breakdown occurs somewhere on the highway far from the city. In this case, using the button on the instrument panel, you can force the fan to cool the engine.
Replacing the block
There are malfunctions in which car enthusiasts have to dismantle the mounting block to check it. These malfunctions are associated with the following reasons:
To remove the power supply, you need to remove its cover (you can read how to do this above), disconnect all the wires from it. Further, if the unit is completely faulty, it can be easily removed and a new one installed by reassembling it in the reverse order.
Advice! When disconnecting, be sure to mark the wires so as not to forget what to connect and where when reassembling.
We have discussed how to diagnose problems with PPs and relays, now let’s see how to identify problems with conductive paths and contacts:
- Even an experienced electrician has a hard time identifying this type of damage. Even if the problem is identified, soldering has to be done with very high precision, which requires high qualifications and a lot of time;
- The main problems associated with contacts in the VAZ 2114 power supply arise due to corrosion and contamination of the contacts. You can usually just clean up the contact with a knife or sandpaper. If it breaks off, you can solder it, but this is very labor-intensive and difficult; one wrong move and replacing the block cannot be avoided.
It’s always better to see once, so look at this review of the VAZ 2114 fuse box: