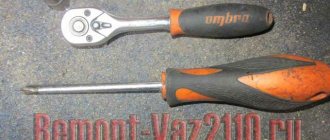
The windshield of the VAZ 2106 is the most vulnerable of all car glazing, so it is necessary to resort to replacing it most often. Even a small chip caused by a pebble or a thorn can spread over time and form a crack over the entire area, making replacement unavoidable. The procedure for replacing a windshield is not complicated and you can do it yourself with only a couple of flat-head screwdrivers on hand. It is advisable to have a large size so that the pickup area is larger. I used drums as they are quite wide and perfect for this repair:
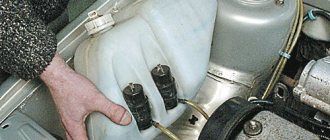
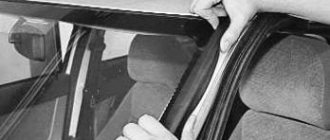
First of all, you need to pry the “lock” from the bottom center of the elastic band and remove it, and then use a screwdriver to pry off the edging:
And then we pull it with our hand, removing the edging along the entire perimeter of the glass:
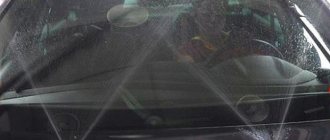
Now about the dismantling process. I personally performed this operation several times and started prying it off from the upper left corner. First, insert one screwdriver so that the sealing rubber disengages from the body from the inside.
Then, from the inside, gently pressing on the edge of the elastic with a screwdriver, push it outward in small sections (approximately 1 cm):
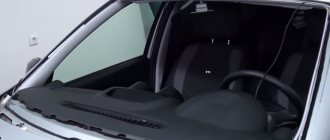
To avoid problems, you need to free half of the glass from the inside from the rubber band, that is, push it out, as shown in the photo above. That is, from above we reach somewhere to the rear view mirror, and from below, respectively, to the middle of the instrument panel. After this, we pry up part of the windshield from the outside and carefully pull it towards us, slowly loosening it from side to side. Please note that there should not be much effort. If the glass does not give in, then you do not need to use much force; it is better to remove the rubber a few centimeters at a time.
The glass is removed along with the rubber band and after that you can install a new one in its original place.
If you buy a new one, you can buy a VAZ 2106 from the factory, produced by BOR, at a price of 1200 rubles or 1500 rubles. with a black stripe at the top. Installation is carried out in the reverse order and it is also necessary to act with extreme caution so as not to damage the glass.
In the VAZ Six, as in other cars, comfort and safety are ensured by car windows. As the vehicle is used, they are exposed to negative environmental factors, which leads to gradual damage to the surface. Ultimately, one glass or another has to be replaced. This procedure is simple and can be done by every Zhiguli owner.
Why do you need glass on a VAZ 2106?
At the beginning of the advent of such means of transportation as cars, their speed was barely faster than that of a person. The driver and passengers did not experience any discomfort and did not need any additional protection. But as speeds increased over time, the need arose to protect the people in the car both from the oncoming air flow and from dust, dirt, stones and precipitation. Automotive glass began to be used as such protective elements. They simultaneously play the role of a kind of shield, and also provide the necessary comfort in the vehicle interior. The main requirements that auto glass meets include high strength, safety and reliability during operation.
Windshield
The windshield of a car, also called a windshield, is installed in the front of the body and provides protection for passengers and the driver inside. Since it is the windshield in a car that experiences the greatest impact from the environment (gravel, sand, dirt, etc.), it is on this element that damage in the form of chips and cracks most often appears. Sometimes situations arise when a pebble flies into the glass from passing or oncoming traffic, causing a cobweb (numerous cracks) to appear across the entire surface of the glass. In this case, the windshield must only be replaced. Therefore, it would be useful for owners of the VAZ “Six” to know in advance the dimensions of the windshield, which have the following values: 1440 x 536 mm.
Inserting new glass
We insert the cord into the groove of the seal, but not the entire length, but only onto the top and sides of the groove. The remaining ends of the cord should be approximately the same length. Then we take the glass and insert it into the lower groove, as if rubbing it in, so that the seal lies evenly in place. Then, calling a friend for help, we begin to press on the glass, while simultaneously pulling the cord out of the groove. At the same time, the cord pushes the sealing rubber aside and allows the glass to gradually take its place.
Glass delivery to your city is calculated based on averaged data.
Taken for calculation: a windshield with dimensions of 1500×1200 mm, the weight of the windshield including rigid packaging is 12 kg.
If the size of your glass is smaller than these data (1500×1200), then the cost of delivery to your city will be less!
We will select the optimal shipping conditions for you, including delivery times and price.
We will be glad to see you among our clients!
Rear window
The rear window of the “six” is also a body element, through which rear visibility is provided, protecting the interior and the people inside from precipitation and other external influences. It is necessary to remove the part infrequently and this is done mainly for the purpose of replacing the sealing rubber, during repair work or replacing it with heated glass. The rear glass measures 1360 x 512 mm.
How to remove glass
The sequence of work for removing the rear window is similar to the procedure with the wind element, but there are some features that we will consider in more detail:
- Use a screwdriver to pry out the elements in the lower corners of the seal.
The rear window is installed in the same way as the windshield.
Rear window tinting
The rear window is dimmed in the same sequence and using the same tools as the windshield. To make it easier to apply the tint film in bends, some car owners divide it into three longitudinal stripes.
Heated rear window
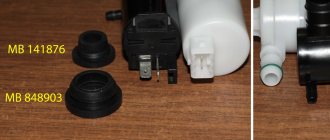
The sixth model of the Zhiguli, although equipped with a heated rear window, was only of the last years of production. This option is not superfluous at all, since it allows you to get rid of glass fogging in damp and frosty weather, thereby improving visibility. Therefore, many owners of “sixes” strive to install such glass on their cars. For such a conversion you will need:
- heated glass;
- terminals - wide and bolt-on;
- circuit breakers;
- wires;
- relay (PC527 or analogue) and a block for it;
- screw;
- rubber tubes;
- on/off button.
Since glass heating consumes quite a large current, it is advisable to use the button from the indications, which will allow you to disable this function in a timely manner.
We install heated glass in the same way as regular glass, and then connect it as follows:
- Remove the negative terminal from the battery.
- We dismantle the instrument panel and embed a button into it.
How to adjust the doors on a VAZ 2101-VAZ 2107?
Note! If you suddenly cannot unscrew the bolts that the hinges are secured with an impact rotary screwdriver, then in this case, resort to drilling them, to do this, take a 6 mm drill and a good drill, and those bolts that cannot be unscrewed, first drill out their heads to a depth of about 6 mm carefully, then with an 8 mm drill, to a depth of approximately 4.5 mm, and when the heads are cut, remove the door, and unscrew the studs using pliers and, if necessary, spray them with WD-40!
1. There are several ways to consider them all, the first is to unscrew the bolts that secure the door hinges to the body (They are indicated by a red arrow, not all bolts are visible in the photo, in fact there are many more of them and there is also a lower hinge), after them when turning, you will need to put thick washers under them, like those shown in the small photo, thereby selecting the thickness and number of washers, you can align the door as you need, if you don’t want to constantly unscrew the bolts and want to finish the job as soon as possible, then cut all the washers in such a way that they fit under the loosened bolts and after which they can be clamped with the same bolts, thanks to this, you won’t have to constantly unscrew the bolts, but just loosen them a little, insert the cut washer and tighten it again, and so on until until the door is level.
2. The next method is to place a thick metal plate under the hinge; in general, a plate is taken; again, the thickness is selected individually; if the door hangs too low, then a thick plate will be needed; if it sags a little, then a thin one will suffice, well, so, what to make such a plate from, you ask, we answer: From any metal that most likely lies in your garage and has a small thickness so that it can be cut, if there is no such thing, then the plate can be made from a metal can, for example, or from anything else be (It’s all up to your imagination), in addition, the plate needs to be cut in the center as you can see in the photo below, just so that the bolts can be screwed in and so that this plate is not visible, make it in size, slightly smaller than the hinge, but only Cut it exactly to size in length so that the loop fits around it from the very top to the very bottom.
Note! To put such a plate under a hinge, you need to do the same thing, loosen the fastening bolts of this hinge a little and then place a plate under it, we recommend starting with the bottom hinge, since if you put it under the top one, then there is a possibility that the door will turn downwards fall over, and not straighten up exactly as needed!
3. And the last method, we’ll immediately warn you that it’s complicated (for some, but we resort to it only when the hinges are already terribly worn out and they have a terrible backlash), but still doable and still more reliable, it’s done as follows, the door is completely removed from the car, after which the middle part is drilled or sawed off with a grinder, under which the pin itself is installed (the middle part is indicated by a red arrow, in no case do not touch those parts that are shown by a blue arrow and by the way, we indicated the pin with a green arrow , so that you understand what it is) and finally the pin is removed and the hinge is removed from the car door and a new one is put in its place (A slightly different method for replacing hinges, but there is no need to drill or cut anything, it is explained in the video clip in the end of the article, if you are interested, check it out).
Additional video: As you have already seen, there are a lot of ways to restore the level of door overhang, but these are not all the methods; in more detail with all of them and visually with those that were given in this article, you can find out in the video videos below:
Method one:
Method two:
Method three:
Note! In addition to these methods, there is one more and it is very good, because thanks to it, without changing the hinges, you can make sure that they do not dangle, but there is some nuance, namely there you will have to knock out the pin and put a washer under it, but not all in cars, this is feasible (Basically, to remove it, you have to cut off the central part of the hinge with a grinder, as we said above), and therefore if you cannot knock it out, then try (If possible) cut off the washer a little and insert it into the grooves where the washer is needed place the pin while knocking it out, see the video below for more details and clarity:
Front door side glass
On the sixth model of the Zhiguli, two windows are installed in the front doors - sliding and turning (window). The first of them has dimensions of 503 x 422 x 5 mm, the second - 346 x 255 x 5 mm. In most cases, the need to dismantle the glass of the front doors arises during the repair of the latter.
How to remove glass
To remove the glass, you will need a slotted and Phillips screwdriver, as well as an open-end wrench for 8 and 10. The dismantling process itself is carried out in the following sequence:
- Remove the plastic plugs from the door armrest by prying them off with a flat-head screwdriver.
Door glass seal
The sliding glass of the front and rear doors is sealed with special elements, the profile of which ensures ease of installation. To reduce friction, the seals are covered with a layer of fluff. When water seeps under the rubber, it flows into the bottom of the door and comes out through the drain holes. Over time, the pile wears off and the seal cracks, resulting in the need to replace the element.
The swing glass of the front door and the rear corner glass are sealed with rubber bands, which also become unusable as the rubber ages and bursts. To prevent water from leaking into the cabin, the seals are replaced with new ones after first dismantling the window and fixed glass.
How to remove a window
To remove the tilt glass, follow these steps:
- We remove the upper sealing element from the door frame.
Video: removing the window on a “classic”
Installation
Installation of the rear door glass is performed in the reverse order, following the previously marked mark on the cable.
Removal of the front and rear windshields on a VAZ 2106 car is carried out if they are replaced with new ones, during body work, for example, when painting a car or for tinting them. To remove the glass, we will need the help of an assistant, as well as a blanket or something like that, a screwdriver, and a piece of cord with a diameter of about 4-6 mm. and about 5 meters long.
If everything is there, then you can start repairing:
The first step in the car interior is to remove all the decorative interior parts that will interfere with us. First of all, these are decorative trims for the front side pillars, remove the interior rearview mirror (see Replacing rearview mirrors on a VAZ 2106), remove the sun visors, and remove the top decorative trim for the ceiling.
Now, starting from the upper right corner (if it’s convenient for you, you can do both at once), use a screwdriver to pry the edge of the seal and slide it behind the body flange and then manually press the seal while simultaneously pressing on the glass. When performing this operation, it is necessary to remove the upper corner of the glass together with the seal from the body opening and press the corner of the glass from the body from the inside.
From outside the car, pry the windshield frame (lock) with a screwdriver and remove it from the seal. Next, having previously bent the windshield wipers, you need to move the top and sides of the glass away from the body and remove the glass, placing it on the hood, with a blanket or any other material laid in advance.
Now that we have removed the front windshield, we need to:
- Remove the rubber seal from it, starting from the middle. Check the seal for mechanical damage and, if necessary, replace it with a new one. Hardening of the rubber seal is also not allowed. We clean the seal and the edge of the glass from dirt and rust.
- Check and, if necessary, clean the seal grooves from dirt, sealant and other debris.
- Locate and clean drainage holes in the seal.
We install a new windshield on a VAZ 2106 car. Follow the following sequence of actions:
- Install the seal onto the new glass, starting from the bottom corners.
- Next, take the previously prepared cord and insert it into the groove of the seal, which fits onto the flange in the body opening. By placing the cord in a circle, ensure that it overlaps with the opposite end by about 20 cm.
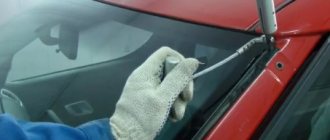
- Dilute the soap solution and use a brush to generously coat the seal and the internal opening of the body where the glass will sit.
- Together with a partner, install the glass back into the opening so that the seal groove at the point where the cord exits sits on the flange of the opening and the ends of the cord are located in the car interior.
- Now one person remains in the cabin and slowly begins to pull the cord so that the edge of the seal goes beyond the flange of the opening; if the edge does not go, then pry it up with a screwdriver, and an assistant, outside the car, lightly taps on the glass in the place where you pull the cord , puts a little pressure on the glass, thereby setting it in place.
After installing the front windshield in place, install all removed parts in the reverse order of removal.
The rear windshield is replaced in the same way, with the exception of some features:
- The glass must be removed starting from the bottom corners.
- Before removing the glass, in the lower corner, outside the car, you need to remove the trim trim using a screwdriver.
At this point, the repair work on removing and replacing the windshields of the VAZ 2106 has been completed.
Not all modifications of the VAZ-2106 were produced with a heated rear window - it appeared on cars of later releases. Meanwhile, many “sixes” have safely survived to this day and successfully roam the streets of Russian cities and villages. Accordingly, many owners of cars without a heated rear window want to install it.
This desire is quite logical. After all, heating helps to get rid of such an unpleasant and visibility-impairing phenomenon as rear window fogging. This seriously affects driving safety, since in this case you can see what is happening behind you only through the exterior mirrors. Accordingly, it is possible that you will see a car overtaking you when you yourself begin to change into this lane.
Rear door side glass
The main purpose of removing glass in the rear door of a "six" is to repair the door. The glazing is made of two elements - downward and fixed (corner). The first glass has dimensions of 543 x 429 x 5 mm, the second - 372 x 258 x 5 mm.
How to remove glass
To remove the rear door glass, you will need the same tools as for working on the front door. The process itself is performed as follows:
- We dismantle the door trim, unscrew the fastening of the guides and remove them from the door.
Even with careful operation of the car, sometimes you have to deal with glass replacement. This especially applies to the frontal element. To replace car glass, you will need to prepare a minimum list of tools, familiarize yourself with the step-by-step actions and follow them during the repair.
- Home
- Auto garage
- How to Install a Windshield on a VAZ 2106
We change the windshield of a VAZ 2107 ourselves
The windshield of a VAZ 2107, VAZ 2106 is replaced in case of damage to stones, chips, etc., emitted from under the wheels. This procedure seems extremely complicated for many car owners, but in reality it is not.
Everything is much simpler and can be done by the car enthusiast himself with sufficient courage. In this article we will look at independent replacement of the windshield of VAZ 2107, VAZ 2106. The work of replacing the windshield should be done with a partner.
Installation
Installation of the rear door glass is performed in the reverse order, following the previously marked mark on the cable.
| Type | lateral |
| Brand | VAZ |
| Model | 2106 |
| Eurocode | 4500FCLS4RD |
| Width | 543 mm |
| Height | 429 mm |
| Installation cost | 1500 rub. |
| Installation/replacement time | 1 hour |
| Cost of tinting | 1000 rubles |
| Tinting time | 40-60 minutes |
| Price | 428 rub. |
| Color | Transparent |
| Car body | Sedan - 4 doors. |
| Side window position | Rear door |
| Anti-glare coating | No |
| Openable | No |
| Encapsulation | No |
| Privacy Glass | No |
Call us at +7 and we will help you select glass for your car
| Name | Eurocode | Manufacturer | price, rub. |
| Glass - front window on a VAZ 2106 |
Range
Huge selection of auto glass from well-known manufacturers.
The cost of a call is from 800 rubles. Installation time - 3 hours.
Installation centers in different districts of Moscow.
A guarantee is provided for all types of work.
In the VAZ Six, as in other cars, comfort and safety are ensured by car windows. As the vehicle is used, they are exposed to negative environmental factors, which leads to gradual damage to the surface. Ultimately, one glass or another has to be replaced. This procedure is simple and can be done by every Zhiguli owner.
How to install a windshield on a seal (elastic band) VAZ 2101. 2107, classic
Contacts for cooperation (sponsors, advertising offers): Mail I'm on VKontakte.
If the edging fits together, install the lock.
Then turn the glass again and insert a cord with a diameter of no more than 4-6 mm and a length slightly exceeding the perimeter of the glass in the seal section. The ends of the cord should cross across the middle of the bottom edge of the edge of the glass.
Place the glass in the body hole and center it.
Now from the outside, press on the bottom of the windshield . An assistant inside the car should begin to pull the cord out of the seal, first from one end and then the other. Using your fingers, gradually press the sealant onto the flange. This way we lower the entire bottom of the glass.
Apply gentle blows with the palms of your hands on the top edge of the glass from top to bottom to deposit the glass.
Replacing windshield and rear windows
You will need: a screwdriver, a blanket (or something similar) to lay under the glass, a piece of cord (preferably nylon slippery) with a diameter of 3.5–4 mm and a length of about 5 m.
Do the work with an assistant.
Pay attention to the marking in the upper right corner of the windshield. Purchase new glass with the same markings. Moreover, to avoid buying fake glass, check its strength by rubbing it with a cloth moistened with a solvent. The markings on branded glass cannot be removed, but on fake glass they are often easily washed off.
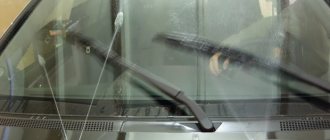
1. Move the windshield wiper arms and blades away from the glass.
2. Unscrew the three screws securing the decorative trim of the front side pillar of the body and remove it (the right one is shown, the left one is located symmetrically).
3. Remove the rear view mirror (see “Rear view mirrors”).
4. Remove the sun visors and their holders (see “Interior fittings”).
5. Disconnect the front fastening of the right handrail (see “Interior fittings”).
6. Remove the decorative trim for the left ceiling lining mounting.
7. Remove the screw and remove the cover holder.
The pad is held in place by its own elasticity, but it is better to have an assistant support it.
8. Remove the trim.
9. Pry up the seal in the upper corner of the glass and move it behind the body flange.
Operations with the right corner of the glass are shown. On the left, the work is performed in the same way. Work can be done on both sides simultaneously.
If the seal has hardened, remove its surround.
To do this, slide the trim covering the joint of the edging in the middle of the lower part of the seal.
Use a screwdriver to pry up the trim, remove it from the groove of the seal and remove.
10. While squeezing out the seal with your fingers, simultaneously press on the glass and.
eleven. . remove its upper corner from the body opening.
12. Press the corner of the glass from the body from the inside.
13. Move the top and side parts of the glass away from the body and remove the glass.
14. Place the glass on the hood, carefully moving it over the windshield wiper arms.
15. Starting from the middle of the bottom side of the glass.
16. . remove the seal from it.
17. Clean the glass opening from rust and dirt.
In the upper part of the opening, the ceiling lining is secured to the body flange with seven spring holders.
. check their integrity and replace if necessary.
18. Clean the grooves of the seal from dirt, mastic (if used), and glass residues (if it is broken).
Replace the seal if there is mechanical damage or signs of aging.
19. Clean the two drain holes (one each on the right and left) in the lower corners of the seal.