VAZ 2109 with lensed headlights
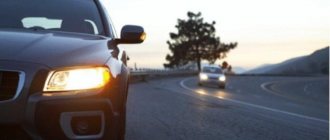
Installing lens headlights on a VAZ 2109 is quite relevant today, because the efficiency with such reflectors increases several times. Lensed headlights on the VAZ 2109, among other things, protect the eyes of drivers of oncoming cars in the best possible way. Naturally, after installing this type of optics on a VAZ 2109, it must be configured correctly.
Note. Installing lensed headlights will significantly improve road safety. Such headlights do not cause bright light to hit oncoming traffic, which eliminates accidents with tragic consequences.
Alternative optics
Besides the fact that alternative optics on a VAZ 2109 or 21099 are beautiful, such headlights are much more reliable than standard lighting fixtures.
Why do the headlights fog up from the inside and thereby spoil the appearance of the car? The fact is that glass allows moisture to pass through, as a result of which the contacts oxidize, and the lamp may simply burn out. Even if this does not happen, the glass will fog up, resulting in poor visibility on the road. Replacing the glass won't do anything. The result, if there is one, will only last for a short time.
Based on this, we can say that tuning the rear lights on a VAZ 2114 or 2109 and 21099, or the front lights, is more of a necessity than just an external change.
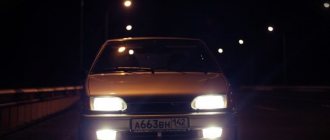
Alternative optics for VAZ 2109
Purely tuning
What can I say – there is no limit to perfection (and beauty). Therefore, many motorists try to improve the appearance of their car. Headlights with lenses look much better and give the car a noble look.
As I wrote, many people install lenses on their cars, even on the halogen version of lamps. That is, there is no task here to somehow increase the luminous flux - just tuning. Although (in fairness) the lenses allow this light to be focused, making it more clearly directed to the desired areas of the road.
But often lenses are installed, tritely, with “angel eyes”, that is, an aesthetic appearance. THAT'S ALL! But lensed optics are not just “decorations”; there are very specific tasks that they solve.
Types of lamps
For rear and front lights, two types of lamps can be used:
- LED;
- xenon
As practice shows, LED lamps are most often chosen for rear lights. This is due to the fact that such lighting devices are much cheaper, but at the same time durable and economical.
In addition, we can highlight the following advantages of LED lights specifically for VAZ 2109, 21099:
- service life - at least 10 years;
- ergonomics;
- energy saving;
- response is 3 times faster than xenon.
Against the backdrop of all this, such headlights provide the optimal amount of light for the car. If you don’t want to change the rear or front headlights, you can tune the ones you already have. It should be noted that, unlike the front lights, the rear lights on the VAZ 2109 or 21099 can even be painted from the inside. It’s quite easy to make this a reality with your own hands.
Rear LED headlights
Why are they needed?
Now lenses are installed in headlights for several reasons, and they do not always come from the factory:
- Purely tuning . Many people like the appearance; often such lenses also have “angel eyes”, an LED rim around the lens. It should be noted that they are often installed on halogen lamps.
- Installed together with xenon lamps . If you install xenon at certified stations, then it is supplied only with lenses; this is done for several reasons (more on this below)
- Standard installation from the factory . Here the lenses are factory installed; as a rule, these are either expensive models (or configurations). And the headlights in such cars are already a whole computer; they have a lot of functions, including cornering lighting.
What I would like to note is that now mass installation is dictated by tuners, that is, the appearance and installation of xenon lamps is banal. However, now I would like to understand each point in more detail.
Necessary materials
First of all, it should be noted that regular spray paint will not work. This is due to the fact that the space inside heats up, and the paint simply slides off. To tune the rear headlights on a VAZ 21099 or 2109, you only need to use special paint.
A special substance for tuning headlights must withstand high temperatures. The cost of one such bottle does not exceed 500 rubles.
Car headlight tinting paint
Preparatory stage before painting
In order for the paint on the headlights to last for a long time, a preparatory stage should be carried out. The algorithm of actions is as follows:
- headlights are dismantled and disassembled;
- the additional turn signal reflector is removed;
- Using fine sandpaper or a special substance, chrome is removed from the surface of the lantern;
- primer is applied.
Please note that the primer must dry for at least one hour. The substance should be applied to the headlight of a VAZ 2109 or 21099 in 2-3 layers. Otherwise, the paint will simply peel off during use.
Preparing headlights for painting
Painting process
The paint must be applied in at least 4-5 layers. It takes at least one hour to dry completely. After this, you can assemble the entire rear light.
At the final stage, you need to be especially careful when applying the sealant. The old one is completely removed. After this, the surface of the rear light is degreased and a new sealant of the appropriate color is applied.
If this protective substance is applied incorrectly, the taillight of the VAZ 2109 (21099) will fog up, which will lead to more serious consequences. In general, doing this yourself is very simple.
Film tinting
If painting does not suit you, you can use tuning using film.
Here it is necessary to note the main rule: the better the quality of the film, the better the result. Therefore, in this case, savings are inappropriate.
Film can be applied to lanterns both outside and inside. But if you plan to cover the front of the headlight, you should understand that the film deteriorates much faster.
Film tinting of headlights
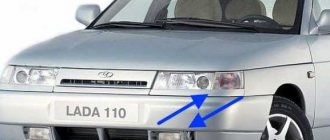
How does the lens work?
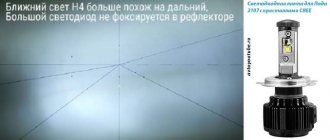
Actually, many people now have a question: how is the flow of light cut, due to which it is corrected horizontally and not “allowed” vertically?
If you disassemble the structure, it consists of a separate block. This is the headlight, the reflector and the lamp itself, be it xenon, halogen or LEDs. The lens itself focuses the light beam onto the road. Actually this is its main function.
In order to cut the beam of light vertically, special magnetic curtains are used, or there is automatic adjustment of the headlights; they lower to a safe angle in the presence of oncoming traffic.
The process of pasting headlights
The algorithm is as follows:
- the headlights are carefully dismantled and disassembled;
- The reflector is removed using an abrasive material or a special liquid.
It is recommended to cover the glass with masking tape to avoid scratching it during work. To make it easier to level the film around the edges, you can use a spatula that is not too sharp. It's a little more difficult to apply film to the taillights. The gluing process itself is the same. Only the preparatory stage is somewhat different:
- the battery is turned off;
- the wires that lead to the lighting fixture are disconnected;
- The flashlight itself is disassembled.
Only after this can the procedure described above be carried out.
Pasting car headlights
In general, tuning a VAZ 2109 (21099) with your own hands is a simple process that almost anyone can do.
But it also has several negative sides:
- significant deterioration of lighting;
- tinting is prohibited by law and is punishable by administrative penalties;
- possible problems during technical inspection.
Therefore, when doing such tuning with your own hands, you should understand and take into account these nuances. With the correct selection of materials and compliance with technical requirements, tuning, which was done by yourself, will not only add beauty to your car, but will also provide it with greater practicality.
A few words about the law
Guys, just like any ILLEGAL addition to the headlight design - handicraft lenses are not LEGAL. Traffic police officers can easily remove them, and if you take them off you will not pass the technical inspection.
In order to establish legal options, you need to contact a certified organization. Sometimes you have to change the entire headlight. Often, permission from the traffic police is even required to make changes to the design.
Now a short video about how to install it into standard optics, many still install it in their garages.
I’ll end with this, I think it was informative. Sincerely yours, AUTOBLOGGER.
( 9 votes, average: 4.56 out of 5)
Similar news
Silk-screen printing on car glass. Why is this necessary? And is it possible?
Tuning headlights for VAZ 2109
Every car enthusiast wants his equipment to become noticeable and original. You can upgrade any car, regardless of year and model. “Nine” is a popular car of the last century, produced by the Russian automobile industry. One of the reconstruction options is tuning the headlights on the VAZ 2109. The headlights on the VAZ 21099 and the headlights on the VAZ 2108 are the same.
Modernization of headlights
Car repairers believe that tuned headlights are more reliable than those installed at factories. Rework options:
- replacing standard optics with xenon;
- use of LEDs;
- covering lighting structures with tinted products.
Replacing lamps
Factory bulbs installed in a car do not last long. LED lamps have the following advantages over a conventional incandescent lamp:
- service life of at least 5 years;
- ergonomics;
- low power consumption;
- fast response.
At night, it is very important to have a good view of the road. Changing the optics often improves the light performance of devices. Xenon lamps are more powerful than diodes, but LED lamps are easy to maintain and have a low cost. Do not forget that unregulated xenon lamps emit a very powerful luminous flux. This can lead to a traffic accident, as the oncoming driver may be temporarily blinded by the bright light.
Painting
A common method of auto tuning is darkening the optics with a special varnish or painting. To complete the work you will need a can of black paint. Only materials with high temperature ratings are allowed. Regular paint will come off as a result of heating, and no tinting effect will remain.
The work is carried out in stages:
- The headlight is removed from the car.
- The optics are completely disassembled.
- Using a curved screwdriver, unscrew the screws that hold the headlight mask.
- The turn signal reflector is removed.
- The chrome paint is being cleaned off.
- Apply primer for plastic in three layers.
- After the primer has completely dried, paint is applied (auto mechanics recommend applying paint in 5 layers.)
- The structure is being assembled.
- The headlight glass is cleaned of old compounds.
- The glass is washed, wiped dry and treated with a degreaser.
- Black sealant is applied along the edges.
- The device is assembled and installed on the car.
- The connection is made to the circuit through the fuse block.
If there is incomplete contact between the glass and the optics box, air may get inside, causing the headlights to fog up.
Film tinting
An inexpensive way to change the optics of a VAZ 2109 is to use a tint film. The result depends on the quality of the materials used. Good tint films have high light transmittance. This is an important indicator on which the lives of all road users depend. It is allowed to apply the film to the inner and outer surfaces of the headlight.
Applying a tinting film to the external surface is possible without removing the optics from the car. To do this, you need to prepare the surface: remove dust, dirt, the surface must be clean and dry. A notch is made and a piece of the required size is cut out. Soap and water are applied to the glass. The protective layer is removed from the film and applied to the headlight. The air is expelled. The surface is carefully wiped with a rag to remove any remaining liquid. This method is fast and simple. Even a car enthusiast who does not have special skills and knowledge can perform it.
When removing the headlight, it is recommended to handle the glass with care. It is allowed to seal it with masking tape to prevent scratching.
The tinting film is easy to remove. But tuning VAZ 2109 headlights with film has its downsides:
- peeling of the material after some time;
- reducing the brightness of the emitted light;
- violation of traffic rules, which may result in a fine;
- Difficulties in passing technical inspection.
Rear foot improvement
Tuning the rear lights of the VAZ 2109 is simple. You can do this operation yourself or contact a specialized auto center. Modernization of rear stops is often necessary even for factory optics: contacts oxidize, lamps burn out.
Several reconstruction options are possible:
- Using LED overlays. LED strips can create a unique pattern and make a car stand out in traffic.
- Application of diode rings. LED strips will allow you to define the hind feet and make them more expressive.
- Tinting. You can tune car headlights using film or paint. It is worth paying attention to the characteristics of the material: it must withstand high temperatures.
Changing the appearance of a car is an interesting activity. There are many types of tuning known. It is important to always remember that a car is a highly dangerous vehicle. The driver should always have a good view and lighting in the dark.
Installation of bi-xenon lenses in a VAZ 2108
No duplicates found
At first I wanted to delete the minus and write about the collective farmer, but then I read it all to the end and changed my mind.1. The guy is not a handyman, which is always welcome.2. Nobody convinced him that he was on the run.
3. Driving a vehicle on the front of which there are installed lighting devices with red lights or red reflective devices, as well as lighting devices, the color of the lights and the mode of operation of which do not comply with the requirements of the Basic Regulations for the admission of vehicles to operation and the duties of officials ensuring road safety, -
entails deprivation of the right to drive vehicles for a period of six months to one year with confiscation of the specified instruments and accessories.
Everything matches. Before installation, the topic was studied thoroughly.
Step-by-step tuning of VAZ-2109 headlights
Are you the owner of a VAZ-2109 and want to perform headlight tuning yourself? You will learn further how to do this. It is clear that any car owner wants to make his car special so that it is different and stands out among other cars, and it does not matter at all what brand of car we are talking about. And it is thanks to tuning that you can make your car unique. Now let's look at the nuances and elements of tuning VAZ-2109 headlights with our own hands.
If the appearance of the car is really important, then it is best to start tuning with optics. Headlights can fog up from the inside, which can also ruin the appearance of the car. This happens because the glass allows moisture to pass through, causing the contacts to oxidize and the lamp easily burns out.
Even if we take into account that this may not happen, in any case, due to fogging of the headlights, visibility on the road deteriorates, which increases the risk of an accident, therefore, tuned headlights are not just an external change, but also a necessity. For headlights and taillights, only two types of lamps are used:
- xenon;
- LED
In practice, LED lamps are most often chosen for taillights. And all because these devices are cheaper than xenon ones, but at the same time they are quite economical and quite durable. Here are the most basic advantages of LED lights for the VAZ-2109:
- Energy saving.
- Service life is about ten years.
- 2 times faster response than xenon.
But xenon lamps can only shine with high beam or only with low beam. In order for them to fully illuminate both the high beams and the low beams, you need to install bi-xenon there, and this is already quite expensive. If you prefer to drive at night, then, of course, it is better to install xenon lenses; they are mounted in different groups of sockets for car lamps.
To install such lenses, you will need to remove the outer glass, and then install the lens. But if you drive more often during daylight hours, then it is still better to install LED ones with an increased service life and good light. After listing all this, it seems that such headlights are the best option for a car, since they provide a sufficient amount of light. However, if you don’t want to change the front or rear lights, then it’s better to tune the ones you’re already using. If you still decide to change, then you need to be extremely careful so as not to fall for any kind of defect. A good-looking headlight does not mean high-quality work. The good news is that the rear lights on the VAZ-2109, unlike the front ones, can even be painted inside. Bringing this idea to life is quite simple.
How I made the speed knob.
This is roughly how the history of this project began.
Let me make a reservation right away - this article is in no way a tutorial, master class or other teaching aid. So, let's go!
First, we had to decide on the manufacturing technology...
I considered the following options for myself:
— Modeling from polymer clay with chrome plating (it was removed due to the fragility of the polymer.),
- Weld all sorts of pieces of iron of a suitable shape, and finish them with a file, grinder, engraver, or something else suitable. (Yes, yes, such nonsense slipped into my head)
Familiar jewelers advised me not to study in kindergarten and study the topic of casting. That's what I did. In a nutshell, the technology is as follows: an accurate wax model of the product is made, filled with gypsum molding mass, after hardening, the wax is melted out and metal is poured into the resulting void. Next, the plaster is removed, and you hold your sculpture in your hand.
I heard several key points from the customer. I quote:
- Do something scary. How can you.
- So that the skull fits in your hand and looks more terrible.
In general, everything is just how I like it. I must say that the picture was formed in my head even then. I didn't fully understand the details, but the general Form was clear. It's hard to explain - you just see the end result right away. One single sketch was drawn, with branches growing into the skull, which was immediately approved.
To make a skull, you need to know what it looks like. We watched a dozen videos with lectures on the structure of the skull bones, and several dozen more videos on sculpture. (if you don’t know how to do it, ask YouTube. It always works)
While I was having fun watching a training video, a brick made of green jewelry wax came to me. All that was left was to simply remove everything unnecessary. That's all) Large excess pieces were cut off with a jigsaw and cut with a chisel
And for the more “subtle” ones, “tools” of various shapes were made. A simple wood carving kit also helped out.
As the process progressed, I reached the point where the work seemed both finished and unfinished. It looks like the skull is ready, the branches are worked out, but something is missing. I decided to take a creative timeout and get distracted by other projects.
Later, when I started working on the handle again, I realized what the problem was. Lacks anger and dynamics. Such a nice shard.
Initially, the handle was intended to be polished, with darkened depressions that would highlight the texture. True, I didn’t quite understand how to achieve such an effect. The first thing that came to mind was to paint it and polish the protruding parts again. (stupid idea) a small test was carried out, the result is visible at the bottom of the handle on the back side.
The next option is ammonia vapor (ammonia). Some craftsmen using this method obtain a dark coating.
The pen was placed in a liter glass jar, with ammonia poured at the bottom. I closed the top with a lid to prevent it from stinking, and put the jar itself in warm water so that the reaction would go faster.
The result was a smooth, beautiful coating, but never dark, but bluish green. Like the Bronze Horseman or the Statue of Liberty in New York. Naturally, this look didn’t suit me either. I had to clean everything out again. As it turned out later, the formulation of alloys in different foundries may differ slightly, which results in a different effect.
There were two more ways left. Blackening in nitric acid, and the use of some special chemicals for jewelers (looking ahead, I will say that this method was not useful)
So, blackening in nitric acid. Finding it turned out to be not particularly difficult, although I had to go through a small “quest” to find the right warehouse and the right guard.
The 50% solution was weakened with water to about 30% (don't ask why, as advised, I did it) Then the handle was lowered into this solution. for a few seconds and after removal it is heated by the flame of a gas burner. The spectacle, I must say, is cosmic. The skull turned black, and the flame began to shimmer in various shades from green to red.
Unfortunately, no photographs were preserved during this stage.
Now more about the process itself
The important thing is that ordinary paint, which is sold in cans, is not suitable for this, because the entire space inside gets very hot, which is why the paint can easily slide off. For painting you need to use only special paint intended for this purpose. This substance must resist high heat as effectively as possible. The price of such a can is about 500 rubles. In order for the paint to serve you for a long time, you will need to prepare for painting in stages:
- the headlights need to be dismantled and then disassembled;
- then you should remove the additional reflector for the turn signal;
- remove chrome from the lamp with fine sandpaper;
- apply primer.
The primer must dry well; this will require waiting at least an hour. Special paint must be applied to the headlight in 2-3 layers, otherwise the paint may simply peel off. After this, it will take time again for the paint to dry completely, this will take about one hour.
Once the paint has dried well, you can completely assemble the rear optics. You need to approach the application of sealant with special responsibility. The old sealant must be completely removed, then the tail light must be degreased and the new sealant must be applied directly. This must be done carefully, since if the sealant is applied incorrectly, the headlight may fog up, which can lead to serious consequences.
It's also a good idea to install a set of strip LEDs or apply tint instead of painting. There is no need to save on film, since in this case the quality of the film is of great importance. It can be applied both from the inside and outside, but if you paste it on the outside, it is clear that the film will deteriorate faster.
In general, tuning headlights is not a particularly complicated process, but if you are afraid of making any mistakes, of course, you can buy tuning devices. However, the tuning process itself is interesting; every car enthusiast would like to do everything himself, putting his soul into this matter.
Standard installation from the factory
Firstly, the basic versions do not come with lensed optics; they are installed only in the almost maximum and maximum configurations.
Secondly, sometimes it is installed on a regular halogen. But why? Again, to provide better focusing of the light beam, and also to remove possible glare of oncoming drivers.
Third, the lenses are installed with serious equipment (a bunch of sensors, automatic adjustment of the light angle, etc.). Often, when a car turns, the lenses tilt to a certain angle, effectively illuminating the corner. THAT IS, THIS IS REALLY SAFETY.
But this equipment is expensive, which is why it comes only in maximum configurations.