01/26/2022 22,081 VAZ Chevrolet Niva
Author: Ivan Baranov
In any vehicle, the gearbox is one of the main units that determine the quality of the car's ride. Accordingly, the occurrence of breakdowns in the operation of power units will, one way or another, affect the driving of the car, especially when it comes to the gearbox control lever. Today you will learn how the Niva Chevrolet rocker is changed and adjusted and how to choose a new component for your car.
[Hide]
Do-it-yourself Chevrolet rocker adjustment: instructions
To set up the scenes you need to perform a number of actions.
- 1st gear does not engage at the gearbox. To turn it on, you need to start the engine, moving the gearbox lever until the car starts moving. Next, turn off the engine while 1st gear is engaged. You need to place shoes or wheel chocks under the tires, not forgetting the parking brake.
- Next, you will need to lower yourself into the hole to unscrew the clamp bolt of the rocker itself.
- Now you need to find the plastic traction lock in the Chevrolet Niva interior and move it to the far left position.
- Next, you need to once again lower yourself into the inspection ditch to tighten the loosened clamp bolt.
So, the gearbox traction adjustment can be considered complete. Now it’s worth checking the functionality of the part. It happens that this process does not help, there is no result, and removal and, therefore, complete repair of the component is required.
Mechanism problems
After the procedure for adjusting the traction of the Niva Chevrolet gearbox, faults continue to appear? Pay attention to them:
- free movement of the transmission lever increases;
- speeds do not change;
- difficult gear shift;
- switching on another gear or there is no possibility of switching gears.
When these problems are identified, there is a need for significant action, expressed in the repair or replacement of the scenes. However, to actually carry out such activities, the mechanism must be removed.
Backstage repair
How to properly adjust the driver's seat
The gearshift linkage is an element of a multi-lever assembly, which is designed to connect the gearbox lever and the rod that fits the power unit. In Niva Chevrolet cars, the rocker is located under the bottom of the vehicle, next to the cardan. This component is susceptible to contamination and the formation of moisture on it, which over time can deteriorate the quality of lubrication of rubbing parts. As a result, parts begin to wear out, which can subsequently lead to various problems.
Chevrolet Niva car - 2013 model
As stated above, the rocker is an integral part of the transmission system in Niva Chevrolet cars. Compared to other components of the transmission system, the rocker, which is also called the gearbox control rod, is a relatively simple mechanism in its structure
However, for correct operation, the condition of the scenes should also be given special attention.
In particular, we are talking about timely repair and adjustment of drive traction. If you want to avoid unexpected unpleasant surprises while driving, then the condition of the scenes should be at the appropriate level.
Node device
On older models, this unit is located under the bottom of the car, thereby being exposed to increased contamination and moisture.
The design of the gear shift mechanism does not have complex connections, the work is carried out without much load, but owners often encounter wear and tear on this unit.
How to replace the secondary shaft oil seal
Chevrolet Niva: cooling system. "Chevrolet Niva": cooling system design and possible malfunctions
If the secondary shaft of the gearbox has a leaky seal, this can lead to a decrease in the oil level. In order to carry out replacement repairs, you need:
Reverse gear is difficult to engage
Despite its specs, it's a great buy because it's hard to find a model this spacious, a little wrapped, and equipped at this price point. In addition to convenient space for people and luggage, you can display the autopilot on the road, talk about the consumption indicated on the on-board computer, or even lean on the station to change a flashing light that has stopped working after the control panel has warned you. All this in a car that was born cheap.
All original headlight: 464. Original brake disc: 491. Original rear view mirror: 170. Brake pads Original: 179. The most revealing is the intermediate expression, which already has hydraulic steering, rear wiper and hot air as standard equipment. Engine mounts An easy problem to solve, usually confused by clutch wear: when the mounts rupture, they cause cramps in the cranks. A simple visual analysis will already identify the problem.
- Hammer
- Various regular screwdrivers
- Any key for thirty
And so to replace we go through the following steps:
- Removing the intermediate transmission shaft
- Remove the seal from the centering ring, unscrew the nut that secures the flexible coupling flange, then remove the centering ring
- Remove the flange and lock washer
- seal and apply sealant
- The final step is to press the oil seal into the gearbox using a suitable mandrel. We install all the parts that were removed in the reverse order. We check what level the oil is at; if we see that it is not enough, then we need to top it up.
How to replace the secondary shaft oil seal
Which is better: Chevrolet Niva or Niva 2121
If the secondary shaft of the gearbox has a leaky seal, this can lead to a decrease in the oil level. In order to carry out replacement repairs, you need:
Reverse gear is difficult to engage
Despite its specs, it's a great buy because it's hard to find a model this spacious, a little wrapped, and equipped at this price point. In addition to convenient space for people and luggage, you can display the autopilot on the road, talk about the consumption indicated on the on-board computer, or even lean on the station to change a flashing light that has stopped working after the control panel has warned you. All this in a car that was born cheap.
All original headlight: 464. Original brake disc: 491. Original rear view mirror: 170. Brake pads Original: 179. The most revealing is the intermediate expression, which already has hydraulic steering, rear wiper and hot air as standard equipment. Engine mounts An easy problem to solve, usually confused by clutch wear: when the mounts rupture, they cause cramps in the cranks. A simple visual analysis will already identify the problem.
- Hammer
- Various regular screwdrivers
- Any key for thirty
And so to replace we go through the following steps:
- Removing the intermediate transmission shaft
- Remove the seal from the centering ring, unscrew the nut that secures the flexible coupling flange, then remove the centering ring
- Remove the flange and lock washer
- seal and apply sealant
- The final step is to press the oil seal into the gearbox using a suitable mandrel. We install all the parts that were removed in the reverse order. We check what level the oil is at; if we see that it is not enough, then we need to top it up.
In what case is replacement performed?
The gearbox is simpler than the engine, but sometimes it needs replacement. Often wear and damage force the car owner to buy expensive spare parts. Ultimately, the sum equals a used box in good condition. In this case it is better to change. Thus, a used box will be the best option.
In addition, replacement may be required after severe impacts and destruction of both the gearbox housing and internal mechanisms, which “dragged” along the parts of the fastenings to the housing. The price of a new Niva box is not high. Thus, repairs will cost the car owner less than many analogues.
Repair and replacement of the rocker on a Chevrolet NIVA
To prevent you from falling for a Chinese counterfeit, we publish here a link to the official website of Autoscanner. The need to repair the rocker occurs after repairing or installing the gear shift drive. If, after replacing the drive, while driving, you feel that the vibration of the gearbox lever remains, then most likely there is increased play in the hinge mechanism.
Accordingly, the backstage may need to be replaced. First of all, under the hood of the Chevrolet Niva, the nut of the screw securing the tip of the gearbox lever with the gear shift rod is loosened. After this, the turnbuckle with the protective cover is removed.
Then the front part of the floor covering is removed from inside the car. Next, the frame of the gear lever cover is removed.
The gear shift lever cover is turned inside out in order to see the clamp securing the cover and cut it with pliers and a regular stationery knife.
How to choose a new backstage?
What kind of rocker should I put on a Niva Chevrolet? This question came to the mind of every Niva car owner who had to deal with a malfunction of this element. In fact, there is nothing difficult in choosing a component.
In practice, many car owners of the above car models install mechanisms from classic Fiat cars on their vehicles. According to reviews on the Internet, these devices are completely suitable for installation in a Chevrolet Niva. However, there is also a negative side. In practice, Niva cars equipped with a mechanism from Fiat cars require more careful adjustment of the element. In addition, despite Italian quality, these components of the transmission system are more susceptible to wear and tear.
Therefore, when choosing a mechanism, you should not “be fooled” by the stories of handicraft “garage” craftsmen and come up with a new headache for yourself. For installation in a Chevrolet Niva, it is better to purchase a standard rocker, which is equipped with basic models of Niva cars.
New rocker for Niva Chevrolet
Replacing an element
As a rule, the need to repair this component arises after installing or repairing the gear shift drive. If you have replaced the drive, but when driving you feel how the vibration of the gearbox lever remains, then, most likely, there is increased play in the lever hinge mechanism. This means that the hinges should be repaired, and accordingly, it may be necessary to replace the rocker.
If you decide to replace a component at home yourself, then prepare in advance everything that you may need during the work process. In particular, we are talking about:
- wrenches on "12";
- wrench set to “14”;
- socket wrench at “10”;
- clamp for securing the gearshift lever cover;
- stationery knife;
- Phillips screwdriver.
Read also: Opel Vectra bumper covers
Of course, you will also need a new mechanism if you decide to replace it.
First of all, open the hood of your Chevrolet Niva and find the connection between the tip of the gearshift lever and the gear shift rod. Once you see this connection, take the appropriate wrench and loosen the nut of the mounting screw. After this, remove the turnbuckle and its protective cover. Now get into the car and remove the front part of the floor covering. Next, remove the gearshift lever cover frame
Be careful, you will need to remove it carefully to avoid damaging the clips. Next, you will need to turn the shift lever boot inside out. Having done this, you will see the cover fastening clamp
Take pliers or a regular stationery knife and cut through this clamp. After this, the cover can be removed from the lever. Please note: the gearbox lever mounting clamp is disposable. That is, if you bite it with pliers or cut it with a knife, you won’t be able to reinstall the part in its original place. Therefore, when assembling the parts, you will need to install a new clamp. Next, you will need to remove the front portion of the floor tunnel lining. Depending on the year of manufacture of your Chevrolet Niva, the instructions for dismantling the floor tunnel lining may differ. Therefore, we recommend that you use the instruction manual specific to your car. Now look at the gearshift lever. You will see that the axle lock is attached to it: this element must be disconnected from the lever. Having done this, the lever axis can be dismantled, simultaneously removing this axis from the holes of the gear shift lever and the rocker. When the axle is removed, you need to remove the gearshift lever. To do this, you will need to pull the lever itself up. Then take a screwdriver and push the plastic bushing inside the gear lever housing. You need to move this element along the shaft. Now, using a wrench, you need to unscrew several screws securing the gearshift lever housing to the car body. By unscrewing and dismantling the bolts, you can remove the housing and remove the gearbox shaft from it. Next, remove the guide rod from the shaft. Now you will see your backstage. If you see a large play in the hinges of the element that cannot be adjusted, or the hole for the lever axis is too worn, then you need to remove the mechanism and replace it with a new one. Since the process of replacing this element is not so easy, we recommend that you visually inspect all dismantled parts. If you have any doubts about their performance or reliability, it is better to replace them immediately. After replacing the backstage, all parts must be assembled in the reverse order. Don't forget to install a new shift lever clamp.
Read also: Funny words in Ukrainian
After installing the rocker, you will need to adjust the gearbox shift drive.
Replacing the drive boot on Niva
The method described below allows you not only to replace the anthers on the hinges, but also to apply lubricant if it is not enough.
- wrenches 17.13;
- large pliers;
- a pair of flat-head screwdrivers - one larger, the second smaller;
- hammer;
- a soft metal drift (if available, a CV joint puller);
- special lubricant for hinges;
- clean rags.
Torn boot
Place the car on the inspection hole, tighten the handbrake, and engage first or second speed. Next steps:
- Loosen the wheel nuts, jack up the wheel and remove it.
- Place a small block of wood under the lower arm to compress it and lower the jack.
- Unscrew the nuts and remove the 3 ball joint bolts.
- Unscrew the shock absorber from below and push it up.
- Knock the hub cap through the wood spacer.
- Pull out the cone-shaped washer and, pulling the brake disc towards you, move it to the side.
- Remove the grenade.
- Having descended into the hole, turn the drive shaft by hand to grab the protrusions of the inner CV joint clamp with pliers.
- Scratch the marks on the grenade body and the drive shaft to put it “as was.”
- Move the boot away from the grenade.
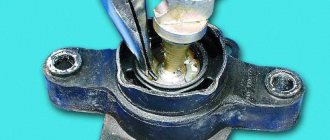
- Feel for the retaining ring inside the hinge and pull it out using a flathead screwdriver.
- Pull out the joint: if you are not going to change the lubricant, put it in a plastic bag.
- Move the plastic casing with the boot at the outer “grenade” towards the inner hinge so that it does not interfere.
- Knock down or use a puller to remove the clip.
- With the device in a vise, remove both retaining rings using a flathead screwdriver.
- Pull out the old boot. If new grease is added, flush everything.
- Place a new boot and boot, add lubricant to it and reassemble the unit in the reverse order.
In the article, we discussed the removal and installation of front wheel drives in the article - “Replacing front wheel drives.”
In this article we will look at replacing the angular velocity joints of the front drive VAZ-21213.
We prepare the car for repair. We install it on a viewing hole or on a lift.
We remove the drive from the car. We clean the hinge from the outside and clamp it in a vice with soft pads.
Since the outer hinge is most often replaced, we will consider this operation first.
Using pliers or pliers, we squeeze the small clamp by the protrusions and, prying it up with a screwdriver, disconnect it.
We remove the large clamp in the same way.
If the protective cover is attached using plastic clamps, then simply cut the clamps using side cutters.
We slide the protective plastic and rubber cover along the shaft.
We clean and wipe the end part of the hinge from old grease.
Using a drift made of soft metal or a wooden spacer made of durable wood, we knock down the hinge by striking the end of the cage.
We take into account that the drift should not transfer force to the separator or balls in order to avoid their damage.
This is the case if you need to put this hinge back on the shaft.
We remove the hinge. The joint on the shaft is held in place by a retaining ring, which is located in a groove at the end of the shaft.
The retaining ring is usually sold complete with the hinge. Pry up the retaining ring with a thin screwdriver
Remove the retaining ring
Separate the protective covers
Removing the rubber cover
Removing the plastic casing
If you need to replace the thrust ring, remove it with pliers
Install the hinge in reverse order.
We clean the shaft and joint from old grease, apply a thin layer of new CV joint grease and put a casing and a new cover on the shaft.
We install a new retaining ring on the shaft. We put 60 cm3 of CV joint grease into the joint cavity.
Using a soft metal drift or a strong wooden spacer, press the joint onto the shaft.
We put on a rubber cover. We install clamps. Before tightening the clamps, you need to release excess air from the rubber boot by prying up the seating belt of the boot with a screwdriver.
How to adjust the rocker on a Chevrolet Niva
The gearbox linkage is a part of a multi-lever unit that acts as a connecting link between the gearbox lever and the rod. Note that in the Chevrolet Niva, such an element as the rocker is located at the bottom of the car body near the driveshaft. This component is susceptible to the appearance of moisture and contamination, and this, after some time, deteriorates the quality of lubrication of rotating parts. Consequently, the components wear out, causing various problems.
In relation to other components of the transmission, the rocker, also known as the gearbox control drive rod, is considered a relatively simple device in structure
However, for correct operation, the condition of the scenes should be given due attention
That is, it is important to do repairs or adjust traction on the Chevrolet Niva in due time. Any car owner wants no force majeure to occur during the movement, and therefore the condition of the scenes must be monitored
Any car owner wants no force majeure to occur during the movement, and therefore the condition of the scenes must be monitored.
On most vehicles, the rocker looks like a fairly durable device that is quite capable of being used for about a hundred kilometers without replacement. At the same time, drivers are not insured against damage to this unit. How can you identify the need to repair the rocker on your Chevrolet Niva? This can be determined for the following reasons:
- The gearbox lever clearance has increased significantly;
- there are problems with gear shifting (the lever may float);
- Reverse gear does not engage;
- adjusting the backstage became impossible.
If the gears work poorly or the wrong one works at all, it makes sense to adjust the mechanism. Naturally, such a fact is relevant only when the position of the drive is visually assessed as working. When the connecting parts of the device’s hinges operate with significant play, then it is advisable to replace the component on the Chevrolet Niva.
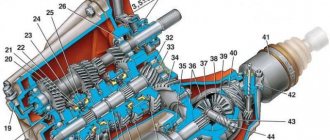
When studying a Chevrolet SUV, which we know as a relative of the VAZ, many do not understand what a rocker is and where to look for it. By the way, in Chevrolet there are 2 such devices. One rocker is designed to change gears, while the other switches transfer case modes.
Consequently, sometimes car owners notice malfunctions in the operation of the gearbox, manifested in the following:
- when engaging 1st gear there is a spontaneous shift to reverse;
- when switching on, 5th speed disappears;
- activating reverse gear instead of selecting forward 5 gears.
The reasons mentioned indicate damage to the drive rod, but there is no need to remove the gearbox and repair it as soon as possible. First, you should try to adjust this element. And although setting up the unit is not an entirely simple task, it is cheaper and easier than changing the entire box or slide.
Buy auto parts boot for the handbrake lever Niva Chevrolet for foreign cars - Autopiter
Prices and delivery times depend on the city chosen.
Moscow Cart
The search for “boot for the handbrake lever on a Chevrolet Niva” found 44 positions Lever st/o. VAZ 2123 Chevrolet Niva Avtopribor
Gearbox lever boot for VAZ-2123 “Chevrolet Niva” (external) (manufacturer: Balakovo Rezino Tekhnika)
Gearbox lever boot 2123 (internal) (03441)
Boot RCS V-2123 "Niva Chevrolet"
Handbrake lever boot for UAZ-452 “Loaf”
Gearbox boot for VAZ-2123 Chevrolet Niva (manufacturer: Balakovo Rezino Tekhnika)
Gear selector boot for VAZ-2123 Chevrolet Niva
switch (limit switch) 2123-3710230 of the handbrake lever Niva-Chevrolet (79.3710)
Suspension arm 2123 Chevrolet Niva upper left AvtoVAZ
Pendulum arm 21213, 2123 Chevrolet Niva assembly AvtoVAZ
Boot RCS VAZ 2123 Niva Chevrolet 2123-1602518
Transfer case connection boot for VAZ-2123 Chevrolet Niva (CV joint)
2123-1703200Р Gearbox lever boot 2123 (on the thrust joint) “BRT”
Suspension arm 2123 Chevrolet Niva upper right AvtoVAZ
Suspension arm 2123 Chevrolet Niva lower left AvtoVAZ
Handbrake lever VAZ 2101-07, Niva-2121-13 (in collection) 2103-3508012 VIS
Transfer case lever boot 2121/1111/2110/2170
gear lever boot 2123-1703101 Niva-Chevrolet ***
2123-1703225Р Gearbox lever boot /2123/
Transfer case lever boot for VAZ-2123 Chevrolet Niva (upper)
2123-1703101Р Gearbox lever boot 2123 external “BRT”
Pendulum arm 21213, 2123 Chevrolet Niva assembled on INTER-AUTO bearings
Suspension arm 2123 Chevrolet Niva lower right AvtoVAZ
Lower lever for VAZ-2123 Chevrolet Niva (Chevrolet Niva) AvtoVAZ right
Lower lever for VAZ-2123 Chevrolet Niva (Chevrolet Niva) AvtoVAZ left
Also interesting: Do-it-yourself rims for low-pressure tires
Backstage of the Niva Chevrolet SUV
Continuing our study of the Russian SUV Chevrolet Niva, which is a relative of the VAZ family of cars, we will pay attention to such a detail as the rocker. What is it and where is it located? Probably, every current driver often heard while studying at a driving school about how the instructor “swears” at the obsolete stage when he changes gear
Yes, indeed, the rocker is a gearbox part that performs an important function, but the Chevrolet Niva has two such devices - one rocker is used to change gears, and the other is used to switch transfer case modes. But this is what this material will actually tell you about.
The rocker is technically referred to as a gearbox drive rod and is a complex mechanism designed to connect the transmission shift lever with the gearbox rod.
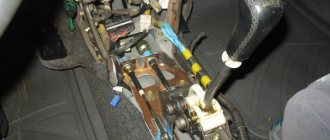
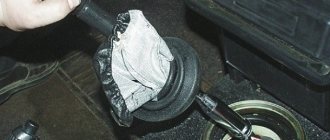
On Chevrolet Niva SUVs, the rocker is located in the cabin near the lever itself, as in many models of Russian cars. Finding it is not difficult if you know what a gearbox is. The slide is located near the transmission shift lever and has the appearance shown in the photo below.
Photo of the backstage located in the vehicle interior
On older models of vehicles from the Russian automobile industry, the location of the rocker was located under the bottom of the car, but this reduced, first of all, the service life of the product, which affected efficiency.
The link on Chevrolet Niva SUVs has a long service life, equal to over 100 thousand kilometers. But this resource depends, first of all, on the integrity of driving, so sometimes drivers may notice failures in the operation of the gearbox, such as:
- When you try to engage first gear, it switches to reverse;
- Fifth speed disappears when it is turned on;
- Reverse gear is engaged when forward five gears are selected.
This indicates a malfunction of the drive rod, but you should not rush to remove the gearbox and repair it, as you can try to adjust the product. Although adjustment is a rather difficult task, it is easier and cheaper than replacing a box or a link.
Location of the rocker clamp bolt
Adjusting the backstage includes the following steps:
- The gearbox engages first gear. To turn it on, you can start the engine and move the gearbox lever until the car starts moving. Afterwards, the engine is turned off, the first gear remains on, and shoes are placed under the wheels. Don't forget the handbrake.
- Lower into the overpass and loosen the bolt of the rocker clamp.
- Inside the car we find a plastic traction lock and move it to the extreme left position until it stops.
- After this, you should go down into the pit again, but tighten the loosened clamp bolt.
Why is downshift needed?
It is difficult to imagine a transfer case without the main functional component - a reduction gearbox. Positioning the lever in the rear direction reduces the transfer case value to 1.2.
You can often encounter the following type of misconception: switching the rear handle can increase the power characteristics of the motor. But this is not true. It serves to change the gear ratio between the engine and the wheels. By increasing it, the traction forces on the wheels will increase. There is also a reduction gear in the dispensing mechanism.
DON'T SPEND MONEY ON REPAINTING! Now you can remove any scratch from the body of your car in just 5 seconds.
Its operation can be controlled using the rear handle. When we shift the lever back, we will have a gear ratio of 2.135 - this is a low gear. It is recommended to downshift such a gear only when the car is stationary and the clutch is depressed. Despite the fact that the manual does not contain such a restriction, novice and inexperienced Niva drivers are not recommended to switch while driving, since the Niva transfer mechanism is not equipped with a synchronizer.
Signs of trouble
The transmission is constantly subjected to high loads while driving, especially off-road. At the same time, the parts, despite the lubrication and the safety margin laid down by the designers, wear out intensively. Therefore, failure of the Chevrolet Niva transmission is not at all uncommon. And the point here is not in the quality of the parts, but in the level of loads and complexity of the mechanism.
Symptoms of malfunction depend on which component is experiencing problems:
- Clutch. In case of breakdowns, jerking occurs when starting to move, slipping under load, or “driving” when trying to stop or change gear. Sometimes the malfunction manifests itself in the form of noise when pressing the clutch pedal or in other conditions.
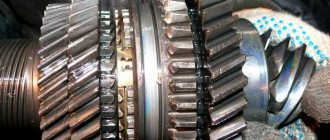
- Gear box. This unit is more complex, and accordingly, its breakdowns are more varied. They manifest themselves in unclear or difficult gear shifting. Oil leaks, crunching noises and extraneous noises are also possible.
- Cardans and intermediate shaft. Here, malfunctions manifest themselves in the form of knocking during acceleration, squeaking or vibration while driving.
- Main bridge. In the event of a breakdown, the mechanism begins to make noise, knocking noises occur when accelerating and oil leaks.
- Transfer case. Problems make themselves felt in the form of spontaneous shutdown of bridges, noise and knocking. There may also be an oil leak.
- Constant velocity joints. Worn parts begin to crunch and knock while driving. The crunch is especially noticeable when the steering wheel is turned hard.
Malfunctions
The most common causes of malfunction:
- the backlash and vibration of the gearshift lever has increased;
- 5th speed goes out or reverse gear is engaged;
- It is difficult to engage reverse;
- fuzzy long-term switching of speeds.
Reference! Vibration of the gearshift lever is the most common problem that occurs in many vehicles when the internal combustion engine is running in the range of 2500 - 3500 rpm.
How to use a transfer case in a field, box design
The relatively complex scheme for distributing torque from the internal combustion engine to the wheels is explained by the universal purpose of the Niva 2121 - if used correctly, it can be used comfortably in the city and along muddy country roads. Such properties are ensured by the presence of a transfer case with a center differential lock, complementing a 4- or 5-speed manual transmission, depending on the year of manufacture.
The normal position for the RK handles, ensuring adequate behavior on the road of good quality:
- Front - from yourself
- Rear - towards you
The special operating mode of the transmission is switched on not long before the car begins to overcome an obstacle (rut, mud, ford or rise). The transition to the lowest row must be done while stopping. Returning to top gear is allowed on the go, although it causes problems for beginners due to the lack of the usual synchronizer.
Problems can also arise when disengaging the lockout, as the clutch teeth literally catch on the ring gear. Engage reverse and, rocking the steering wheel, push the lever away from you. This action is performed immediately after overcoming a difficult section in order to avoid overloading the gearbox. It is most effective to disable the differential together with the transition to lower stages.
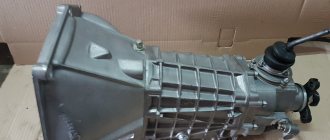
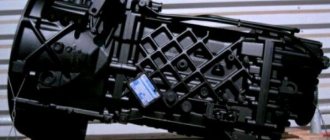
Removing gearboxes on Niva Chevrolet
What are the main faults when it is necessary to remove the gearbox:
Exhaust tip Ensure that it is present and does not show signs of visible corrosion: there are cases where it falls off and causes a concentration of hot gases in the barrel floor, aggravated by the lack of thermal insulation in place. In extreme cases, it can even melt the liner.
Ignition Symptoms of a system malfunction include a flashing panel fault indicator and minor engine failure. The scanner almost always indicates a defect in the coil, which costs about 500 reais in an authorized one. And the space is great even for tall people. I don't like the finish: it's very plasticky and noisy, especially in the trunk lid and glove box, which doesn't close properly. Consumption could be better.
- It's difficult to change gears
- Various noises appear
- The gears switch on themselves or, on the contrary, switching off is difficult
- Oil is leaking
Its removal is also required when replacing the clutch.
To remove the gearbox:
- Place the car on a pit or a special lift
- Disconnect the terminals from the battery, remove the protection
- Drain the oil from the box
- The front driveshaft and intermediate shaft should be removed
- Disconnect the wires from the reversing lights
- We remove the cover of the handle with which we change gears
- Unscrew the handle and remove it with the cover together
- We unscrew the nut that secures the support plate of the PP mechanism and remove the rear power support unit
- We unscrew the nut and the clamp that tightens the mechanisms that change gears
- Remove the MPP drive by unscrewing three bolts
- Unscrew the bolts that secure the clutch housing shield
- We remove it from the hose by unscrewing the two bolts of the clutch cylinder
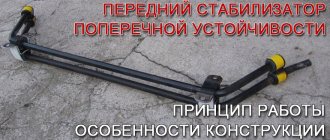
- Removing the lateral stability stabilizer
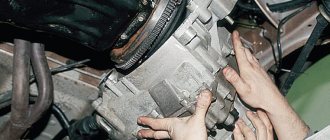
- We remove the entire mechanism assembly, namely the clutch housing and gearbox
Thus, having completed all the points, you can change the oil or the entire gearbox on a Chevrolet Niva yourself, the process is not entirely automatic, so you will have to work hard.
Experts note that during the operation of a Chevrolet Niva, something happens that it stops engaging in reverse gear. This happens due to the fact that the car has a worn-out rocker, which plays an important role when changing gears.
It should be noted that in the Niva Chevrolet there are two such scenes: one is for changing gears, and the second is for switching the transfer case.
Removal
Place the car over an inspection ditch or on a lift, put supports under the front wheels and hang the rear axle on one or both sides. Release the parking brake and place the gearshift lever in neutral. Disconnect the battery cables. Remove the front floor mat and outer covers from the transfer case and transmission levers. Remove the lever hatch covers and seals. Unscrew the handles from the transfer case levers.
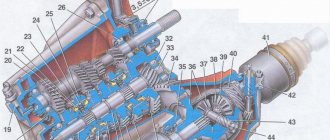
Press down on the lever rod 29 (Figure 3-12) and use a screwdriver or other pointed tool to remove the locking sleeve 33 from the groove on the lever rod; remove the rod.
Disconnect the pipe suspension and turn off; it in the rear of the car, and then the muffler pipe from the exhaust pipe. Disconnect the clamp securing the exhaust pipe to the gearbox. Using a spanner, unscrew the nuts securing the front muffler pipe to the exhaust manifold and remove the pipe downwards.
Unscrew the lower bolts securing the clutch housing cover. Disconnect the ground wire from the clutch housing and the wire from the reverse light switch.
Unhook the release spring 1 from the clutch release fork 5 (Fig. 3-13) and remove the cotter pin 4 from the pusher 6. Disconnect the slave cylinder 8 from the clutch housing. In this case, cylinder 8, connected to the pipeline going to the clutch release drive master cylinder, remains on car, which eliminates the loss of brake fluid and the need for subsequent bleeding of the hydraulic clutch release drive.
Rice. 3-13. Clutch release drive:
1 – fork release spring; 2 – lock nut; 3 – adjusting nut; 4 – cotter pin; 5 – clutch release fork, 6 – pusher; 7 – bolt securing the working cylinder to the clutch housing; 8 – clutch release working cylinder
Place clamp 2 (A 70025) on elastic coupling 3 (Fig. 3-14) and tighten it. This will facilitate the removal and subsequent installation of the elastic coupling. Unscrew nuts 1 and, turning the intermediate propeller shaft, remove the bolts securing the elastic coupling 3 to the flange of the secondary shaft of the gearbox.
Rice. 3-14. Elastic coupling connecting the propeller shaft to the gearbox:
1 – nuts securing the propeller shaft flange to the elastic coupling; 2 – clamp a 70025; 3 – elastic coupling; 4 – cross member of the rear engine mount.
Note. You can remove the gearbox assembly with the intermediate shaft. In this case, disconnect the intermediate driveshaft flange from the transfer case shaft flange.
Disconnect the speedometer flex shaft from the speedometer drive on the transfer case.
Disconnect the transfer case driveshaft flanges. Lower and move the axle drive driveshafts to the side.
Unscrew the bolts securing the transfer case brackets to the body and remove it along with the driveshaft.
Using a hinged socket wrench 02.7812.9500, unscrew the bolts securing the starter to the clutch housing and loosen it. Unscrew the bolts securing the clutch housing cover.
Disconnect the rear engine mount from cross member 4 (Figure 3-14), and then remove the cross member while supporting the transmission from below.
Auto & Chevrolet Niva & Chevrolet Niva backstage adjustment
Chevrolet Niva is the successful result of fruitful cooperation between Russian and American engineers. The car is ideal for use in Russian conditions. He is not afraid of bad roads or sudden changes in temperature. The Chevrolet Niva has a spacious, roomy interior and a powerful 1.7- or 1.8-liter engine with distributed fuel injection. The Chevrolet Niva all-wheel drive car can be used as a representative city or country car for trips into nature. High quality workmanship and low cost have made this comfortable car a sales leader in Russia.
A new passenger five-seater SUV, replacing the popular VAZ all-terrain vehicle. The conceptual solutions he inherited from the Niva - a monocoque body, permanent drive of all wheels - are combined with a number of innovations. Adjusting the Chevrolet Niva backstage Among them is a five-door body with glued glass; a trunk door that opens to the side; engine with distributed fuel injection; electric power steering, powerful heater.
The chassis and transmission of the old Niva have remained virtually unchanged structurally - modernized, life-tested units have been used. Here is a list of modifications to the Chevrolet Niva: the front axle gearbox is “decoupled” from the engine; The design of the gearbox drive has been changed; extended intermediate shaft; the transfer case has fine-meshing gears; front and rear driveshafts are unified.
Perhaps the only modification that still won its right to life. Although with significant changes and with the participation of a foreign company. Although initially everything looked quite tempting. And here's what happened at first...
The base model of the new Chevrolet Niva family is a car with a five-door station wagon and a 1.7-liter gasoline engine equipped with an electronically controlled distributed fuel injection system.
Main design features: the engine is located longitudinally in the front of the machine; permanent all-wheel drive with center differential lock; five-speed manual transmission; two-speed transfer case; electric power steering; fifteen-inch wheels shod with 205/75R15 tires. Adjusting the Chevrolet Niva rocker In addition to the base engine, there are three more. Two of them are gasoline engines of the VAZ-21231 and VAZ-21233 models. Well, the third is a real surprise from VAZ - the domestic turbocharged diesel VAZ-3431. Moreover, for truck versions of vehicles, the diesel engine was supposed to become the base one.
Make sure that nothing prevents you from grabbing the handbrake handle at any time, you never know. But boxes of juice, tape cassettes, the hem of your companion’s lovely dress can get in your way.
Chevrolet Niva: improvements based on tips from owners
Author: Sochi Auto Repair
By and large, motorists don’t care what it’s called. It is important that in production not only changes are made to the design of the machine due to the tightening of certain standards, but also those that are useful to the consumer. I'll name them.
The central wiring harness has a soft braid instead of plastic. In addition, the pads have been changed - modern ones are more compact and smaller. The purpose of the change is to reduce noise in the Chevrolet Niva cabin.
Chevrolet Niva 2022 Wiring harnesses of the old (bottom) and new type. Wiring harnesses of the old (bottom) and new type.
The clutch slave cylinder is in an aggressive environment. Often, due to moisture penetration, the cylinder mirror corroded. The result is leakage and failure. Now a cylinder with a new rod is installed on cars, preventing moisture from penetrating under the rubber boot.
Chevrolet Niva 2022 Clutch slave cylinders: old (left) and new. The rod has a labyrinth lock to prevent moisture penetration. Clutch slave cylinders: old (left) and new. The rod has a labyrinth lock against moisture penetration.
The Valeo clutch driven disc received a torsional vibration damper. This is done to reduce transmission noise at idle. Simply put, we got rid of the characteristic rattling in the warm season, when the gearbox is in neutral and the clutch pedal is released.
The rear shock absorbers manufactured by SAAZ were equipped with covers extended by 20 millimeters, which prevents dirt from getting under the cover into the “rod-oil seal” work area. The fastenings of the casings themselves on the shock absorbers have also been strengthened.
Chevrolet Niva 2022 An extended casing appeared on the rear shock absorbers (lower in the photo). An extended casing appeared on the rear shock absorbers (lower in the photo).
The Niva's ball joints use high-tightness covers - the upper part of the boot now has a ferrule.
Chevrolet Niva 2022 Fresh ball joints, tie rod ends and other chassis elements. But before checking the wheel alignment angles, the suspension still needs to be “squeezed” properly. For this purpose, cars from the assembly line pass along a special comb. Fresh ball joints, tie rod ends and other chassis elements. But before checking the wheel alignment angles, the suspension still needs to be “squeezed” properly. For this purpose, cars from the assembly line pass along a special comb.
ads
Photo of a rocker located in the vehicle interior On older models of vehicles from the Russian automobile industry, the location of the rocker was under the bottom of the car, but this, first of all, reduced the service life of the product, which affected efficiency.
Adjusting the rocker The rocker on Chevrolet Niva SUVs has a long service life, equal to over a thousand. But this resource depends, first of all, on the integrity of driving, so sometimes drivers may notice malfunctions in the gearbox, such as: When trying to engage first gear, it switches to reverse ; Fifth speed disappears when it is turned on; Reverse gear is engaged when forward five gears are selected. This indicates a malfunction of the drive rod, but you should not rush to remove the gearbox and repair it, as you can try to adjust the product.
Although adjustment is a rather difficult task, it is easier and cheaper than replacing a box or a link. The gearbox engages first gear.
Parts and consumables:
To turn it on, you can start the engine and move the gearbox lever until the car starts moving. Afterwards, the engine is turned off, the first gear remains on, and shoes are placed under the wheels.
Don't forget the handbrake. We managed to switch on some gear, and, accordingly, it was liquefied.
Like riding a tractor!!! I arrived at an open field.
Without a flashlight, but to an advantage with a key of 13, tighten the clamp. About 20 times I managed to adjust it so that all gears were engaged like clockwork! The main mistake was not the first one, which I did not take into account: Before loosening the clamp, you need to catch the neutral with the lever, and then loosen it - adjust and tighten it! So, about the most important thing: In Niva Chevrolet cars, the rocker is located under the bottom of the vehicle, next to the cardan.
This component is susceptible to contamination and the formation of moisture on it, which over time can deteriorate the quality of lubrication of rubbing parts.
As a result, parts begin to wear out, which can subsequently lead to various problems.
How does the Chevrolet Niva gearbox work, Chevrolet Niva transfer case
Niva Chevrolet car - model of the year As mentioned above, the rocker is an integral part of the transmission system in Niva Chevrolet cars
However, for correct operation, the condition of the scenes should also be given special attention.
In particular, we are talking about timely repair and adjustment of drive traction.
Inside the vehicle, to gain access to the transmission control lever housing, remove the control lever collar and mounting frame. Take a screwdriver with a blade approximately 4 mm in diameter and insert it into the locking hole in the side wall of the lever housing.
If the screwdriver is inserted without difficulty, then the linkage is adjusted correctly and, therefore, is not the cause of poor gear shifting; Next, it would be best to remove the gear shift drive rod and inspect it for wear and damage. Section Removal, inspection and reinstallation of the gear shift drive.
If the screwdriver does not fit into the locking hole, the position of the rod is not adjusted correctly. At the point in the engine compartment where the selector rod passes through the bulkhead, loosen the selector rod pinch bolt A near the rubber coupling B to allow free play between the two halves of the selector rod.
When to replace the grenade boot on a Chevrolet Niva?
As a rule, replacing the Chevrolet Niva CV joint boot is carried out after inspecting the part and detecting damage. It could be a small hole, a crack, or a large tear. Regardless of the degree of damage to the protective cover, it must be replaced with a new one. If this is not done in time, the owner will face complex and expensive repairs.
Checking the rubber protection must be carried out regularly, since parts wear out quickly if they are constantly under load. Checking is a simple undertaking. You just need to turn the front wheels to the right or left all the way and inspect the elements. There should be no traces of oil or cracks on them.
| See all advertisements in the archive |
How to adjust the rocker on a VAZ 2110 with your own hands
Before adjusting the gearbox linkage, it is necessary to perform a number of preparatory work:
- Drive the car into the pit.
- Tighten the handbrake and install the wheel chocks.
Method No. 1 - adjusting the rocker according to the rear speed.
- Loosen the clamp.
- Engage reverse gear and position the lever as you would like it to be in this position.
- Then tighten the clamp and check how the rocker works, whether you are satisfied with the current position of the lever and the operation of the rocker.
Method No. 2 - adjusting the rocker at first speed.
This method is used, as a rule, when the first method did not produce results.
- Turn on first speed.
- Loosen the rocker clamp.
- Turn the rocker drive counterclockwise until the gearshift lever begins to rest against the plastic reverse speed stop.
- Tighten the clamp and check how everything works.
How to adjust the gearbox rocker
The linkage is adjusted when the standard one is changed to a short-stroke one or in case of repair. There are several adjustment methods:
- On the first transfer.
- In reverse gear.
You need to adjust the rocker with the engine turned off and the parking brake applied. Before you perform any actions related to disconnecting all the parts, make notes, they will be useful for later reassembling everything correctly. Otherwise, changes in the operation of the mechanism may occur.
To adjust, you need to loosen the clamp
To proceed directly to the adjustment itself, you need to loosen the clamp that directly holds the shift lever itself with the rod. Small turns or movement of the hub along the traction lever changes the clarity of the choice and the inclusion of certain gears. After each test, tighten the clamp and check your result.
To adjust the reverse gear, you need to gradually loosen the clamp and move the gearshift lever to a position that corresponds to the ideal engagement of the reverse gear. After adjustment, tighten the clamp back.
To adjust first and second gears, turn the lever clockwise. For the third and fourth speeds, you need to adjust the movement of the lever along the rod forward, in the direction of movement of the machine. However, it is not recommended to rotate it about its axis! To adjust the rocker in fifth and reverse gears, turn the lever in the opposite direction.
If there are problems with shifting first, third, fifth and reverse gears, the lever moves back. You need to do it until you achieve the desired result.
In vehicles where the role of the rocker is performed by cables, and not by a lever, adjustment occurs according to a different algorithm:
- First, move the gear lever to the neutral position.
- Then the gearshift lever boot is removed.
- The cables are tightened. Several nuts are used for tensioning. You need to loosen the far nut, which is located on the cable side. Initially, unscrew the nut 3 turns. Then we tighten the nut, which is located on the reverse side, 3 turns. All fasteners should be locked.
- Then the operation of the gear selector is monitored.
Most likely, the process may differ in different models of machines, but the principle of operation does not. Therefore, before starting work, you should familiarize
with instructions specifically for your car model.
If the adjustments made do not produce results, you need to think about repairs. Most likely, in the gear shift drive, the bushings and ball joints wear out, and the cables also stretch (according to the device). If there are no significant intentions to change the assembly, then you should think about purchasing a repair kit that is suitable for your car and replacing the problematic part.
Article: 2123-1703225more, additional articles: 12403hide
Order code: 546856
In stock Available for order – >10 pcs. Data updated: 05/30/2021 at 15:30
Order code
546856 Articles 2123-1703225, 12403 Manufacturer CS-20 Catalog group: ..Gearbox Transmission Width, m: 0.06 Height, m: 0.04 Length, m: 0.06 Weight, kg: 0.02
Product reviews
Where is it used?
Reviews
There are no reviews for this product yet.
Write a review
- Boot VAZ-2123 gearbox shift mechanism housing CS-20 Article: 2123-1703225, 12403 Order code: 546856 130 ₽ or place an order by calling 8 800 6006 966
Availability of goods in warehouses and stores, as well as the price of the goods is indicated on
30.05.2021 15:30
.
Prices and availability of goods in all stores and warehouses are updated once an hour.
If there is a sufficient quantity of goods in the store you need, you can buy it without pre-ordering. Internet price
– valid when ordering on the website or through a call center operator by phone
8-800-600-69-66
. Subject to sufficient quantity of goods at the time of order.
Price in stores
– retail price of goods in store sales areas without pre-order.
The period for moving goods from a remote warehouse to the warehouse of an online store.
The parts data presented on this page is for informational purposes only.
121909b6995d5222d0398e07d763ea26
Add to cart
Available to order:
Order quantity:
Product successfully added to cart
!