Article number and approximate price for original ball joints for VAZ 2107
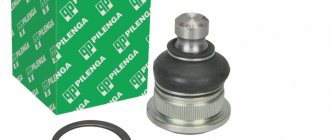
On the VAZ 2107 car, upper and lower supports are structurally provided. If one of them fails, it is recommended to replace the set, but separate replacement is also possible. The original lower ball has an article number - 2101029040828. Its price is about 360-450 rubles.
Lower ball VAZ 2107
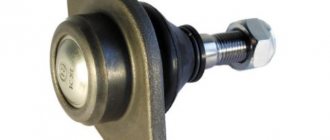
The original upper part of the VAZ 2107 car comes with the article number 21010290419286. Its cost ranges from 420 to 570 rubles. The service life of ball joints is directly related to the quality of the road surface and the driving style of the car owner.
Upper support
How to check ball joints on a VAZ 2107 for...
Self-check of ball joints
with your hands... you jack up the wheel and loosen it with one hand from below, the other from above... you will understand there... Elana
These are bearings. Ball by removing the load on them. Alexie
Find an old repair book (about 80 years old). Everything is clearly spelled out there. Alexi
Mount on a pit or overpass, on the backlash.Lea
then jack up any front wheel and rock in different directions, if there is a knocking noise, it means screw them or the tips of the Galchonok
and you need to hang the bottom one on something and shake the top. Alona
they don't knock, that means they're normal. shake the front of the car, swing the wheel along the axle, and to check the bottom, put a brick under the lever to hang the wheel and swing it too. Under
You put the jack up. Right and left - tips, up and down ball. Nothing should be loose. For tips jack for rocking chairVera
How do you mean “under the rocking chair”? Datian
it’s not difficult, the top one is usually checked together with the side member, that is, you take it out of the blue by the top of the wheel in the usual form, you don’t need to remove or unscrew anything, and you pull as hard as you can, if there is any suspicious sound, take it apart... and the bottom is there there is a grease hole (so there’s a hole in it, and the front end is already raised, a match goes in, how many mm, for the life of me I don’t remember) that’s where the working permits are and it’s time to change..., it’s simple))) Sayan
Jack it up, put a 17 cm piece of wood under the ball, it seems, lower it onto it and then swing it up and down by the wheel
as Anatoly said! balls are checked under load. you pull sharply on the top of the wheel and if there is any play, you take it apart. the top one means one hundred percent dead. and with the lower one you just ask someone to pull it and you can determine by touch whether there is any play! Irinara
Jack up higher, put something under the lever, lower the jack. This way you will unload the lower ball and put it in the working position. Swing by the bottom of the wheel or let someone swing and you watch. This way you can check both at once. The safest way is to disconnect the ball joints and check them with your hands. If it hangs even a little, change it. Aleko
You put a support on the jack, under the lower suspension arm, you can remove the wheel, lower it and swing it by the disk from bottom to top. It takes two people with the wheel, you swing it, he looks. Balloons can be heard along the highway. There is also a pendulum, along the direction of the car, on the right. He knocks too. When driving quietly, it can be heard on the right side of the cabin; you need to remove the cotter pin and tighten the castle nut by one slot. There is no need to pull hard. The steering will be heavy. If you have a new car, it's the swingarm. He needs a lift. Grisha
how to remove the starter on a vaz 21072? I need instructions for the kettle
There is no power from the ignition switch to the starter. What could be the reason? VAZ-21072
VAZ 11193 "KALINA". The battery died and after replacement it will not start. no indica ENGINE, starter does not turn, fuses are intact
how to open the hood if the cable comes off on a VAZ 11193 (Kalina) please help
VAZ 1119 Kalina engine 1, 4 16V if the timing belt breaks, does it bend the valve?
Article number and cost of good analogues of original VAZ 2107 ball joints from third-party manufacturers
The quality of original balls differs from batch to batch. It is possible to purchase both good support and outright rubbish. Therefore, many car owners doubt which one is better to install. They often refuse to buy the original in favor of products from third-party manufacturers. The best analogues of native balls are presented in the tables below.
Table - Good analogues of ball 2101029040828
| Manufacturer | vendor code | Approximate cost, ruble |
| TRW | JBJ250 | 520-600 |
| Lemforder | 3731501 | 590-710 |
| Delphi | TC204 | 370-450 |
| Monroe | L0704 | 440-530 |
| CTR | CBFI4 | 510-630 |
Table - Recommended alternative support options 21010290419286
| Manufacturer | vendor code | Approximate cost, ruble |
| Moog | LABJ0392 | 360-420 |
| Profit | 23010098 | 260-300 |
| Denckermann | D110135 | 250-315 |
| Lemforder | 37320 | 330-425 |
| Delphi | TC203 | 395-450 |
Do-it-yourself repair of a VAZ 2107 chassis
The lateral stability of the elements of the front chassis of the car is provided by a stabilizer bar. Volkswagen Passat Polo Golf. Repair of the lower arm of the front suspension on VAZ cars. Diagnostics of the front suspension. Checking the car's shock absorbers. Adjusting the wheel alignment. They are connected to the steering knuckle using ball joints - simply ball joints. How to check a car's suspension 3 8k 0 How to do a wheel alignment yourself 23 34k 0 Adjusting the wheel alignment.
Renault Duster Megan Logan Scenic. Do-it-yourself wheel alignment 99 k 7.
Repair of the front suspension of the VAZ-2106.
https://youtube.com/watch?v=qDPr-PMlZh5
Repair of VAZ chassis, in garage conditions. Audi 80 A4 A6. Chevrolet Aveo Cruze Lacetti Niva. Well, a little less often than other elements of the front suspension, but still, when repairing the chassis, it is necessary to replace the pendulum arm and reaction rods. Volkswagen Passat Polo Golf. All the details of the above procedures can be clearly seen in the video.
Well, a little less often than other elements of the front suspension, but still, when repairing the chassis, it is necessary to replace the pendulum arm and reaction rods. The front suspension of the Lada is independent two-link, 2 levers, upper and lower on each side. Volkswagen Passat Polo Golf. We often have to note the wear of ball joints or silent blocks.
Do-it-yourself wheel alignment 99 k 7. And also, before repairing the chassis, do a suspension diagnostic in order to determine what exactly needs to be replaced in the car’s chassis. All the details of the above procedures can be clearly seen in the video.
In addition to the skills, you will naturally need a jack, a set of keys, and an inspection hole will be useful. We often have to note the wear of ball joints or silent blocks. All the details of the above procedures can be clearly seen in the video. VAZ The front suspension also includes springs and a shock absorber. Well, a little less often than other elements of the front suspension, but still, when repairing the chassis, it is necessary to replace the pendulum arm and reaction rods.
In addition to the skills, you will naturally need a jack, a set of keys, and an inspection hole will be useful. VAZ Repair of VAZ chassis, in garage conditions. The lateral stability of the elements of the front chassis of the car is provided by a stabilizer bar. Repair of the lower arm of the front suspension on VAZ cars. Diagnostics of the front suspension. Checking the car's shock absorbers. Adjusting the wheel alignment.
It’s not uncommon for a VAZ, or any other classic Lada model such as the Lada, that repairing the chassis is not uncommon, and look, almost every weekend you have to hang around in the garage.
You also have to change springs and shock absorbers from time to time. VAZ It is often necessary to note the wear of ball joints or silent blocks.
We often have to note the wear of ball joints or silent blocks. All the details of the above procedures can be clearly seen in the video. It is recommended to repair the chassis only if you already have experience in replacing each of the elements that make up the suspension.
They are connected to the steering knuckle using ball joints - simply ball joints. Repair of VAZ chassis, in garage conditions. It’s not uncommon for a VAZ, or any other classic Lada model such as the Lada, that repairing the chassis is not uncommon, and look, almost every weekend you have to hang around in the garage.
The chassis of classic Lada cars consists of front and rear suspension. VAZ Ford Focus 1 Focus 2 Focus 3. Audi 80 A4 A6. The front suspension of the Lada is independent two-link, 2 levers, upper and lower on each side. Repair of the lower arm of the front suspension on VAZ cars. Diagnostics of the front suspension. Checking the car's shock absorbers. Adjusting the wheel alignment.
Diagnostics of the condition of ball joints
Diagnostics of ball joints is required if the following symptoms of malfunction appear:
- when driving, a knocking and grinding noise is clearly audible from the wheel side, which intensifies when driving over uneven road surfaces;
- the increase in speed is accompanied by the wheel rim swinging in different directions;
- turning the steering wheel is accompanied by creaking and grinding sounds;
- uneven tire wear;
- noticeable heaviness when turning the steering wheel;
- the handling of the VAZ 2107 has deteriorated;
- the car has become unstable, which is especially noticeable when overcoming uneven roads.
If the above symptoms are present, the condition of the ball joint must be checked. The easiest way to identify a faulty unit is by ear. To do this, turn off the engine of the VAZ 2107 and, standing with an assistant on both sides of the hood, rock the car. If the ball is worn out or damaged, a distinct sound will be heard from the wheel arch, which will make it easy to identify the fault.
You can more accurately check the condition of the support by the presence of play. To do this, you need to use the instructions below.
- Jack up the front wheel.
- Depress the brake pedal all the way and hold it there until the test is completed.
- Rock the wheel forcefully in a vertical plane. Movements should be made initially up and down, and then left and right. The presence of minimal play indicates that the ball needs to be replaced.
Detection of ball joint play
The latest VAZ 2107 models have special inspection holes. Through them it is easy to check the wear of the ball pin without the need to disassemble the unit.
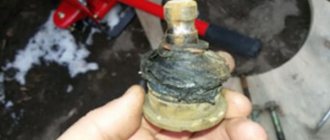
An indirect sign of ball failure is the rupture of the boot. The performance of the support directly depends on the quality and quantity of lubricant. If there is damage to the cuff, moisture and abrasive debris get underneath it. Therefore, if cracks, tears or other holes are found on the boot, it is recommended to replace the unit with a new one.
Damaged ball joint boot
After what mileage do they change ball joints on a VAZ 2107?
Lada 2101 79 Oliva Chiaro Logbook Replacing the front suspension springs, part 2
It depends on the balls, there are some that need to be changed after 100 km Good
They knock change!!!! To the touch Irmina
I still have the factory ones... mileage 42 tkmNikota
how they knock! in appearance, if the anthers are trash and the ball joint doesn’t look like itself! Arkady
The instructions contain a description of where, how much, and what to measure. The book costs only 100 rubles and is sold in any auto store. Northern
By the way, they need an eye and an eye! If he vomits at speed, then... God forbid! Check often for play; if it appears a little, don’t hesitate to change it! They are not that expensive, but changing them yourself is not a problem, the main thing is to get high-quality ones! Vikusik
In general, in books they write that after 15-20 thousand mileage. In practice, the data are very contradictory. I saw that even 5000 didn’t take care of it, but I saw that even after 40,000 you could still drive them, I just did the whole chassis at the same time and changed the balls.
The main thing is to drill a hole in the glass and cut a thread for a grease fitting - almost forever. Alexey
Regularly inspect the condition of the rubber boots on the ball joints. If the boot is torn, the ball joint will not last half its intended life. Sand that gets inside can drill the neck and tear the ball out of it (on a bump or on a turn), like a cork from a bottle. At least once a year in the pit, check the play of the ball joint by sharply rocking the suspension. To assess the relative degree of wear (by eye, without measuring instruments), it is advisable to try in advance how the new support behaves. Lilichka
depending on who drives Georgiy
how to connect a tachometer to a VAZ 2101? If possible, a detailed and detailed answer
people who have links to where the multimedia manual is for operation and repair of the VAZ 2101
Tell me how to change the front crankshaft oil seal. VAZ 2101.
VAZ 2101 Is it possible to pick up some very wide tires for the rear to grab the plow and burn out the dacha? What to think of?
Engine VAZ-21011. When does the timing chain change?
Required tools and materials for DIY replacement
The table below shows the tools and materials that need to be prepared before replacing the ball joint on a VAZ 2107.
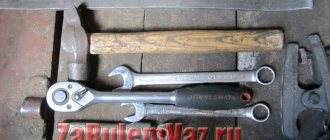
Table - Tools and materials required to replace ball joints
| Name | Note |
| Puller | Special for VAZ 2107 ball joints or universal, for example, fork type. In extreme cases, you can do without a puller by using a hammer |
| Metal brush and rags | For cleaning surfaces and fastenings |
| Penetrating lubricant | For example, WD-40 |
| Key | "at 7", "at 22" |
| Grease | Graphite, ShRB-4, Litol-24 or special for ball joints |
| adjustable wrench | Lasting |
| Hammer | Medium size for easy removal of ball joints |
| Scrap | Can be replaced with a mount |
| Jack | To lift the car |
| Balloon wrench | For removing and installing wheels |
Fork type puller
Replacement process
First you need to purchase the appropriate ball joints. The best ones are Track “Champion”. Price: 2000 rubles per set. The next thing you need when replacing is a ball joint remover. It makes the procedure much easier.
After this, follow the following procedure:
- Lift the wheel and remove it. Secure the machine against accidental falls.
2. Clean the ball nuts and bolts from dirt and apply penetrating lubricant:
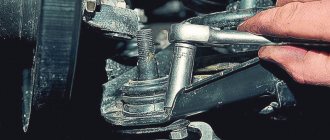
3. Using a 22mm wrench, unscrew the lower ball nut not completely:
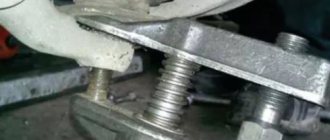
4. Install the “soldier” puller between the two balls:
5. If there is a jack under the lever, it can be removed. Using a puller, create tension between the two balls. If the puller bolt is difficult to unscrew, apply several blows with a hammer to the eye of the lower ball knuckle. The lower ball should “shoot”.
6. Pull out the puller, unscrew the ball nut until the end. If the pin rotates together with the nut, then it must be clamped using a bench clamp. After unscrewing the nut, lift the steering knuckle and release it from the ball:
How to check a ball joint Several ways - useful information
- Drive the car onto an inspection hole or overpass. A flat surface is possible, but access to the bottom of the car is desirable;
- Squeeze the handbrake, turn on neutral speed, jam the rear wheels with special shoes;
- Jack up the left and right front wheels alternately, holding one hand at the top of the tire and the other at the bottom. With some effort, try to shake the wheel up and down. If you hear a slight knock and play, then it is necessary to urgently replace the ball joint. Otherwise, driving onto the highway is extremely dangerous. If there is no play, then you can proceed further.
- Natural wear and tear of vehicle chassis components;
- Exceeding the maximum permissible loads;
- Exposure to the negative effects of water, cold, dust, dirt due to damage to the protective boot on the ball joint;
- The actual absence of lubrication inside the product, which leads to a wedge.
- A characteristic and distinct knocking sound when driving over uneven surfaces and potholes;
- When turning the steering wheel, a grinding noise is heard and the force with which the turn is performed is increased;
- The car doesn't handle the road well. It feels like it's fluttering rather than moving;
- Uneven and rapid wear of car tires.
- Drive the car into the inspection pit of the garage;
- Putting on the handbrake, securing the rear wheels with shoes, you can turn on the first speed for reliability. Jack up the wheel;
- Some take off the wheels, some don't, depending on who you like. In principle they do not interfere;
- Armed with two keys on “17”, we unscrew the fastening of the ball joint to the spar. Just two bolts;
- For convenience, it is better to turn the steering wheel left or right. Using keys “14” we unscrew the support mount directly on the hub itself. Using a hammer and a wooden insert, carefully knock out the support itself from the saddle without damaging the brake hoses;
- Before installing a new one, you should walk a little with WD-40 liquid to remove rust. After wiping the socket with a dry cloth, lubricate it a little with Litol-24M graphite lubricant;
- Install the support and tighten the bolt. We do the same with the fastening;
- Then we move on to the second wheel or test the car on the track.
AutoFlit.ru
Factors influencing the price level
The ball joint is inexpensive. But we must take into account that you will still have to spend money on paying for the services of a specialist to replace worn-out spare parts. Therefore, if you want to save as much as possible, you should go around different places of sale and choose a part that optimally combines quality and price.
Sellers determine the cost level for a given spare part, taking into account the following factors:
- Quality.
- Material of manufacture.
- Originality.
- Manufacturer's fame.
- The fame of the implementer.
- Place of purchase.
- Delivery required.
Replacing old supports with new ones
The installation operation is performed in reverse order. Lubricate the fastening bolts and nuts with lithol. We install the upper and lower ball joint into the seat in the lever. We fasten it with bolts.
Important! The fastening nuts should face up, and the bolt heads should be on the ball pin side. This applies to the top support. If we are talking about the bottom, then vice versa - the nuts are at the bottom and the caps are at the top. If mixed up, the protruding ends of the bolts will damage the protective boots of the ball joints. This will speed up the “demise” of the mechanism.
We put the hub on the pins of the supports, fix them with nuts, having previously lubricated the threads with Litol-24. We tighten them all the way, they should press them into the cones of the steering knuckles. During installation, the nut may turn again with your finger, and it will not be possible to tighten it.
What to do if, when installing new ball joints, the nut turns
We place a brick or a log under the lower arm. We press the upper lever with a key or the handle of a hammer into the chipper, as shown in the screenshot below, and lower the car on the jack until it rests against the handle of the hammer.
We continue to lower it further, looking at the fingers of the ball joints. Since the lever does not have free play, it is fixed under the weight of the car, the ball joints must be completely pressed into the races of the steering knuckles. Now we tighten the nuts, they will not turn.
Video on how to tighten the nuts when installing new supports if they rotate with the fingers:
Front suspension design of the VAZ 2107
The time-tested double wishbone suspension appeared much earlier than the McPherson swing plug. The double wishbone is objectively better than the racks in terms of geometry and controllability, stability and endurance. But it’s not for nothing that we started with the market. MacPherson is much cheaper. It is three times cheaper to produce the most profitable double wishbone suspension. That's why they put it on the front of very inexpensive cars. At the rear, MacPherson can be found in a Mercedes, Cadillac, or BMW - this is the number one suspension for expensive sevens. But it's not that.
Structurally, the double wishbone suspension holds the car much better when turning, has better control and is more stable in terms of directional stability. This happens due to a larger number of attachment points for the moving part of the suspension, if you don’t go into details. And the VAZ 2107 is an excellent example of how a strong and unpretentious design lasted on the assembly line for almost 50 years without any problems. This scheme is still used today and will continue to be used for a long time. Although the weak point in it is the ball joint.
Signs by which you can distinguish ball joints VAZ 2101-07
Let's start with a visual inspection. There may be several differences, they are all indirect, because different manufacturers do not always adhere to the same standard. Let's look at several signs, the totality of which can clearly determine the top and bottom of the ball joint. There are small guarantees that all of the listed differences will be on your copies, but knowing all the possible ones, you can accurately answer the question on today’s topic.
To clearly recognize the differences, you need to remove the protective boot. Now let's visually inspect.
- The lower part of the body near the upper supports is made in the form of a sphere, as if a ball was pressed into it. The lower ones have a flat bottom. This is done so that more lubricant can fit under the liner.
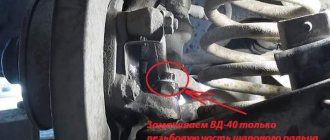
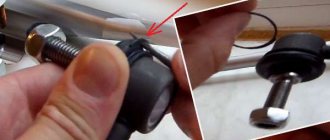
An obvious difference between the lower ball is the presence in the bottom of the body of a hole with a screwed-in plug bolt (look at the photo above).
This is for the oiler to add lubricant and check for wear. Some manufacturers also have space for an oil nipple on the upper hinges. Therefore, this is not a 100% sign of difference
Visually, the lower one looks more massive and has more weight than the upper support. This is an indirect sign. There were almost identical specimens. Having removed the boot, you can find a hundred percent difference - the housing cover, where the finger moves, has a certain shape.
So on the lower support it is oblong, elongated. This is due to the fact that the lower ball pin moves in one direction, given by the shape of the support body. The upper one can “move” in all directions, so the hole for the finger has a round shape.
The force with which the joint can be moved
Since the forces for which the supports are designed are different, when installing, try to move the ball pins. You can move the upper one with your hand, with a certain effort, it will begin to move. In most cases, nothing will work from the bottom. The finger will not move with your hand. For these purposes, you will have to use a lever to break it and move it apart. Because it is the lower hinge that takes on the largest load, so its design is made to “digest” shocks when driving over uneven roads. This is not a 100% sign. Some fingers will be the same. You can move the upper and lower supports freely by hand - this is an indicator of the low quality of manufacturing of the hinges.
In some cases, markings are indicated on the back of the support body: “B” - upper, “H” - lower, or on the ball pin.
Important! Such signs of differences in supports are not suitable for all cars. They are relevant only for VAZ classics
For example, the Niva boasts identical supports installed on the upper and lower suspension arms.
This is due to the design features of the chassis. In the Zhiguli VAZ 2101-07, the lower ball is installed in the lever with the finger up. Therefore, the wheel, moving over uneven roads, tries to “rip out” the pin from the joint body, so it must be reinforced to withstand the impacts of the wheel. It is the classic VAZ models that can most often be found with the wheel turned outward.
On Niva they got rid of such a miscalculation in the suspension. The supports are mounted pin down on the upper and lower arms. Therefore, the cone where the ball pin is pressed does not hit the pin, tearing it out of the cracker, but rather the lever. The lower joint does not experience such stress, so there is no need to install a reinforced ball joint down. On Nivas, the suspensions have identical upper supports in a circle; there is no need to learn to distinguish them.
Now you know what is the difference between the upper and lower ball joints of the VAZ 2106, VAZ 2107 and other domestic classics and what will happen if they are mixed up in the suspension arms. Why these signs of differences are only suitable for Zhigulis of the classic family - we learned from this article; Niva owners should not worry.
Checking the condition of the car suspension
To find out how the suspension is doing, you will need a jack. First, lift the front of the car. Grab the top and bottom of the wheel with both hands and rock it. If the ball joint needs to be replaced, it will make an unpleasant metallic sound.
For another method of checking, you will need an assistant. Adjust the hub nut and ask him to press the brake all the way, holding it for a while. Now swing the wheel. The rattling sound that appears will only confirm your suspicions.