Adjusting the gearshift cables of the Lada Granta
Those.
Most solutions do not remove the vibration itself from the fork, but leave it within the play of the cables. And the vibration occurs only along one cable - the one that presses on the fork, so the lever trembles in the longitudinal direction. Those. vibration source: aluminum 3/4 gear fork. The shaking does not occur at all speeds (from new on cold oil it was from 2500-3000), on hot oil from 3500 during acceleration. Now the trembling is only felt by the hand on the lever, if it is pressed to the boundary point of the 3rd gear, but a little back and everything is quiet (it no longer makes noise).
IMHO, all solutions to dampening noise in the handle mechanism are other than simply “muffling the problem itself.”
Another option is that in 3rd gear the engine bends onto the mount, which adds a cable tension effect
- i.e. There is vibration only during acceleration.
| User menu www-shurik |
| View profile |
| Find more posts by www-shurik |
| User menu @LEKS70 |
| View profile |
| Find more posts by @LEKS70 |
| Marceonary user menu |
| View profile |
| Find more posts by Marceonary |
| User menu syava-gor1 |
| View profile |
| Find more posts by syava-gor1 |
| User menu www-shurik |
| View profile |
| Find more posts by www-shurik |
| User menu @LEKS70 |
| View profile |
| Find more posts by @LEKS70 |
| User menu @LEKS70 |
| View profile |
| Find more posts by @LEKS70 |
Initially, I simply pulled the gearbox lever slightly towards myself during acceleration (much like on an old gearbox - like the VOLGA, when the lever with its weight presses on the fork, it wobbles), with us it presses, but through a cable.
By the 10,000th mileage, the vibration went away on its own (minuscule remained) - i.e. The pressure of the fork to the coupling is minimal there (probably the fork has gotten used to it), with all the clamps in the same position. Due to manufacturing tolerances, some people have a larger clamp and may not wear in for a long time.
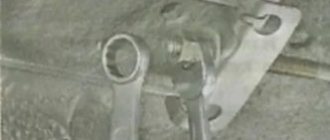
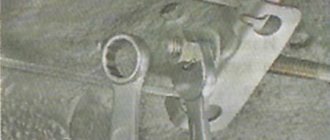
The treatment option was to weaken the clamp spring by placing a 2mm thick washer under it (pos. No. 9) in the picture. But I couldn’t unscrew it with a regular key (24). Second post from top
The latch presses on the plate (I took the picture a page earlier) - of a tricky shape, and this plate turns the rocker shaft, on which the shift cable sits - i.e. Due to this clamp, the mechanism is fixed at the desired point even without the gearbox itself, and in fact this mechanism continues to put pressure on the 3/4 gear fork. The only difference is that when accelerating to 3rd, the engine on the cushions turns out and the cable tightens even more, but in 4th, on the contrary, it loosens.
Added after 8 minutes As an option, someone moves the cables and sometimes helps. You just need to take into account that the position of the cables when the car is turned off is not the same as it will be during acceleration, and taking into account this correction, you can add play (the cable should not be tight when the third one is on) and as a result, weak vibration will not go beyond the rocker/cable connection under the hood - it is really weak and has a small amplitude. But when it hits the lever, its large shoulder, like a pendulum, swings a little more.
Of the many options, I would choose the option with a washer (but the vibration itself began to go away, and I had already bought a washer, I didn’t find the time and a high head for 24, the low one doesn’t fit) And I wanted a short-throw link (after loosening the spring, I think it would be just right was)
Added after 6 minutes And to check whether there will be vibration on the 3rd without unscrewing the motor - just put it on bricks and try to spin the wheels as usual - I didn’t have any vibration at all - i.e. By turning on the third, pulling the cable, we “ate” the backlash and any bend in the motor will create a force on the rocker.
PS: OD has not yet removed it under warranty - but they did change the cables. I personally don’t understand at all how they wanted to remove it by changing the cables if it comes from the wings.
Work order
Step 1. Disconnect the connector with wires from the air flow sensor.
Step 2. Loosen the clamp and disconnect the inlet pipe hose.
Step 3. Disconnect the connector with wires from the canister purge valve.
Step 4. By pulling up, we disconnect the valve itself from the body.
Step 5. Disconnect the clamp securing the wiring harness.
Step 6. Then disconnect the air intake pipe.
Step 7. Remove the air filter housing from the rubber mounting supports.
Step 8. The last thing that holds the body is the clamp that secures the expansion tank hose. We disconnect it in the same way as the clamp securing the wiring harness.
Such clamps, like clips, can break when removed, not always, but it happens. Therefore, it is better if you have a couple of pieces in stock.
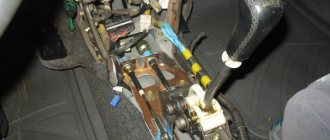
By removing the air filter housing, we open up free access to the clutch cable.
Step 9. Remove the cable from the clutch fork and unscrew the plastic leash.
If we look a little deeper into the engine compartment, we will see that the clutch cable is secured with a bracket to the gearbox.
How are we going to extract it? To do this, we will look into the wheel arch of the left wheel, after first turning the steering wheel to the left all the way. From here we can clearly see the very bracket that holds the cable.
A little to the right there is another bracket that holds the cable.
So, we looked at the cable attachment points, and now let’s start removing it. To remove it from the first bracket you will need an ordinary screwdriver.
Step 10. Hook up the cable with a screwdriver and you're done.
Step 11. The cable does not snap into the second bracket, but simply lies in it, so it is enough to move it to the side.
Step 12. Next, pull out the cable from the bracket. To do this, you can use a screwdriver.
This is what should happen.
Step 13. Once the cable is pulled out, place it on top of the gearbox.
Work inside the car
Now we move from the engine compartment to the interior.
Step 14. Using a size 8 wrench, unscrew the nut that secures the cable to the pedal assembly.
Step 15. Next, you need to move the cable to the left to remove it from the pedal assembly stud.
Step 16. Then unscrew the plastic nut and bend the pile covering.
Step 17 Our next step is to remove the spring from the clutch pedal sensor.
To remove the spring, a hook was used, which was made, at one time, to remove springs from rear brake pads. You can use regular wire with a bent end.
Next we have to remove the cable from the clutch pedal. It is secured with a locking bracket.
However, it is not so easy to get to it. To open access to the bracket, the clutch pedal will have to be lifted up. Before you lift the pedal, look at what it might entail. When you start to lift the pedal up, it will rest without going up all the way.
Don't rush to put in the effort. Otherwise, you risk breaking the clutch bushing guide and pedal position sensor. Look where the pedal rests.
It can be seen that the pedal rests against the clutch bushing, and the bushing, in turn, rests against the sensor. This limits the free movement of the pedal up.
If you suddenly apply a little more force when lifting the clutch pedal up, you will certainly break the following parts.
This illustration shows a cylindrical bushing driver. On the right it is shown intact, and on the left it is broken off, as an example of what happens if you raise the pedal a little higher.
A broken bushing is not so bad. It happens that the clutch sensor, into which the bushing rests, also breaks. So, to avoid unexpected breakdowns, you can use one of the options proposed below for the development of events.
First option
Unscrew the two screws securing the sensor to the pedal assembly and remove it so that the bushing does not rest against anything when we lift the pedal all the way up.
Everything seems simple, but in practice getting to these screws is very problematic. There is catastrophically little space there. No screwdriver can get into it. If you manage to do this, then we can only be happy for you. We will abandon this idea and proceed to the 2nd option.
Second option
To do this, you will need to pull out the clutch pedal shaft, and then remove the pedal along with the cable from the pedal assembly.
Step 18. First, use a screwdriver to slightly bend the locking bracket.
Step 19. You can then insert a piece of wire or wire into the bracket to make something like this.
Step 20. And then – a matter of technique – we pull the wire and tear off the bracket.
Step 21. Then use a screwdriver to lightly press the axle so that it moves slightly to the right.
Step 22. On the other side, use the same screwdriver or another flat object (you can use a pry bar) to hook the pedal axle and pull it out.
Step 23. After the axle is removed, carefully pull out the pedal.
Now nothing prevents us from disconnecting the cable from the pedal.
Step 24. Remove the locking bracket and disconnect the cable.
Step 25. Pull out the clutch cable. Before pulling out the cable, first remove the rubber seal, which is installed in the hole in the partition of the engine compartment.
The cable in the engine compartment may bump into something when you pull it, so don’t be too zealous, but rather take another look and see what’s in the way.
Preparing the clutch cable for installation
Step 26: Check the location of the rubber bushings. Before installing a new cable, place both cables (old and new) so that the front ends are approximately at the same level.
And then pay attention to where the rubber bushings are located on the old cable. On the new cable, the rubber bushings can be located anywhere, just not where they should be. They need to be moved to the same places as on the old cable, because it is in these places that the cable is fixed with brackets.
Step 27. Cable location in the engine compartment. We stretch it almost in a straight line and place it on the checkpoint.
Step 28. Then we insert the threaded end of the cable into the bracket.
Step 29. Fix the cable in 2 brackets. This can be done directly from the engine compartment by inserting the cable first into the bracket on the right, and then into the one at the gearbox.
Step 30. Fix the cable in the bracket. To do this, stretch the cable so that the rubber bushing of the tip fits tightly into the mounting socket of the bracket. To make the rubber bush fit more tightly, you can tighten it with a screwdriver.
At this point, we suspend work in the engine compartment and go back to the interior.
Step 31 : Lubrication. Before putting the cable on the clutch pedal rod, you need to remove any remaining old grease from it and apply new one. The bushing itself will also need to be lubricated.
Similarly, lubricate the clutch pedal axle bushings.
As well as the axis itself, after which you can begin installing the pedal into the pedal assembly.
Step 32. We put the cable on the pedal rod.
Step 33. Snap the locking bracket. If you can’t lock it completely by hand, you can use a wrench.
Step 34: Before inserting the pedal into the pedal assembly, be sure to place the plastic sleeve with the driver on the clutch pedal, like this.
Step 35. Insert the pedal into the pedal assembly. Now will be a DIFFICULT MOMENT, so be careful and follow the recommendations discussed below! First, we insert the left side together with the plastic bushing of the axle into the opening, and on the right we press on the bushing with a screwdriver.
You will have to press harder so that the pedal enters the opening of the pedal assembly. If you just try to insert the pedal at random, then there is a high probability that you will break the plastic bushings of the pedal axle.
When the pedal enters the opening, lift it up to insert the clutch bushing behind the sensor.
Step 36. Now you can insert the clutch pedal shaft. To push the axle in, place the flat end of a screwdriver against the end of the axle, and the other end against the steering shaft driveshaft, and press while moving the pedal from side to side.
At the very end, when there is very little left to push the axle in, place the index finger of your left hand on the left side of the hole and try, by moving the pedal, to align the center of the axle with the center of the hole - this way you will be able to complete the installation faster.
Step 37. Fix the axle with a locking bracket.
Step 38. We insert the rubber seal of the cable into the hole in the partition of the engine compartment, fasten the clutch cable to the pedal assembly and secure the pile carpet.
This completes the work inside the car. We move again to the engine compartment.
Clutch cable adjustment
Step 39. In the engine compartment, all we have to do is screw the plastic leash onto the threaded end of the cable and adjust the length of the cable. Let me remind you that the distance between the clutch fork and the driver should be 27 mm.
Why 27 mm? Because this is the free play of the gear tip in the automatic cable length adjustment mechanism - it is exactly 27 mm.
This power reserve allows you to maintain the optimal cable length for a long time. Thanks to the automatic adjustment mechanism, the clutch pedal is always in one position and does not rise up as the driven disc wears. However, this is where the advantages of this mechanism end. It is because of this that almost every “Grantovod” has clicks in the clutch pedal, which are very annoying. To learn how to successfully deal with clutch pedal clicks, read the article: “Eliminating clutch pedal clicks on Lada Granta FL.”
Clutch wear indicator
I also want to pay attention to the position of the leash - it is twisted almost to the very end.
What does this mean? This indicates that the clutch disc is already quite worn out. And although it doesn't require immediate replacement, it's time to save up for a new clutch kit. The position of the leash is a kind of “wear indicator”. In addition, the more the clutch wears out, the “tighter” the clutch pedal will become. The reasons for a tight pedal are described in detail in the article: “Stiff clutch pedal of the Lada Granta FL: causes and solutions.” That's probably all that I wanted to pay attention to when replacing the clutch cable of a Lada Granta. If you have any questions, write in the comments.
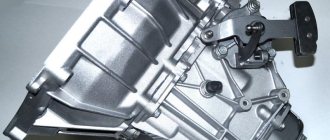
Lada Granta gearbox with cable drive
When AvtoVAZ decided to install modernized transmission units on its progressive Lada Granta and Kalina models, most car enthusiasts looked at these products of the domestic automobile industry in a new way.
The updated transmission, a cable-driven gearbox, has gotten rid of the vibration that previously occurred during driving. At the heart of the design of the switching unit, instead of the previously familiar rods with the scenes, there are now connecting cables. This made it possible to eliminate the negative impact on the vibration stability of the unit.
Operational and design features
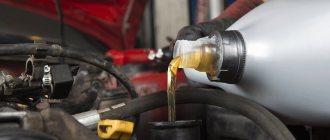
Among the main innovations of such a development as a cable-driven gearbox is a reduction in the volume of oil used in the box. Previously, the manufacturer assumed the use of mineral fluid in a volume of 3 liters, but now the unit requires semi-synthetic fluid with the amount reduced to 2.2 liters.
Many Lada Granta owners are concerned about the question that has arisen: what type of oil should they choose when replacing a progressive gearbox to ensure its normal functionality? The manufacturer continually recommends using fluids with a viscosity parameter of “75W-85” in accordance with the “GL-4” specification.
A distinctive feature of the new cable-driven gearbox from its ancestor (VAZ-2108) is the modernized switching circuit. This confirms the fact that the fifth speed is not located to the left of the first stage, but opposite the 5th gear. This design has managed to acquire serious popularity among Grant owners. It also allows you to eliminate the moment of accidental engagement of reverse gear when moving forward.
Clutch drive adjustment
After installing the cable, it is necessary to adjust the clutch drive. To do this, the cable is pulled forward by the threaded end until it stops (you need to overcome the force of the clutch pedal spring). Next, the cable is held in an extended position.
The adjustment looks like this:
- Using a caliper, measure the distance from the end of the plastic guide to the clutch fork lever (the norm is 27 mm).
- If deviations are noticeable, you need to obtain the desired distance by rotating the leash.
We also recommend reading the article about why the clutch slips. From this article you will learn about the main causes of clutch slipping, as well as how to repair this problem. - When there is no load (the cable is released), it is necessary to ensure that the leash is adjacent to the fork lever without any gap.
- Next, you need to press the clutch pedal 2-3 times for the automatic cable length adjustment mechanism to work. Then you need to measure the full travel of the clutch pedal, which should not exceed 146 mm.
Having completed the adjustment, you can replace the air filter housing. After installation, you can check the quality of the clutch and drive while driving. Please note that if the clutch on the Grant is selected incorrectly or is badly worn, there are problems with the gearbox, etc., replacing the drive cable will not solve the existing problems with the smoothness and clarity of gear shifting.
Lada Granta with automatic transmission
The Russian automobile industry has begun to seriously work on its mistakes, and the new Lada Granta with an automatic transmission serves as a striking example. Looking at the car body, equipment and interior, you can immediately understand that the car was manufactured by a Russian engineer for a Russian driver. The car is fully prepared for domestic roads, and almost every desire and need of the buyer is satisfied. Increased ground clearance, electric windows and a spacious trunk are ideal for the practical driver. Improved design and thoughtful shapes make the car not only practical, but also a beautiful means of transportation.
But still, the main advantage of the Lada Granta is the presence of an automatic transmission. The domestic car began to be equipped with an automatic transmission from the Japanese company Jatco. The four-speed transmission JF414E (AY-K3) from a subsidiary of Nissan is time-tested and has been serving Almera and March for a long time. Resistant to wear and aggressive driving style, the Japanese mechanism is ideal for both inexperienced beginners and experienced drivers. It is worth noting that the box has undergone minimal changes by Russian engineers, so there is no need to worry about the service life and safety of the unit. The box is time-tested, and its characteristics are not inferior to new models.
Adjusting the gearbox cable drive on the Lada Granta
Like every car mechanism, it is important to monitor the gearbox and correct any malfunction in a timely manner. In addition, you can adjust the working mechanism in order to improve the performance of the “sluggish” Lada engine. One of these upgrades is setting up a gearbox with a cable drive built into the Lada Granta. But before you tinker with a transmission element, it’s important to familiarize yourself with the consequences of tuning. It also doesn't hurt to check the warranty card. If the car's warranty has not yet expired, then it is better to hold off on setting it up, or contact a service center.
Consequences of gearbox modernization
Among the positive factors, we can note more accurate operation of the gear shift mechanism. If the setting is done correctly, vibration on the lever and extraneous noise will noticeably decrease. Fine-tuning will improve not only the accuracy of gear operation, but will also increase the reliability of the entire unit. But besides the positive properties of the gearbox modification purchased on a Lada Granta, there are also negative factors that you also need to become familiar with.
Catalog numbers, bearing names
Replacing an automatic transmission with a manual transmission and vice versa: how justified is it?
The question is ambiguous, since each owner must start from his goals. When it comes to aggressive driving style, drifting, etc., you can’t find a better mechanic.
If you are a supporter of a smooth ride, medium speeds, and fuel economy, then an automatic is the best choice. Although, if you have the skills, you can drive it on the automatic type.
The final choice is up to the owner of the technical device.
How to change gears on a grant
Unlike a conventional gearbox, the cable-driven gearbox has received some improvements and upgrades.
VAZ-2181 gearbox with cable drive
In order to understand how everything works, let’s compare a standard gearbox labeled VAZ-2180 and the new VAZ-2181:
- To reduce the vibration generated by the traction drive gearbox, cables from the manufacturer Atsumitec were installed.
- To reduce the effort for shifting 1st and 2nd gears, the manufacturer installed multi-cone synchronizers.
- The clutch size has increased to 215 mm.
- Due to changes in the transmission design, the starter had to be positioned along the engine rather than the gearbox.
- To facilitate gear shifting, it was necessary to reduce the bevel angle of the synchronizer teeth from 125 degrees to 100.
- To eliminate oil leaks, the designers moved the gear selection mechanism to the top. But this nuance gave impetus to the development of a new switching scheme and design changes.
- The volume of lubricant poured has decreased from 3.3 liters to 2.2 liters.
- A selector plate is installed, which allows you to change gears more clearly.
- The transition from mineral oil to semi-synthetic oil has been completed.
- To prevent accidental reverse gear, a special lock was developed.
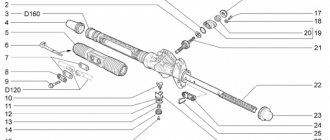
The main elements and components that go into the design of the new gearbox can be seen in the figures below:
Gearbox diagram and decoding of its main elements
- main drive drive gear;
- secondary shaft;
- input shaft;
- fifth gear shift fork;
- third and fourth gear shift fork;
- reverse light switch;
- clutch housing;
- gear shift mechanism;
- central lock.
VAZ-2181 box synchronizer device
1 – first gear gear; 2 – intermediate rings; 3 – blocking ring; 4 – synchronizer clutch; 5 – synchronizer clutch hub; 6 – clamp; 7 – second gear gear.
Gear selection mechanism
1 – gear selector levers; 2 – selector grid pin; 3 – selector grid; 4 – reverse locking mechanism; 5 – central three-dimensional plate.
Full view of a cable-driven gearbox
Thus, the manufacturer decided to improve and modernize the gearbox, which was unreliable and had a lot of problems. Due to the new improved system, vibration in the body and gear knob has been reduced. The gears switched on, started more clearly, and the huge backlashes disappeared.
Reviews
| № | Positive |
| 1. | Vladimir: after two years of active operation, there are no complaints about the operation of the manual transmission. I carry out technical inspections in a timely manner, fill in semi-synthetic oil, medium speed limits, non-aggressive driving style. |
| 2. | Sergey: after driving a car for a year and a half, I will say the following: there were no major breakdowns, nor any unscheduled repairs. However, twice I independently tightened the drive cable on the lever. |
| 3. | Kirill: I took a Granta with an automatic rifle from the showroom, the car is playful, good acceleration dynamics, average fuel consumption. The build quality is satisfactory, spare parts are always available in the market and stores. |
| 4. | Dmitry: I recently underwent scheduled maintenance, the master assured me that the transmission was in good working order. Replaced consumables, filter, oil. I have been actively using the car for two years now. The manufacturer indicates a resource of 180 - 200 thousand km before major repairs. Let's see how much mine comes out. |
| 5. | Vasily: at 65,000 km I replaced the rubber boot once, since the previous one was defective. There were no other breakdowns, consumables were replaced as usual. |
| 6. | Ivan: my positive review of the Lada Granta car. This is my second year of driving actively, and in a month I hit two months’ worth. I'm pleased with the build quality of the transmission, no complaints. |
| 7. | Vitaly: the manufacturer recommends changing the transmission oil every 60,000 km, in practice my interval is 50,000 km. I believe that the fresher the oil, the more useful substances are retained in it to protect and lubricate the gearbox gears. |
| Negative | |
| 1. | Ivan: I do not agree with the manufacturer’s statements about the service life of 180,000 km. Already at 80,000 km the cable drive was replaced. In the process, other minor breakdowns were eliminated. The model is crude, there are many shortcomings and defects that are not eliminated from year to year. |
| 2. | Vasily: after 75,000 km, my automatic transmission began to change gears with a certain delay (pause). After visiting a service station, the technician diagnosed a defect in the control unit and solenoid. |
| 3. | Gennady: in general, the transmission is good, but there are a number of shortcomings and defects that need to be eliminated. In order not to be fooled in the future, I plan to buy a Renault Logan. The model is proven, the weaknesses are known, there are not so many of them. |
Conclusion The design of a standard transmission is quite complex, regardless of whether it is manual or automatic. In case of repairs and preventive maintenance, prepare thoroughly and study the methodological recommendations.
When it comes to major transmission repairs, use the services of service station professionals. At a special diagnostic stand, technicians conduct tests and calibrate the operation of the box. Upon completion, they provide a quality guarantee for the block of work performed.