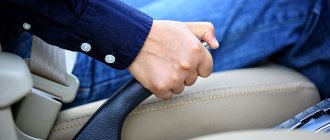
The parking brake, better known as the handbrake or handbrake, is an important mechanism in a car. The hand brake allows you to block the wheels of the car “bypassing” the main braking system, that is, without pressing the brake pedal.
This solution allows you to:
- start uphill without rolling back using a manual transmission or manual transmission;
- secure the car on a flat or inclined surface;
- block the wheels and cause the car to skid when performing any maneuvers or techniques (for example, during extreme driving, emergency braking on slippery surfaces, etc.).
In this case, during operation, the driver may encounter the fact that he does not hold the handbrake. In this case, it is necessary to restore the functionality of the mechanism. To do this, adjust the parking brake on Kalina. Read more in our article.
Possible causes of handbrake problems
There are several reasons for the handbrake not working correctly on the Lada Kalina. Below are the main ones:
- Driving with the parking brake lever applied. One trip is enough. Brake pads wear out faster in this mode. After “driving with the handbrake” you will have to tighten and adjust the parking brake.
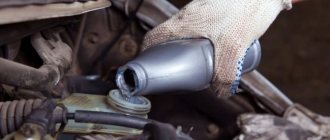
- Biting the cables. In a car they run along the underbody. Handbrake cables are used in extreme conditions. They are affected by dirt, moisture, temperature changes.
- Malfunction of the ratchet mechanism or jamming of the parking brake lever.
How to check the condition of the unit, and what are the causes of breakdowns?
If you feel that the parking brake system on your Lada Kalina is insufficiently effective, then the first action will be to check the degree of tension of the cable; the handbrake cable should be well tensioned. To do this, pull the lever towards you and count the clicks made by the ratchet mechanism. On a correctly adjusted unit there should be from 2 to 4 such clicks. If these limits are not met, then you will need to know how to tighten the handbrake when the number of clicks is exceeded or loosen when there are less than the designated minimum. Quite often, the need for loosening appears after replacing the pads or cable drive.
There are also frequent cases when the parking drive is not able to cope with its functions, which may be due to excessive wear of the pads or the unsuitability of the cable for further use, and in this case the parking brake cable must be replaced.
Handbrake diagnostics
To diagnose the parking brake yourself, use the inspection hole. On automobile forums, it is advised to develop the cable when it is dirty and snagged, but this measure is ineffective. Don't skimp or change, your safety is more important.
When the lever is tightened, clicks are heard. With the handbrake adjusted, there should be from two to four. In this position, the wheels should not spin. If there are fewer or more clicks, proceed to adjusting the handbrake or replacing the rod and drives.
The parking brake cable may become stuck, broken, or stretched. If the handbrake lever does not rise (does not tighten) and the car does not lock on the road, then most likely the cable is jammed. If the handbrake lever is pulled up to the end, but the car does not lock, then most likely the cable has broken or stretched.
To make replacing the handbrake cable easy and safe, we drive the car into a pit or use a lift. Raise the rear end using a jack. We remove the wheel.
Next we need to release the cable from the adjusting mechanism. It is located under the car, near the handbrake lever. To get there, unscrew the 4 nuts of the central muffler protection from the body using a No. 10 wrench. Be careful - they may rust and break off. It is advisable to treat them with WD 40.
We remove the rubber bands that secure the muffler and move the protection forward so that it does not interfere. On top of the muffler is the parking brake adjustment mechanism.
Using a long head No. 13 with a cardan, unscrew the adjusting nut and remove it from the rod.
Remove the cable equalizer from the cable adjusting rod and remove the front end of the cable from the hole in the body bracket. Then we remove the cable from the fastenings to the beam and body.
Next, remove the rear brake drum. To do this, use a long socket or wrench No. 7 to unscrew the two drum guides to the hub. With a few blows of the hammer we knock the drum off the hub and remove it.
At this stage of work, we have the opportunity to see the condition of the brake pads. There should be no peeling. If the minimum thickness is 2 mm or less, then they should be replaced. If the wear of the brake drum on the plane adjacent to the pads is more than 1 mm, then the drum should be replaced. The brake cylinder must be dry and free of brake fluid leaks and dust caps.
Next, remove the cable from the brake shoe flag, and the cable casing from the brake drum boot.
We install a new cable. To do this, simply perform all the steps in reverse order:• put the end of the new cable into the brake block flag;• thread the cable into the fastenings on the body and beam;• insert the front tip of the cable into the hole in the body bracket;• insert the ends of the cables into the equalizer, put them on the rod and tighten the adjusting nut.
Thanks for subscribing!
After the cable is installed, put on the brake drum. Tighten the guide nuts. We rotate the drum to make sure that the pads do not jam. The drum is easy to spin. We tighten the adjusting nut on the rod until the block begins to come into contact with the brake drum, this will be visible when you turn it - the drum will turn tightly.
Now you need to adjust the handbrake. We check how many clicks the parking brake lever is tightened. It is advisable to make 3-4 clicks from start to finish, while the car should be in a disengaged state.
If everything is adjusted, we put the protection in place. We screw it on. We put on the muffler rubber bands. We install the wheel. We compress the wheel mounting bolts.
Why does the wheel jam?
A situation where the rear wheel jams on a Lada Grant can occur suddenly while driving and lead to an emergency on the road. Let's look at a few of the main reasons why a wheel (both rear and front) can get stuck, and find out how to fix this problem.
The piston of the working brake cylinder has soured
The rear wheel brake mechanism on the Lada Grant is a drum type with a two-piston wheel cylinder. When you press the brake pedal, the pistons move out of the cylinder and press the brake pads against the walls of the drum. Under the influence of moisture, street dirt, and friction dust, the wheel cylinder pistons can rust and sour. If the piston does not return to the cylinder, the brake pads remain pressed against the drum, the wheel jams and stops spinning.
Broken rear brake cylinder
The front brakes on the Grant are disc with a single-piston floating caliper, consisting of a caliper and a cylinder. If there are problems with the rotation of the front wheel, then the cause may also be a soured piston.
The pads are skewed
Another common reason for the rear wheel to jam on a Lada Grant is severe wear of the brake pad friction lining. If a worn pad is not replaced in time, the lining may physically collapse, its fragments scattering inside the drum and jamming the wheel. Also, misalignment of the brake pads can be caused by jamming of the pistons of the working cylinder.
Wheel bearing jammed
Bearings are used in the design of the chassis of any car. The wheel is attached to a hub, inside of which there is a wheel bearing, which ensures easy rotation of the wheel. Due to heavy loads, the bearing may collapse and jam, causing the wheel to stop rotating.
conclusions
Heavily worn parking brake cable
The cable on the Lada Kalina must be tightened every 40,000 km in accordance with the service data. But, as practice shows, this can be done earlier. For example, one or two trips with the handbrake and the cable will have to be tightened, and in the worst case, replaced.
The cable on the Lada Kalina must be tightened every 40,000 km in accordance with the service data. But, as practice shows, this can be done earlier. For example, one or two trips with the handbrake and the cable will have to be tightened, and in the worst case, replaced.
Procedure for replacing brake cables
For convenience, drive the car onto a viewing hole or overpass. Carry out the replacement with a partner: it is difficult to secure a new drive alone
. Before installing new cables, they are generously lubricated; this procedure will extend the service life and prevent the cable from biting. It’s better to change two at once, even if one is still intact.
- Perform steps 1 to 5 for adjusting the handbrake (see above).
- Unscrew the equalizer and release the left and right cables.
- Suspend the rear left or right wheel. Remove the wheel.
- Remove the brake drum. It is secured with two guides.
- Bend the clamps on the beam and the bottom of the body and release the cable.
- Disconnect the cable from the brake mechanism.
- Install a new cable.
- Install the brake drum and screw the wheel.
- Repeat pp. 3–8 for the second rear wheel.
After replacing the left and right parking brake actuators, make adjustments. How to do this is described in detail above. When replacing the rear brake pads, also make adjustments.
We recommend checking the handbrake regularly. In case of malfunction, do not be lazy to eliminate the defects. There is no need to put off repairing the parking brake - this is for your safety, including in financial terms. You don't want to be late for work one morning and find your pet stuck in a concrete parking lot, right?
In this article I will try to talk about such a procedure as replacing the parking brake cables on a Lada Kalina car. To begin with, it is worth noting that to perform this procedure we will need a lot of tools, namely:
- head for 7 mm and 10 mm
- ratchet or wrench
- extension
- deep head 13 mm
- pliers or long-nose pliers
- flat blade screwdriver
- penetrating lubricant
The first thing you need to do is drive the car into the pit, or raise the rear end to such a level that you can do everything from below without any problems. So, first we move the resonator to the side or disconnect it. In my case, it had already been filmed, so everything was quite free.
And we remove the screen from the studs without any problems.
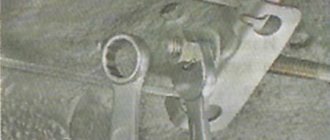
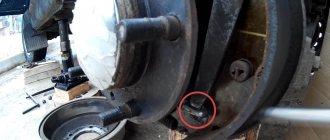
After this, the entire handbrake adjustment mechanism is accessible. Now, using a deep socket, you can unscrew the two nuts of the central rod, as shown in the photo below.
And remove the cables from the bracket on the body. Over time, the cables may become sour in that seating area, so it is advisable to first apply a penetrating lubricant to the seating area. And when a certain force is applied, the cable is still removed from its place.
After this, we carry out further actions on the other side. First, we disengage the cable from the place where it is attached to the body.
Now you can disconnect the cable from the lever by moving it slightly to the side with a screwdriver.
And finally we pull out the cable if it is still jammed somewhere. On the other hand, everything is done in the same way. The price of a set of handbrake cables for Kalina is from 400 rubles for two pieces. Installation is carried out in reverse order.
In the Lada Kalina, as in other cars, there are many parts that over time either lose their properties or fail. Filters get dirty, brake pads wear out, and the response time of the devices increases. Setting them up does not always require the intervention of a service station; the owner can solve some problems himself, for example, adjusting the handbrake. Often it requires adjustment: they want to tighten or loosen the handbrake.
- 1 Where is it located?
- 2 How to check the handbrake on Lada Kalina
- 3 What if I replace it?
- 4 Tool for adjusting the handbrake
- 5 How to tighten up
- 6 If you need to loosen the brake
- 7 How to tighten or loosen on a station wagon and hatchback
- 8 If it doesn't help
For convenience, drive the car onto a viewing hole or overpass. Carry out the replacement with a partner: it is difficult to secure a new drive alone. Before installing new cables, they are generously lubricated; this procedure will extend the service life and prevent the cable from biting. It’s better to change two at once, even if one is still intact.
We recommend checking the handbrake regularly. In case of malfunction, do not be lazy to eliminate the defects. There is no need to put off repairing the parking brake - this is for your safety, including in financial terms. You don't want to be late for work one morning and find your pet stuck in a concrete parking lot, right?
Reporting a malfunction
The battery icon lights up if the voltage in the on-board network drops; often this problem is associated with a lack of battery charge from the generator, so it can also be called the “alternator icon”. On vehicles with a hybrid engine, this indicator is supplemented by the inscription “MAIN” at the bottom.
The oil icon, also known as a red oil can, indicates a drop in the oil level in the car engine. This icon lights up when you start the engine, and does not go out after a few seconds or may light up while driving. This fact indicates problems in the lubrication system or a drop in oil level or pressure. The oil icon on the panel may have a droplet or waves at the bottom; on some cars the indicator is supplemented with the inscription min, senso, oil level (yellow inscriptions) or simply the letters L and H (characterizing low and high oil levels).
The airbag icon can light up in several ways: either the red inscription SRS and AIRBAG, or “a red man wearing a seat belt,” with a circle in front of him. When one of these airbag icons lights up on the panel, the on-board computer notifies you of a malfunction in the passive safety system, and in the event of an accident, the airbags will not deploy. Read the article on the website for the reasons why the airbag sign lights up and how to fix the problem.
The exclamation mark icon may look different and its meaning will accordingly be different. So, for example, when the red (!) light is on in the circle, this indicates a malfunction of the brake system and it is advisable not to continue driving until the cause of its occurrence is determined. They can be very different: the handbrake is up, the brake pads are worn out, or the brake fluid level has dropped. A low level is precisely what poses a danger, because the reason may not only be in heavily worn pads, as a result of which, when you press the pedal, the fluid disperses throughout the system, and the float gives a signal about a low level, the brake hose may be damaged somewhere, and this is much more serious. Although, very often the exclamation mark lights up if the float (level sensor) is faulty or shorted, and then it simply lies. On some cars, the exclamation mark is accompanied by the words “BRAKE”, but this does not change the essence of the problem.
An exclamation mark can also light up in the form of an “attention” sign, both on a red and yellow background. When the yellow “attention” sign lights up, it informs about a malfunction in the electronic stabilization system, and if it is on a red background, it simply warns the driver about something, and, as a rule, explanatory text is displayed on the dashboard display or combined with other informative text designation
Replacing the handbrake cable on a VAZ 2110, VAZ 2111, VAZ 2112
Lada Kalina wagon Luta Logbook Replacing the ignition switch. Fiddling with keys
Welcome! The handbrake cable - over time it stretches and becomes unusable, and sometimes it even happens that it breaks (In fact, everything depends on its quality, some cables sometimes don’t even stretch at all), all these problems associated with the cable cause a lot of inconvenience , it all starts with the fact that the car simply cannot be put on the handbrake, or it will hold the car, but very, very weakly, so to avoid such inconveniences, the cable must be replaced from time to time with a new one, this is not difficult to do and you can do it yourself You don’t even need to go to services.
Note! To carry out work on replacing the cable, we recommend that it be convenient to work: Firstly, drive the car into the inspection hole and secondly, stock up on a wrench and sockets for it, if you do not have such an opportunity, then stock up on ordinary keys, such as sockets and wrenches !
- Replacing the handbrake cable
- Additional video clip
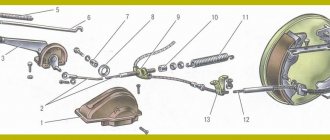
Where is the handbrake cable located? It passes under the bottom of the car, in order to understand its location in more detail, first you will need to look at the handbrake (Indicated by a red arrow in the large photo), next to it there is a bracket, it is also indicated by a blue arrow, and so under the bottom the cable is located in exactly the same place , in general there are only three cables and the last two must be replaced as an assembly (in a pair), the first cable is the one that comes from the handbrake (Small cable, see small photo), the second two are those that are connected to the bracket, the bracket is also shown in the small photo and indicated by a blue arrow.
When do you need to change the handbrake cable? It can rust from old age, or if you don’t use it, exactly the same situation will happen, in connection with this, it will begin to move into the shell with great difficulty, will jam and may even not really hold the car, except for this problem, the cable needs to be changed when it gets loose (You can understand this by looking at it) or it has become very stretched (If the cable cannot be adjusted even by adjustment, then it has become very stretched; how to adjust the cable, read in the same article below).
Note! Immediately before starting work, remove both rear brake drums from the car, because the ends of the cable are attached to the brake pads, and without removing the drum you will not get to the pads (For information on how to remove it, read the article: “Replacing brake pads at ten")!
The counter nut is loosened and the adjusting nut rotates in the desired direction, thereby the bracket begins to move and the cable is adjusted, finally the counter nut locks the adjusting nut again and thus the cable is adjusted) and then you can unscrew both of them, when the nuts are in your hands, remove the bracket back and the main cable (it is also called a rod) will come out of the bracket (see small photo).
Note! After the operation has been completed, remove both ends of the cable from the bracket, one is shown with an arrow for clarity, and as soon as they are removed, put the bracket aside so that it does not interfere with further work on replacing the cable!
2) Now, using two screwdrivers or you can just stock up on one, remove the ends of the cable from the hooks of the levers, for more details in the photo below, see all the information, in a nutshell, the ends (One of the ends is indicated by a blue arrow) are connected to the hooks and these are needed and remove (one end for each wheel) to release the cable ends in some other places.
3) Well, finally, remove the shells of both cables from the second bracket, and also unscrew two nuts (One for each bracket), remove the additional brackets from the levers (see small photo below) and then completely remove both cables from car, but just keep in mind that they go criss-cross, so when reinstalling, don’t forget this and be sure to take it into account.
Installation: Installation of both cables is carried out in the reverse order; be sure to connect all removed brackets in their places so that the cables do not dangle or touch anything unnecessary.
Additional video: You can see the process of replacing the cable in more detail in the video located just below; in addition, it also explains the procedure for replacing the handle itself, you may need this too.
The importance of serviceability
Most drivers rarely use the parking brake, relying on the reliability of installing the car “on the transmission” - by engaging a lower forward or reverse gear. This solves the problem to some extent, but not always.
When should you not do this?
- When parking or emergency stopping the car on a rise or slope. In this case, the car is held in combination: both at speed (gear) and on the handbrake.
- When making a not very successful turn on a narrow road, especially when the car has already moved a little into the ditch (backwards or forwards). This is especially true for inexperienced drivers.
- When parking at a traffic light waiting for the green light - so as not to hold the car on the brakes.
- When forced to start on a hill, etc.
You may also be interested in our specialist's article, which describes the crankshaft position sensor in detail.
Without a handbrake, you cannot make a so-called “police turn” - this is sometimes necessary, and not only for the police, since very different situations can arise on the roads.
Even the most experienced driver needs it, not to mention beginners.
Let's sum it up
The assembly process, after the cable has been replaced, does not present any particular difficulties, so there is no point in commenting on it. The sequence of actions itself is the reverse of the dismantling procedure. Before installing the ends of the cable branches into the mounting holes on the brake shields of the Lada Kalina, do not forget to clean these openings from any dirt accumulations.
On the Lada Kalina, during operation of the handbrake, it may become stretched and will require adjustment. So, signs that the handbrake needs to be tightened are poor fixation of the car, with the handbrake raised, on an inclined surface. This bell signals that the cable needs to be tightened.
Replacing the clutch cable on Kalina and Priora. It's time to learn this
Lada Priora hatchback Star Maggie Logbook Replacing the cabin filter of Priora without air conditioning
- Wrenches (8, 17);
- Calipers;
- Ruler;
- Slotted screwdriver.
- At the bottom of the dashboard, using 8mm wrenches, unscrew the nut securing the cable stop to the pedal. After this, the stop is removed from the bracket;
- The locking bracket is removed from the pedal pin (clutch). The mechanism that compensates for wear of the friction disc linings must be dismantled;
- Remove the bushing from the pin. It is usually subject to wear and tear. Therefore, if upon inspection there are traces of damage and wear on the plastic, a new one should be installed. Before installation, be sure to generously lubricate the bushing with lithol or any other similar lubricant;
- The seal should be pulled out from the compartment under the motor through the shield hole; it is more convenient to do this using a screwdriver;
- Pull the cable tip (direction according to the movement), then disengage it from the clutch release fork;
- Using 17mm wrenches, unscrew the tip mount from the bracket located on the gearbox. Be sure to keep the second nut from turning;
- The tip is pulled out. Next, the cable is removed through the shield hole.
A new cable is passed through the shield hole. Immediately attach a wear-compensating device to the pedal; The cable stop is attached to the pedal mount; A seal is installed in the shield; The tip of the cable casing is installed (as carefully as possible) into the mount (located on the gearbox). Be sure to immediately tighten the nut securing it; A leash is screwed onto the tip located below
Make sure that the tip protrudes relative to the leash by 1 millimeter. Before installation, generously lubricate the tip with grease; The drive cable is installed in its original location
To do this, be sure to move the lower tip as the machine moves. Hold it in this position and use a caliper to measure the distance from the leader to the fork. In fact, this should not exceed 27 mm. If this indicator is different, then you should turn the tip in the required direction;
We insert the tip of the cable into engagement with the groove of the fork that disengages the clutch. Then it is released; the action of the spring should cause it to fall into place. There should be no gap between the fork and the tip; Press the clutch several times until it stops. Finally, the settings are also checked. If necessary, adjust again.
How to understand that the handbrake needs adjustment
Lada Priora hatchback Logbook Steering rack repair
Component diagnostics should be performed approximately once a month. If you use your car actively, check the handbrake every 30,000 km. The process of studying the condition is not difficult, so it can be carried out more often, at the slightest sign of a malfunction.
Self-diagnosis is performed in two ways.
- Raise the car up a steep slope and tighten the lever as tight as possible. Did the car remain motionless? The handbrake is fine. If it doesn't stop, apply the brake fully. Is the car still moving? The brake needs urgent repair or adjustment.
- Pull the handbrake all the way and engage first gear. Smoothly lower the clutch pedal. If everything is fine with this part of the car, the engine will stall. If there is a malfunction, the car will move slowly.
This is what the parking brake cable looks like. It is this that often needs adjustment or replacement.
Handbrake adjustment
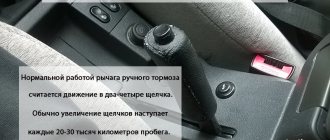
Adjusting the handbrake on Kalina involves either tensioning or loosening the cable. In most cases, it is necessary to tighten the brakes, since over time the rear pads wear out more and more, and thus the number of clicks when applying the parking brake increases. As written in many repair and operation manuals, the normal lever travel is from 2 to 4 clicks until the wheels are completely locked.
At the moment, my Kalina has covered more than 40,000 km and the rear wheels lock only at 6 or even 7 clicks, which indicates decent wear on the pads and the need to adjust the handbrake. Below is a list of the necessary tools that will be needed to complete this work:
- Ratchet with 10mm head
- Short extension
- Two open-end wrenches for 13
- WD-40 lubricant is highly recommended
If it doesn't help
The hand brake on a car is a lever to the right of the driver, which additionally secures the car during long-term parking. Over time, it weakens, and for a strong fixation it is necessary to tighten it more. At the same time, even a novice car enthusiast can adjust it independently.
- The stove on Kalina does not heat well: reasons
- Replacing the fuel filter on Kalina with your own hands
- Lada Kalina replacement of front brake pads
- Replacing the tension roller of the viburnum generator belt
Where is
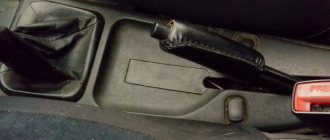
The handbrake consists of a pair of cables and an adjustment block, which is located at the level of the rear seat under the bottom of the car. It is better to use a pit for adjustment, but you can use an overpass.
Often, it is precisely because of the design features of the Lada Kalina that the handbrake weakens and it becomes necessary to tighten the cable
Main works
Any work related to the repair and maintenance of a car, as a rule, requires the use of a certain set of tools, and tensioning the handbrake on Kalina is no exception to the general rules. Tools:
- keys No. 10 and No. 13;
- head with extension No. 13;
- ratchet.
Of course, you can get by with the minimum, for example, two open-end wrenches, but such a tool will not be very convenient to work with, and it will not speed things up.
Of course, you can simply jack up the car and place it on trestles or blocks. This, however, is not entirely safe, and working this way is not very convenient. The best solutions are:
- Inspection ditch.
- Lift.
- Overpass.
In order to tighten the handbrake on Kalina, you need to drive the car onto an overpass or inspection ditch (the car owner hardly has a lift). Further sequence of actions:
- Engage first gear and fully release the parking brake.
- While under the car, you first need to use a 10mm wrench to unscrew all four bolts that secure the protective cover of the device.
- To make it more convenient to work, you need to remove the rubber suspension from the muffler mounting hook - a “carrot” in driver’s slang.
- The protective cover must be moved forward, providing access to the adjustment unit, which serves to tighten the handbrake on Kalina. At service stations, mechanics use a special long wrench with a swivel joint so as not to remove the muffler from the suspension and speed up the whole process.
- Then you need to fix the adjusting nut with an open-end wrench No. 13. Next, use a 13mm head to unscrew the locknut, which ensures reliable fixation of the adjustment. By turning the adjusting nut in the direction of tightening, tighten the cable. From time to time you need to check the number of clicks of the tensioner ratchet. Having brought the number of such to four or five, it is worth checking the handbrake in action.
- Having jacked up the rear wheels, you need to turn each one in turn. In this case, the brake drums should rotate freely, slightly touching the brake drum - this will be audible - and when tightening the cable, it is not possible to completely rotate the wheels by hand. Or you can try, by lowering the rear wheels and removing the jack, to move the car with a taut cable - all these methods have already been described above.
If everything is in order, then you need to tighten the locknut with the head, while holding the adjusting nut so that the adjustment does not go astray.
After this, the casing is put in place.
When tightening the nuts securing the casing, this should be done without excessive fanaticism, so as not to tear off the studs that are attached to the bottom of the body. They are spot welded and may not withstand too much force.
Before tightening the nuts, you should not forget that you need to place one locking washer under each of them - this will prevent self-unscrewing.
It happens that, despite the correct actions, it is not possible to adjust the parking brake. Possible reasons in this case are the following:
- wear of the brake pads of the rear wheels;
- wear of the brake drums of the rear wheels;
- extreme wear of the cable or its jamming.
In order to understand the reason, you need to jack up the rear wheels again, putting the car in first gear.
After removing the drums, make sure that the brake pads and drums are in good condition or not. The thickness of the linings should be at least four millimeters, and the wear of the drums should not be excessive.
If everything is fine here, then the handbrake cable will need to be replaced.
Adjust or change?
To determine whether the parking brake can be adjusted or whether it is better to install a new one, remember how long ago you replaced the brake pads and drums on the rear. On average, replacing rear pads is necessary every 50–80 thousand km, but the frequency also depends on driving style. If the pads are worn too much, the parking brake will not be effective (as will the braking system of the car as a whole) . Inspect the pads: if their thickness is less than 1.5 mm, urgent replacement is needed. Also, try opening the pads manually with a screwdriver. They should be separated without excessive force.
We recommend: Fuel filters for VAZ 2110–2112: do-it-yourself replacement
If the thickness is within acceptable limits, pay attention to the brake drum. Measure its diameter with a caliper. If the value is above 20 cm, the drum must be replaced with a new one.
If you notice scuffs, cracks, or severe corrosion on the pads or drum, replace the damaged parts. It is not recommended for an inexperienced motorist to try to restore components.
If all the inspected components of the car are in order, but the parking brake still does not work, the problem lies in the cable. If it breaks, the handbrake will lift without any effort - in this case, the part definitely requires replacement. You can tighten the cable with your own hands, but if it is already raised to the maximum and tightening is impossible, you should go for a replacement.
There is another sign that it’s time to adjust the parking brake: when you tighten the handbrake, you hear less than two or more than four clicks of the lock. During operation, the number of clicks can be increased to six.
Setting up the handbrake on Kalina hatchbacks and station wagons
After making sure that all components of the brake system are normal, you can begin adjusting. Goal: to ensure that the rear wheels are completely locked with 2–4 clicks of the lever lock.
- If the blocking occurs faster, you need to lengthen the cable a little and check again.
- If you have to expect five or more clicks, you should shorten it, selecting the desired length experimentally.
This work can be done independently, without an assistant, but you will need an overpass or inspection hole. You will also need:
- two 13mm wrenches (open-end and socket);
- wrench with extension and heads for 10 and 13;
- liquid key type product (WD-40).