01/25/2022 63 750 Power steering
Author: Victor
Electric power steering is a component used to provide more comfortable driving. Not so long ago, domestically produced cars began to be equipped with EUR, in particular, in this article we will talk about Lada Kalinas. What malfunctions can occur with the Kalina EUR and what troubleshooting methods are there? Find answers to these and other questions below.
[Hide]
Causes of EUR failure
Why does the electric power steering on the Lada Kalina not work, turns off and refuses to work, for what reasons does the steering wheel with power steering knock, jam, bite or squeak? To repair the system yourself, you need to know how diagnostics are carried out and what causes precede the breakdown. Most often, amplifier failure occurs due to a breakdown of the unit itself and failure of the amplifier. Faults in this plan are resolved by thoroughly checking the system to identify the exact fault.
As practice shows, often the failure of the electric amplifier (failure) is associated with the failure of the speed controller.
- steering wheel wedges,
- flu
- gets tight
- other
Thus, the cruise control sensor ensures that the power steering is turned on and off in different driving modes. The amplifier on Kalina works if the car is moving at low speed. When the speed begins to increase, the booster automatically turns off, allowing you to drive the car more safely when driving at high speeds.
So, briefly about the reasons for the inoperability of the EUR:
- The cruise control is out of order, or the control unit does not receive, or the signal from it disappears. In this case, the reason could be either a breakdown of the sensor, damaged wiring or poor contact of the controller with the on-board network.
- The voltage in the vehicle's on-board network has decreased. The reasons can be different, ranging from a dead battery and a non-working generator to the use of inadequate electrical equipment in the car.
- The permissible number of crankshaft revolutions has been exceeded.
- Incorrect operation or failure of the control module. Depending on the cause, the control unit may need to be repaired; more detailed diagnostics are required.
Reasons for shutdown
The main reason lies in the electric power steering. When ignited, the system performs a self-diagnosis and if the mechanism does not pass it, a signal is turned on indicating a malfunction. The color of the signal indicates the degree of danger. The light turns red, the problem needs to be fixed urgently. If the color is yellow, the vehicle can be operated, but safety precautions should be taken. There may be several reasons why the electric power steering on Kalina does not work:
- speed sensor malfunction;
- torque sensor malfunction;
- speed exceeds 60 km/h;
- engine speed is less than 400 per minute;
- failure in the control unit;
- poorly soldered contacts;
- insufficient tension.
Software shutdown
- The electric power steering on Kalina turns off after 60 km/h. Therefore, keep this point in mind; it is set in the system unit and is not a breakdown. The Priora's electric power steering is switched off at a speed of 110 km/h.
- Also, the EUR does not work at low engine speeds. If the value is less than 400 rpm, it is not active.
This is software planned inactivity. It is needed to give information to the steering wheel at high speed and reduce wear of the mechanism.
Electrical booster malfunctions
In the event that it is impossible to immediately check the cause of failure of the electric power steering on Kalina, you need to remove the fuse from the block. This is necessary to prevent sudden activation of the mechanism, which leads to emergency situations.
A direct indicator of a malfunction of the speed sensor in Kalina's electric power steering is a non-working speedometer, as well as a lit-up exclamation mark on the dashboard. It may not work for several reasons. Check the appearance of the sensor; if it is covered with dirt, simply clean it. See if any metal shavings have become magnetized and remove those as well.
If this does not help, then the sensor is probably faulty. Such sensors are now inexpensive and can be found in many auto parts stores. We do the same for the torque sensor. But where is the speed sensor? It is usually located in the gearbox housing, see photo on the left.
Another cause of malfunction of Kalina’s electric power steering is the generator. The control unit requires a voltage of 13.6 V to operate; if you have less, change the voltage regulator (chocolate) on it.
Diagnostics
To check the amplifier in a car, you need to disassemble the plastic trim on the steering column; to do this, unscrew the bolts securing it from below.
This means you will need to get to the 8-pin plug, its pinout is as follows:
- the blue contact is connected to the ignition switch, this is a 12 volt power supply;
- red-brown contact - tachometer connection cable;
- the gray contact goes to the automatic speed controller;
- white-pink wire - amplifier control indicator;
- black-yellow contact - diagnostic line;
- the next contact is empty, the wire is not connected to it;
- brown contact is grounded;
- empty.
More accurate results will be obtained when checking the amplifier with a scanner. But since such equipment is usually found only at gas stations, you can try to check the operation of the system using a paper clip.
To check you need to do the following:
- First turn off the ignition.
- Then, using a paper clip, you need to close contacts numbered 6 and 7 of this plug, but you do not need to disassemble the plug itself.
- After this, you need to turn on the ignition.
- After performing these steps, the EUR malfunction indicator located in the dashboard will begin to blink; by the number of blinks, you can determine the system failure (video author - Gosha Vakhromeev).
- one long and one short signal - the electric amplifier is working;
- one long and two short - no engine speed signal;
- one long and three short - failure or lack of power to the torque regulator;
- one long and four short flashes - problems in the operation of the electric motor;
- one long and five short - the steering shaft position regulator has failed;
- one long and six short - the engine rotor position regulator has failed;
- one long and seven short - power problems - too high or very low voltage;
- one long and eight short - the electric power steering control module has failed;
- one long and nine short - failure of the speed controller.
Error codes
s1044 - incorrect sequence of rotor position sensor (RPS)
c1621 - incorrect voltage 5V
s1622 - speed signal circuit malfunction
c1011 - car engine speed signal circuit, no signal - divide the signal from the Hall sensor (or from the standard speedometer through the voltage limiter) by 4 and apply to the speedometer input,
c1022 - error, main output voltage of the torque sensor - the shaft cover may have worn insulation and the green wire in the center is shorted to ground
Fuse box
The weak link of the electric power steering on Kalina is the fuse box; if something doesn’t work, it’s worth checking them. To get to them, you need to open the dashboard, to the left of the steering wheel. To do this, pull the top part towards you and the latch will open.
Check if the fuse is working, if it fails, replace it. It is very easy to check, check the integrity of the thread inside the fuse. Changing a 50 amp relay to a 30 amp one will also help.
Newer versions of Kalina are equipped with electric amplifiers from Hyundai, which has a positive effect on its reliability. However, there are still thousands of cars with the domestic version, which malfunctions and breaks down from time to time. Now it will be easier for you to repair the electric power steering on Kalina yourself. The main thing to remember is that not every amplifier shutdown is a breakdown. And you can find the problem yourself and fix it, but somewhere you will have to go to a service center.
Electric power steering is a component used to provide more comfortable driving. Not so long ago, domestically produced cars began to be equipped with EUR, in particular, in this article we will talk about Lada Kalinas. What malfunctions can occur with the Kalina EUR and what troubleshooting methods are there? Find answers to these and other questions below.
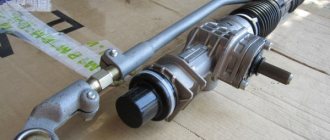
Dismantling and disassembling the electric amplifier
Before removing the amplifier, it is necessary to disassemble all steering column switches. Remove the cover from the stand and disassemble the devices, remembering to disconnect the connectors from the power supply.
How to remove the EUR with your own hands:
- After removing the switches, you will need to remove the lower cross member of the instrument panel. To do this, you need to click on the fasteners that secure the connector with wires, and then disconnect the wiring from the control module. After completing these steps, you can disconnect the connector from the switches.
- The system bracket is fixed with nuts; you will need to unscrew them with a wrench.
- Next, the steering rack will need to be carefully lowered. To do this, you will need to find the bolt that secures the driveshaft to the booster shaft. This bolt needs to be unscrewed, but when unscrewing it you will need to secure the nut, this will prevent it from turning. When the bolt is removed, it will be necessary to release the fasteners, after which the intermediate shaft will be carefully disassembled. At this stage, we recommend marking the position of the shaft and gears; you can use a marker for this. This step is very important as it will avoid possible installation problems in the future. If the marks on the shafts do not match, this may cause the amplifier to malfunction. When disassembling, be careful not to damage the wiring, as this will also lead to the inoperability of the EUR.
- When the unit is disassembled, it will be necessary to disassemble it and replace faulty elements. Further changes are made in reverse order (video by Murzik Bely).
What lubricant should I use for the steering rack?
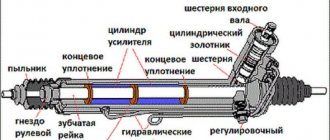
Technologically, the unit consists of several parts, each of which requires maintenance:
Serious force is generated at the points of contact of the teeth. The value does not depend on the amplifier: it only helps the driver operate the steering wheel. The load on the gears is not only strong, but also variable.
That is, the vector quickly changes direction in a short time. Under such conditions, the working oil film breaks, exposing bare metal.
The ideal option is liquid lubricant, like in an engine crankcase. The interacting parts are either “bathed” in an oil bath, or the working fluid is constantly supplied to the friction zone.
But the design of the steering rack housing cannot ensure tightness, and the liquid lubricant will instantly leak out. The boots on the steering tips protect against dirt getting inside, and not against leaks.
This means that the lubricant must be consistent. Such a composition will be retained inside the mechanism, but at the same time it will not independently spread over the surface of the gear joint in the event of extrusion from the load.
Manufacturers compromise by creating lubricants with mutually exclusive properties:
- on the one hand, high viscosity ensures a strong and sticky oil film on the working surface;
- on the other hand, the compositions are quite fluid and fill voids well.
The best option: lithium-based consistency oils.
The best lithium greases for steering racks have the following qualities:
Lubricant for a steering rack with electric power steering should have the same properties, except that neutrality with the rubber seals is not required. Lithium greases have good dielectric properties, so lubricating the electric power steering cannot harm its motor.
Important: Lithium compounds are quite versatile. If the old lubricant does not contain debris and metal shavings, it is not necessary to wash it out of the mechanism before adding a fresh portion. When mixed with a similar oil, no conflict will occur.
How to tighten the electric power steering rack?
The appearance of a shock in the operation of the electric power steering is associated with the need to tighten the steering rack.
How to do it right:
- First you need to disconnect the battery, to do this, disconnect the terminals from it. We unscrew the battery holder; to do this, you need to unscrew two more nuts located at the edges. After this, the battery is removed and set aside.
- Then you need to lift the plastic holder, there are four more screws under it, they also unscrew.
- Once this is done, this stand needs to be pushed forward until the platform releases from the air filter housing retaining pad. Subsequently, the platform can be moved back, this will provide freer access to the track itself.
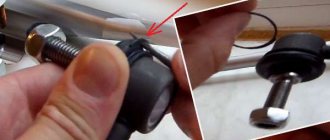
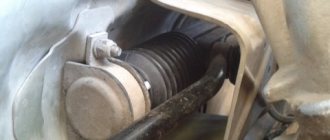
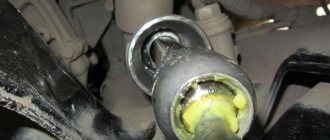
- In the next step, you will need to get your hand under the railing. Directly below it, as shown in the photo, there is a rubberized cap, this will need to be disassembled, this will allow the wrench to access the adjusting nut.
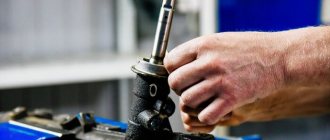
- To carry out adjustment work, you will need a special wrench to tighten the guide; without it, the adjustment procedure will not work. Using this wrench, you will have to crawl under the car track to install the tool in the correct hole.
- When adjusting, be careful not to overtighten the guide. If it is tightened too tightly, the track will stick when turning, and this, in turn, can affect traffic safety. The angle of adjustment is always different depending on how loose the nut is, but usually the nut is tightened about 30 degrees when doing this type of work. This should be enough for things to go well. Once the setup is complete, you will need to check that this action is correct. That is, you will need to ensure that the steering wheel rotates normally in any position until it stops and there is no knocking. If the hit persists, adjustment continues.
Photo gallery “Adjusting the steering rack”
Simpler, but even more expensive: what breaks in steering racks with electric power steering, and how they are repaired
Having studied in the most thorough manner all the shortcomings of hydraulic power steering, the designers eventually came to the conclusion that it would be cheaper and more reliable to give the “reins of power” to electrical systems. There are many advantages: the absence of working fluid and tubes with hoses, and the reduced weight of the entire system... In addition, thanks to electronic control, you can make the steering wheel rotate independently, as, for example, in a system with automatic parking. But every coin has a flip side: over time, no less, or even more, problems have emerged than in hydraulic systems. Today we will talk about these problems, as well as ways to eliminate them.
Features of work
Before we start talking about the types of electric amplifiers and their characteristic problems, let's say a few words about the algorithm of their operation. Immediately after starting the engine, a self-diagnosis of the system is performed to confirm its functionality. In the neutral position, the electric motor does not work: the entire system is waiting for active action.
As soon as you start turning the steering wheel, the signal from the steering angle and torque sensor goes to the ECU, which in turn gives a command to the electric motor, which makes your life easier. Moreover, the nature of the operation of the electric booster will be different depending on the speed of the car: in this way, progressive operation of the electric power steering is achieved. After going through a turn and gradually removing force from the steering wheel, the system will return the wheels to the neutral position.
Surely, owners of front-wheel drive cars with a transverse engine have noticed how the car pulls a little to the side during an active start. This is due to the different lengths of the drive shafts on the right and left sides. So, models with electric power steering can also steer the wheels a little, thereby compensating for the slip. In general, the force on the steering wheel is completely under the control of the EUR - and therefore it is on its conscience that the “emptiness of the steering wheel” and the “artificial force” that is so often talked about and about which numerous journalists complain.
How can I lubricate and adjust the EUR?
How and with what to lubricate the amplifier?
Litol can be used as a lubricant, the procedure is as follows:
- First you need to remove the plastic casing; to do this, unscrew the bolts that secure it. Unscrew with a Phillips screwdriver. It is also advisable to remove the lower cross member of the instrument panel located under the steering wheel.
- Next, unscrew the two bolts that secure the amplifier itself; for this you will need a 13mm wrench. After this, the column can be released down.
- We unscrew another bolt, after which you can immediately lubricate it.
- First, the steering wheel is turned all the way to the left. The lubricant is poured into a 10 cm3 syringe and sprayed into the resulting hole. You must roll all 10 dice.
- Then the steering wheel is turned to the right all the way - the syringe is again directed into the hole, all the lubricant is sprayed.
- After this, the steering wheel should be turned to the central position and the hole should be sprayed with lubricant again.
- Also, the steering wheel must be turned several times in different directions until it stops. The lubrication operation is repeated again.
- Then all components are assembled in reverse order.
Symptoms
The main signs that it is time to inspect the steering rack are knocking and extraneous sounds. They appear when the steering wheel swings from side to side, when turning or turning the steering wheel sharply, or when driving over uneven surfaces. But sometimes it is not clear from the sound whether it comes from the rack or from the suspension elements. The force required to turn the steering wheel also increases.
To find out for sure that the reason is in the rack, you need to do the following:
- Place the vehicle on a level surface
- Open and lift the hood
- Turn the steering wheel in both directions until it stops
- When turning the steering wheel sharply, listen carefully to where the sound is coming from.
Thanks to such simple diagnostics, you can easily determine whether the steering rack is the cause of the extraneous noise.
vendor code
Standard electric power steering VAZ 1118 (Kalina), Granta, Datsun On-Do (Mi-Do), Priora 11186-3450008-02, 1117-3450008-02
Manufacturer: Autoelectronics Kaluga, Russia
Price 20500 rub.
How to lubricate the steering rack without removing it - step-by-step instructions
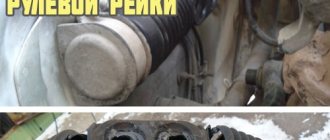
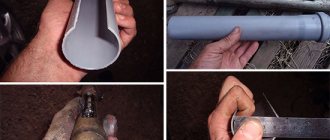
1. So, first of all, we get to the anthers and bite off with side cutters or cut off with a knife the old clamps that secure the steering rack anthers.
2. Next, we evaluate the condition of the lubricant and its presence; as you saw in the photo above, my rack was completely dry. Also inspect the rack boot; if it is damaged or cracked, it needs to be replaced.
3. Turn the steering wheel as far as possible to the left or right (depending on which side you are working on) so that the rod goes inside the rack and does not interfere with filling the lubricant, then take a syringe with an extension (a piece of tube from a medical “system”), if you have one, of course, fill it lubricant there and squeeze the contents of the syringe into the cavity of the steering rack. If there is no syringe, fill it manually using a screwdriver or something similar to a spatula.
4. When the grease is full, take the boot and put it in place, after which we fix it with a plastic clamp.
5. Now we repeat all the above steps on the other side, remove the boot, turn the steering wheel in the opposite direction and fill the rack with lubricant.
6. We put on the boot and secure it with ties.
7. For greater reliability, you can turn the steering wheel left/right, thereby pumping the lubricant, as it were, and then repeat the procedure again. However, if you turned the steering wheel all the way and used a syringe with an extension, then I think there is no need for re-lubrication.
After lubrication of the Lada Kalina steering rack is completed, we assemble all the tools, wash our hands and check the work. The steering wheel should become smoother and softer. If lubrication does not lead to anything, you will have to look for the problem elsewhere. Perhaps it lies in critical wear of the rack parts or is associated with steering tips that need to be replaced.
Comments and reviews
Replacing the speed sensor (gasoline level worked - the amplifier turned off - the speedometer did not work) - the amplifier does not work - tell me how to fix it?
Is it possible to go (home) without euros? Car Lada Kalina
Or the EUR is working, which means the Lada Kalina is not working
At a speed of more than 60 km on Kalina, the EUR turns on and moves to the left. And when the car is moving and the steering wheel is turned to the left, the malfunction light stays on all the way.
Kalina 111940, while driving the speedometer stopped showing, the yellow indicator on the “steering wheel” at the bottom right came on, you can hear that the electric booster has stopped working.
Hello Sergey, I changed the thermostat, the electric amplifier failed, can you tell me what could be the reason?
Hello, please tell me, in dry weather the EUR does not work on the Lada Kalina. And when it rains, everything is fine, everything immediately starts working
In the Lada Grant car, when turning the steering wheel all the way, shocks occurred in the opposite direction, especially in the opposite direction. Then, as we moved forward, opposite points began to appear. Korean EUR.
The eur sensor turns on and stops working
Hello, the EUR does not work on Kalina, even if the speedometer works, what is the reason?
hello eur periodically refuses, changed the speed sensor on the viburnum, checked the voltage, a leak to the ground was detected. The battery is old, but we corrected its health (reanimated it), the problem remains, in general, a hundred conversations will help only by replacing the EUR. I wouldn't want to buy such an expensive part, the error is solid yellow
Electric power steering works and doesn't work. Locked down. Outputs: one and two. I. One and seven. I measured the voltage at 13.9, everything seems to be in accordance with what is happening? Lada Kalina
Good evening! please, is it possible to attach the electric power steering to the key in viburnum?
Lada Kalina 11194 EUR stopped working, the tachometer turned off and an error popped up, low signal from the camshaft sensor, rV sensor did not help, dry brains
Kalina 11194, the tachometer stopped working, the euro and control showed a low signal from the camshaft sensor, changing the camshaft sensor did not help. Dry brains
Goodbye! The Kalina car won't start, the controls are on and the EUR sign is connected to the brain? What could be the reasons?
Because viburnum works in less than 30 euros
Good day, Sergey! The reason arose in such a way that on Kalina 2006, the electric power steering began to periodically turn off.
Hello, help with EUR on Kalina
Sometimes the electric power steering on a 2006 Kalina car fails
The Euro light is on, you constantly overload everything fine, after which the Euro lights up again and doesn’t work?
Hi, the reason I was driving this Lada Kalina and it was highlighted that the electric power steering is faulty, I went in and they told me that the sensors that are in the electric power steering are faulty and they said that they are out of repair , but then it started working again, now I’m driving for the second day, it works from time to time. Who doesn’t work
I turned the steering wheel a full turn and the euro went out
Sometimes the EUR on Kalina 1 goes out, but the warning light on the instrument panel does not light up
Hello. The Euro does not work on Kalina and the warning lamp does not light up
Grant's car, door on the left, toe-in didn't help
On Kalina 2006, the electric power steering, car speedometer fails, does the tachometer work? The 14.3-4 generator was working stably and even under load there was error 1602. Changing the dead battery didn’t help either, but there are no errors on the amplifier?
The EUR on the viburnum periodically turns off after starting the engine.
Euro Kalina 1 is buggy, and somehow strange, but when replacing the k4 relay during the day, for some reason I drive smoothly.
The on-board computer shows that there is no power to the power steering.
While driving, the steering wheel lit up with an exclamation mark and the car began to jerk and stopped and would not start.
How to disable EUR on Kalina
The EUR and speedometer of the viburnum do not work, but sometimes they work
While driving, I began to notice a slight bite on the steering wheel. I searched on Google and found very useful information on this topic. I did everything as described in the article and was very pleased with the result. Things to do in 15 minutes, and the result...
Some owners of Kalina cars note poor handling after 50 thousand kilometers. The car begins to “patrol” the road, the steering wheel becomes uninformative and “clogged.” If the tire pressure is correct and the camber angles are checked, you can lubricate EUR Kalina to eliminate these symptoms. Gears of the EUR (electric power steering) Kalina gearbox without lubrication bite each other, jam, resulting in increased loads on the steering wheel. Lubricant is added to the EUR at the factory, but during operation its lubricating properties are lost. By filling the amplifier, you will not only renew it with new lubricant, but simply increase its quantity; it’s no secret that the factory knows how to do this to save money) EUR Kalina, you need to work with your own hands. To do this job you will need to remove 5 bolts from the plastic steering wheel cover. Then unscrew the two front nuts securing the steering column to the body with a 13mm head. The steering wheel together with the holder will lower slightly and access to the bolt, which is located horizontally, will open (shown in the photo with a red arrow). For ease of unscrewing, you can use a cardan and head thirteen. Once the bolt is unscrewed, you can add lubricant to the resulting hole. We will apply the lubricant with a regular medical syringe. It is recommended to put a thin tube on the tip of the syringe, insert the tip of the tube into the hole and, pressing the syringe plunger, add lubricant to the gearbox. When applying lubricant, it is recommended to move the steering wheel to the left or right for better distribution of lubricant over the gears of the power steering gear. To completely fill the electric booster with lubricant, you will need about two syringes. It is best to take imported low-temperature grease containing molybdenum. Reassemble the unit in reverse order
The problem of EMUR jamming (aka EUR - electric power steering) is familiar to many Kalinovodovs; this malfunction can, unfortunately, be considered a disease of all Kalinas. However, our man would not be ours if he had not found a solution to this problem.
In this article I want to talk about how to solve the problem of the Lada Kalina steering wheel biting quickly and cheaply, at home, without the need to replace the EUR.
As you understand, the problem is more than serious. There are many topics on thematic forums online where owners share sad reviews about how, after a good time behind the wheel, the steering wheel simply got stuck and stopped turning. Everyone has their own outcome, some managed to avoid an accident, some did not, in general there is a problem and it needs to be solved immediately.
To get rid of the Lada Kalina EUR steering wheel bite, you need to have: several wrenches, a Phillips screwdriver, as well as a syringe and lubricant (Litol or an alternative).
Table
| Steering parts and components | Materials | Material requirements | Problem solving |
| Protective caps | Wet environment Low operating temperatures (T≤-40°C) | ||
| Rack and pinion | Lubricants | High loads (Pc > 3000 N) | Reduced vibrations |
| Steering shaft bearings | Lubricants | Long-term lubrication Increased loads (Рс > 2100 N) Wide operating temperature range | Extending the relubrication interval |
| Steering rod joints and seals | Wet environment Resistant to water wash-off Compatible with elastomers (including rubber) Low operating temperatures (T ≤ -40° C) | Prevent plastic and rubber parts from deforming or breaking | |
| Electric booster worm gear | Lubrication | High loads (Pc > 3000 N) Long-term lubrication Good anti-wear properties Wide operating temperature range | Extending the relubrication interval |
One of the new products for servicing steering components is grease. These are synthetic PAO greases based on calcium sulfonate. It is designed to service the steering shaft bearings. The lubricant works well under the influence of moisture, heavy loads and is compatible with plastics.
Another new product from is a mineral lubricant made on the basis of potassium sulfonate. It is used to service steering shaft bearings and other heavily loaded vehicle components. The lubricant has high anti-corrosion and water-resistant properties, works under heavy and shock loads and ensures long-term and uninterrupted operation of components.
The use of lubricants that do not meet the requirements listed in the table leads to premature wear of steering parts and assemblies, which is one of the reasons for its jamming.
Every owner of a used car, sooner or later, begins to look for information on how to lubricate the steering rack. This element is responsible for the ability to perform maneuvers by turning the steering wheel. If there is not enough lubrication, the risk of breaking the rubbing elements increases. To ensure road safety, it is important to promptly check the condition of the rack and choose the right lubricants.
To understand why a lubricant is used, it is worth understanding the structure of the mechanism. It consists of a rack and pinion. Thanks to these elements, the rotational motion is transmitted to the wheels. When the driver turns the steering wheel, the toothed gear moves in the specified direction. She clings to the teeth of the rack and pushes it.
The rack transmits movement to the steering rods rigidly fixed at its ends. They begin to move, and as they count, the wheels turn at the desired angle. The rods are connected to the steering tips; they transmit the steering movement to the axles of the front wheels.
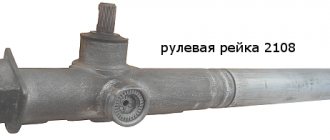
Steering rack
According to the type of drive, racks are divided into three types:
- The most modern ones are electric.
- Hydraulic, like the previous version, are designed to reduce the driver’s effort when turning the steering wheel.
- Mechanical ones are widespread.
This part converts the rotation of the steering wheel into a deflection of the front wheels relative to the horizontal plane. Driving a car requires constant maneuvering, so the mechanism used to control it must be in good working order. Applying lubricant makes the steering wheel easier to rotate and therefore simplifies the driving process.
The steering rack transmits and transforms the movement of the steering wheel to the wheels. But when traveling, due to friction, the metal elements of this unit heat up and are subject to wear. Lubrication increases the service life of parts and extends the service life of the entire mechanism.
The exact parameters must be indicated in the instructions supplied by the automaker; you must follow them. But external factors are also taken into account, including climatic conditions.
For example, some lubricants are not suitable for cold climates with sub-zero temperatures. To improve properties, additives are added - they increase frost resistance, oxidation resistance, moisture resistance and other characteristics.
Among the various types of lubricants, those made on a lithium basis are considered suitable for the steering rack. They can last for a long time and do not dry out much when exposed to oxygen. They are not afraid of water; if moisture gets in, the composition retains its original properties.
A viscous substance is produced by thickening petroleum oils with lithium soap. Lubricants are distinguished by their degree of viscosity, and they also come in different colors. The most commonly used types of lubricants are:
- Fiol
- available in varying degrees of viscosity. - Cyatim 201
is a domestic development and is in wide demand due to its affordable cost. It has an operating temperature range from -60 to 90 degrees. - Severol
is frost-resistant, designed for regions with cold climates. - Litol-24
- at a temperature of -20 degrees, the viscosity of this product is halved.
It is better to choose the level of frost resistance with a margin, otherwise the mixture designed for -25 degrees will freeze in a sudden frost of thirty degrees. But first of all, it is important to follow the recommendations of the car manufacturer. As a last resort, the recommended product is replaced with an analogue of similar composition.
Synthetic lubricant
The service life of the mechanism is affected by operating conditions. The hinge must remain sealed to prevent dust and moisture from entering it. When the seals are damaged and do not fit tightly, even an ideal lubricant cannot improve the safety of the parts. The lubricant mixture mixed with dirt particles only increases wear.
You can determine the malfunction of this unit with 100% accuracy by contacting the nearest service station. But it is also possible to independently identify the need for lubrication. To do this, you need to listen to the car while driving and pay attention to extraneous sounds.
If there are knocking noises in the steering gear area, one of the most likely causes is a lack of lubrication. Often the sound appears only when driving on rough roads outside the city. But using this method does not provide a complete guarantee, because the reason may not be in the rack at all.
When the steering wheel stops turning, this indicates that the steering mechanism has become jammed. Such a breakdown is possible, for example, when the teeth bite due to insufficient lubrication. You cannot ignore it, since the car’s controllability and road safety depend on the serviceability of the steering wheel.
Teeth on the steering rack
Often drivers decide to lubricate the rack if the manufacturer used little lubricant. After purchasing a new car, it is recommended to check this unit, even if there are no visible problems. This measure is simply necessary if the steering wheel has to be turned with force. But you shouldn’t lubricate the rack when you don’t have a suitable product at hand.
When applying lubricant, it is important to completely fill the gaps and turn the steering wheel so that the mixture is evenly distributed. For this reason, a syringe is used for injection, which can be purchased at a pharmacy. It allows you to pump a lubricating substance into hard-to-reach places.
In cold weather, a lubricant that is not suitable for the temperature range will freeze. As a result, the steering wheel will stop turning; in order to move, you will have to warm up the engine for a long time. Then a crunching sound is possible when turning the steering wheel, so as not to damage the anthers, you will have to be careful when driving.
If you start making sharp jerks, the mechanism may be damaged. On vehicles with power steering, the hose may rupture and the power steering pump may fail. Of course, you can continue to operate the vehicle, but it is better to change the lubricant to one suitable for sub-zero temperatures.
The longer a given unit is in use, the more attention must be paid to maintenance. If there are serious problems, it is better to completely disassemble the mechanism. Only with complete disassembly can you lubricate the rack as efficiently as possible. To carry out the work you will need the following tools:
- set with keys and sockets;
- nail polish or marker;
- syringe;
- hose connected to the syringe;
- WD-40 product.
First, the steering wheel is placed in the middle position and the position of the shaft is marked with nail polish or a marker. If this is not done, during subsequent assembly it will be difficult to understand what position the shaft was in. To get to the steering rack, you need to remove the interfering parts in the engine compartment.
If the mechanism is equipped with power steering, you will first need to pump out the fluid from it. This operation can be performed using a syringe with a hose connected to it. Next you need to install the jack and remove the front wheel.
Then you need to unscrew the stabilizer link and the lateral stability arm.
Now you can remove the protective boots and steering rods. After this, the locking nut and bolt are unscrewed, which holds the steering shaft.
The shaft is knocked up using a hammer, having first removed the retaining ring.
Now you can remove the seals, it is important to remember that the top one is secured with a locking pin. This pin can be knocked out with a hammer.
Next, you need to twist the locking ring plug, disconnect the hoses and pipes attached to the rack, and then drain the oil. To dismantle it, you will have to remove the propeller shaft bolt. The spare part must be placed on the table and disassembled.
The removed parts are washed with a special engine cleaning agent or regular gasoline. The old lubricant should not remain on the surface and mix with the new one. First of all, remove the boot and oil seal. Then the anthers located on the tips are dismantled and twisted. To remove the shaft, unscrew the nut. The removed parts are also washed.
The rack needs to be lubricated; you will have to apply a lubricant to the outer surface. Now you need to carefully put on the boot, it is important to ensure that it does not twist. Then the bolts and tie rods are put back. To tighten the bolts correctly, you cannot turn the steering wheel, otherwise the marks will get lost. Next, assembly is performed in the reverse order of disassembly.
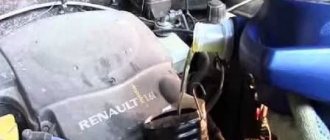
Since removing the entire assembly is difficult, many people refuse such a complex method. But the rail can be lubricated without removing it. First you need to remove the protective casing from the motor cover. Now you need to find the steering rack boot and cut off the casing on which it rests with side cutters.
You need to check the condition of the boot and rod. If there is little or no lubricant on the surface, then you need to apply it. For this purpose, it is convenient to use a syringe or a rod bent in the shape of the letter “L”.
The viscous mass must be packed between the body and the rod. Next, the boot is installed; to secure the parts, you need to use ties of the appropriate size. Then you need to turn the steering wheel to the right and lift the car with a jack to get to the rack. All that remains is to check the boot on the wheel side.
The process of pumping lubricant is discussed in detail in the video:
Even without lubrication, the car will be able to drive, but the mechanism will wear out quickly, and at sub-zero temperatures the steering wheel will not turn. Therefore, you should regularly check that there is sufficient lubricant. The main thing is to know the temperature range at which the car will be operated. It is not necessary to contact a specialist, because any motorist can lubricate the mechanism if desired.
What and how to lubricate the steering rack
5 (100%) 4 voted
The steering mechanism of any car bears a huge responsibility. The life and safety of both road users and others depends on its serviceability. Like most mechanical components, the steering system requires careful maintenance. It is especially important to know how to lubricate the steering rack
.
What is a steering rack and why is it needed?
The essence of the steering mechanism is to transform the steering torque into linear movement of the steering rods. The main element of this mechanism is the steering rack. In it, with the help of a gear and a rack, steering rotation is transmitted to the wheels. The gear is attached directly to the steering shaft. As it rotates, its splines cling to the teeth of the rack, pushing it in a certain direction. The rack, in turn, drives the steering rods, which are rigidly fixed at its ends. Steering tips are attached to the opposite ends of the rods, which transmit the turning force to the wheels.
By understanding the operating principle of the vehicle control mechanism, it is easier to prevent its premature failure. It is also important to know what maintenance is needed, how to lubricate the steering rack, and how to care for it. You also need to consider the overall lifespan of your vehicle. After all, with every thousand kilometers traveled, the vulnerability of its parts and components becomes more and more noticeable. And accordingly, he needs to pay more attention.
Why do you need steering rack lubrication?
As in any mechanisms, processes of interaction between metal parts take place in the steering rack. Such contact does not occur without the occurrence of a friction effect. As a result, the temperature of the parts increases and their wear also increases. In order to reduce the negative effect of friction, lubricant is used. Also, a lubricated steering rack makes it easier for the driver to turn the steering wheel. If the steering mechanism is supplemented with an electric or hydraulic booster, then their service life is noticeably extended. But before you lubricate the steering rack
, it must be disassembled and the remaining old grease must be carefully removed. Only after this can the rack be filled with new lubricant and reassembled. Regular repetition of the above procedure will ensure long-term and trouble-free operation of the steering rack.
How can I lubricate the steering rack?
It is necessary to lubricate components and parts of automotive mechanisms with oils and lubricants recommended by the vehicle manufacturer. But even with ideal lubrication, the main factor in the reliability of the unit is the conditions in which it operates. If the hinge is protected hermetically from moisture and dirt, it will work for a long time. And the quality of the lubricant will not fundamentally affect the service life. If the protective seals are broken, then even with ideal lubrication the service life of the parts will be very limited. Water and dirt entering the protection will turn the lubricant into an abrasive mass.
One of the conditions for reliable operation of the steering rack is its tightness. Also, it is necessary to fill it with lubricant to capacity. This extends the service life of both the rack and pinion mechanism and the lubricant itself. Therefore, it is advisable to check that there is a sufficient amount of lubricant even on a new car. Another important requirement for steering lubricants is their resistance to low temperatures. After all, hardened lubricant in the steering mechanism can have a bad effect on the car’s handling.
Video about lubrication of the steering rack
Advice from professionals.
The steering rack bears a lot of responsibility for safe driving. Therefore, professionals advise paying special attention to it. Timely lubrication of the steering rack extends its service life, but not indefinitely. Also, wear is possible in other steering parts. The following symptoms that appear in the steering mechanism should cause increased concern in the driver:
— The steering wheel play has increased;
— There is a knocking sound in the steering wheel;
— The force required to turn the steering wheel has increased;
— Lubricant leakage from the steering rack is noticeable.
In such cases, you should immediately contact a car service center to diagnose the steering. This event will allow you to timely identify the problem area and eliminate the malfunction. This way you will prevent more dangerous consequences of possible problems.
What types of lubricants are there?
Different lubricants have different physical-chemical, mechanical, lubricating, anti-wear and other properties. As a rule, lithium greases are suitable for the steering mechanism. Their performance characteristics meet the requirements for ideal lubricants. This group of lubricants includes Litol-24, Fiol, Severol (for especially low temperatures), Tsiatim and others. These lubricants have good water resistance, conservation properties, and have antioxidant additives.
The steering mechanism is one of the main elements of vehicles, which bears considerable responsibility for the life, health and safety of the driver. Steering rack lubrication requires special attention, without which it is impossible to transmit steering rotation to the wheels. Indeed, during the process of friction, the metal parts of the car are constantly exposed to heat and wear out to the point of being unusable. The processing of parts makes it easier to turn the steering wheel, and if there is an electric or hydraulic booster, it extends their service life.
A steering rack is a device that allows you to control the synchronous operation of the front wheels using the steering wheel.
How to eliminate biting steering wheel of Lada Kalina with your own hands
- First of all, we remove the protective plastic casing; for this we use a Phillips screwdriver, and with its help we unscrew several screws on the left and right sides.
- Next, take the key to “13” and unscrew the two bolts that hold the steering column. After unscrewing them, the steering wheel together with the transmission easily lowers, thereby freeing access to the bolt through which we will lubricate our EUR.
- The photo shows the bolt through which we will “pump” our EUR. This bolt must be unscrewed with a socket wrench.
- Now we take the prepared syringe, fill it with fat and start lubricating it. Lubricate according to the following scheme: turn the steering wheel to the right, drive in 5 cubes of grease, then put the steering wheel back straight, squeeze the grease into the hole, then turn the steering wheel to the extreme left position and fill the hole with grease again. In general, look at the situation, the fat should be thick and should be filled generously until you notice that the steering wheel has become softer and smoother.
- After completion, put everything back together in reverse order. We fix the plastic film, start the engine and go check the operation.
The result will definitely surprise you, the steering becomes softer and any hint of sticking disappears, in general everything works as expected. I have all this, I hope this vital trick will save you time and money, and most importantly, eliminate the need to change the EUR assembly.
How to lubricate the EUR on viburnum?
Moderators are asked to move this to the steering wheel FAQ or to the section header.
This concerns the EUR produced by the Makhachkala Aviaagregat plant. Kalina 2006
So I defeated the strumming and knocking in the EUR itself. I took it off three times, the first time in the summer I tightened a special nut with two holes, it didn’t last long, the crack remained. I filmed it for the second time this month and decided to take apart the EUR more. I separated the halves and saw the whole mechanism with my own eyes. When disassembled, there is no knocking, but as soon as I connect the halves, the knocking appears again. As a result, I stuffed more grease into the worm crankcase and put everything back together. It’s winter now, and in the morning, while the car was cold, the EUR didn’t make any sounds, but as soon as the interior was warmed up, the drumbeat started again. the lubricant simply became softer and play appeared. In general, this extraneous sound bothered me for no less than four years, I endured it. I was afraid to get into the EUR. But the time came to deal with the problem, and I removed it for the third time.
Next, I will describe the repair and modification process.
We will remove the steering column.
Disconnect the “-” terminal of the battery. The wheels are straight. Inside, remove the plastic around the steering column. We disconnect the electrical connectors of the ignition switch, immobilizer, disconnect two connectors from the EUR itself (the large one and the smaller one next to it on the left), you also need to disconnect the connectors of the steering column switches for the wipers and turn signals and remove them themselves, everything is simple there, disconnect the horn connector. Maybe I missed something, but in the end all the connectors from the steering column need to be disconnected. Next, at the bottom, using a 13mm head, unscrew the nut on the driveshaft in the middle, where there are no splines, but just a flat part that connects to the steering shaft driveshaft, and disconnect the driveshaft. Now unscrew the four 13mm nuts that secure the steering wheel. column to the body. Do not unscrew the last one completely, this whole structure weighs 10-12 kg, so carefully, holding it with your hands from below, unscrew the last nut and lower everything to the floor. Now you can take the steering column out of the car and disassemble it.
Let's disassemble the EUR.
We put it all on the floor on the steering wheel. First, disconnect the bracket (4 x 13 bolts). Next, mark the position of the cardan and shaft with a marker, unscrew the nut to 13 and remove the cardan. Now, using a high 27 socket, unscrew the large nut on the shaft. All that remains is to unscrew the three 13mm bolts that connect the two halves of the EUR. The halves will begin to move around each other a little. Now you need to be careful
To separate them, to do this, use a flat and powerful screwdriver to pry up the upper half in several places, just do not put pressure on the ears of the fastenings (where there were three bolts) - the alloy is powder, you can break off the ears. We wiggle it a little and the upper half should slide up and come off. If everything went well, then we should find a thin washer on the shaft near the plastic gear (sometimes it sticks to the bearing in the upper half). As I found out experimentally, this adjusting washer is responsible for the clearance at the point of engagement of the plastic gear and the EUR worm. Over time, the gear wears out, wears out, the gap changes, backlash appears, hence the knocking and clanking noises. I found a tin can at home, cut out a similar washer and placed it under the factory one.
The thickness of the new washer is approximately 0.3 mm. Those. In the end we got two washers: mine and the factory one. I assembled the halves, secured them with one bolt, and began to twist and listen. and the knocking stopped. I was shocked and very happy. So, after all, there was wear and the sound was due to it. In general, I put everything back together, put it on the car and went to check it out. I drove onto a section of road with bad asphalt (like a ridge) and here it was SILENCE. very, very quiet. I just didn't recognize the car. But I suffered for 4 years, thinking and wondering how to overcome this nasty knocking and strumming. Yes, and the steering wheel has become heavier, more pleasant on the highway, it seems like the feedback has increased. I am very pleased with the work, I recommend it to everyone.