Everyone knows the problem of the family of front-wheel drive vases, with its rack and specifically play on the shaft, due to wear of the plastic bushing and plastic lining on the piston, which is adjusted with a nut. On the new VAZ 2110 rack, the internal diameter of the rack body is 40 mm, and the shaft is 26 mm, 08 family, where the rack is different, the sizes are different, like 35 and 26, respectively.
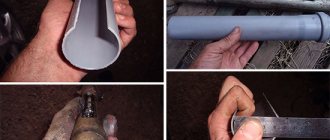
So the point is that it is possible, supposedly by making them from plastic, to make bushings of suitable diameters, but with a large friction support surface. For the right side, a plastic water pipe 41 by 27 is suitable, by cutting it lengthwise with an ordinary metal saw, I will attach a photo later. It’s more difficult on the left side; the lining is made and fluoroplastic is made using a turner, or using a homemade method, I’ll also attach a photo later. The point is, remove the backlash and knocking. Installation is possible without removing the rail itself, but this procedure is temporary; for a complete capital, you will have to remove and reassemble.
Hi all. Today I want to share with you one very useful, in my opinion, life hack on how to effectively eliminate the laxity of the steering rack on the “basins”. The instructions for modifying the steering rack are not mine, the link to the source is at the end of the article.
All owners of front-wheel drive VAZs have noticed that after a certain time an unpleasant play, knocking and laxity appears in the rack, which they want to remove. However, as a rule, no one knows how to eliminate the knocking of the steering rack; everyone either puts up with it, or changes the rack, or “chemically” something. I happened to come across one such “homemade” modification on the open spaces of the “Runet”.
The point of the modification is to increase the strength and thickness of the plastic seal (cracker) along which the steering rack shaft moves. Due to constant loads in the form of impacts and friction, the small plastic bushing located inside the rack fails quite quickly. As a result, the owner has to constantly tighten the rack, but over time the possibility of adjustment ends and the question arises of what to do in this case. There are two ways out, either change the steering rack, or change the plastic cracker, and then again in a circle, tighten and change. As it turned out, there is a third option - try to improve the design and make a homemade, more durable and long-lasting cracker.
Unlike the factory bushing, a homemade plastic bushing fills the working area of the shaft along the entire length, resulting in less wear, and due to the increase in thickness, the work of the rack becomes almost ideal and resembles the work of the rack of a foreign car.
Direct implementation
- First, we disassemble everything, wash it and begin cutting fragments of the required length. A PVC pipe with a diameter of 5 cm will act as a cracker; we will cut it and lay it in four layers. The length of the improvised bushings is 24 cm, so you don’t need to adjust anything, everything is tested from personal experience :).
- In the center of the pipe, it is necessary to remove a strip about 3.5 cm wide. This is necessary so that during installation the cracker can shrink to the shape of the rail.
- When the first fragment is cut out, you can begin installation. We carefully squeeze the cracker and push it inside so that nothing sticks out or sticks out anywhere, since during operation this can create a lot of problems.
4. Cut out the second cracker in the same way. The only nuance, and it needs to be taken into account, is that each new plastic element will shrink more, so the strip that we cut in the center should be wider than the previous one. After cutting, install the second fragment in place. If necessary, carefully trim everything using a sharp knife.
The 3rd and 4th crackers are manufactured and installed in the same way. You should get something similar to the one in the photo. Another important point is to make sure that the edges of the pipe do not protrude into the working window of the rack and do not interfere with the free movement of the steering rods and shaft.
When you install the last fragment, the free play between the housing and the shaft will become exactly what we need, as they say, snugly. For better results, add the required amount of graphite lubricant, change faulty parts (oil seals, tips, etc.), if necessary, and then reassemble in the reverse order.
- I personally and many who repeated this experiment are happy with the result! I hope you will also be able to remove the steering rack knock, and you will not regret the work done. Thank you for reading to the end. I would be grateful if you share this article with your loved ones on social networks using the special buttons located below. Good luck to everyone and see you again at VAZ Repair. Bye!
Dismantling and debugging of the steering rack on a VAZ 2110
It happens that the VAZ 2110 steering rack fails at the most inopportune moment.
Most car enthusiasts assume that eliminating this malfunction is a labor-intensive process that not everyone can do. Contrary to the erroneous belief, tightening the steering rack or completely repairing it is quite simple. This does not require any specific experience and knowledge; you just need to understand a little about the design features of the VAZ 2110 steering rack. If you detect uncharacteristic sounds or tapping sounds while driving over bumpy terrain or uneven sections of the road, you will need to tighten the steering rack yourself. Below we consider in detail how the steering rack is adjusted and repaired.
How to replace silent blocks in steering rods on a VAZ 2110-VAZ 2112?
1. First, remove the steering rod you need, or both at once, to remove them, you will need to unscrew the bolts that attach the rods to the steering rack (How to do this is explained above), then you will have to remove the tie rods from the holes and you can remove the rods (Regarding tips, it is written in the article: “Replacing steering tips on a VAZ”).
2. After which you will have to use a bolt of the appropriate size, the bolt that secures the wheel (One of the fastening bolts), it will need to be inserted into the hole of the silent block and using a hammer, you will have to hit the bolt several times and it, together with the silent block, will come out , but just keep in mind that you need to hit in such a way that the silent block can be pressed out without problems, that is, putting a rod on the asphalt and hitting the bolt with a hammer simply won’t work, you will have to either look for a vice and knock out the silent block as shown in the photo below, or just a couple of bricks Place it side by side, they will replace the same vice and the silent block will easily come out the third or fourth time (Instead of a bolt, you can use a head of a suitable diameter).
Adjustment, reassembly and replacement for VAZ 2110
To adjust the steering rack, you must first securely secure it in a vice. To eliminate the possibility of its swinging, it is recommended to use wooden blocks as spacers between the part and the vice. When starting to adjust, you need to grab the rack rods with your hands and move them from side to side. This will help you identify the presence and amount of play. To correct the gap you will need a special faceted wrench. Having inserted it into the opening, you need to turn the key 10-20° counterclockwise.
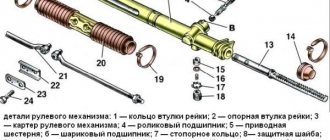
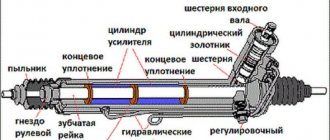
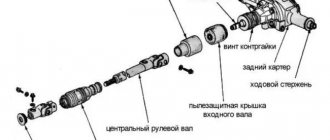
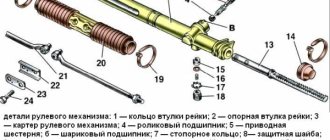
Steering mechanism assembly with drive. 1 – tie rod end; 2 – ball joint of the tip; 3 – rotary lever; 4 – adjusting rod; 5 and 7 – inner tie rod ends; 6 – bolts securing the steering rods to the rack; 8 – steering gear mounting bracket; 9 – steering gear support; 10 – protective cover; 11 – locking plate; 12 – connecting plate; 13 – rubber-metal hinge; 14 – damping rings; 5 – rack support sleeve; 16 – rack; 17 – steering gear housing; 18 – coupling bolt; 19 – elastic coupling flange; 20 – roller bearing; 21 – drive gear; 22 – ball bearing; 23 – retaining ring; 24 – protective washer; 25 – sealing ring; 26 – bearing nut; 27 – intermediate steering shaft; 28 – boot; 29 – protective cap; 30 – sealing ring of the stop; 31 – rack stop; 32 – spring; 33 – stop nut; 34 – retaining ring of the stop nut; 35 – plug; 36 – liner spring; 37 – ball pin insert; 38 – ball pin; 39 – protective cap; A, B – marks on the boot and crankcase; C, D – surfaces on the ball joint and swing arm
While observing the interval, you need to check the amount of play each time until it completely disappears. It is worth considering that excessive tightening is extremely undesirable, since there is a possibility of complicating the rotation of the steering column. Once the adjustment is complete, you will need to tighten the stop nut by tapping the crankcase threads.
This adjustment method is considered official, since it is described in the technical manual for the VAZ 2110. If you have dismantled a part and discovered that it has become unusable, it is advisable to replace it completely. Regardless of whether you are installing a stock part or a new one, assembling the mechanism is the same.
Before installation, you must turn the shaft gear all the way to the right or left using pliers. Then you need to scroll it all the way in the opposite direction. As a result, the flat on the shaft gear should be placed directly along the machine in a vertical position. Now you can install the steering rack in the required sequence. Everything is done in the same way as during disassembly, with exact observance of the reverse order.
Replacing silent blocks in the steering rod on a VAZ 2110, VAZ 2111, VAZ 2112
Welcome! Steering rod silent blocks - They consist mostly of rubber, the rubber hardens over time, which is why it cracks later, which is why there is play in the steering wheel (If the silent blocks are in good condition, then take a look at the steering rack, because of it too there may be some play, read the article: “Adjusting the rack on the tenth family”) and by the way, if the rods in your city don’t cost much money, then we recommend that you immediately buy them entirely with silent blocks, because when everything is manufactured at the factory, it will be better.
Note! To replace silent blocks, you will have to remove the traction from the car and, using a head of a suitable diameter, press out the silent blocks; the tools you will need are: A large set of keys, screwdrivers, special tools. a puller for pressing the steering tip out of the hole, pliers and a hammer!
Summary:
Where are the silent blocks located in the steering rods? One at a time, the silent blocks are located in the steering rods, and they are inserted into those places where the rod is bolted to the steering rack, this hole is indicated by a red arrow in the photo below for clarity, and the silent block itself is shown in a small photo in the lower left corner of the picture (It taken in a large photo from the draft).
When do you need to change silent blocks in steering rods? It is not possible to see the silent block in the steering rod without unscrewing the bolt that secures it, so in order not to tinker with these bolts from time to time, wait for a symptom to appear, namely, when play in the steering wheel appears, knocking sounds will appear in the steering rack, when this everything starts to be felt, unscrew one bolt at a time (After unscrewing one bolt, immediately screw it into place, looking at the silent block, you don’t need to unscrew both, because the locking plate will fall) that secure the rods, to do this, pry up the locking plate using a flat screwdriver (see . photo 1) and unscrew the bolt you need, which secures one of the rods, holding the rod with your hand, carefully lower it and look at the condition of the silent block, there should be no cracks on it, the rubber should not harden too much (It should be alive, fresh ), if everything is in order with the silent block, look at the other link and at the end, install the locking plate in its place; if everything is in order with the silent blocks, and there is play in the steering wheel, then look at the steering rack.
Method of tightening the rack without dismantling
In order to tighten the steering rack on a VAZ 2110 without dismantling it, you need to find or purchase a special octagonal spanner wrench size 17. As in the previous case, the car needs to be driven onto an overpass or raised with a jack. Make sure the machine is supported securely as you will have to work underneath it.
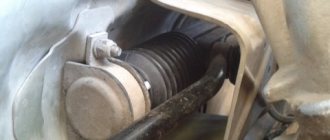
First of all, you need to dismantle the engine protection. You need to take a screwdriver and establish good lighting in the space under the car. Climb under the car from the back of the subframe and get to the steering mechanism. Find the intersection of the rack and the steering shaft, there you will find a small nut with which you can adjust the mechanism.
It is worth considering that there is also a plug in this place, which has a similar shape. Therefore, before starting work, you need to thoroughly clean this plane of dirt. The nut has an octagonal shape and a special wrench fits it. It is this factor that you should focus on when searching.
When adjusting this part for the first time, you will find a green plastic cap on it, which is installed at the factory when the vehicle is manufactured. It can be easily removed with a screwdriver, the main thing is not to overdo it, since the cap is quite fragile and breaks easily.
After removing the cap, you need to insert a wrench into the octagonal opening and adjust the rack. The nut tightening pattern remains unchanged. Adjustment is carried out according to the same rules as during disassembly. In this case, the tightness of the nut must be calculated based on the force of the knock that occurs when hitting obstacles. There is no need to turn it all the way, it is enough to eliminate the resulting noise.
To check the result of your efforts, you will need to sharply turn the rack in any direction. If there is no knocking or noise, the adjustment has been completed successfully. Now you can put the cap back on. The procedure for adjusting the steering rack on a VAZ 2110 takes no more than 30 minutes. This interval is relevant for situations when the rack is adjusted for the first time. With the necessary experience, the adjustment process takes much less time.
Steering rack damper: advantages
On many foreign-made cars, when hitting ledges or holes, the impact is not transmitted to the steering column. This is achieved thanks to power steering and a steering rack damper. If the first device is found on almost all cars, the second is found only on some models.
The steering rack damper is designed for two-way shock absorption. It is often installed on SUVs and expensive premium cars with rear-wheel drive. The device helps maintain steering position when driving on gravel or overcoming difficult areas.
The VAZ 2110 does not have such a device, but you can purchase it and order installation at a car service center. It is not recommended to do the installation yourself, since the damper must be reliably strengthened and the steering rack must be protected. Otherwise, the steering mechanism will quickly become loose, and you will have to spend a lot of money to restore it.
Installing a damper on a VAZ 2110 provides certain advantages. When traversing uneven terrain, feedback to the steering column is softened by 30 percent. At the same time, the noise level of the suspension is reduced several times. If there is no balancing, when braking at high speed, the vibration of the wheels stops giving feedback to the steering wheel.
Installing the rack
Through the opening of the left wheel we return the steering rack to the engine compartment, install the seal in its place and begin the most difficult operation - installing the rack on the car.
Ideally, one person will hold the rack against the engine bay while another person connects it to the steering shaft flange. I did this without an assistant, so I lightly tightened the nuts securing the rack to the body and pressed the rack to the body with this lever:
Not without difficulty, I installed the steering rack shaft and flange in their original position (picture on the left), but this was the second time, and the first time I incorrectly aligned the rack and worm shaft (picture on the right).
After the first assembly of the rack, the flange bolt, with the steering wheel in a straight position, did not fit into the recess on the shaft, so when trying to tighten it, I also damaged the thread on it. I had to replace the bolt and rebuild the rack again.
Once the steering rack shaft axle and splines are aligned with the steering column flange, you can screw the rack to the body. Here the ratchet wrench will help us again, but remember that using excessive force is unacceptable. Hold the key literally with two fingers.
When the shaft is in place, with the steering wheel turned 45° to the right, it will all look something like this:
To ensure that the flange is completely seated on the steering rack shaft, you can grab the steering wheel and push it away from you. It will turn out like this:
After this, you need to tighten the flange coupling bolt , but this must be done by hand, without using keys, so as not to damage the threads of the bolt if for some reason it does not fit into the recess on the shaft.
The thread of the coupling bolt is very easy to damage, so it must be tightened without using a key - by hand
I admit, I myself did not foresee this, and therefore I ruined this bolt and went to buy a new one. In theory, you can’t drive without this bolt, but I replaced it with a thinner one with a nut and that’s how I got to the store, but in general, it’s better not to joke with the steering. If anything, buy a ball joint bolt from a classic - it will definitely fit.
So, if you push the steering wheel away from you, then there will be no gap left between the steering wheel and the steering column pad. You can’t leave it like that, because when you turn the steering wheel, all this stuff will creak.
Now the bolt should easily screw into the flange by hand, to approximately this state.
I remind you: there is no need to tighten it with a wrench yet . We do everything with our gloved hands. Now that the bolt is screwed in, but not yet tightened, pull the steering wheel towards you, it will extend about a centimeter and a gap will appear:
Great! Now you can tighten the bolt with a 13mm spanner - you won’t damage the thread.
So, at this point, your rail is already screwed to the body. I recommend that you lightly lubricate the protruding threads of the four studs securing the rail to the body with lithol. This will avoid problems during future possible dismantling of the steering mechanism.
If the steering wheel is turned, then return it to the “straight” position and screw the steering rods to the rack. the large 17mm bolts that secure the rods to the rack with the same “meter” wrench and quite firmly.
We put a locking plate on top. This must be done, otherwise the bolts may come loose.
Now is the time to check the rack again for knocks. To do this, you need to grab the steering rod and pull it up and down. If everything is good, then during such a check there should be no knocking, the steering rods should be absolutely motionless.
Next, we screw on the thermal protection, connect the IAC and TPS connectors, install a platform under the battery and fix two wires to it from below, and install the battery itself on the platform. Not forgetting to remove the rags (if there were any), install the air duct between the air filter and the engine, and tighten all the clamps with a screwdriver.
Repair of steering rack VAZ 2110, 2112
Neglect of the condition of your iron horse leads to far from pleasant incidents on the road. The car requires not only constant care, but also regular technical inspection to confirm the serviceability of its key components. Timely repair of the VAZ 2110 steering rack and diagnosis of its malfunction is the key to your safety on the road.
The presence of play in the steering mechanism, a dead zone in which the steering wheel turns in its original position, and a characteristic drumming sound transmitted to the steering wheel when moving on uneven surfaces is a clear sign of a breakdown typical of this article.
Symptoms of steering failure 2110
The adjustment of the steering rack of the VAZ 2110 begins at the first sign of a malfunction. And these signs are quite deceptive. Very often, knocking inside the rack is attributed to ball joints or bearings, but once you correctly diagnose the steering, everything will fall into place. This is not difficult to do.
While driving, you can hear sharp pounding sounds that do not actually come from the suspension. The supports will not knock like that when they are under load. Silent blocks will not knock either, so such a relaxed knock is characteristic only of the rack itself. These are the first signs that the rack needs at least adjustment. Maximum - dismantling and repair. But it’s too early to talk about this.
Steering system diagnostics
Suppose you notice an uncharacteristic rattling sound in your car when driving? How do you still understand that it is time to repair the rack? There are not so many diagnostic methods; they are extremely simple and do not require any special sophistication from you:
- 1. Check the steering mechanism at the point where the steering shaft and rack combine. If it gives in to force and a characteristic knock is heard, most likely the problem is the lack of lubrication of the needle bearing;
- 2. The presence of play due to a worn bushing or a banal insufficient tightening of the main components can be concluded by grasping the joint of the steering rod under the hood of your car.
If we have already decided on the need to restore the rack, it’s time to decide on the method of repairing it.
It’s worth immediately making a reservation about repairing the steering rack from a VAZ 2110 with your own hands - the process is very labor-intensive, nervous and thankless. It is recommended to decide what is easier for you: perhaps spend the whole day doing hard and painstaking work, buy a new rail, or pay about 3,000 rubles. for repairs at a service center?
In defense of do-it-yourself repairs, we note that only you yourself are capable of performing the work with due seriousness and responsibility, dictated by the love for your own car. Repairing the VAZ steering rack on your own will be much cheaper, but it is advisable to enlist the help of a friend when reinstalling the rack and pinion mechanism in its place under the hood - doing this alone is absolutely impractical.
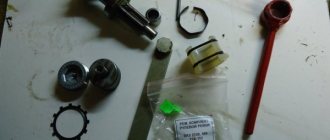
Necessary tools and spare parts for self-repair:
Steering rack repair kit for VAZ 2112
The cheapest repair kit for repairing the steering rack from a VAZ 2110 with your own hands will cost around 200-250 rubles. A more complete and universal set of spare parts will cost us about 500 rubles. It is also recommended to definitely replace the central corrugation (its price is approximately 250 rubles).
In total, it turns out to be at least 500 rubles. At the same time, buying a completely new rack and pinion mechanism will cost about 1,100 rubles. The tools we will definitely need are:
- special key 2110, which is a hollow octagon;
- wrench with long handle and octagonal socket 15 mm;
- ratchet with 10 and 13 mm heads;
- a set of metalwork tools;
- mount;
- jack.
And the following materials:
- penetrating lubricant for rusted bolts or kerosene (in the second case you will also need a syringe);
- diesel fuel, gasoline or other means for washing parts;
- Litol-24 lubricant, ideally FIOL.
Diagnosing the malfunction
Like any other mechanism, the steering rack fails sooner or later.
A similar mechanism is present in any car, both equipped with electric and hydraulic booster and without it.
Muffled sounds and impacts can be felt when driving over uneven surfaces, and can also be transmitted to the steering wheel.
The malfunction manifests itself in a similar way when the car is stationary and the steering wheel is turned.
When turning the steering wheel, a significantly increased force may still be observed.
These main symptoms indicate that the steering rack needs to be repaired, no matter what brand of car they appeared on: VAZ 2110 or another model.
To determine the state of this node, we do the following.
Grasp the steering shaft where it meets the rack.
Jiggle it up and down. If a knocking noise occurs, this is evidence that either repair of the steering rack housing will be necessary, or a possible cause of the knocking may be a lack of lubrication in the so-called needle bearing.
Lubricate the bearing or replace this part.
The next step is to check the bushing for play and the contact of the rack with the steering gear.
To do this, grab the joint of the steering rods in the engine compartment and try to move the steering shaft.
Let's start dismantling
If you already have all of the above tools, then it’s time to start the actual work. First, let's open the hood and begin dismantling the associated parts: remove the battery, the platform under it and the air duct.
Removing the steering rack of a VAZ 2110
The steering gear mounting brackets on both sides of the rack securely hold it in place with four bolts. The biggest danger at this stage is the risk of tearing off the bolts, for which we first carefully moisten them with penetrating lubricant or kerosene.
Now unscrew the bolts holding the inner tie rod ends. First, of course, do not forget to remove the locking plate. All that remains is to unscrew the flange bolt securing the rack to the steering wheel inside the cabin, but you should definitely note its relative position to the intermediate steering shaft in order to maintain alignment when the steering wheel is in a straight position.
Removing the Kalina steering rack
Before removing the steering rack from Kalina, I drove the car into the garage with the hood towards the doors, and slightly shifted the front part to the right, leaving free space on the left so that I could easily remove the rack through the opening in the left front wheel arch. Ideally, there should be at least a meter of free space to the left of the front left wheel.
Immediately place the steering wheel straight. The front left wheel can be lifted immediately, although this can be done later. It is only necessary to lift the left front wheel, and this is necessary in order to reach the rack through the opening between the wheel arch and the engine compartment. Now we open the hood, use a screwdriver to loosen the clamps of the air duct between the air filter and the engine, remove the air duct, and plug the now free holes with a clean rag for the duration of the repair. Next, remove the battery (10 and 13 mm spanners) and the platform under the battery (13 mm spanner).
Attention! To avoid breaking the ratchet wrench, it is not recommended to use it to remove tightly tightened bolts!
When the pad is unscrewed, it turns out that two wires are attached to it from below. They need to be released, and a 10 mm wrench will help us with this. This is what the mount looks like without wires:
In order not to damage the wires and connectors of the IAC and TPS, it is recommended to immediately disconnect them.
Now a very important point! Right now, treat the 4 studs attaching the rack to the body with a wedge or kerosene - let the threads soak. It may turn out that the nuts have become stuck (rusted) and then you can easily twist the stud, tearing it out of the body. In this case, you are guaranteed a real problem, compared to which ordinary rack repair is just a piece of cake. By the way, if possible, douse these nuts with Vedeshka or kerosene a couple of days before the repair.
For ease of operation, unscrew the top nut securing the thermal protection to the body, and slightly bend the thermal protection itself towards the engine.
Now you can remove the locking plate from the inner tie rod end bolts. This stopper prevents the bolts from coming loose. We insert a flat-head screwdriver between the stopper and the plate connecting the bolts and slide the plate off the bolt heads.
When the stopper is removed from the bolts, you can unscrew them; this is where a powerful wrench with a long handle and a 17 mm head comes in handy. Personally, I managed to move the bolts from their place only by reinforcing the handle with a half-meter steel pipe. After unscrewing, the bolts must be removed and the steering rods simply placed down on the thermal protection.
We continue to dismantle the rack from the car. First of all, go into the interior, under the pedals. While the steering wheel is straight, pay attention to where the flange bolt is located and how the groove is located on the shaft and steering rack. This is exactly how the bolt and groove are located when the steering wheel is in a straight position, this is exactly how they will need to be placed when installing the rack on the car. I recommend making marks on the shaft and flange, for example with a marker, and even photographing them. Later, all this will help you set the rack so that when driving in a straight line, the steering wheel is in the middle position.
Now turn the steering wheel a quarter turn to the right and, using a 13 mm spanner, completely unscrew and remove the steering rack flange bolt from the hole. Once again, pay attention to the position of the flange slot and groove on the steering rack shaft. When reassembling, you will need to return them to their original position.
Attention! Now is the most crucial moment. You must unscrew the nuts from the four studs that secure the steering rack to the partition between the passenger compartment and the engine compartment, but this must be done very carefully. Don't forget: the studs hold the body very weakly and can break off even with a little force.
Treat the threads again with kerosene or WD-40 and begin unscrewing the nuts with a ratchet wrench, holding the wrench with literally two fingers. I hope you will be able to move and then unscrew all the nuts without damaging any of the studs. If you overdo it, then you will have to find a bolt similar to a stud, but longer, drill a hole into the interior and insert it from the inside. We return to the cabin and use a powerful screwdriver to push the steering rack shaft out of the flange.
The rack should detach from the steering column and fall out into the engine compartment; if this does not happen, then it can be helped a little: in the engine compartment, using a pry bar, press the rack away from the engine shield.
We will reach the steering rack through the opening above the left wheel, so the left front part of the car must be jacked up. There is no need to unscrew the wheel, and there is no need to lift it high either, the main thing is that the opening is higher than the wheel. We pull out the steering rack like this:
Conclusions and recommendations for repairs
Particular attention should be paid to the condition of the support bushing and the worm gear mechanism. Damage to the anthers causes excessive corrosion of the rack, destruction of the gear teeth, destruction of the locking spring and clogging of all parts with dirt.
The parts need to be washed, bearing play checked, and cleaned. Also generously lubricate all mating surfaces. The rack stop and retaining ring must be replaced, as the parts most susceptible to friction and wear.
Lada 2110 › Logbook › VAZ 2110 steering rack. Repair and modification.
Dron1977 last online 2 weeks ago
Everyone knows how extraneous noises, knocks, squeaks, etc. can get on your nerves. in vehicle components. I suffered a knock in the steering rack and steering tips for a couple of weeks, until I finally got around to repairing it over the weekend. The question arose whether to rebuild the rack yourself or buy a new one. A new one costs 2,700 rubles, a used rack costs about 1,000 rubles, a repair kit costs 500 and a few kopecks. Naturally, it is better to take parts such as the rack new, if the budget allows, buying a used one is not an option, since the stingy one pays twice, there is a third budget option left, buying a repair kit. Steering lugs and a steering rack repair kit were purchased. The first problem I encountered was that I could not unscrew the tie rod mounting bolts, even with the help of a half-meter pipe placed on the knob. The bolts either stuck or were tightly tightened. I decided not to worry and remove the rack along with the steering rods, since the ends were going to be replaced anyway. About the tie rod ends later, with photos. Using a puller, together with an assistant, I removed both steering tips, loosened the fastening to the steering column, and unscrewed the four nuts securing the rack and took it out through the left mounting window. In front of the car it was hung on supports like “birch logs”. further on we go. As I sorted it out, I don’t think it’s worth writing, everyone knows how it’s done. I will dwell on the unpleasant moment of reassembly. To replace the broken cracker, a new one was installed, lubricated with lithol, but... the rack shaft flatly refused to enter the cracker, although the cracker sat in its place. When measuring the internal diameter of the cracker, the rod showed 24mm, while the diameter of my shaft was 26mm. More than strange, but nevertheless it is a fact. While I was smoking and thinking about what to do on the street, the assistant said that I can’t keep my head warm, everything is fine... the new cracker is no longer new and is no longer a cracker, but pieces of plastic... in short, it broke. The culprit turned out to be the manufacturer of the repair kit, which “makes all kinds of crap.” Common situation? Wow! The assembly stopped, but I came up with a plan to improve the quality of the rack by installing a fluoroplastic bushing there instead of the original cracker. The turner assured me that we would do everything, and in anticipation of tomorrow, to kill the rest of the evening, I began to change the steering ends with the rods removed. Naturally, they were pre-labeled as left and right. I measured the new tips and the old ones. The dimensions turned out to be identical 93 mm. Tenths of mm. doesn't count. I marked the old tips with soft clamps, calculated the number of tightening revolutions, and installed new tips. Having tightened it to the required number of turns (in my case it turned out to be 18 turns), the new tip fell into place, exactly the same as the old one, on both rods. Perhaps in my case I was lucky, but I will still have to go to the alignment, although looking ahead I will say that the car behaves perfectly on the road. The next morning, I had in my hands a fluoroplastic bushing with an internal diameter of 26 mm, almost 6 cm long. I don’t have the exact dimensions, nor do I have a photo of the bushing itself, since they made it locally and pressed the bushing directly into the rail. The bushing fits into the rail very tightly, the shaft moves along the bushing just as tightly, but without excessive force and without any play. The assembly and installation of the rack took place in the reverse order, without any incidents. Now we have the absence of extraneous knocking in the front suspension, steering rack and impacts in the steering wheel when driving at different speeds on roads with different surfaces (tested on a crushed stone road and on a technological road of a coal mine). A few photos, good luck to everyone...
They didn't want to turn away.
Complete lack of lubrication. Or is this normal?
An old cracked cracker.
The shaft teeth are visually in good condition.
The bushing itself. The other end of the sleeve is split.
A soft clamp as a limiter, with the old tip.
New tip installed.
Like 39 Subscribe
Rail repair
Great! The steering rack is in your hands. Now you need to carefully cut off the plastic clamps from the anthers without damaging the rubber bands themselves if you plan to reuse them. The left clamp securing the rack to the body can be left untouched, but the right one must be removed along with the rubber band: this is necessary to replace the central corrugation.
You can also remove the gasket located at the point where the rack contacts the hole in the engine shield.
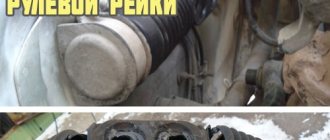
We remove the left and right anthers, and then the corrugation. Look at the picture I discovered when I removed the left steering rack boot. There was grease here, but mixed with dirt.
On the right side, on the contrary, there was no trace of lubricant, but a whole mountain of rust spilled out from there.
The central boot is reluctantly, but still removed from the steering rack housing.
The right end of the rack was covered with a thick layer of rust without the slightest hint of lubrication. Not surprisingly, it dangled loudly in the broken bushing.
Soak the stop nut with kerosene or WD-40, and in the meantime you can try to remove the worm shaft.
Having unscrewed two hexagon bolts, I found a bearing and a disc spring, but I could not remove the worm shaft, no matter how much I knocked the rack body against a piece of wood.
As a result, I realized that I didn’t need this, because I could wash and lubricate the insides of the rail without even completely disassembling it. Having thoroughly lubricated the bearing, I returned the cover to its place and began to unscrew the stop nut. To do this, you will need a very good key, I came across this one.
Having unscrewed the nut, I saw the same picture as in the rail itself. Everything was covered in grease mixed with dirt, or maybe the grease had become unusable over time.
We take out the spring and rubber band, turn it upside down and hit it against a wooden block until the stop pops out.
When I took out the stop, I discovered that it was covered in dirt, like everything else inside the rack housing.
Compare the new stop with the old one: the plastic lining has worn off, the rack has become less pressed against the worm shaft, and now it is clear how the play in the steering arose.
But the rumble when driving over small irregularities comes from the steering rack bushing. To get out the old broken bushing, you need to use a thin long screwdriver to bend inward each of the two protrusions that hold onto the recesses inside the rack body, and pull the bushing out of the body using a steel wire hook.
Here's what the old and new steering rack bushings look like:
So, we have disassembled the steering rack, and now it’s time to wash it properly. To do this, you can use gasoline, diesel fuel or kerosene, as well as dry rags and something long and thin to clean the insides of the steering rack housing. By moving the rack inside the case and cleaning out the remaining old grease and dust from it, I achieved almost perfect cleanliness of both the rack itself and the case, and also cleaned off the rust as much as possible.
But the worm shaft, which I couldn’t get, still didn’t look perfect:
If you want to bring the rack to a perfectly clean state, then right now you need to blow it with carburetor cleaner. Do not forget to rotate the worm shaft to blow out all the dirt from its reverse side. After such a wash, the rack looked almost like new, all internal surfaces shone with a dazzling shine and newness. This is the feeling for which we do it ourselves - the feeling of satisfaction from a renovation done in a way that no one else could do it.
Now we wipe everything down, lubricate it generously and assemble it. We turn the worm shaft and lubricate it.
We do not spare grease on the toothed part of the rack - it is here, between the worm and the rack, that the main friction occurs.
We also coat the right end of the rack with lubricant, which will not only play the role of a preservative here, but should also extend the life of the new bushing.
Having thickly lubricated the right end of the rack, check whether the bushing fits onto it. It must be put on with some effort, only in this case the repair will bring silence when driving over small irregularities.
The bushing must then be removed from the rack and carefully inserted into the pre-lubricated housing. The locking protrusions on the bushing must fit into their seats on the inner surface of the rack body.
Now screw in one of the bolts that secures the tie rods to the rack, and with the rack housing with the bushing facing down, being careful not to damage the bushing, insert the rack into it. The rack should fit tightly, but with a certain force applied to the bolt, it should still move.
Attention! The following actions will determine whether you will be able to assemble everything so that the steering wheel faces straight. First of all, you need to find the middle of the window in the frame body, mark it, for example with a file or marker, and set the frame to the middle position. In this case, the central hole should be opposite your mark.
Since the stop is not yet inserted and does not press the rack against the worm shaft, by turning the rack body over with the stop hole up, we can put the worm shaft in any position we need. Install the shaft as it was when you removed the rack from the car. My groove on the shaft was on the right and was almost vertical. Unlike you, dear readers, I was not armed with this experience at that time, and therefore assembled the rail at random. As a result, in order to install the steering wheel vertically, I had to disassemble the rack a second time.
Having installed the shaft in the desired position, make sure once again that the rack is in the middle position and then, through the hole in the rack stop, press the rack to the worm shaft. In this case, neither the worm nor the rack should change their position.
Now lubricate everything generously and install the new stop, spring and rubber sealing ring in place, and screw it all on top with the stop nut.
Next, use a special wrench to tighten the nut by hand, and then unscrew it back 2 notches, which will correspond to 24°, as indicated in the instructions.
When you install the rack on the car, the steering wheel may seem a little heavy to you, but after a couple of hundred kilometers the stop and rack will break in, and you will get perfect steering.
Now we assemble everything in the reverse order, and do not forget to put all the removed parts back in their places. Secure the anthers with nylon ties.