Note. To replace the hood lock rod together with the shell, it is necessary to perform labor-intensive work - remove the instrument panel. This describes a method that allows you to change the hood lock rod with minimal disassembly. If the rod moves easily in the shell, but you have to change it because it has broken off, then you can only replace the cable by pushing it into the old shell.
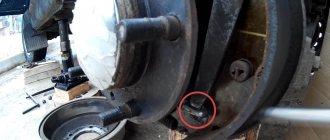
4. Using an 8 mm open-end wrench, unscrew the nut of the rod clamp.
Note. The nut is located above the clamp loop, so access to it is difficult (the photo shows the view from below).
5. Remove the clamp first from the threaded rod and then from the rod shell.
6. After unscrewing the three bolts, remove the left headlight shield.
Note. On cars of early years of production, the upper cross member of the front end is of a different shape and does not have a headlight shield.
7. Pull the shell of the hood lock rod into the resulting opening.
8. Fold the nylon cord in half and put the resulting cord loop on the bent end of the cable. We tuck the end of the cable into the sheath.
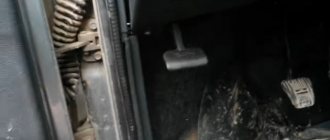
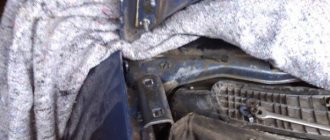
9. Using a 13 mm socket wrench with a ratchet (or a spanner), through the open cover of the mounting block, unscrew the axle with the hexagonal head of the hood release handle (for clarity, the photograph shows a view with the instrument panel removed; access to the axle is made difficult by the wiring harnesses).
10. Take out the handle axis and remove the rod shell from the bracket slot. We lower the handle under the instrument panel and remove the plastic rod end from the handle.
11. Pull the hood lock rod into the car interior (until the cord appears).
12. Disconnect the cord from the rod and remove the rod assembly with the shell.
Withdrawal procedure
1. First of all, remove the wire from the negative terminal of the battery.
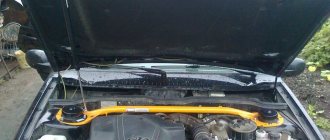
2. After this, to access the hood lock, you need to remove the radiator trim.
3. When starting to replace the rod, the first thing you need to do is mark the position of the washers. This will make it easier to adjust the lock in the future.
4. Now you need to unscrew the two bolts on both sides of the lock. Please note that there are spring washers underneath.
5. Now we remove the lock from under the bracket and unbend the end of the rod. After this, we remove the end of the rod from the bushing and disconnect it from the lock lever. After this, you can remove the bushing from the rod.
6. After the bushing is removed, you need to move the rod end and remove the cable from the lock.
6. Please note that there may be shims on the end of the rod shell. try not to lose it.
7. Now you need to remove the end of the cable sheath.
9. The next step is to unscrew the nut securing the cable holder. After this, you need to remove the holder from the stud, and then from the rod shell itself.
10. Now you need to push the rod sheath holder inward and remove it from the cable sheath.
11. To make it easier to install a new rod, you need to tie a rope slightly longer than the rod itself to the end of the cable.
12. Open the cover of the mounting block and press the handle that opens the hood all the way.
13. Raise the tip of the sheath and remove the cable from the slot.
14. Now you need to disconnect the cable end from the hood release handle. To remove the cable, you need to slide it in the L-shaped slot and pull it out.
15. Now you can pull the rod deep into the cabin so that the rope fits into the place of the rod.
Damage on the hood side
The most difficult situation is when the cable breaks on the side of the lock. To open a lock, you need tools. It is also advisable to drive the car onto an overpass, pit or structures that imitate them.
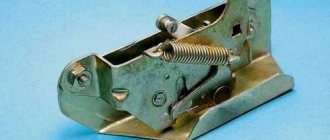
Hood and lock parts: 1 – hood hinge; 2 – buffers; 3 – hood; 4 – hook; 5 – hook spring; 6 – hook axis; 7 – pin; 8 – lock spring; 9 – shell with lock rod; 10 – handle axis; 11 – lock handle; 12 – rod shell bushing; 13 – shell with lock rod; 14 – hood stop bushing
So, the sequence of actions to open the hood:
- The first step is to wait until the engine cools down;
- Secure the car with a jack;
- Get under the bottom of the car and remove all protection of the mechanism from damage and dust, using special tools convenient for this;
- Stick your hand into the space between the radiator and the engine compartment, trying to reach the lock;
- Under the hood there is a locking ring to which a cable is attached, so you should pull the ring;
- If you can’t open the hood, you will have to call an assistant and ask him to press the hood from above, then the mechanism will work and the hood will open.
Second way. If the cable is damaged near the lock, you can pull it with pliers. When the hood has opened, you should begin replacing the old cable with a new one.
As a last option, you can solve the problem by using wire with a small cross-section. But this is a painstaking and long process, and there is no guarantee that it will work. Therefore, the first two will be the simplest.
Video on replacing the hood cable:
Replacing the hood cable is a fairly popular service that can be provided by specialists from the Professional network of body shops. If you notice that the engine compartment has begun to open poorly, do not put off visiting us. Replacing the hood release cable will solve the problem.
Attention!!! Replacing the hood opening cable will have its own specifics depending on where exactly the break occurred - in the engine compartment or directly inside the vehicle. Our specialists know what to do in each of these cases; the price for replacing the hood cable will be affordable. Do you want to understand how much the help of our specialists will cost you? Take a few pictures of your vehicle and briefly describe the symptoms of the breakdown. Send the letter to the following email address: This email address is being protected from spambots. You must have JavaScript enabled to view it. In just a few minutes, our specialists will prepare an approximate estimate and send it to you. The final cost will be announced after the technical inspection of your car in our bus station. The difference from the initial indicators is no more than 10%.
Hood lock replacement and price
The main reason for a “loose” hood on the VAZ 2110-2112 is the wear of its lock. Since this design is practically beyond repair, it is necessary to replace this part to solve the problem. The price of a new lock is about 170 rubles in any auto store.
As for replacement, if you decide to do everything yourself, then you will need a tool such as:
- 8 and 10 mm socket heads
- Ratchet handle
- Pliers
Before you begin any repairs, you must remove the radiator grille. Depending on the year of manufacture and type of VAZ 2110 model, it can be mounted in different ways. In this case, it was necessary to unscrew only two bolts:
After which it is removed and access to the lock structure is opened. It is secured with two bolts that must be unscrewed:
When you unscrew the second bolt, hold the lock with your hand so that it does not fall.
Then we carefully remove the lock and lower it down a little so that it will be convenient for everyone to continue working.
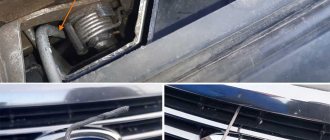
Next, you need to disconnect the cable from the hood lock. To understand how to do this, look at the entire structure of its mount in the photo below:
It is necessary to straighten the bend of the cable using pliers:
And move the lock to release the cable:
After which you can remove the cable without any problems, since it is no longer attached to anything:
Installation proceeds in reverse order. There should not be any difficulties in performing this repair. One point worth noting is that during installation it is necessary to set the position of the lock relative to the mounting points in such a way that there are no distortions, problems or difficulties when closing the hood.
Replacing the hood cable: main stages of work
If the part is worn out as a result of the end of its service life or due to insufficient lubrication, the hood lock cable needs to be replaced. The procedure involves going through the following stages:
- dismantling the old part, finding the beginning and end of the fastening;
- installing a new cable and gradually pushing it towards the engine compartment;
- opening the hood, finding the end of the new part, placing it so that there is no contact with the working mechanisms;
- bringing the cable to the hood latch and tightening the clamping fasteners;
- adjustment operations (pulling).
Important!!! Only professionals should be trusted to carry out such an operation as replacing the hood opening cable. The fact is that each brand of car has its own characteristics, so finding the break point in some cases is quite difficult. Don't waste time trying to solve the problem yourself. Come to us.
Our service technicians know how to properly replace a part and extend its service life. We strictly adhere to the basic rules for installing a cable:
- we treat the case with a special lubricant;
- eliminate creases and sharp bends;
- We install the part with a reserve length.
Having problems with the cable? Contact our managers and determine a convenient time for your visit.07/03/2017
One of the common problems that our customers periodically encounter is a dead car battery. As a result, it becomes impossible to get into your own vehicle if, for example, the traction from the door cylinder is disconnected, and also to open the hood to replace or charge the battery, especially if it is equipped with an electromechanical lock.
There are several reasons why a battery may lose its charge - this could be either the period of its operation up to this point, or the banal forgetfulness of the owner, who left the lights or other source of energy consumption in the car on. This problem can also arise if the car is parked for a long period of time without moving. The security system and normal door opening stop working along with the discharged battery. Of course, you can try to open the door with a key and the hood of the car with a lever from the passenger compartment. But this is only possible if the door lock cylinder is in working condition - not rusted from infrequent use, not disconnected from the locking mechanism in case of additional protection of the car when installing an alarm or immobilizer. In addition, this method is only possible if an electromechanical hood lock is not installed.
VAZ 2110 - replacing the hood lock drive rod
Removing the hood lock drive rod on a VAZ 2110 car is performed to replace it in case of breakage or damage to the shell. Prepare a standard set of tools and perform the following sequence of actions:
- De-energize the vehicle by disconnecting the negative terminal from the battery.
- Remove the decorative radiator trim.
- To facilitate subsequent adjustment of the position of the lock, mark the washers of the bolts securing it relative to the body.
- Unscrew the bolts, remove them and the spring washers installed under them.
- We remove the lock from under the bracket and unbend the end of the rod.
- Then we remove the end of the rod from the metal sleeve and disconnect the rod from the lock lever.
- Remove the metal sleeve from the rod.
- We move the tip of the rod shell and remove the cable from the slot in the lock body.
- Adjusting washers can be installed on the tip of the rod shell.
- Remove the end of the rod sheath.
- We unscrew the nut securing the metal holder of the cable sheath and remove it from the stud, and then from the sheath.
- Using a small flathead screwdriver, press down the plastic shell holder and remove it.
- We tie a strong thread to the end of the rod, no less than the length of the shell, thereby making it easier to install a new one if it was not planned to replace the shell.
- Inside the car, open the cover of the relay and fuse mounting block and press the hood release lever all the way.
- Lift the tip up and remove the rod from the slot in the bracket.
- And disconnect the tip from the handle.
- We take out the old rod, meanwhile the thread tied earlier will enter the shell.
- We tie the end of the thread to the new rod and insert it into the shell in reverse order.
- Carry out subsequent assembly in reverse order.
At this point, the repair work to replace the hood lock drive rod on the VAZ 2110 has been completed.
Option 1. Safety rope.
One of the easiest ways to organize the opening of the hood lock, but not the most convenient, is a safety cable, which is hidden in a hard-to-reach place under the engine compartment of the car.
To get to it, you will either have to lift the car on a lift and remove the engine protection, or use a jack (which still needs to be found) to first remove the wheel. In addition, most owners simply forget where this cable comes out. The safety cable is installed by default when installing each electromechanical hood lock and is included in its price.
Option 2. Emergency power output.
The most preferred method of emergency opening of the hood is to supply emergency power from an external battery or from another vehicle through wires connected to elements in the cabin.
The simplest option is to have an emergency wire, previously routed from under the hood into the passenger compartment and hidden, for example, under the steering wheel or in the glove compartment of the car. In this case, you will still need to use an external cable with “crocodiles” at the ends in order to be powered by another battery. This option does not require lifting the car or any complex manipulations, but nevertheless, it will not be possible to quickly power a dead battery. If everything is done correctly, then using this method it will be possible to revive the security alarm and disarm the car, as well as open the hood to access the battery. The alarm itself and the electromechanical hood lock consume little current, and a small cross-section of wire will be enough to unlock them.
Remember this
Removing the hood and the hood release cable is quite simple if you know what to unscrew and where. Check the parts and mechanisms for serviceability, and regularly, then a breakdown will not take you by surprise.
Please refer to the instructions for your car more often; there are many practical tips and solutions to problems there. If you doubt your ability to disassemble the unit or dismantle the part yourself, take the car to a service station. Of course, the service is not free, but there is a guarantee that the breakdown will be fixed.
>
| 1. Disconnect the wire from the “–” terminal of the battery. | |||
| 2. Remove the radiator trim (see the corresponding section). | |||
| 3. Mark the position of the washers relative to the body. This will make it easier to further adjust the lock position. | 4. Unscrew the two bolts securing the lock; spring washers are installed under them. | 5. Having removed the lock from under the bracket, straighten the end of the lock drive rod. Pull the end of the rod out of the metal sleeve and disconnect the rod from the lock lever. Remove the metal bushing from the rod. | |
| 6. Slide the tip of the rod sheath and remove the cable from the slot in the lock body. | 7. Please note that shims may be installed on the tip of the rod shell. | 8. Remove the end of the rod sheath. | |
| 9. Unscrew the nut securing the metal cable sheath holder and remove the holder from the stud and then from the rod sheath. | 10. Carefully push the plastic rod shell holder inward and remove it from the rod shell. | 11. Tie a soft wire or rope no shorter than the length of the rod to the end of the rod. This will make the job easier when installing a new rod. | |
| 12. From inside the cabin, fold back the cover of the mounting block (for ease of operation, the mounting block can be removed), press the hood release handle all the way and. | 13. . Lifting the tip of the sheath up, remove the cable from the bracket slot (for clarity, the instrument panel has been removed in the photo). | 14. Disconnect the cable end from the handle. To do this, slide the cable in the L-shaped slot of the handle until it stops and bring it out (for clarity, the instrument panel and the hood opening handle have been removed in the photo). | |
| 16. Install the hood lock drive cable in the reverse order of removal, except that the cable sheath holders must be attached last, after installing the lock. Please note that the end of the cable on the lever must be bent with the end of the cable sheath installed in the lock body. | |||
Option 3. Emergency socket.
Let's talk about the most convenient way to open the electromechanical hood lock in the event of a low battery, which involves installing an emergency socket.
At its core, an emergency socket is a cable connected to the car battery with a connector at the end, which is led either into the passenger compartment, or in the case of door locks, the lock cylinder is disabled - outside the car, for example, under the bumper. This connector is equipped with a fuse to protect the vehicle's electrical circuit. When the battery is low, just plug into the connector the cable included in the emergency socket kit with crocodile connectors at the other end, which are convenient to attach to the donor car, external battery or charger. Then wait a while so that it becomes possible to use the alarm key fob to disarm the car and open the hood for further battery maintenance. It should be noted that the presence of an emergency socket, while significantly making life easier for the owner, does not in any way affect the protection of the car from theft and is of no interest to car thieves.
As you can see, there are several ways to open the hood and charge the battery, the choice is yours. To install an emergency socket or make an emergency power supply, you just need to call any Autostudio branch.
Quite often, drivers have a question: how to open the hood? Most often, this structural element jams due to the fact that the cable breaks. The reason for this is wear of the cable or lack of lubricant in the moving mechanism. This seemingly simple detail plays a very big role. It is thanks to the cable that the hood of the car can open and close. Therefore, when it breaks, it brings significant trouble to the driver.
The most unpleasant thing is that a cable break usually occurs precisely when you urgently need to go somewhere. Therefore, any driver must be able to open the hood of the car in the event of a malfunction. There are two ways to do this, which depend on where exactly the cable broke.
The hood opens backwards
This is an even more complicated case. There are two options to solve the problem. The first is to reach the lock through the air intake holes in front of the windshield. But it should be noted that not every manufacturer provides access through this window. In this case, it would be more appropriate to use the second method. Unscrew the fasteners themselves - to do this you will again need to remove the decorative grille from the front of the car. After opening the hood, you need to change the cable in order to be able to use it again.
The video shows the opening of the hood with a broken cable on a VAZ:
Breakage Prevention
To avoid damage to the hood cable, you should adhere to the following preventive recommendations:
- A problem with damage to the hood opening mechanism can arise due to insufficient care or simply after the service life has expired. If your car is several years old, check all parts every six months to avoid sudden breakdowns.
- To replace it, it is worth buying a multi-core cable, since it has a greater strength margin, wears out more slowly and practically does not stretch.
- The cable outlets and attachment points should be lubricated from time to time with lithol, this will help avoid rapid wear from friction.
- Even after light frontal collisions of the car with any obstacle, check all components and parts of the front part of the car. Short circuits, jamming and damage often occur, which can lead to very serious consequences. If you do not have experience with such checks, it is better to contact the service for professional help.
Changing the cable
Many motorists ask the question: how to change the cable? This procedure is not very complicated, but it requires patience and consistency in performing the necessary actions. You must do everything very carefully.
Removing the old cable
It is necessary to begin replacing the cable by dismantling it. It is necessary to remove the broken cable from the lever to open the hood. Remove the handle or look under the dashboard. If the rest of the cable is visible, you can squeeze it with pliers and pull it towards you. When the hood opens you will have access to the cable.
If the cable breaks under the hood itself, you need to drive into the pit and remove the engine protection. Wait until the car engine cools down, otherwise you may get burned. Place your hand between the radiator and the engine block. You should feel for the lock spring and pull it back. In most cases, the part can be pressed towards the battery. After completing these steps, close the hood.
Now you need to remove the old cable - pull it out of the special fastening in the spring. Usually it is enough to use a screwdriver or pliers. Next, you need to remove the fastening near the lever. Perform this step with extreme caution as access is very difficult. Release the fastenings in the body part. They usually look like regular rubber plugs. Now you can safely pull out the cable.
On the video - replacing the hood cable, part 1:
https://www.youtube.com/watch?v=ex5A7QGT5SU
Reasons for failure of the hood cable on the VAZ 2110
Content
The hood lock of a VAZ 2110 car is jammed due to a broken cable. The problem is identified when inspecting the car. Vehicle owners may panic because they cannot open the hood the old fashioned way. However, panic will not help here. The first thought that comes to the driver is to go to a car service center for help, but this is very expensive and takes a lot of time. Are there ways to troubleshoot problems ourselves? Of course there is, but before you start to act, you should understand where the problem occurred.
First you should look for a strip in the interior. There is a lever under the dashboard that has a cable attached to it. The owner of a VAZ 2110 will be lucky if the cable breaks on the inside of the car, then you can get to the broken part with pliers. Having felt the rest of the cable, you need to grab it with a tool and pull it out, but smoothly, not sharply. It is recommended to grab the middle of the cable, not the beginning, as it may slip out. Next, you need to make a small loop so that the tool can be used to tighten the piece into the interior. The main thing is to do everything smoothly, without sudden movements, otherwise the cable will break in another place. If all manipulations are done correctly, the hood will open.