Experienced motorists are fully aware of the need to bleed the shock absorber (strut) before installation. This allows you to identify defects in advance. Prolonged inactivity directly affects the condition of the oil. In addition, when storing the device in a horizontal position, shock-absorbing fluid flows. To restore normal performance, this is precisely what is required. It is important to do everything correctly, avoiding common mistakes.
Why is pumping needed?
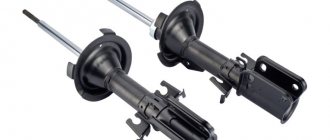
First you need to figure out whether you need to pump it. We are talking about new shock absorbers that have not yet been put into operation.
Shock absorbers contain a stable environment of gas, oil, or a combination of both. New racks fresh out of print may have defects, minor defects, or undistributed filler.
It is to check the rack for serviceability that pumping is needed. In addition, without it, the shock absorber will not have simulated behavior due to the undistributed medium.
Rapid wear and tear can add to these problems. Technically, the medium can be distributed independently, even without pumping the shock absorber struts. However, in the car they will immediately be subject to stress and the filler will begin to diverge. But often the lubricant begins to leave the cylinder, since it was not distributed and concentrated near the rod. In this case, the resource is limited to 5-10 thousand kilometers.
So the answer to the question: “Do I need to bleed the struts before installation?” is yes. This is necessary for the safety of the driver and the vehicle.
By the way, car mechanics recommend replacing shock absorbers in pairs, rather than one at a time. Otherwise, there may be a noticeable imbalance and the machine will be slightly tilted.
Technology for pumping McPherson struts and cartridges
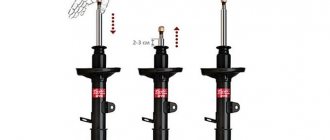
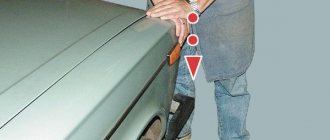
- Install the rack or cartridge with the rod up and smoothly, without jerking, compress it to a certain point (the working surface of the rod should not reach the top of the rack glass by 2-3 cm);
- Fix the shock absorber rod in this position for 2-3 seconds;
- Smoothly pull out the rod until it is fully extended;
- Repeat operations A, B, C 2-3 times;
- Holding the shock absorber vertically, with the rod up, perform a control operation (with sharp but short movements of the rod, make sure that the piston moves smoothly, without failures). In well-pumped shock absorbers, the piston moves smoothly without dips (please note that in some shock absorbers, when fully decompressed, the valve mechanism may enter the compensation cavity, designed to expand the shock-absorbing fluid when warmed up, and not provide any resistance).
Based on materials from the site: https://www.kybcom.ru/prokachka.html
What varieties can be upgraded?
So, which shock absorbers are bled before installation? The answer is everything. Gas, hydraulic and gas-oil ones must be pumped before installation on the car.
Just keep in mind that individual pumping of shock absorbers has been developed for each individual type. Below are detailed instructions.
How are gases pumped?
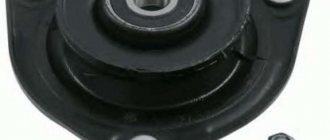
First, study this picture to understand the design of the gas strut. Afterwards you can pump up the racks:
- Turn the stand over with the stem facing down. Place it on a solid base. A concrete floor or brick is best.
- Now gently press down on the plunger. Act without jerking, smoothly and hold it there for a few seconds. At this time, the filler will be smoothly distributed throughout the cylinder.
- Then turn the stand over with the stem facing up and hold it there for 10 seconds.
- After the time has passed, carefully, without jerking, push the piston all the way.
- Now in this position repeat steps 2 and 3.
- We can say that the procedure is completed. All that remains is to make a sharp but short push of the piston inward. Please note that the movement should be soft, smooth, without squeaking.
Almost done, now do not turn the rack over until you install it, otherwise you will have to repeat it. The stem must point up!
It is advisable to wipe the cylinder with a rag to remove oil leaks so that the cylinder does not jump out of your hands during installation.
Hydraulic (oil)
How to properly bleed oil shock absorbers. In essence, the instructions differ little, but with some reservations. In hydraulic types there should be no gas (i.e. air) at all.
Here are instructions for pumping oil shock absorbers with your own hands:
- Lower the stand with the rod down and push it down. Perform the procedure without jerking, with extreme caution.
- Hold in this state for 3 seconds and then turn the piston up and hold for another 6 seconds. Please note that at this moment all the air should come out. This can be determined by the characteristic hissing.
- Now pull out the rod and turn it down and then up.
Unlike gas, oil is a more viscous medium and distributes more slowly. Therefore, it is necessary to repeat this procedure about 3 times. Then sharply push the piston in and make sure that it does not rub and fits easily into the groove.
If friction is noticed, you can repeat the procedure again. Has the result changed? This means you received a defective item that needs to be returned to the store.
Gas-oil
How to bleed shock absorbers before installation? In general, the instructions are almost the same, with the exception of repetition.
Repeat pumping 4 more times at 3 second intervals until the filler is completely distributed inside the cylinder. The gas-oil mixture is very capricious, so sometimes pumping needs to be repeated 5-6 times.
The pumping of gas-oil shock absorbers is now complete. Please note that during installation, extraneous sounds similar to slurping may be heard. This is absolutely normal for this type of rack.
What is needed to pump racks correctly
Any shock absorbers need to be pumped:
- front and rear,
- new and contract,
- one- and two-pipe,
- collapsible and non-collapsible.
The pumping process is not difficult. No special tools required. Just gloves will be enough to protect your hands from injuries and dirt. First, you should familiarize yourself with the general rules for its implementation:
- after completing the procedure, until the very moment of installation in its place, it is necessary to keep the part vertically - otherwise air may again get into it;
- It is important to consider the need to drain oil from some shock absorbers.
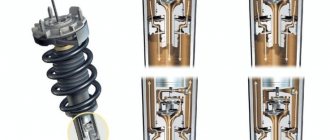
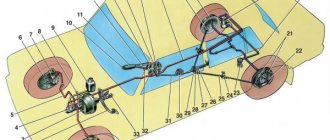
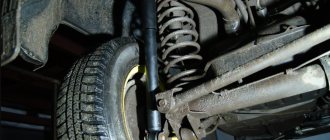
Shock absorbers can be either single- or double-tube, and there are also struts with a remote chamber
You can perform draining in different ways:
- by sinking the piston into the lower component of the part (there should be an undercompression of approximately 3 cm);
- through a groove designed for this purpose - it is usually present in the upper part of the part.
What to do with used ear supports
How to pump new shock absorbers was described above, but with used ones the situation is different. Let's say you disassembled the car and removed the struts from the suspension or bought used shock absorbers - do you need to bleed them? The answer is yes, it is necessary to do this if the racks have not been used for some time. During this time, the natural distribution of the environment has been changed, so they will not be able to perform their functions as expected.
Even if the seller swears that they work properly and were only removed from the car yesterday, don’t take the risk. It's best to spend a couple of minutes preparing before putting them in place.
There is no difference in the process, except for some nuances:
- Listen to the sound the cylinder makes as the piston moves. If a squeak is noticed, repeat the procedure 5-6 times. If the situation has not changed, then all that remains is to throw out the racks or have them serviced for restoration (it won’t be much cheaper than buying them).
- If they work normally, then one pumping will be enough. There is no need to repeat it.
Bleeding the shock absorber before installation - how to do it correctly?
If it comes in handy, here it is for you:
1. Of our domestic hydraulic oils, AMG-10 is still better; it is intended for use in aircraft hydraulics. And as you probably know, even modern passenger aircraft fly at altitudes of about 9000 m with year-round outside temperatures of -40 and below. That is, this oil works normally at such low temperatures. Where can I get it? ... well, think for yourself.
When using the AMG-10, there are pros and cons (figure out the pros and cons for yourself, this is a very personal matter ):
- it is guaranteed to be of high quality, its characteristics are stable and do not depend on manufacturers (+);
- the racks don’t “wrinkle” in the cold, well, there is no effect of a cart on wheels at sub-zero temperatures (in my opinion +);
- the car becomes softer and more comfortable (I have a family car, in my opinion it’s a +, but for GTechnicians it’s a -);
- not all seals tolerate this oil (maybe they do, but I use Japanese ones, so there are no problems with them). I check durability in the simplest way - I take a small jar, fill it with AMG and throw in the oil seal intended for the next replacement. Before “throwing” I measure the dimensions of the oil seal. The holding time is long - my last “repair kit” has been soaking for six months now, they just don’t seem to snot, they hold their geometry and it’s easier for me to keep them in a jar of oil until the next repair than to take them out, scrub and rinse them and store them somewhere. And so they lie quietly in the oil in a twisted mayonnaise jar. There was one case of instability, but these were our, domestic seals.
2. It’s not for me to teach you how to pump and expel air from the inner cylinder. But many people forget about flushing the rack with kerosene, which means an internal cylinder and a piston. I almost forgot, if the struts have already completely died and they have already been “punched” to the point of a characteristic knock, then most likely the valves on the piston are already broken. Then repairing the rack is more of a complacency, it will not work normally. They need to be changed or the valves need to be changed, along with the piston.
3. Are they soldering the nipple away from the camera? Well, this is not our method.
You can, of course, make it simpler, drill a hole in the outer cylinder and insert a short nipple from a tubeless camera there (you’ve probably already met, there is a standard - long nipple, and there is a short one). I’m not asking the question of how to pump the same pressure into both racks, this is, in principle, more or less realistic - from one compressor-receiver it is simultaneously supplied to both racks and is turned off when the required pressure is reached. Unfortunately, less, because the pressure difference will still be due to the nipples. And do you know why? The fact is that the nipple opens at a certain difference in pressure at the inlet and outlet. This pressure difference is determined by the nipple spring, and it is different on each nipple, well, just a little, but different. Taking this into account, it turns out that we supply the same pressure to the input, but at the output we will get a different one. And if we also take into account the small volume of the pumped cavity... in general, the real difference is approximately 0.3 atmospheres. That is, the racks will turn out different. Well, besides, when driving, the pressure in the stand can reach tens of atmospheres. Forgive me, a sinner, but the nipple is not designed for this. He will simply start poisoning. For these reasons, I refused nipples.
True, now I drive simply repaired ones, without “supercharging”, and you would be right in calling all of the above theorizing. Just rummaging around in all this near-column, another idea for the same “supercharging” appeared. Unfortunately, I haven’t done this on my stands yet (well, somehow they still run like that), so I think it’s too early to share my experience.
4. Often they do not replace the entire rack, but put it in the old cartridge. In this case, the inner cylinder with the piston is removed and the same cartridge is inserted into the outer cylinder. There is one subtlety here that is often forgotten and because of this the cartridge dies earlier than it could; death occurs most often in the summer.
So, when the cartridge is already inserted, then you need to pour any oil, even waste oil, into the cavity between this same cartridge and the wall of the old rack. And the point of this is that by placing the cartridge in the rack without oil, we get something like a thermos. The cartridge will heat up when driving; between it and the outer wall there is air, which is known to be a poor conductor of heat, i.e. the cartridge will not be able to transfer heat anywhere, it will heat up, heat up, and overheat to the point of failure. When we pour oil into this wall, the heat from the cartridge through the oil will be transferred to the outer wall and dissipated into the nature around us.
Why is it important to install shock absorbers only after bleeding?
Regardless of the type of shock absorber, pumping allows you to evenly distribute the working substance throughout the cylinder and equalize the pressure. If this is not done, a critical pressure difference will occur, which will damage the rubber elements of the piston. This is especially important for devices that have been stored horizontally. Bleeding also allows you to check the operation of the shock absorber and its serviceability. After all, the rod of a serviceable shock absorber, under low loads and low speeds, enters and exits smoothly, without much effort, knocking or failure.
Must know
During the pumping process, you must know the following rules:
— Any rack is pumped vertically (the rod should point upward);
— After pumping, you cannot change the position of the stand until it is
installation completed;
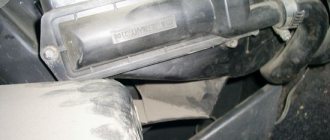
— There are shock absorbers whose design allows oil to be drained from the inner sleeve.
This is done like this: the shock absorber rod is pushed inward using a technological groove. It can be seen at the top of the stem.
How are gases pumped?
The algorithm for working with shock absorbers filled with special gas is as follows:
- The part is turned over with the rod towards the ground.
- After this, you need to smoothly compress and fix it for several seconds.
- After completing the procedure, you need to turn the part over; you must hold it there for no more than 6 seconds.
- The next stage is to extend the rod all the way;
- The final stage is turning the shock absorber over.
Differences in the operating principle of hydraulic and gas shock absorbers
If possible, it is worth familiarizing yourself with the video recording of pumping parts of this design in advance.
The easiest way to work with new racks on video
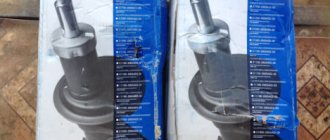
We pump original oil shock absorbers of Lada Priora
These bleeding methods are suitable for most shock absorber struts installed on domestic cars, including the VAZ 2107.
Doing the work manually is not easy, but it is possible. Please note that the front shock absorbers on the Priora are not replaceable and those from other models, especially the VAZ 2110, are not suitable, they have different springs.
There are two methods of pumping, without turning over and with turning over the shock absorber strut.
But there are general recommendations that must be followed in all cases.
- When pumping, the shock absorber should be in a vertical position, and if tilted, then no more than a few seconds;
- Bleeding must be carried out immediately before installation on the car;
- Do not use a tool that can damage the product (gas wrench, hammer, pliers), hydraulics is a delicate matter, remember this;
- Do not allow the rod to rotate in the stand itself around its axis;
- Apply efforts smoothly, without jerking;
- An already pumped shock absorber must be in a vertical position at all times.
Method 1
Place the shock absorber strut on a level place with the lug facing down.
The task is to fully extend the rod when pumping at least 10 times and return it back, thereby ensuring that the liquid (oil) evenly fills the working space.
It is difficult to pull the rod out by hand, so they come up with different devices.
In our case, you can take a 30mm adjustable wrench with a hole in the handle whose diameter just allows you to use the tool as a lever.
Place the key on the rod so that the threads do not touch and take it to the break.
Do not sharply, using even force, pull it out until it stops.
We return it back smoothly, without any jerks.
The latter should go down easier than up, the ideal case is when the lowering occurs under its own weight. But if the rod does not fall without influence on it, this is not scary.
Pumpable types of shock absorbers
Surely you know that shock absorbers are divided into oil, gas and gas-oil. All of them are quite actively used in the design of vehicles.
In this case, pumping is required for all categories of suspension units:
- front shock absorbers;
- rear;
- new parts;
- used;
- original;
- analog;
- single-pipe;
- two-pipe;
- collapsible;
- non-separable.
As you can see, it doesn’t matter what kind of shock absorbers we are talking about. All of them are subject to preliminary pumping before installation. Let you have at your disposal an ordinary old Gazelle or a brand new Audi. Although owners of expensive cars often prefer to have their car serviced at a car service center. But that’s not about that now.
Although it is not fundamentally important whether the shock absorbers are rear and new, or front and used, special attention should be paid to the specific type of element. Gas, oil and gas-oil shock absorbers have their own instructions. Relying on them, you can pump the part with your own hands, and the rack will work for a long time, efficiently and effectively.
Gas shock absorbers
Let's start with pumping these particular shock absorbers. The gas most often used here is nitrogen. It's not difficult to upgrade them. You just need to follow a certain sequence of actions: