Articles
Install a car radio on a VAZ 2110
In this article we will look at how to connect a VAZ 2110 car radio. Of course, this process is not complicated, but you should know the basic rules. For example, how to make sure that after connecting the radio does not drain the battery, or how to connect the car radio to a VAZ 2110 so that it can be used even when the ignition is turned off. Connecting the speaker head unit on this car can be done in several ways.
Connecting a radio: an easy way
Connecting the VAZ 2110 radio consists of performing several simple steps.
They are interrelated and must be carried out sequentially. If everything is done correctly, the device will function efficiently and reliably. The first thing you need to start with is to submit the positives. We are talking about the red and yellow wire. At the same time, it is worth knowing which of them is responsible for what. So, red controls turning off the device, and yellow controls its memory power.
Radio wires
It is normal for the radio to turn off completely when the ignition is turned off. To ensure this, the red wire must be connected correctly. It must go through the lock. The VAZ 2110 car has its own characteristics. The main one is that there is no need to pull the wire to the lock. It can be attached to the pads, or rather to their fifth contact.
This connection has both pros and cons. The disadvantages include the fact that in order to listen to music, you need to keep the key in the ignition. This is very inconvenient if the driver gets out and the passengers remain in the car. Otherwise, the radio will stop working. In addition, keeping the ignition on constantly increases the vehicle's energy consumption.
We carry out plus
The positive wire is an important component of the process of connecting the radio to the car. Its installation must be done correctly. It is better to take a wire equipped with an additional fuse for these purposes. However, its size should not be smaller than the connector itself. There are cases when such a wire is installed from the cigarette lighter. This option should not be practiced. It is only suitable for cases where no other installation option can be used.
Connecting a car radio
This wire can be connected according to the following principle:
- Connection wire black;
- Yellow is sent to the battery. This will allow you to get the nutrition you need;
- The red one is connected to the ignition switch. This will ensure the radio works;
- Blue is responsible for the antenna and is intended for connecting it;
- Diodes required. They can be of any type.
How to check current leakage
Checking current leakage
As you know, any car, including the VAZ 2110, has a minimum leakage current. It is about 50-80 mA. So:
- The alarm consumes about 20 mA.
- Injection system controller - 5 mA.
- Car radio - about 3 mA.
As a rule, such leaks are considered normal and the battery in this case can last for several years without letting the vehicle owner down.
Note. If the leak exceeds 80 mA, it’s time to sound the alarm and look for the cause.
Leakage current measurement
In our article we will not dwell in detail on measuring leakage, but will provide only general recommendations on how and what to do. Basically, everything will concern the car radio:
- Set the multimeter to 10/20 Ampere mode.
- We stick the black probe into the COM hole.
- Red probe in hole 10
Note. To check, it is recommended to remove the battery from the TV remote control and measure the short-circuit current. It is prohibited to measure short-circuit current on the battery itself!
- Go ahead and remove the terminal from the battery.
- We connect one of the wires of the device to the battery.
- Another probe is placed on the wire removed from the battery.
- We look at the value and determine.
Note. If the leakage current comes from the car radio, then most likely the value will be 520 mA.
A simple rectifier on a step-down transformer from a 220 V network
The implementation of this option is more difficult, but for those who love to tinker, it will not be difficult. We won’t tell you how to wind a transformer. We assume that you already have it and with the necessary parameters. Namely:
- input voltage 220–230 V, output - 12 V;
- power - from 120 watts depending on the audio system;
- current up to 10 A.
At its output we will have 12 V AC, and the car radio is powered by DC. Therefore, this tension must be straightened. You can assemble an elementary circuit using a diode bridge and a capacitor.
Diodes, for example, KD226, it is better to set the capacitor at 4700 μF to reduce ripple. Before connecting, check the output voltage parameters. Without load it can be slightly higher and amount to 14 - 15 volts.
Audio system installation
There is a wide selection of audio head units available for sale. All of them are equipped with a radio receiver and differ from each other in the type of sound signal media used (compact cassette or CD), as well as the ability to connect additional sound-reproducing equipment (external amplifiers, filters, CD changers, etc.) and the characteristics of their own amplifier .Materials on choosing a head unit and speaker systems can be found in the “Behind the Wheel” magazines. We will limit ourselves to only describing the method of installing the simplest sound reproduction system. This approach is also justified by the fact that if you decide to install an audio system yourself, it is better to go from simple to complex and, accordingly, more expensive equipment, which, in turn, requires higher qualifications for a successful and high-quality installation. In addition, due to subjective characteristics, each person perceives and evaluates the quality of the sound reproduced by the system differently, and there is a possibility that you will not feel the difference between the sound of an expensive and complex, and an inexpensive but high-quality audio system. In this case, it is illogical to pay extra money for something that you are not able to use. It is better to spend free funds on something more substantial. So, our sound reproduction system will consist of a head unit (radio tape recorder) and four speakers. All system components will be installed in the places provided by the manufacturer. Here you should make a small digression and remember the warranty conditions of the car manufacturer
Of course, this is important to know if your car is new and the warranty has not yet expired.
Determined by output power and number of linear outputs
The power and sound quality of the factory speakers on the VAZ 2112 do not suit many car owners. When choosing a car radio, you should consider the presence of such parameters as:
- Number of linear outputs – additional speakers and a subwoofer can be connected to them.
- Output power – calculated from the power consumption of the speakers. This parameter is usually overestimated by the manufacturer in the technical description for the device.
- The installed equalizer will help you clearly adjust the sound quality.
- Subwoofer adjustment – makes it easier to set up the system.
- Having a screen for watching DVDs is a necessary option for drivers who spend a lot of time behind the wheel.
Once you have made your choice, try the device before purchasing or read reviews about it if you are purchasing it in an online store. Sound quality and working with settings should not be annoying or distracting while driving.
Car radio
How to connect a VAZ 2110 car radio correctly
In this article we will look at how to connect a VAZ 2110 car radio. Of course, this process is not complicated, but you should know the basic rules.
For example, how to make sure that after connecting the radio does not drain the battery, or how to connect the car radio to a VAZ 2110 so that it can be used even when the ignition is turned off. Connecting the speaker head unit on this car can be done in several ways.
Connectors
How to connect a car radio to a VAZ 2110
As you know, head units use various connectors. You should be able to distinguish them:
- Simple connectors.
- International standard or ISO connectors.
The second option is more convenient, since it is easy to connect a radio through it. And even if you replace the standard car radio with a new one, it will be enough to plug the plug and that’s it.
As for individual connectors, it's a little more complicated. You will either have to buy an ISO adapter or cut the wires. The connection must take place through a special individual connector circuit.
Diagram of an individual car radio connector using the example of Audi
Note. Experts do not recommend using the second connection option
As a last resort, you will need to additionally use heat-shrinkable casings and follow maximum precautions
How to spend a plus
How to connect a car radio to a VAZ 2110
The positive wire plays an important role when connecting a car radio. It must be connected correctly and it is recommended to take the wire directly from the battery using an intermediate fuse.
Note. It is imperative to take into account that the diameter of the wiring should not be smaller than the car radio connector. Some people also connect the positive wire from the cigarette lighter, but this is done in extreme cases.
If we consider the connection in diagram form, it will look like this:
- The black wire is grounded.
- The yellow wire is pulled to the battery, creating a power supply of plus 12 volts.
- The red wire is designed to turn on the radio from the ignition switch.
- The blue wire is intended to turn on an antenna or other device.
- The use of diodes is mandatory. Any type will do, and you can even use low-current ones like KD522B.
Connection in a simple way
Car radio in VAZ 2110
To correctly connect the radio to the VAZ 2110, you should do the following:
Apply plus to the red and yellow wires.
Note. Don’t forget that the yellow wire will be responsible for powering the device’s memory, and the red wire will be responsible for turning off the radio.
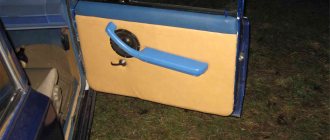
In order for the radio to turn off after turning off the ignition, you need to pull the red wire through the lock.
Note. Features of the VAZ 2110 car will allow owners not to pull the wire to the ignition switch, but to connect directly to the fifth contact of the block.
But this connection also has disadvantages. In particular, you need to leave the ignition key with the passenger so that he can listen to music if the driver is not present. In addition, listening to the car radio with the ignition on significantly increases power consumption.
Complicated connection method
How to fix a VAZ car radio
This method is more correct:
- We lead the red wire of the radio through the cut to the button. Everything is clear here. A standard button with on/off switch is hung in the cut of the red wire. This connection method is good because the radio will always work. If you intend to park the car for a long time, simply turn off the power supply with a button.
- You can do this through the switch button between constant plus and after ignition. This means activating the emergency button. At the same time, if the button is pressed, a constant plus from the battery or cigarette lighter will go to the radio, but if it is not pressed, a plus from the ignition will go.
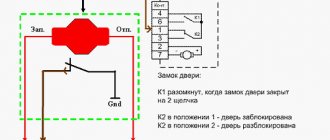
- Possible through an alarm system. This is a standard scheme that involves supplying a plus and automatically disconnecting it from the alarm. If the VAZ 2110 has a two-wire solenoid that is activated to close/open, changing the polarity for each operation, then the work will proceed as follows.
- When the doors open, the plus is supplied to the relay. It fires and goes into self-pickup mode. This ensures constant power supply from the battery through the terminals of the contacts and the second relay. In other words, the radio is automatically connected to power.
- As for turning off the radio, it will go like this. The second relay is activated and the power circuit is turned off - the first relay/radio tape recorder. Thus, the relay goes into a de-energized state.
Note. And this scheme has a drawback. This increased energy consumption is due to an additional relay that will be constantly turned on along with the radio.
Choosing the right connector
The head unit has several connectors. And this is not surprising. It is multifunctional and performs different tasks. Each hole serves a different purpose. Before you begin installing the equipment, it is important to determine which connector is needed for this.
They come in two types: simple and international standard or ISO. Each of these connectors can be used to connect a VAZ 2110 radio. But the process is different. If we talk about a simple option, then it is worth using the ISO hole. To replace a standard device with a new one using it, just change the plug.
- Guide for connecting radios on Toyota models
Car and radio ISO pads
As for other connectors, they are individual. Therefore, working with them will be more difficult. In this case, you will need to additionally purchase an ISO adapter or cut the wiring. In this case, a special circuit is used, which is shown in the photo below.
Radio connection diagram
As practice shows, specialists rarely practice the second option. And this is not surprising. After all, it requires the use of additional elements. For example, heat-shrinkable cambric. In addition, the entire procedure must be performed with extreme caution and in compliance with safety precautions.
How to connect
To correctly connect the radio to the VAZ-2110, you need to connect the yellow wire for supplying a positive pulse directly to the battery. This cable ensures that settings are saved in memory and is used to power the amplifier when the car radio is operating. The cord with red insulation must be connected through the ignition switch; direct connection to the battery leads to an increase in the leakage current to 100-120 mA, which quickly discharges the battery.
When connecting the red wire through the lock, the radio only works when the ignition is on, which does not suit all owners.
When the key is inserted into the lock, positive power appears at the output, allowing you to turn on the head unit. When the key is removed, the radio automatically turns off; the discharge current in idle mode does not exceed 30 mA.
Connector selection
To connect the radio to the VAZ-2110, ISO connectors are used, which are connected to the head unit through an adapter or by twisting wires. The second method is not recommended because it does not provide reliable contact.
2 connection methods
The basic connection method is to use the power cord of the trip computer, which is not installed on all machines. The method is easy to install; switching does not require extension of power cables. But the radio only works when the ignition system is turned on, which further discharges the battery.
The owner needs to find the connector hidden in the depths of the instrument panel, and then use a test device to find the contact to which positive voltage is applied. A wire with red insulation is connected to this plug; voltage is supplied when the ignition is turned on. In this case, the yellow wire is connected directly to the battery, ensuring that the settings are saved.
An alternative technique is to switch through a 5-pin relay and alarm controller. Terminals 85 and 87 are supplied with positive voltage from the battery; terminal 30 is connected to a positive power cable running through the ignition switch. The negative output of the additional channel of the security complex is connected to plug 86.
The circuit ensures that the audio device is automatically turned off when arming, but at the same time the battery is actively discharged. To reduce the current, it is recommended to install additional transistors in the additional channel circuit. Another switching method is to install a resistor instead of a relay located in the circuit between the power and control cables.
source
Connection instructions
Connecting the radio through the ignition switch ensures that the head unit operates when the key is turned to the ACC police or the ignition activation position. After removing the key from the lock, the power to the amplifier is automatically turned off, only the voltage supply from the battery is maintained to support the radio's memory.
The radio connectors have 2 cables equipped with an insulating coating in yellow and red colors. The yellow cord leads directly to the battery or element on which positive power is not lost. A separate fuse is inserted into the circuit to protect the equipment from short circuits and fire.
The red cord is led to the contact group of the ignition system lock.
The user can connect the car radio through the ignition switch on a VAZ-2107 with an injection engine according to the following scheme:
- Lay a cable from the ignition switch that connects the ACC plug and the red power cable of the radio.
- Route the yellow cable to the battery using the standard channels in the engine panel. The cable is laid parallel to the standard harnesses; it is necessary to protect the product from contact with hot elements of the exhaust system or moving parts.
- The negative power supply cable, equipped with a black protective layer, is connected to the car body or output to the battery. It is possible to use the negative output of the cigarette lighter, which is located next to the mounting socket of the head unit.
- Connect the display and button backlight cable to the positive side light outputs. When you turn on the external light, the backlight on the radio automatically turns on, the intensity is adjusted by the standard regulator.
- Check the functionality of the device. Make sure there is no leakage current when the equipment is turned off by connecting the test device to the power circuit. The permissible current in standby mode is 10 mA.
Algorithm for updating the lock:
- Remove the decorative plastic casing of the column.
- Disconnect the plug from the contact group.
- Remove the 2 Phillips head screws that secure the lock body to the column. To dismantle, insert the key into the hole and then move it to position O. There is a hole on the side of the body into which a thin object is inserted, pressing the latch tab.
- Remove the device from the steering column.
- Carefully remove the contact group in which you will need to change the configuration of the lower platform. It is allowed to use an element from a product that has the ACC position.
- Install the removed elements in reverse order. As a result of the modification, instead of the O position, the ACC position is obtained, which allows you to connect the head unit according to the method described above.
To install the equipment on VAZ vehicles with front drive wheels, terminal 15 is used, located on the ignition switch housing. A standard cable protected with blue-black insulation is suitable for the terminal. The power cord is connected by soldering or crimping with a metal tube and then protecting the junction.
It is not recommended to twist the cores, since the connection does not provide reliable contact and oxidizes.
On Priora-2 and Grant cars, standard wiring with ISO connectors is used, connected through a lock.
An alternative method of connecting equipment without an ignition switch is to connect to the plug of the on-board control system, which is installed on some VAZ models with front-wheel drive. To connect, use pin 5 (gray cord), located in the middle in the top row of plug wires. When the key is placed in the keyhole, positive power automatically appears on the contact. After removing the key, the radio turns off, but the memory settings are saved by connecting the yellow cord to the battery.
In this article we will look at how to connect a VAZ 2110 car radio. Of course, this process is not complicated, but you should know the basic rules. For example, how to make sure that after connecting the radio does not drain the battery, or how to connect the car radio to a VAZ 2110 so that it can be used even when the ignition is turned off. Connecting the speaker head unit on this car can be done in several ways.
Connecting a radio via an additional button
To prevent current leakage, place a button in the cut of the red wire:
- Button in the section of the red wire of the radio;
- The button switches between constant “plus” and after ignition;
- Through the alarm.
With the first option, I think everything is clear: just a regular on/off button is hung in the cut of the red wire on the radio. Thus, your radio always works, but if you decide to leave the car in the parking lot for a long time, then simply turn it off. button to supply current to the radio.
The second option is when an emergency button is used instead of a regular button. You will use the second emergency button to switch the power mode of the radio:
- The button is pressed - power is supplied to the radio through a constant plus
- The button is not pressed - power is supplied to the radio through the plus from the ignition
Example of connecting a car radio:
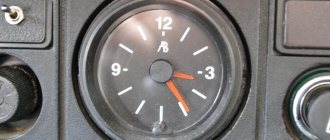
- The radio backlight wire to the cigarette lighter backlight wire.
- Plus after ignition from the clock block (orange wire)
- A permanent plus with a battery or cigarette lighter.
- Ground "-" from the cigarette lighter
Third option: you can install a simple circuit that will supply a plus and automatically disconnect it from the alarm.
If the car has a two-wire solenoid with activation for closing and opening by changing the polarity for each of these operations, then it should work like this: When the doors are opened, a positive pulse from the solenoid is sent to relay P1, and the relay will operate and actually go into self-retaining mode, providing power from the battery through the terminals of its contacts and relay P2 and connecting the radio to the power supply.
If there is a positive pulse during closing, relay P2 will be triggered, and the power supply circuit of relay P1 and the radio will break, the radio will turn off, and the relay will go into a de-energized state. But this scheme also has a minus - it is increased power consumption due to the additional relay P1, which will always be turned on along with a working radio.
How to connect
Connecting a car radio is carried out in stages:
- choosing a suitable connector;
- determining the connection method;
- connecting wires;
- housing installation.
Connector selection
For the VAZ radio, different connectors are selected:
- simple configuration;
- ISO type or international standard designs.
Simple connectors are universal, can be quickly installed, and require the use of a plug.
International format designs require the development of a special circuit for the connector. During installation, heat-shrinkable tubes can be used to comply with safety requirements.
We carry out plus
When connecting a car radio, it is important to route the positive wire correctly. The diameter of the wiring must match the radio connector
The diameter of the wiring must match the radio connector.
The positive connection is carried out according to the standard scheme, taking into account the following rules:
- The black wire needs to be grounded.
- The yellow wire is connected to the battery to create a power supply of 12 W.
- The red wire is required to connect the device to start from the ignition device.
- The blue wire is intended for connecting an antenna or other equipment.
- In the process it is necessary to use standard or low-current diodes.
Easy connection without button
You can connect the VAZ-2110 radio without a button by following the steps indicated in the instructions:
- It is required to apply a plus to the yellow wires (they regulate the power supply to the device’s memory) and the red wire (controls the radio turning off).
- To automatically turn off the car radio after stopping the ignition, you need to pass a red wire through the lock structure.
- In a VAZ-2110 model car, you can run networks to the contact of the block.
Correct connection with button
The button connection method ensures stable operation of the device. When stopping the car for a long time, it is necessary to turn off the current transmission.
You can correctly connect the radio in a VAZ-2110 car with a button by following these steps:
- The red wire is connected to the button through the connector. Then a standard button is hung.
- You can connect a button that allows switching between poles after ignition. In this case, the button reporting an emergency will be activated.
- You can connect the car radio through the alarm system. The standard method involves applying a pole that automatically disconnects the alarm.
For a car that has a two-wire solenoid that is triggered to open or close the doors and changes polarity at the stage of sequential operations, the radio is installed in a different way. Plus must be fed to a relay, which starts and operates in automatic picking up mode. In this way, constant power supply is ensured.
The car radio gets the ability to start in automatic mode. It must be taken into account that the implementation of this connection scheme ensures high power consumption due to the use of an additional relay.
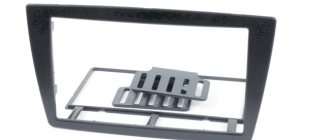
Installation of the car radio is carried out in the following sequence of actions:
- It is necessary to remove the cover under the clock and route computer equipment.
- The metal body of the device is inserted into the rectangular window, which is fixed using triangular-shaped tabs.
- Then the antenna and power connectors are connected to the main device using adapters or directly.
- The housing must be installed in the mounting channel before the latches engage.
- Finally, the correct operation of the equipment is checked and decorative polymer plates are installed.
When operating a technical device, it is important to monitor current leakage due to the installation of an additional device. The allowed minimum current loss reaches about 50-80 mA
If the indicator is exceeded, it is necessary to inspect and repair the equipment.
- How to connect a car radio to a power supply from a computer
- ISO connector
- Do-it-yourself installation and connection of a radio on a Lada Vesta
- Instructions on how to connect the Mystery radio and wiring diagram
Installation
Installation of the car radio is carried out in the following sequence of actions:
- It is necessary to remove the cover under the clock and route computer equipment.
- The metal body of the device is inserted into the rectangular window, which is fixed using triangular-shaped tabs.
- Then the antenna and power connectors are connected to the main device using adapters or directly.
- The housing must be installed in the mounting channel before the latches engage.
- Finally, the correct operation of the equipment is checked and decorative polymer plates are installed.
When operating a technical device, it is important to monitor current leakage due to the installation of an additional device. The allowed minimum current loss reaches about 50-80 mA. If the indicator is exceeded, it is necessary to inspect and repair the equipment.
There is another way to connect the radio, which will ensure that it is turned on not through the ignition switch, but using a separate button.
First, you should buy a suitable button and a contact block with the wires intended for it at any auto store. All this is not very expensive and will require no more than one and a half hundred rubles. Moreover, it doesn’t matter what the button is if the owner does not need order on the console. It can be from the main beam, or with a different image, the main thing is that it fits under the connector for spare buttons, where the plug is located. The only point is that it is advisable to choose a button with an indicator.
Mounting blocks for installing an audio system
If the wires of the block turn out to be short (and this often happens), it is better to extend them in advance by soldering. Twisting is not suitable here and should not be used.
The button is connected in the following way:
- connector A - for grounding;
- B - passes from the side lights illumination;
- C - removed from the block purchased with the button;
- D - powers the power indicator;
- 1 — battery wire (red);
- 2 - red radio wire.
In one block, two contacts should be soldered together - 2 and D. The button is installed without removing the console. It will be enough to pull out the corresponding plug.
Cut the wire that fits the contacts of the red wire of the radio and solder wires 1 and 2 into the cut. A and B should be connected to the same contacts from the rear window heating button or other similar buttons. Do not forget that during all electrical work the battery should be disconnected.
When everything is connected and soldered, you need to double-check the system and make sure that the circuit and connections are made correctly. Then the slides and the removable radio panel are installed in place. The last step is to check how everything works. Now you can turn the radio on and off with a new button, and you don’t have to worry about charging the battery. One of the nice features of this connection is that when you turn off the radio, all settings are saved.
If, out of habit, the radio was turned off with its original button, this is not a problem, because the indicator of the new button will still light up and remind you of the need to turn it off.
For those who have already installed radios on other Lada family cars, installing a multimedia device on Kalina will be a breeze.
Possible problems with the VAZ 2112 radio
The electrical circuit of the VAZ 2112 connects the power to the radio through a 15 A fuse and is combined with the cigarette lighter. Being the most vulnerable equipment (connection of additional energy consumers, ingress of moisture, debris or foreign objects), the cigarette lighter very often becomes the cause of a malfunction of the music system.
Car radio
If a situation arises when the radio backlight is on (with the ignition on) but there is no sound, you need to check the fuse. The shield in the VAZ 2112 is located on the panel to the left of the steering column.
The check is carried out as follows:
- The fuse panel opens.
- Take 6 fuse from the top row.
- The integrity of the contact between the two connectors is checked.
- A new fuse is installed (if necessary).
- The functionality of the equipment (cigarette lighter, radio) is checked.
Car radio 2 din
What you will need
To connect you will need a set of materials:
- a piece of copper cable;
- soldering iron and lead-tin solder;
- insulating tape on a fabric or polyvinyl chloride basis, the use of heat-shrinkable tubing is allowed;
- a set of tools for removing the steering column casing;
- test device.
Traditional and recommended connection
The instructions for the standard radio of VAZ cars, and other brands of cars too, describe the connection via the ignition switch. This is a completely working scheme: insert the key into the ignition - the music starts. I took out the key and it didn't work.
How this is implemented can be understood from the diagram shown in the photo: the black wire is connected to the case, the yellow wire supplies constant power to the radio - power supply to the memory, so that the settings are not lost and the clock works. The red wire is the power wire, it supplies the main power, passing through the ignition switch, and is connected to the power terminal of the radio. From the point of view of manufacturers, this is the most correct scheme. From the users' point of view, there are disadvantages to this method:
- Inability to use the radio without the ignition on. And that’s right, there’s no point in sitting in the car, go do something. But there are different situations, you are waiting for someone, or something else. In general, it's inconvenient.
- The need to leave the key in the ignition, leaving the passenger in the cabin;
How else can I connect?
If there is a problem, there will definitely be ways to solve it.
- Connect directly. One of these methods is to connect directly, bypassing the ignition switch. This is the most common option. But it’s far from the most convenient or correct. According to the previous figure, both the yellow and red wires are twisted together and go to the battery. This method solves the above problem - the radio always works, the main thing is that there is a working battery.
But having corrected one, we get another problem: a constantly working radio tape recorder consumes energy sensitively. Even when turned off and even with the panel removed. Which is very sensitive when parked for long periods of time for old Ladas.
- Ignition simulator. In fact, the ignition key is an ordinary on-off button. If you connect an ordinary button directly to the connection diagram of the radio, in the gap of the red wire, this will make it possible to listen to music when the ignition is turned off by pressing the power button.
If the car is parked for a long time, the button is turned off and the radio does not consume energy. The breaker on the power supply wire can also be installed before the ignition. Then the radio can be turned on with the second button for turning on the emergency signal: when the button is pressed, power is supplied from the constant plus, when turned off, through the ignition.
- Basics of radio electronics. This option is more technologically advanced. To implement it, you will need a pair of diodes designed for a current of 300 mA. The cathodes of the diodes are soldered together. We connect a wire to the anode of one, which is supplied with power coming from the ignition switch. To the opposite diode on the anode we connect the blue wire from the radio, the one marked REMOTE (power supply for the active antenna). We connect the wire leading to the ignition to the diode junction to control the ACC function (power supply to primary consumers - first key position).
Some tips
I recommend taking advantage of the opportunity while everything is sorted and carrying out some simple procedures to improve quality. These tips may seem trivial to you, but they will help extend the life of the new audio system for an extra year or two. First, tin the wires and solder them.
This procedure will prevent the sound from losing quality even during prolonged use. Use female/male connectors. This method will be more effective and easier than soldering. Use heat shrink tubing. They will help maintain the quality of wire connections and extend the time it takes to resolder.
Car radio 2 din class
More and more car enthusiasts who value comfort and convenience have begun to consider the option of equipping the VAZ 2112 with 2 din radios. It is distinguished from classic models by:
- Dimensions – 17.8 x 5.0 x 18.0 cm.
- Availability of a tuner for playing CDs.
- USB input for reading information from a flash drive
- Ability to play DVD files.
- Input for connecting and viewing information from a video camera, navigator and recorder.
- LCD liquid crystal touch screen.
The ability to connect to the driver’s cell phone via Bluetooth allows you to make/receive hands-free calls. The navigator helps you accurately plot your route.
Car radio 2 din
The procedure is:
Step-by-step installation of a Lada Granta radio: how to install it yourself in standard, normal and luxury
- Installation of the radio shaft.
- Power connection.
- Connecting the connector to the speaker wires.
- Connecting a video camera.
- Installation of the radio itself in the shaft and fastening with a snap frame.
Polarity must be observed when making connections. The wiring is pink - positive, black - negative (ground). If the connection is incorrect, the fuse may blow. If the radio does not work after connecting, you should check its serviceability and, if necessary, replace it with a new one after reversing the polarity.