Nowadays, many developments in the field of automobile accessories are aimed at increasing the operating comfort of cars.
One of these accessories, which is becoming increasingly popular, is a device for automatically raising the door windows when the car is armed with an alarm, it is also a module for one-way closing of the door windows.
Popularly, such devices are called glass closers.
The usefulness of using door closers is obvious; before setting the car alarm, the owner does not need to check whether all windows are closed, since these devices will automatically close them.
Initially, only premium cars were equipped with window closers, and then only in the top configuration.
Over time, many drivers appreciated the benefits of this device, which led to the emergence of universal door closers that can be installed on almost any car.
In addition, some car owners who are familiar with radio electronics have begun to assemble homemade devices that perform their function very well.
Glass closer - what it is, how it works
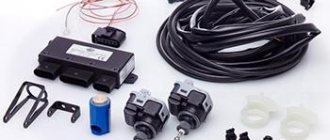
A car window closer is an electronic unit that connects to the alarm or central locking system, as well as the window control system.
Moreover, in the car electrics it is installed between the control keys and the electric motor that raises and lowers the glass. So this device can only be used on cars that have a control system.
All modules operate on the same principle: since it is included in the system between the keys and the electric motor, the voltage that is transmitted from the keys to the motor in any case passes through the block. But during normal opening and closing, the module is not involved in the process.
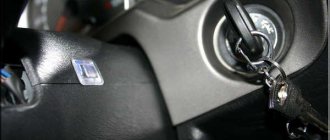
As soon as the owner of the car turns them on from the control panel of the security system or central locking, the control module transmits a signal to the device, and it powers the electric motor, which raises the window.
Standards and schemes from different manufacturers
There is no standard scheme for connecting a car security system.
This can be understood by analyzing the electrical circuits of signaling systems from different system manufacturers. The color of electrical circuits in systems from different brands may be intended to solve different problems. Almost every manufacturer has a certain method of installing and connecting devices. The colors of the cables in each electrical circuit may differ depending on the standards adopted in a particular country. In order to correctly connect the signaling elements, you need to focus on electronic measuring equipment for ringing. When installing an alarm system on a car, it is not recommended to use conventional lamps for dialing. Depending on the location of the main units, the user may need to purchase additional electrical circuits. During installation, it must be taken into account that the cross-section of the additional and standard signaling wires must be identical.
Map of the location of the component signaling devices
Tips for choosing a door closer
The market for automobile accessories does not suffer from a shortage of window closing modules. They are mainly produced by companies engaged in the production of security systems for cars.
The most popular manufacturers of door closers are Sheriff, Pandora and Tiger, although there are plenty of other manufacturers.
Choosing car window closers is not so difficult. First you need to decide how many windows this module should be responsible for closing.
All this needs to be done because devices are produced that ensure the closure of two glasses, as well as four.
So when choosing, you should consider whether there are glass control systems on the rear doors.
Next, you need to decide what functions the module should have.
According to this criterion they are divided into:
- Simple single-function;
- Multifunctional.
Simple devices are only capable of closing the windows when arming a car. But multifunctional ones are able to remember the position of the windows before closing and return them to the same position after removing the car from the alarm system.
They can also return the glass to its original position if it hits an obstacle when closing.
Some modules may have a number of other functions that can be turned on and off, in general, you can customize the operation of the closer at your discretion.
But the cost of multifunctional modules is much higher than simple ones, despite the fact that many of its capabilities may not be in demand, and connecting it will be quite difficult.
Review of popular models
We've sorted out the installation of the mechanism, now all that remains is to choose the closer. Let's talk about models that are suitable for any type of vehicle. From Russian VAZs to foreign Mitsubishi, Nissan.
- Pandora DWM 210 - works on two windows. The car will be able to remember the position of the glass. There is protection when meeting an obstacle or overload. You can turn off the alarm sensor while the glass is moving, this will provide additional protection against accidental activation.
- Mongoose PWM-4 - works on four windows. The windows of the car are closed one by one. There is no position memory. There is overload protection. One of the most popular models.
- Cyclon PWM-4 - connects to four glasses. The unit is additionally protected from overload.
- Convoy CL-200 is an inexpensive model with 4 windows. Protected from overloads.
- Cyclon PWM-2b - installed on 4 car windows. Protected from excessive loads.
Installing a simple door closer
The more functions and the number of doors that the module will work with, the more difficult it will be to include it in the car’s power supply circuit.
Next, we’ll briefly look at how to connect a simple module that operates on two doors.
You can install such a door closer yourself without any problems.
You will need a few tools:
- Screwdrivers;
- Knife and wire cutters;
- Insulating tape.
First you need to decide on the installation location of the device.
If the car has only one window control system, installed on the driver's door, but also responsible for opening the glass on the passenger door, then it would be better to install the module inside this door.
If the systems are separate and located on two doors or the control keys are located on the center console or tunnel, then installation under the dashboard would be optimal.
Installation and connection.
After choosing the installation location, you can begin installation and connection.
The module must be powered from the car’s on-board network, so a “positive” wire must be connected to it, as well as “ground”.
Then you need to identify the wires that transmit voltage from the control keys to the electric motors.
According to the diagram supplied with the closer, the wires from the module are inserted into the power supply wiring.
Each door has its own outputs in the module and they differ in the color of the wires.
It turns out that the wire running from the key to the electric motor is cut in a place convenient for connection and the module wires are connected to each end of the wire.
This way the module is connected to the glass control system.
It is important to choose the right wires, since there are two of them from the keys to the electric motor - when voltage is applied to one of them, the glass is raised, and when voltage is applied to the second, it is lowered.
If the module is mistakenly connected to the lowering wire, then when the car is armed, the windows will automatically open.
Next, you need to connect a wire to the closer that will transmit an impulse from the security system module. Moreover, you need an impulse that will be transmitted to the module within a few seconds after arming the car.
Different systems use positive or negative impulses. Therefore, before connecting, you should find out what kind of impulse the system installed on the car sends out.
Closers are universal, so they have output for positive and negative impulses, the main thing is not to confuse them.
After connecting all the wiring, before removing all the wires, it is better to check the functionality of the closer.
If everything works fine, all that remains is to properly insulate all wire insertions and then remove them from sight.
Connecting a 4-door closer is done according to the same principle, only there will be more connections to the standard wiring.
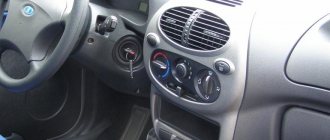
"Kalina": installation work
We will install the window closer in the driver's door area. There is no need to pull any conductors. It is best to mount the unit itself as close to the button connectors as possible.
Many models of these devices may have different active signal levels, so you must first understand each individual circuit. To do this, you can use the following algorithm. Let's use Beta-10 as an example to look at what goes where.
The device is equipped with a set of connectors that are suitable for Kalina and Kalina 2 with old buttons. With the new ones you will have to redo everything.
The difficulty here is that in Kalina everything is switched to +. The closer receives signals through a short circuit to ground. This means you need to tear off the positive wire on the button block and solder ground in its place.
Homemade door closer
As for homemade door glass closers, car enthusiasts have already created a large number of different models that work well. Moreover, there are also simple homemade devices, and some manage to create multifunctional sensors.
It’s not difficult to make a simple closer, having a little knowledge of radio electronics, and you also need the elements to create the module.
You will need several capacitors, electromagnetic relays, a timer and several transistors and resistors.
The principle of operation of a homemade module is as follows: the signal to the module is taken from the security system unit.
This signal is sent to a relay, which closes its contacts, connecting the power source to the capacitor through a resistor to charge it.
After the signal stops, the capacitor is connected to another relay, which begins to power the timer.
The low voltage coming from the timer will open the transistor, then the voltage will go to another relay, after which the voltage will go through the resistor to the electric motor - the glass will begin to close.
After the glass is completely closed, due to its emphasis on the door, the load current in the network will increase, which will entail a voltage drop.
Due to the voltage drop, the transistor will close, thereby de-energizing the relay, and the closer turns off.
This scheme is considered very simple, but it works without problems and performs its tasks well.
Specifications
| Supply voltage, V | 9…15 |
| Current consumption, mA | 3 |
| Maximum output current, A | 20 |
| Trigger pulse type | positive, negative, not less than 500 ms., digital code |
| Output pulse type “Expansion” | digital code |
| Work control | electromagnetic engine noise |
| Limitation of operating time (for each glass), sec | 8±1 |
| Number of switched channels | 2 |
Bottom line
As a result, we can say that factory car window closers can be installed by almost every driver with at least a little knowledge of electrics, especially since the instructions are included.
But not everyone can solder and install a homemade device, and the reliability of such a device is highly questionable.
Although there are already good models that have been working for years. But here you need to focus on the reviews of people who use such devices and the qualifications of the master who made them.
Connecting power windows VAZ-2109
Owners of a VAZ 2109 car can replace power windows with electric windows. On 2109 cars, electric windows can be connected via standard wiring, which already has everything provided for connecting an ESP.
This circuit is used to connect ESP on more “rich” configurations of the nine and it is advisable to use it when connecting independently. Below are diagrams for connecting an ESP with fuse blocks of new and old models.
Wiring diagram for power windows on a VAZ 2109 with an old-style mounting block (17.3722):
- 1 - Mounting block
- 2 - Ignition relay
- 3 — Ignition switch
- 4 — Right door electric window motor
- 5 — Left door electric window motor
- 6 - Right door power window switch
- 7 - Left door power window switch
- K7 - Power window power relay
- A - To terminal “30” of the generator
- B - To the wiring harness block connected to the heater lever illumination display
- B - to the heater lever illumination display
- G - conventional numbering of plugs in the gear motor block