Puller drawings. Repair equipment. Tool
This topic will provide drawings of pullers and devices for car repairs, as well as drawings of special tools.
The following drawings are currently available:
Drawing of the front suspension strut rod nut remover.
Drawing of a universal screw puller for steering rod pins.
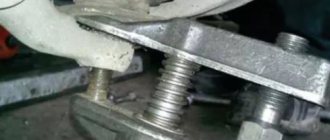
Drawing of spring ties for front and rear suspensions.
Drawing of a puller for pressing out the silent block of the rear suspension shock absorber.
Drawing of a puller for pressing in the silent block of the rear suspension shock absorber.
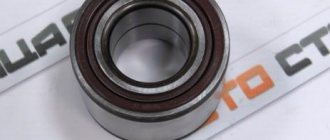
Drawing of a wheel bearing puller for the front and rear wheels.
Drills for knocking out wheel bearings
Photo of drifts for knocking out a wheel bearing
Mandrels for pressing in wheel bearings
Photo of mandrels for pressing in the wheel bearing of the front and rear wheels of VAZ-2108, VAZ-2109, VAZ-21099, VAZ-2113, VAZ-2114, VAZ-2115. The photo also shows rings from old wheel bearings, they also help with pressing.
Drawing of a puller for replacing rubber-metal hinges of the rear beam.
Replacement of rubber-metal hinges of the rear beam
Drawing of a puller for replacing the silent blocks of the front suspension arm.
Puller for replacing silent blocks of the front suspension arm
Device for compressing brake cylinders.
The brake cylinder compressor is made from old brake pads. Everything seems to be visible in the photo.
Photo of a device for compressing brake cylinders.
Drawing of brake cylinder compression device
Source
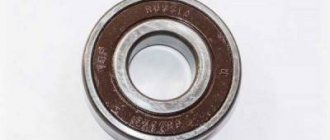
Replacing the wheel bearing Lada Kalina - installing a new part
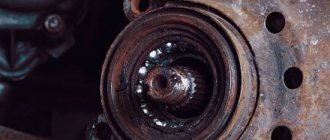
- After pressing out, we take out the puller; the fist without a bearing looks like this:
- Clean it from dirt and wipe the inside - the seating surface.
- Install the retaining ring on one side.
- On the other side, press in the new wheel bearing using a puller or press and secure it with a locking ring.
You can also press the bearing using a vice if you have no other tools. Spread the jaws of the vice so that the bearing and fist fit in. Use the puller's backing disc under the outer ring, so that the vise forces are directed only towards the end of the outer part. The process is shown in the photo below.
- Let's return to the hub, first remove the protective ring.
- Next, we clamp the part in a vice and use a sharp chisel to move the bearing race from the hub of the Lada Kalina by 1 cm.
- Now we hook the clip with a puller and pull it off the hub.
- We press the hub into the inner race of the new part.
When pressing, make sure that they mate without distortion. To make pressing easier, heat the parts (not the bearing); in our case, you can heat the rotary housing. You can also lubricate the surfaces of products with Lithol.
- Now the whole assembly is assembled.
- Reassemble the assembly in reverse order. (See points No. 10-No. 1.)
After replacement, put on a new hub locknut.
Which wheel bearing puller to choose or how to make it yourself
A wheel bearing puller is a specialized tool designed for pressing and pressing parts into vehicle hub units.
Since the bearings are installed on the seating surfaces with interference, pressing or pressing them requires a lot of force to be applied to a limited area of the unit. Conclusion - for this operation you need a reliable and also universal tool.
A wide range of size ranges for hub units correspond to various types of wheel bearing pullers (HBP). Choosing the right puller for replacing bearings is not easy. You will learn what parameters to follow by reading the article. We will also touch on the topic of making the device yourself and how to operate the tool.
Recommendations
If necessary, replace the Kalina front wheel bearing; all connections should be cleaned during reassembly. Removing dirt allows you to increase the service life and improve the quality of fit of parts and elements;
We also recommend reading the article on how and with what to lubricate a wheel bearing. In this article you will learn why you need to lubricate your wheel bearings, as well as how to lubricate your wheel bearing.
During the process of reassembling the connections, it is also important to fill them with lubricant. Graphite lubricant (graphite) is well suited for these purposes. Additional lubrication also increases the service life of parts, and also greatly simplifies subsequent disassembly.
Types of wheel bearing pullers
Study the summary table, which presents several main types of BSC, as well as specific recommended models.
| Type and model | Application | Average price, rub. |
| With 3 legs | Removing parts from axles and shafts, including rear hub ball bearing races. | 2000-3000 |
| With 2 legs | Removing parts from axles and shafts, including rear wheel hub bearings. | 1000-2000 |
| Cup with a set of mandrels | Removing and pressing parts into holes, including steering knuckles and front wheel hub bearings. | 6000-8000 |
Third stage
Now you need to weld two supports to the body. The seam must be strong and airtight. Let's start working on securing the nut. We screw the bolt into the hole and thread the nut. We secure everything with a welding seam, but do not overdo it with the current, otherwise the nut may melt. It can be attached externally or internally. With the nut located internally, the overall design of the puller seems more durable and reliable. The threaded rod will act as a handle. This makes it much easier to remove the bearings.
A quick overview of wheel ball bearing pullers
It is impossible to choose a universal kit for all types of car repairs, since the range of actions is limited:
- a variety of shapes, sizes for charging to the starting position;
- limited work space.
Cup - “Force 9T0311”
- Internal mandrels 34-80 mm.
- External mandrels 44-90 mm.
- The dimensions of the outer diameter of the cups are 44-90 mm.
- Rod (stud) with nuts.
- The plates fit a wide range of sizes.
- The steering knuckle remains in place.
- The set is included in the workshop press kit.
- Pressing-pressing takes place in one step.
Three-jaw – “KS TOOLS 630.3002”
Garage tool. Suitable for use in restricted access work areas.
- Long life if you follow the manual.
- The articulated design of the paws engages securely.
- Removing stuck parts from shafts and machine axles.
- Wide grip range - 20-230 mm.
- Maximum force - 4.5 tons.
- Screw rod dimensions: M18 x1.5 x 240.
- The dimensions of the bolts for the hinges are 19 mm.
Two-grip universal – “Kukko K-2030”
The tools from the set of the German manufacturer Kukko are well-thought-out forms of gripping mechanisms. On the traverse, the paws move along guides, and the suspension screws fix the specified position.
- Grasp the paws at an angle parallel to the axis of the tension force.
- Reliability of engagement.
- Maximum tension - 5.5 tons.
- The legs rotate 180 degrees.
- Wide grip range.
- Double acting.
- Suitable for use in confined spaces.
Hydraulic pullers
You can also find hydraulic pullers on the market. The operating principle of hydraulic SSPs is similar to jacks. Designed for repair shop mechanics, no muscle power required, speeding up the repair time. Pay attention to the quality of the metal, the rotation of the screw rod, and the condition of the hinges.
Replacing the front hub of Lada Granta
- We place the car within the perimeter of the repair area and provide priority safety measures.
- Let's jack up the right (left) side.
- Unscrew the bolts and remove the wheel.
- Let's unlock the hub.
- On the back side, unscrew the two bolts that guide the brake caliper.
Location of two bolts
- We remove the caliper, hang it on a wire (we fix it on the steering tip).
- Unscrew the hub nut and remove the brake disc.
Removing the hub nut
- We unscrew the two bolts - the rack clamps. If necessary, we use a liquid to remove deposits like WD-40.
- Disconnect the strut with the steering knuckle and unscrew the ball joint fasteners.
- We remove the CV joint.
Next, install the new hub assembly and assemble the structure in the reverse order.
Wheel and bearing puller for VAZ and LADA cars
To replace the front and rear hub units on VAZs, according to the manufacturer’s recommendations, two types of removable devices are needed.
- Gripping tools are used to remove the ball bearing from the rear wheel.
- For pressing and pressing the bearing at the front wheel, cup types are used.
You can select models of these tools from the overview presented above. To select a cup puller, focus on the outer and inner diameters of your bearings, but as a rule, it is enough to read reviews and get advice from the seller.
vazoved
I drive a LADA VESTA CROSS, Moscow
Then there will simply be no one to pay the fines! This is a Korean tablet video recorder 15 in 1 for Android..
I forgot about fines and Yandex Navigator.
There is FULL HD shooting, radar detector and GPS with 32 satellites. I got it at a reasonable price for such great functionality: HERE
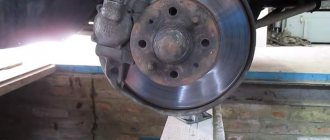
Signs of need for replacement and diagnosis
In addition to the hum in the area of the front wheel, other signs may indicate the need to replace the bearing on the VAZ 2110. Even inexperienced drivers will notice deviations from the norm while the car is moving. The change in the trajectory of traffic around turns will be clearly visible. Due to the uneven ride, the front of the car will sway from side to side.
To further check the condition of the wheel bearing, release the steering wheel on a level road. If the car skids to one side or the other, the part is worn out and requires replacement. You should not delay such repairs, since if the bearing is destroyed while driving at high speed, you will get an emergency situation and an uncontrolled skid, which can lead to an accident.
Do-it-yourself universal wheel bearing puller
Buying a puller is not always justified, since it is not used so often when operating and repairing a car, so if you want, you can make the tool yourself.
Homemade tools also have advantages:
- Proven material.
- Possibility to make it to your own size.
- The cost is lower than that of a purchased device.
- Possibility of finishing or alteration.
Homemade three-grip tool
This type of tool is the most difficult to manufacture, since the parts have a unique shape and require precise dimensions to mate them.
Required tools and materials:
- Grinder with cutting disc for metal;
- Sheet 1 m2 10-20 mm thick;
- Hairpin M18x1.5x 400 mm;
- Two nuts M18x1.5 height 20 mm;
- Pipe section outer diameter 89 mm, wall thickness 7 mm;
- M10 bolts for hanging the legs in the eyes;
- Welding machine.
Replacement methods
First way
- In the first case, it is necessary to use a puller to remove the bearing;
- Simply carefully remove the bearing and replace it with a new one;
- After installation, all the steps above should be carried out in reverse order.
The main advantage of this method is the fact that the technician will not need to touch the camber adjustment bolt, which is very difficult to put in place later.
If we talk about the disadvantages, we can note the following: the master will have to take a very uncomfortable position to perform actions. That is why it is necessary to prepare a lift and climb into the inspection hole.
But it is still very inconvenient for a car enthusiast to knock out the hubs in this position and press in the bearing assembly.
Second way
Consists of the following steps:
- To remove the bearing using the second method, you must carefully dismantle the steering knuckle and completely remove the hub;
- After this, the master will need to go to the workbench;
- The VAZ 2110 wheel bearing is replaced directly on the workbench;
- After this, everything is installed back, just as it was removed before.
This method is undoubtedly much easier than the first, but since it affects the camber, problems with adjustment cannot be avoided. Before you begin to unscrew the knuckle mounting bolts from the strut, you need to mark their position with chalk or a marker.
The first mark in this case will indicate the location of the adjusting bolt on the rack. The second mark will indicate the previous position of the fists.
After the master begins assembly, he will focus precisely on these marks. Of course, it will be difficult to achieve great accuracy and it will not be possible to return the parts to their place. But with careful work, installation errors can be minimized.
There are some steps to follow:
- The master puts marks;
- Knocks out the knuckle bolts;
- Unscrews the mounting bolts from the lower ball joint;
- The bearing must be knocked out of the hub;
- The retaining rings are dismantled;
- Using a vice, the bearings are pressed out.
Before reassembly, the space in the fists must be thoroughly and thoroughly lubricated.
This method is often used when repairing not only one bearing component, but the entire chassis. As a result of this method, it will also be possible to safely replace ball joints, silent blocks of levers and steering tips.
Third way
It is carried out in the following order:
- In this case, you will need to remove the entire rack completely;
- After all the components have been removed, the technician will need a special vice;
- The wheel bearing will be replaced at the vise and all parts will be reinstalled.
This method is the most complex and difficult because it requires the technician to dismantle the entire rack. In addition, it will be necessary to unpress the steering tip, and you also need to unscrew the fastening nuts, they secure the upper support to the body base.
Direct removal of this VAZ 2110 unit is carried out only after the entire rack has been removed from the car. And this process takes a lot of time.
Three replacement options
Subsequent actions can be performed according to one of 3 options. The first method involves replacing bearings using pullers, and it is not necessary to unscrew the steering knuckles of the machine. In the second case, you will have to dismantle the steering knuckles, and further work will be carried out on a workbench using a vice and pullers. If you choose the third option, you will have to completely remove the stand and change the bearings using a vice.
Note! Each of the above methods has its pros and cons, so before defining them you need to consider them in more detail.
- Method one, in which the steering knuckles are not dismantled
The advantage is that you do not have to touch the bolt that regulates the camber. The disadvantages include an inconvenient position when changing the bearing. In such a situation, it is problematic to carry out actions without a lift or inspection hole. In addition, in this position it is inconvenient to knock out the hubs and press in the bearings.
- Method two
Using this method, the work of changing the bearing is carried out more conveniently and easily, but a problem arises in violations of the machine’s camber adjustment. Before unscrewing the steering knuckle mounting bolts from the strut (see), you need to put two marks.
Note! One mark will correspond to the position of the adjustment bolt to the strut, and the second will correspond to the position of the knuckles.
During the assembly process, you need to take into account the coincidence of these two marks. It is unlikely that you will be able to achieve initial accuracy, but the errors will be minimal. This method is ideal for those who need not only to replace one wheel bearing, but also to repair the chassis, namely changing ball joints, steering ends and silent blocks of levers.
- Method three
This is perhaps the most difficult method, since you have to remove the strut, unpress it, as well as the fastening nuts that secure the upper support to the base of the body. Change the bearings only after removing the strut from the car. This task is not easy, it will require more time, but this is an excellent method for those for whom the two previous methods did not work.