Winter is a challenge for any car owner. Moreover, many are annoyed not so much by the deterioration of the road situation (snow, ice), but by the difficulty of starting a cooled power plant. Of course, those whose cars “winter” in heated garages do not have this problem, but there are relatively few of them. Most car owners have their cars idle overnight in the open air or in a regular garage (at best).
And yet there are ways to alleviate the plight of car owners. One of the most optimal methods now is to install a heater on a VAZ or any other car.
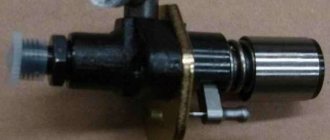
Preheater
The problem of difficult starting of a power plant in winter is associated with several factors - the viscosity of the oil increases, the resistance in the battery increases, and it is no longer able to produce good starting currents. As a result, when trying to start, the starter “lazy” turns the crankshaft, and the rotation speed is clearly not enough to start the engine. And only after a couple of attempts, when the oil is mixed a little and the battery “warms up”, the engine can still be started, but this does not always happen.
Note that the chances of a successful start in cold weather are also affected by the technical condition of the power plant and the degree of its wear. Thus, the probability of owning a VAZ of the classic family (2101, 2106), produced 30-40 years ago, is significantly lower than a relatively new car. But installing a heater on a VAZ-2101 increases these chances, and significantly.
As noted, the difficulty of starting the power unit is largely due to the solidification of working fluids. But if you warm them up before starting, then the resistance that they create due to the increased viscosity will not exist, and it will be much easier for the starter to turn the crankshaft. It is precisely the preheating of the engine that is the task of the heater.
This device, in principle, is universal, so you can easily install a preheater on a VAZ, UAZ or any other make of car.
Types, features of work
There are several options for such equipment, but in essence such a device is a conventional electric heating element that provides heating of one of the fluids of the power unit.
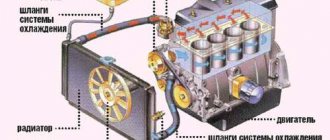
There are several types of heaters. Some of them heat antifreeze, others heat oil. In the case of coolant, by acting on antifreeze, it is possible to heat the cylinder block, as well as the elements of the power system, which is important for ensuring normal mixture formation.
But such a device has disadvantages:
- it takes more time to warm up the engine, since the cooling system is just a shell of the cylinder block;
- the oil heats up slightly, since it is located below the cooling jacket in the sump, so heat will flow to it only after the cylinder block has been well warmed up;
But when using such a device, there is practically no need to warm up the engine after starting, since it is already heated, and warm air is immediately supplied from the stove to the cabin.
As for heaters that act on oil, such a device only heats the lubricant; the cylinder block and power system remain cold.
Since the volume of oil is small and it is all in one place, it takes little time to warm up. But due to the fact that only the lubricant heats up, after starting it will take time to warm up the motor itself.
In general, the effectiveness of using one or another device is approximately the same. When heating the antifreeze, we get a heated cylinder block and power system, which ensures good mixture formation (the result is excellent flammability of the mixture), but cold oil (the load on the battery and starter will remain high). If you heat the oil, then everything is exactly the opposite - the starter will turn easily, but the unit itself and the power system will remain cold.
Heaters also differ according to the power source used:
- From the network 220 V;
- From the on-board network 12 V (autonomous);
The first option is characterized by high power, and therefore the speed of heating of the working fluid. But to use it, the car must be close to the outlet.
As for autonomous devices, the heating element is powered by a battery, which means you can warm up the liquid anywhere, even in the field. But they are not very powerful, and during operation they drain the battery, and if it is already on the verge of exhausting its life or is simply discharged, then there will simply be no energy left for the starter after warming up.
Antifreeze heaters operating from a 220 V network have become widespread among car owners. In general, this is one of the most optimal options - the battery does not run out, the power of the heating element is high, and after using it, the driver also receives hot air from the stove.
Now manufacturers of automotive accessories and equipment offer different models of preheaters. All of them are almost identical in operating principle, but may differ in design - some consist only of a heating element, while others may additionally have a circulation pump.
Main advantages and disadvantages
- use in any climate zone;
- low cost;
- not a complex design;
- simple diagram;
- easy installation;
- saving fuel consumption;
- reliability;
- high degree of security;
- durability;
- the battery does not lose charge;
- recharging the battery;
- ease of maintenance;
- after warming up, the starter load decreases;
- wear of parts is reduced;
- additional features will allow you to preheat the interior and eliminate icing of the windows.
The only disadvantage of such boilers is their dependence on the electrical network.
Installation of equipment on a car
Installing a heater on a VAZ-2106 or any other model does not require any modifications to the power unit. Such equipment is external, and all that is needed is to correctly insert it into the power system.
The heater kit consists of:
- Block with heater;
- Fastening elements;
- Adapters, tees and clamps for insertion into the cooling system;
- Cable with plug.
Additionally, for installation you will also need sections of pipelines of the required length to make an insert.
There are several installation schemes for such a device, the simplest of which is shown below.
To ensure uniform heating, antifreeze must be supplied to the device from the lowest point of the engine, which is the drain plug of the cylinder block. But the exit of the already heated liquid is the opposite - to the top point.
To connect the equipment to the VAZ-2106 engine, you must:
- Install the fitting from the kit into the engine block and connect it with a pipeline to the input terminal on the heater block;
- Insert the tee from the kit into the upper pipeline of the cooling system coming from the radiator. Connect a pipeline leading to the output from the heater block to this tee;
- Attach the block with the heating element to the engine or subframe;
- Route the cable to ensure easy access to the plug.
When installing a heater, it is not even necessary to drain the antifreeze from the system. If you pre-assemble the heater (connect the pipelines to the block, tee and fitting) and quickly carry out installation work, then during operation 1-1.5 liters of coolant will leak out, which will then have to be replenished.
After installation, be sure to check all connections for leaks and, if necessary, fix them by tightening the clamps.
Installing the heater on a VAZ-2107 injector does not differ from that described above.
Security measures
Finally, a little about the safety rules when using such a preheater:
- Do not leave the equipment turned on for a long period of time. For normal warming up of the engine, 1-1.5 hours is enough;
- If an extension cord is used for connection, its wires must have a cross-section appropriate for the load;
- If the equipment is used on a car parked on the street, you need to mark or fence off the area through which the power cable runs.
For ease of use of the device, it should be connected to a power outlet through an adapter with a timer, on which you can set the time for turning the heater on and off.
Related articles:
Recommendations for choosing a boiler
To figure out which 220V boiler to choose from the entire variety of models on the market, it is important to consider the following factors:
- boiler from 220V with a specialized coating;
- a boiler without boiling points to prevent deposits from forming;
- a cheap boiler does not fit well with the aggressive antifreeze environment.
The boiler is manufactured with the following power gradations:
- 1.5 kW – for a 16kl engine;
- 1.0 kW – for an 8kL engine;
- 0.5 kW – for use when parked for regular engine heating.
The period for heating is selected individually, experimenting and choosing. Decisive factors:
- type of engine;
- boiler rated power;
- ambient air temperature.
Now boilers are made of square-shaped plastic.
On average, the boiler heats up for 40-60 minutes. In this case, it is important that the engine is hot, but the liquid does not boil.
You need to buy a boiler only from trusted commercial manufacturers of this type of product.
You can purchase the boiler on the manufacturer’s websites, in specialized retail outlets or at the car market.
Due to the wide range and many models, the device is selected for cars, trucks, and SUVs.
Video - installing an engine heater
I came to the garage, warmed up the engine so as not to mess with the cold, and disassembled the car. Well, I took it apart and removed the air filter and battery. And I realized that on Solaris there is no drain plug or coolant in the block. I didn’t expect this, but how. I went online and found a hint that the manufacturer recommends installing the engine heater between the heater return (inlet to the engine heater) and the upper radiator hose. Well, since he recommends it, we’ll do it that way. The Operating Instructions and Installation Instructions are located on this page. The problem is to determine which of the return pipes.
I had to quickly put the car back together, but just quickly, without screwing anything in. I started it up, turned the heater on full blast, started checking the temperature of the pipes by touch, and began to doubt it. I decided not to guess, took a digital thermometer and measured it. I found out that the entrance is from below, the return is from above. The difference is only 3 degrees. I chose the installation location for the heater itself.
There was plenty of space for installation under the air filter. The place is good, in my opinion, the battery, gearbox, and air filter will heat up. Warm air always makes it easier to start. Since the coolant was strained, I decided not to spill the existing one. I cut off a half-barrel, placed it under the stove return hose, made a cut in the right place, the liquid ran out, but not much. I opened the cap where the coolant is poured, the liquid flowed out, the bottle was filled, closed the cap, the coolant stopped flowing, emptied the one and a half bottle and started again. In total, about two liters of coolant were drained. Not a drop was spilled.
I cut a 2.5 centimeter piece of hose on the stove pipe. I inserted the tee and clamped it with clamps (by the way, I changed the clamps and used my own stainless steel ones, the ones included in the kit are very weak).
I cut the upper hose from the radiator, use a sharp tool (there was no liquid there anymore), inserted a tee, and pressed it with clamps. I installed the heater itself and secured it to the screw to which the engine mass is attached. I didn’t cut the mounting plate, it doesn’t interfere, and there will be additional heat transfer. I connected everything with hoses, from the stove to the boiler inlet, the outlet to the radiator pipe. Everything, it seems, turned out not bad. I secured everything with plastic clamps, laid an electrical wire, also secured it with plastic clamps, and brought it out into the radiator grille. I had to modify it a little, cut off the protrusions on the sides of the Euro fork, everything fit perfectly.
Types of engine preheaters
First, let's define what an engine preheater is. This is a special device that heats the liquid in the car’s cooling system (antifreeze) and makes it easier to start the engine at low temperatures.
There is no need for pre-heating if the car constantly sleeps in a warm garage, and also if the winter in the region is mild and the temperature rarely drops below -5 ° C.
Preheaters differ fundamentally in their design options and power sources, and are divided into two categories:
- Electric engine preheaters are devices that operate from an external source of electricity. They are simple, therefore have a low cost, and are usually connected to a regular household outlet with a voltage of 220V.
- Autonomous engine preheaters have a more complex design, and their price is noticeably higher than electric ones. They are powered either from the vehicle's fuel system or have their own fuel tank.
Some aspects and nuances
When using preheating, it is recommended to take into account the following points:
- a switch with a timer will ensure engine heating in the mode that the vehicle owner needs;
- the engine is started with the clutch depressed;
- I do not lay the 220V wire through high-voltage supports on the road;
- If the boiler power is higher than 1.0 kW, you should not leave it on overnight.
Compliance with these rules will protect you from fines from the fire inspection and unpleasant situations.
DIY engine preheater
Is it possible to make an engine preheater with your own hands? The video below shows just one of these homemade products.
The fact that many do not want to spend money on installing electric engine heating and intend to do it themselves is not surprising. Russia has never complained about the lack of self-taught inventors, so there are many examples of such crafts.
Homemade heaters are made from various materials. Most often at home they try to warm up the engine with the following devices:
- based on a blowtorch;
- made of tungsten spiral;
- from wire and other improvised means.
All homemade engine heaters have two big drawbacks: they are a fire hazard (there are many cases where cars and garages caught fire due to such devices) and their low efficiency. So it’s better not to skimp on buying a high-quality preheater.
Installing an engine preheater
You can install the engine pre-heater yourself, since this process does not require any special knowledge or skills. Of course, a visit to a car service center is always preferable, because there the entire range of work will be performed by professionals who will save time and also provide a guarantee for the work.
If you don’t want to take money to the station or you can’t stay without a car for a while, you can install the engine heater yourself (usually installation instructions are included in the kit).
For video instructions on how to install a 220V electric heater with your own hands, see just below. The procedure for installing the heater is as follows:
- Draining antifreeze (it must be drained up to 2 liters);
- Disconnecting the heater pipes from the engine cooling system;
- Installation of the heater and its connection to the system;
- Assembly (you need to tighten the unscrewed nuts);
- Filling with antifreeze.
The whole process will take no more than 2-3 hours.
The advantages of installing an engine preheater are obvious:
- noticeable extension of engine life;
- saving fuel while warming up the engine;
- saving time;
- environmental protection.
By the way, if you do not yet have an engine heater installed, you can read simple tips on how to start your car in cold weather.
Heating the fine fuel filter of a diesel engine
The manufactured fuel filter heater is non-removable and must be assembled on a filter that will be directly installed on the vehicle.
If you do not have the necessary knowledge and skills, you should entrust the connection of the fuel heater to a professional electrician. Improper modifications to the vehicle's electrical circuit may cause a fire.
First way
The main goal of this method is to create a heating field around the outer contour of the filter device.
What will you need?
To complete the task you will need:
- from 7 to 10 meters of copper wire with a cross-section of up to 1 mm (nichrome material can be used);
- four-pin relay;
- 10 amp safety device;
- heat-resistant sealant or fiberglass;
- two couplers or plumbing clamps;
- device activation and deactivation button;
- connecting electrical circuits of appropriate length;
- elements for soldering cables - rosin, tin and soldering iron.
Algorithm of actions
Independent work on installing and connecting a liquid heater is done as follows:
- At the first stage, you need to lubricate the fiberglass with sealant, and then glue the material to the outside of the filter device housing.
- Then this structure is dried for 24 hours.
- The body element is wrapped with wire, and the ends are fixed with clamps.
- Then the made coil, coated with sealant, is wrapped in fiberglass.
- The resulting structure is dried.
- Terminal clamps are soldered onto the ends of the wire to connect power lines.
- The device is assembled in accordance with the diagram shown.
Connection diagram for bandage filter heater
Second way
The main difference compared to the first method is that in this case ready-made heating equipment is used. Such a device uses a heating system for side mirrors or a special flexible heater.
What will you need?
To complete the task you will need:
- insulation;
- conductors of appropriate length;
- button to activate and deactivate equipment;
- four-pin relay;
- foil thermal insulation 0.5 mm thick;
- 10 amp fuse;
- plumbing or plastic clamps or a piece of wire.
Algorithm of actions
Installation of the electric fuel filter heater is carried out as follows:
- A heating thread or special material is wound around the filter device. Fixation is performed using insulation.
- The wiring is being connected and laid.
- The thermal insulation material is attached on top of the heating device.
- The resulting structure is fixed using clamps or wire.
- The resulting device is connected to the battery.