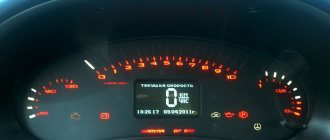
Hello everyone, today I would like to look at the instrument panel on a Chevrolet Niva car. I would like to say right away that this article is for beginners or for those who have just purchased this car and have not yet figured out the instrument panel. So, let's go.
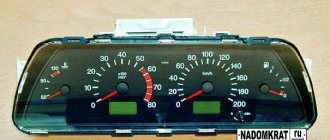
The gauge shows the engine temperature; if the arrow rises to the red line, this indicates that the engine is overheating. Which is absolutely unacceptable.
The tachometer shows the crankshaft speed.
Turn signal lamps.
The speedometer on the Chevrolet Niva shows the speed at which you are moving.
An indicator that shows the amount of fuel in the tank.
An indicator lamp that indicates the side lights are turned on.
A warning light that indicates a malfunction in the brake system. Glows red.
- Daily mileage reset button. Also serves as a switch between time and temperature.
- We move on to the display, which displays the distance traveled.
- Engine control lamp. When a fire occurs, it is necessary to diagnose and check the engine and systems.
- Display showing time and air temperature.
- The low battery warning light, when lit continuously, indicates that the vehicle is not charged.
- The handbrake lamp comes on when the handbrake is raised.
- Engine oil pressure lamp.
Well, that’s all we looked at the main indications and indicators on the instrument cluster of the Chevrolet Niva. Bye everyone.
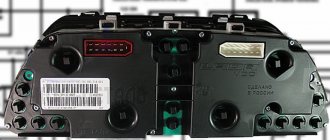
Niva instrument panel: description of indicator lamps
For the fullest description, we took the shield from the most common version of the VAZ 21213.
| Number | Description |
| 3/4 | The turn indicators turn on simultaneously when the hazard warning lights are activated. |
| 7 | Insufficient fuel level in the gas tank. |
| 8 | The vehicle's side lighting is on. |
| 9 | Emergency situation in the brake system. |
| 10 | The long-range illumination of the head optics is activated. |
| 12 | Vehicle mileage monitor. |
| 13 | Check engine light. If the indicator lights up, you need to carefully check the power plant. |
| 14 | Hazard warning light. |
| 15 | Clock display. |
| 16 | If the lamp lights up, you need to check the generator and battery charging. |
| 17 | Handbrake activated |
| 18 | The engine oil level has dropped critically. |
| 19 | Most configurations include a backup lamp. |
You should also highlight the colors of the car's indicators. They can be divided into three parts.
- Green/blue – indicators of these colors indicate normal operation of machine components.
- Orange/yellow - tells the driver that a certain unit requires attention or service.
- Red is the most dangerous color. If a lamp of this color lights up on the dashboard, the car must be urgently shown to a mechanic.
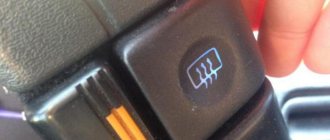
Exclamation mark on the Niva panel
Indicates that the fluid level in the brake system has decreased. You will need to open the expansion tank cap and add brake fluid to the required level. It is recommended to check the line for leaks and pad wear.
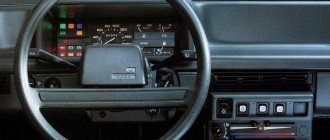
What is a torpedo
All cars have a dashboard (board), which is located in front of the passenger compartment. In a Niva Chevrolet car, it is a plastic covering on which almost all vehicle control elements are located. Although the panel is not a necessary part for driving a car, without it driving turns into complete dissatisfaction. Under the socket there are parts that can fail from time to time. And sometimes, to get to them, it is necessary, as they say, to disassemble half the car. Let's take a closer look at the stages of removing a torpedo from a Niva Chevrolet car.
Steps for removing the instrument panel
The reason for removing the panel may be not only the breakdown of parts located under the panel, but also the following points:
- Car interior modernization;
- Insulation and noise reduction of the interior;
- Cleaning the car heater;
- Replacement with a new, improved one.
Removing the Niva Chevrolet dashboard is carried out in stages. You need to arm yourself with a simple set of tools and get started.
- Stage 1. The car is disconnected from the battery. This is necessary, because there is a huge amount of wiring on the instrument panel, which can accidentally be shorted during removal. To do this, simply disconnect the negative terminal from the battery.
- Stage 2. First of all, the part of the casing located under the steering wheel is removed. The five fastening screws are unscrewed with a screwdriver, and this casing, consisting of two parts, is removed.
- Stage 3. The steering wheel and the switches located on the side are removed. The steering wheel is removed by unscrewing the nut located inside the steering wheel. Remove the steering column shaft. How to remove the steering wheel and its parts can be found in the relevant sections.
- Stage 4. The car radio and its installation location are removed from the passenger compartment. Let's start removing the floor covering. To remove the A-pillar trim, you need to unscrew four screws. The ignition switch is also removed.
- Stage 5. We proceed to disconnecting the wires. The blocks with wires located at the bottom near the gas and brake pedals are disconnected and marked with a marker. The wires supplying the car's anti-theft system are disconnected. The power supply of the instrument board consists of three blocks, which are also detachable.
- Stage 6. The ground wire of the car is unscrewed from the stud. Under the hood, you need to remove the filter, which is designed to filter the air entering the cabin.
- Stage 7. Most of the liquid is drained from the expander, and the clamps suitable for the heater radiator are disconnected.
- Stage 8. Work is carried out with a wrench inside the car. The bolts securing the panel to the stand and the stand to the bracket are unscrewed. The cross member strut is removed. A cross member of the instrument panel is attached to the steering shaft bracket, which can be removed by unscrewing four bolts.
- Stage 9. All visible and invisible bolts securing the instrument panel are unscrewed. These fasteners are located on top near the glass and on the side. The front air duct, which is designed to supply cold and warm air into the cabin, is removed.
- Step 10. You can remove the dashboard. It is best to do this together, so that one person observes the removal processes from inside the panel. Otherwise, any power wire or part may be damaged or broken.
Shield Niva 21213
A transitional link between the classical and modern systems. The dial indicators and indicators are similar to the dashboard of the VAZ 2105, which many car enthusiasts do not like, and they want to change it.
Which panel is suitable for Niva 21213
Users often install panels from a VAZ 2114 or 2110 car. A minimum number of alterations and modifications will be required here. Contact groups and wiring terminals are reinstalled under the required pins. Refinement of plastic and seat will be required.
Possibilities of the daily mileage reset button
The mileage reset button on the Niva Chevrolet and Niva Travel has a lot of useful functions:
- Setting the time.
- View the outside temperature and on-board voltage.
- Mileage reset.
- Starting the self-diagnosis system
Each possibility should be considered separately.
Setting the time
Turn the barrel switch fully clockwise to set the clock. Shifts will take place one hour at a time. To adjust the minutes, you need to turn the button counterclockwise. The time will be saved independently and will be reset only after the battery is disconnected or after the instrument panel on the Niva is rebooted.
View outside temperature
To display the outside temperature on the left display, you need to briefly press the button and release. Pressing the button again will display the on-board network voltage on the display, if provided for by the version of the panel.
Mileage reset
To reset the mileage on your Niva Travel, press the button and hold until “0.0” appears on the bottom line.
Self-diagnosis system
The instrument panel on the Niva Chevrolet is being diagnosed. To do this do the following:
- With the ignition off, press and hold the mileage reset button.
- Turn on the ignition.
- You can release the button, and the arrows on the dashboard will begin to move and all the lights will light up. This way the panel checks the functionality of all elements.
- Pressing the button again will display the software version.
- Another press will show engine error codes.
Despite the possibility of engine diagnostics, its readings are not always correct and therefore do not inspire confidence. For diagnostics, you should use appropriate software and devices.
Shield Niva 21214
In the version where the injector is installed, the manufacturer installs a relatively modern device with a small display. The partially digitized version is easier to read and has a new indicator - a seat belt light.
Which panel is suitable for Niva 21214
On this version, users rarely change the device. The native panel is informative and only overexposure may be required here. If the driver decides to make a replacement, he needs to choose from a Lada tenth series car.
Let's bring Shniva to mind: Our own icons in the BKL (Indicator lamp block)
I decided to add functionality to the ShNivovsky BKL, especially since it still does not use all the potential inherent in it. Attention! If you have a FAM or ReSHN with ABS+SRS, then the BCL is full-fledged, all indicators are wired. If you have a ReShN in the basic configuration (without ABS), then you do not have a BCL, instead there is a plug. Therefore, you will have to buy it separately if you want to make your own badges) If you have a pre-restyle, then the BKL has a short board and only the first 3 badges are soldered. You can read about how to make such a BCL full-fledged here
The device on the Niva failed - the reason
For most classic versions, problems exist.
- The corresponding fuse has blown. This is usually insert F2.
- There are problems with the wiring. Such problems are not uncommon in classic car models. Here you should check the wires for damage to the insulation, loosening, oxidation of contact groups, breaks.
- Damage to the device. Here you should check the device circuit for breakdowns and burns.
If we are talking about modern modifications with an ECU, it is easier to find the problem using computer diagnostics. The BC standard errors will accurately indicate the location of the fault.
Niva instrument panel does not light up
The backlight of the shield is checked in the same way. If the panel periodically blinks or only some of the indicators go off, check the wiring. This is where the contact groups are usually oxidized. It is also possible that the integrity of the insulation may be compromised and individual light bulbs may burn out. If the backlight goes out completely, check the lighting fuse.
Design Features
What can the instrument panel tell us? The Chevrolet Niva is designed in such a way that its panel unites all the control devices of the car. It includes:
- speedometer;
- odometer (counter of kilometers traveled);
- tachometer (crankshaft revolution counter);
- coolant and ambient temperature indicators;
- fuel level indicator;
- 12 control (signal) lamps.
In order for the driver to monitor instrument readings at night, the panel is illuminated when the side lights are turned on. How bright is the instrument panel backlight? "Chevrolet Niva" has the function of adjusting the level of illumination of the dashboard. It is provided by six special light bulbs.
Important: the shield has an electronic design and cannot be repaired if it fails! Spare parts in the form of individual panel units are not available for sale. The only exceptions are signal and lighting lamps. In other words, if at least one indicator fails, you will have to buy an assembled panel.
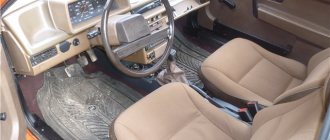
“The strangest thing you will see today”: Americans about the Niva Travel salon
Along with the enthusiasm of foreigners for the Russian Niva SUVs, there are often critical notes in the foreign press - after all, for a sophisticated buyer, the archaic nature of the Niva Legend and Niva Travel is difficult to completely cover with cross-country ability and low cost. The Lada Niva Documentary resource has prepared a translation of an article from the American publication Jalopnik dedicated to the interior of Niva Travel.
“The Niva Travel dashboard, its appearance, will definitely be classified as an “anachronism” in any dictionary. Ventilation holes in the shape of medicine capsules, empty dummy buttons, large climate control knobs - everything looks decades out of date compared to the small and slightly more modern stereo above.”
The American magazine does not skimp on epithets; this is just one of the quotes. It is all the more surprising that the author assessed the Niva’s multimedia system relatively favorably.
After all, it was this innovation, which appeared in 2022, when the Niva was still a Chevrolet brand car, that was seriously criticized by fans of the model. Many Russian motorists recognized the need for such a device on a modern car, but could not agree with the way the MMC was integrated into the dashboard by the designers.
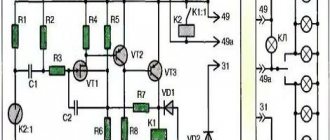
Relay and fuse box:
Please note that in the schematic diagram of the block, two rows of fuses are located at the bottom, and the relay is at the top. Under the panel cover, the fuses will be located opposite the top, so do not confuse the numbering. If you notice a discrepancy in the numbering of fuses or relays, then you have a different Chevrolet Niva model, newer or older, in this case, find the corresponding diagram and troubleshoot using it.
K1 - Relay for monitoring the health of lamps.
K2 - Windshield wiper relay. If the wipers do not work, check this relay and fuse F9. If they are working properly, the problem may be in the wiper motor, its brushes, mechanism and gears, as well as in the interior switch and its contacts.
Installation is important!
One last critical note about replacing a halogen bulb with an LED: make sure the latter is installed correctly! If you choose a lamp with the correct arrangement of LEDs, but install it upside down (this is not difficult to do), you will not achieve the desired result. The light will be "curve".
Read the installation instructions, read the forums, or watch the following video to see how LED light bulbs are installed correctly:
To understand what the video is about, click on subtitles > translate subtitles
Cover: flickr.com
Resistor resistance and power
The above resistor parameters correspond to a 220 V network voltage. It happens that the LED lamp is powered from a line of a different rating. Then you will have to calculate the resistance and power of the resistor yourself.
We calculate the resistance using the formula R=∆U/I, in which ∆U is the difference between the actual voltage in the device’s power supply line and the lamp voltage, I is the LED current.
The light bulb will work normally if the resistor value is in the range of 150 - 510 kOhm.
We calculate power using the formula P=∆U×I, where the letter values are similar to the above explanations.
Knowing these formulas, it is easy to make the necessary calculations of the resistor value.
Maintenance and repair
As mentioned above, lamps on a Chevrolet Niva should be replaced once a year; unfortunately, after this period they show much worse efficiency and can also fail quite unexpectedly. You can do the replacement yourself; it is not a difficult job.
For optimal operation of lighting fixtures, it is worth covering the contacts with a special grease twice a year. This will reduce the risk of corrosion. This action is usually carried out in spring and autumn.
Replacement of the unit itself is required if it is damaged. If there are no associated body malfunctions, then this can also be done independently.
PTF adjustment — Chevrolet Niva, 1.7 l., 2012 on DRIVE2
Over the summer I installed PTF, but did not make any adjustments to the headlights; it was enough that they just shine. Until recently, it was not necessary to use PTF very often, since the weather was not particularly damp and the road in the dark on poorly lit city streets was quite clearly visible, but recently the weather has become damp, either rain or snow, respectively. In order to better see what is happening in front of the car, I often turned it on together with the low beam and PTF. Everything would be fine, especially together with the low beam, but separately the PTFs shined only right under the nose, illuminating no further than 10 meters in front of the car. Having read the instructions for the PTF, I didn’t understand anything, since it says that the headlights at a distance of 25 meters should shine 0.5 meters below their axis. How is that?! On the wiring box it is written that the upper limit of the light should be at a distance of 10 meters and 5 cm below the axis. But my wiring was not ShNivovskaya, but from a VAZ-2115, and to believe what was written, well, I don’t know... I started looking for information on adjustment, but I didn’t find anything clear. Either they say that, according to GOST, PTFs should shine no further than 15-16 meters, then you need to calculate the angle of inclination to be half that of the head light. I looked at the latest manual for the Shniva, and there’s some terrible writing there...
In the earlier edition, everything was somehow stated more simply.
That's what he used. I gathered my courage, took a friend with me, grabbed a set of Torx keys, a tape measure and chalk, and went in search of a more or less suitable place with a more or less level area and a wall. We found and measured 10 meters from the car to the wall (in principle, 5 meters would have been enough, as according to the manual, but at 10 the picture of how the PTF lights look better to understand how the light is distributed), unfortunately the area turned out to be not entirely level, slightly convex , but this didn’t really interfere. First, let’s look at how our PTFs shine in general.
Full size
It seems that the border of the light is even, but, as expected, the headlights shine a little low. I measured the height from the ground to the middle of the PTF glass, it turned out to be about 47 cm, I measured the same amount on the wall from the edge of the shadow from the convexity of the platform, drawing a horizontal stripe with chalk. The manual says that the upper limit of the PTF light should be at a distance of 10 meters at the same height as measured, or a little lower. Take a Torx T20 wrench and use it to feel for the sprocket of the PTF adjusting screw.
Full size
We close the right headlight and raise the left one so that the upper limit of the light is at the level of the strip drawn in chalk on the wall; we do the same with the right headlight. This is the result.
Full size
My PTFs are a little splashed with dirt from the road, especially the right headlight, so the edge of the light is a little blurred, but it turned out not bad, the headlights now shine as they should. Ideally, of course, the area for adjusting the headlights should be perfectly level, the pressure in the wheels should be uniform - 1.9 atm., a full tank of gasoline and the driver in his place, and of course clean headlight optics... But these are too ideal conditions that are difficult to create, and there is no need for them, it is enough to make the adjustment in such a way that it suits you and not blinded oncoming drivers