01/25/2022 4 701 Ignition system
Author: Victor
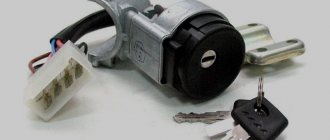
Regardless of the car model, the ignition switch (IZ) is one of the main components. With its help, the driver can start the engine and turn off the power unit, so if problems arise in the operation of the mechanism, this may lead to the impossibility of starting the engine. How to change the contact group of the Daewoo Nexia ignition switch and in what cases is it necessary? Read more below.
[Hide]
Features of the ignition switch Nexia and Matiz: theoretical part
Before removing, repairing or changing the ignition switch on a Matiz or Nexia, read the possible list of causes and signs of device failure.
Causes of malfunction
- ZZ overload is one of the most common causes. Overload occurs due to the installation of additional devices and devices that consume high power. The problem manifests itself as a result of the fact that high voltage passes through the contact group, for which it is not suitable. The mechanism can get very hot and eventually it will simply fail.
- Manufacturing defects. If the starter contact ZZ is made poorly, such a device will not work for a long time.
- Moisture getting into the structure. Of course, for this reason the unit cannot become stuck, but, nevertheless, moisture getting inside the device has a detrimental effect on its functionality.
- Short circuit in the electrical component of the car. This problem does not happen often, but if high power current damages the contacts of the mechanism, it will cause it to break.
- Over time, the mechanism may wear out the contact tracks or the group itself. This is normal, since wear and tear is typical for any automotive mechanism. Due to wear, grooves will appear on the metal components of the structure.
- Mechanical damage or broken contacts, as well as other components of the group. It will not be possible to repair such a fault; the only best option would be to replace it.
Signs of failure
Now briefly about the signs:
- Several devices refuse to work at once, which, as it may seem at first glance, are in no way connected with each other. Inside the mechanism, one or more voltage consumers are connected to each contact. For example, these are optics, turning lights, audio system, video recorders, parking sensors, interior lights, etc. If one of the contacts wears out, it will no longer be able to power the equipment connected to it.
- Inoperability of the starter unit. If you try to start the engine with the starter not working, you will not hear the relay click. If there is no click, we can conclude that no voltage is passing through the device cylinder.
- If a piece of equipment does not work, but then suddenly activates if the driver moves the key in the lock (the author of the video about replacing the mechanism yourself is the CarDan Tv channel).
Eliminating the cause of burnout
It should be noted that replacing the contact group with a working one helps for a while. For high-quality repairs, it is necessary to eliminate the cause of burnout: reduce the current load on the contacts. You can strengthen the weak point of the Daewoo Nexia by installing additional relays according to the diagram:
When using two relays, the load on a group of contacts is halved
This method will help extend the service life of the contact group by more than 2 times. Anyone can improve the electrical ignition circuit of a Korean car.
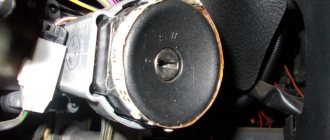
Let's move on to practice: replacing the ignition switch cylinder
To change the cylinder, you need to purchase the corresponding mechanism of a certain article. Please note that you only need to buy original parts produced by the car manufacturer. If you buy a Chinese larva, there is a chance that it will not fit into the seat, since its size will be larger. In this case, you will have to grind the device, and this will take additional time.
The replacement procedure is performed as follows:
- First of all, turn off the ignition and open the hood. Disconnect the terminals from the battery.
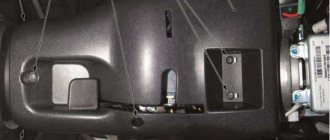
- After this, using a Phillips screwdriver, you will need to remove the screws that secure the plastic steering wheel cover. By unscrewing the bolts, this cladding element can be dismantled.
- Next, you will need to disconnect the connectors connected to the contact group of the device; they are secured with bolts. In this case, you will need two screwdrivers, one longer and one shorter. The screw itself that you need to unscrew is located inside the device.
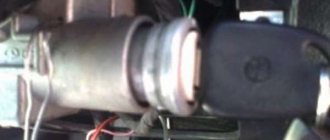
- Now you will need a wire - with its help you need to press on the cylinder mount through the existing hole, at the same time the ZZ must be moved to position 2. After this, you will be able to remove the larva by about 0.5 cm. Having done this, it can be completely dismantled.
- When installing a new cylinder, make sure that the 3Z is in position 2. Using the pin, press the fastener and install the new structural element.
If you change the cylinder in the ignition switch, then you should also change the cylinders in the trunk lock and in the doors, otherwise you will not be able to open the door and trunk with the key to start the engine.
Photo gallery “Changing the larva with your own hands”
Check Engine Error - How to Determine the Cause of the Signal?
Let us immediately note that it is almost impossible to independently diagnose the reason for the appearance of a signal on the dashboard without the presence of an on-board computer. If the BC is installed, it is possible to directly view information and engine error codes. If it is missing, the only way is to diagnose the engine at a service center.
Diagnostic connector for Nexia n150 dohc
During the diagnostic process, the technician connects a computer with special software through a special service connector, which retrieves and visualizes information from the memory of the Daewoo Nexia electronic control unit.
The simplest case
Separately, it is worth saying that the appearance of a Check Engine may be associated with a normal electronics failure, low-quality fuel and other reasons. In this case, you can try to “reboot” the electronic unit by removing the negative terminal from the battery for 10 minutes. If the error does not disappear, this means that diagnostics are still necessary.
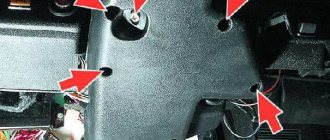
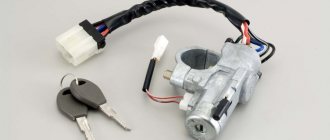
Installing a new contact group on the ignition switch
How to replace a contact group with your own hands:
- First, open the hood and disconnect the battery.
- Then, as in the case of the cylinder, you will need to unscrew the bolts securing the casing to the steering wheel. Remove and set it aside.
- Now you will need a flat blade screwdriver. With its help, you need to disconnect the plug, and then dismantle the upper casing on the steering column.
- Having done this, you can remove the O-ring, which is located on the lower casing. Before doing this, you will need to remove four bolts.
- After this, you will need to disconnect the block with the wiring that is located on the plug. Having done this, you need to install the key in the 3Z and then turn the mechanism to position 2.
- After completing these steps, you will need to unscrew the screw that secures the mechanism, after which you need to remove the contact group from the device. When the group is dismantled, a new one is installed. The assembly procedure is carried out in reverse order.
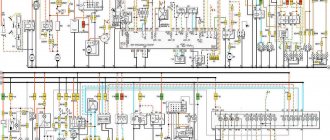
Electrical diagrams of Daewoo Nexia N100 and N150
1. Configuration of electrical connectors and numbering of wire connector sockets for Daewoo Nexia electrical equipment:
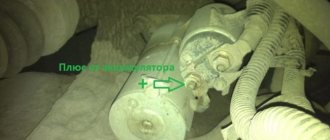
2. Diagram of electrical connections of the ignition switch, starter and generator, as well as diagram of Daewoo Nexia connections of ignition system devices:
3. Electrical diagram of Daewoo Nexia - connections of fuel injection system sensors with IEFI-6 type ECU:
4. Electrical connection diagram of the Daewoo Nexia engine malfunction warning light, torque converter lock-up system, fuel pump and on-board diagnostic system with IEFI-6 type ECU:
6. Fuel injection system sensor diagram:
7. Electrical diagram of connections between the Daewoo Nexia engine malfunction warning light, the torque converter lock-up system, the fuel pump and the on-board diagnostic system with an IEFI-S type ECU:
8. Electrical connection diagram for car lighting devices:
9. Electrical diagram of Daewoo Nexia - connections of fog lights and rear fog lights:
10. Daytime running lights, parking lights and license plate lamp and horn electrical connections:
11. Electrical diagrams of the Daewoo Nexia: glove compartment light, cigarette lighter, clock with digital display, interior light and trunk light:
12. Diagram of the car’s brake signal lights, as well as the reversing light and torque converter locking system:
13. Operation of turn signals and hazard warning lights:
14. Electrical connections for heated rear window of Daewoo Nexia:
15. Electrical diagram of Daewoo Nexia - connections of windshield wipers and washers of the windshield and rear window:
16. Instrument cluster:
17. Electrical diagram of the Daewoo Nexia in 3 photos - connections of the electronic control unit with the control system components:
18. Diagram of the Daewoo Nexia cooling system and air conditioner:
Purpose of fuses
Each protective insert is responsible for a strictly defined part of the on-board wiring. In some cases, a fuse can protect several elements at once, due to their low energy consumption.
The most important 10 Ampere insert in the car is responsible for powering the car control unit. In most machines it is located in the first cell. Individual assemblers mounted the part in the 2nd place in the standard electrical circuit. Depending on the configuration, the assembly is transferred to the first slot.
Dimension fuse
Located in the main mounting block under the second number. The device is responsible for protecting the on-board network and lighting elements of the car, license plate, and interior lamps.
Motorists complain that the fuse often burns out, which causes a lot of inconvenience. The reasons for combustion of a part are quite varied.
- Short circuit in the serviced circuits. Short circuit with contact to on-board wiring or body. This disables any protective devices.
- Installing too powerful lamps. Some drivers install high-performance lighting kits on their cars, which increases the load on protective elements and fuses.
- Water splashing onto consumers or device contacts. When wet, the terminals oxidize, their conductivity decreases, which causes heating and melting of the plastic parts of the contact.