The principle of operation of the VAZ 2110 generator
When starting the engine, starting current is supplied to the starter from the battery. But the battery itself does not produce energy, but only accumulates it and then releases it. If you use only the battery to power all consumers, it will quickly discharge.
A car generator produces electricity, charges the battery and powers the vehicle's on-board network while the engine is running (when it reaches a certain crankshaft speed). Car generator The generator begins to produce electric current starting from the idle speed, however, it reaches optimal operating mode when the engine reaches 1600-1800 rpm or more.
Possible battery malfunctions
Over time, any battery becomes unusable due to wear and tear. Its service life largely depends on operating and maintenance conditions. If there is a problem, the VAZ 2110 battery light comes on on the instrument panel.
Battery indicator is on
The warning light may come on if the following problems occur:
- low electrolyte level in banks;
- Excessive heat causes the battery case to swell;
- the appearance of the smell of rotten eggs (that’s what sulfur smells like) indicates a battery leak, which is also characterized by oxidation of the terminals;
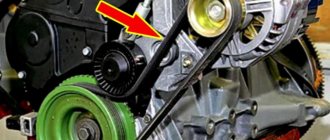
- low tension of the generator belt due to damage or wear;
- overheated fuse or poor contact in the connections of the mounting block;
- malfunction of the diode bridge, relay regulator;
- a break in the electrical network;
- oxidized contacts on the battery terminals or generator output;
- the brushes on the generator device are worn out;
- Poor contact of the ground wire.
To detect the causes of the malfunction, you need to diagnose the battery and test the entire electrical circuit of the car.
Electrical diagram of VAZ 2110
What functions does it perform and what is it responsible for?
So, what is a generator for? First of all, in order to provide all VAZ 2110 equipment that runs on electricity with energy. Perhaps someone thinks that this is the battery's task. Not really, because the battery is needed to maintain functionality when the engine is not running (it starts the engine, supports the alarm, music system while parked, etc.).
But when the engine has already started, with the help of the battery, the generator comes into play. During the trip, it is he who supports the operation of all electronics, air conditioning, audio (or even video systems), and everything else that you have added to your VAZ 2110.
Another equally important function of the generator is charging the battery. This also happens when the engine is running. And if it weren’t for this device, the battery would not be able to cope with its tasks, and it would have to be charged all the time.
Considering that today on the VAZ 2110, in addition to the standard layout, many additional energy consumers are installed, it happens that the generator voltage is not enough. In this case, it makes sense to install a 120 amp generator.
What to do if the voltage relay fails?
It happens that the relay fails at the most inopportune moment, when you still have a drive home and the battery is not charging. The battery capacity in economical mode can ensure fairly long engine operation, which will allow you to get to the repair site without any problems. Below we will provide a list of recommendations that will help you drive, as they call it, “on battery power” and not stall.
- If the battery is overcharged, the relay must be disconnected from the circuit. To do this, the contact wires are removed from it and left hanging. In the case of the “ten”, it is enough to unplug the plug with the wire from the generator brush connector. Thus, battery charging is turned off, and further movement will no longer harm the battery.
- Many experts suggest going the other way - turning off the generator excitation winding. To do this, remove the corresponding fuse. However, this can be done if you know where the fuse is located.
- If the battery is weakly charged, then there is practically no reason to panic. To get to your destination, you need to maintain high speeds in order to, at least a little, bring the voltage value to the nominal value. Before stopping the engine, it is recommended to maintain the speed at 3000 rpm for a few seconds using the gas pedal. This will prepare the battery for the next start.
- Avoid using music, power windows, headlights (especially high beams), and other electrical devices unless their use is absolutely necessary. This will save battery power well.
Generator VAZ 2110 (gena don’t die)
My adventures began three years ago, being in a semi-fainting state, I came to the electricians for service with the problem of the battery being discharged - after poking around for about 10 minutes under the hood, the electrician rendered a verdict: Gena is dead - install a new one, because... the way was far, I went to a nearby store of the rank of PBOYUL (or there were already individual entrepreneurs then, I don’t remember) and purchased a generator of the KZATE brand (see Fig. 1) for 80Ah (a standard generator for the 10th eight-valve Zhiguli family).
Fig.1. Generator KZATE
At first everything seemed to be fine, but over time, namely six months later, the battery also began to discharge. Armed with a multimeter (you can use any DC voltmeter with a measurement range of 0-20V and a value division of at least 0.5-1V), I began measuring the voltage (it should be noted that polarity must be observed when taking measurements and not allowing the positive terminal of the battery to touch the body of the car, and it might “bite”). Measurement of the battery showed that it was not up to a charge of 12.0 - 12.2V (at the required 12.5-12.8V).
I decided to start with a simple check of the voltage regulator - I warmed up the car, put an assistant behind the wheel, forced it to give it 3000 rpm and turn on all consumers - low and high beam headlights, heated rear window and heater - measured the voltage 11.5 - 11.7 V (should be at least 13.2V), and when the cooling system fan was turned on, it dropped right down to 10.5V. Having asked the assistant to turn off all consumers except the high beam headlights, he measured the voltage again - 11.9-12.1 V, although it should be in the range of 13.2-14.7 V. After analyzing the results, I came to the conclusion to replace the voltage regulator (chocolate) - by purchasing a regulator brand - auto electronics (see Fig. 2a) for 100 rubles and forgot about the problem...
But not for long, another 4 months passed, the battery was discharged, the measurements were not reassuring under a load below 12V, in addition to the chocolate bar, this time I decided to change the diode bridge (installed in the generator to convert alternating current into direct current, Fig. 2b).
Fig. 2a - Autoelectronics regulator
Fig. 2 b - Diode bridge VAZ2110
Checking the diode bridge can be done in two ways: with removing it from the car and without removing it. Without removing the diode bridge, the voltage regulator is checked using the method proposed by the Za Rulem publishing house. We remove the battery and generator wires (including from the voltage regulator terminal) and assemble the circuit according to Fig. 3. As a test lamp, you can use the side light lamp of the headlight of the tenth family; for complete safety of this test, you can install a 15 or 20A fuse on the positive wire (10A is possible).
If the lamp is lit in the circuit assembled according to Fig. 3a, then both the positive and negative diodes have a short circuit, and the diode bridge must be replaced. If the lamp is lit in the circuit assembled according to Fig. 3b, then the positive diodes have a short circuit, and the diode bridge must be replaced. If the lamp is lit in the circuit assembled according to Fig. 3c, then the negative diodes have a short circuit, and the diode bridge must be replaced. Detection of a short circuit in additional diodes is carried out in a similar way according to the following scheme: connect the plus of the battery through a lamp to terminal D of the generator, and connect the minus to one of the phase terminals of the stator winding. If the lamp lights up, then there is a short circuit in the additional diode.
RICE. 3. Checking the diode bridge on a car: a – checking simultaneously positive and negative diodes
Rice. 3 b – checking positive diodes
Rice. 3c - checking negative diodes.
B+ - positive output of the generator; D - common output of additional diodes
Checking the diode bridge when dismantling it is carried out by checking the diodes using a multimeter when switching it to the appropriate position (Fig. 4). The diode works like a switch - i.e. alternating current is carried in one direction, but not in the other, and because... alternating current flows through a sinusoid; to rectify it, four diodes are needed (two are rectified in one half-cycle, two in the other, as a result the current is constant and not pulsed).
Rice. 4 Function for checking diodes on a multimeter
As a result of checks, the diode bridge was found to be serviceable, but it was decided to replace it too to complete the picture.
Having stopped at a spare parts store, only the Penza voltage regulator was found in stock (Fig. 5). I would like to express my gratitude to the manufacturer for good packaging and a beautiful logo, but not for their voltage regulator. During an external examination, no special flaws were found, but during a resource test, by moving the generator brushes with the fingers, they remained on the researcher’s palm for a minute.
Rice. 5 Voltage regulator (A) in a plastic case
After exchanging this product, the voltage regulator and diode bridge were purchased at another auto store. But there were some surprises here too. When dismantling the old diode bridge and installing a new one, they were not studied and analyzed in detail. On the new diode bridge there was no gasket (Fig. 6a) for the positive terminal B+ (a bolt with a tetrahedral seat on the head, onto which the contact of the noise-suppressing capacitor is attached (Fig. 6b)). As a result, a short circuit occurred and the contact of the noise suppression capacitor burned out. Due to the lack of a megohmmeter (to diagnose its functionality), it was decided to replace it, fortunately the price is not high - 25 rubles.
rice. 6a - a - diode bridge view from the back side, the installation location of the generator output gasket B+ is indicated
Fig. 6b – noise suppression capacitor
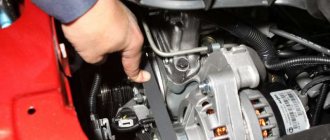
Another three months passed, and the problem of the battery not charging resurfaced at the wrong time. This time it was decided not to change the regulator and diode bridge, but to delve deeper into the study of the “miracle machine”. It is worth noting the foresight of the AvtoVAZ design department in placing the generator in a place convenient for removal (weak components of the eight-valve tenth family in the palm of your hand). After suffering with the generator clamped in a vice for half an hour, I got to the treasured parts of the “crocodile”: the rotor and stator.
The rotor and stator are checked according to two criteria: checking the windings for open circuits and checking the windings for short circuits. I won’t describe it, because the Internet and technical literature are full of information on this topic. I will only note that when checking the rotor, you need to pay attention to its slip rings (the place where the brushes rest) their diameter should not be less
12.8 mm, and the marks and grooves on their surface must be cleaned.
It is also necessary to check the height of the brushes; it should be at least
4.5 -5 mm.
The rotor and stator passed my test and were found suitable. As a result, without hesitation, I went to the store and purchased a PRAMO brand generator. The only thing that caught my eye when purchasing was the lack of voltage regulators for this generator on sale (the seller said that they are rare), and they differ in design from KZATE. I have been using this generator for 2 years and have no comments or complaints about its operation.
In conclusion,
a few tips from the publishing house “Behind the Wheel” and from the YouTube channel “Denis Legostaev”
:
1.
If the main components of the generator are in good working order, but at the same time it has unstable operation (the warning lamp lights up periodically, etc.) - this may be caused by poor-quality insulation of the generator winding wire.
To fix the problem, lower it for 2-3 minutes. the generator rotor and stator in electrically insulating varnish or boiling drying oil and then dry; 2
.
If the voltage regulator fails along the way, its functionality can be restored by connecting the “DF” voltage regulator terminal to ground (Fig. 7a) through a low-power 5-8W lamp, for example a headlight side light lamp (or type A-12 lamps -5 or A-12-8). 3
. You can quickly check the generator in the following way: connect the circuit according to Fig. 7b, if the generator is working properly, then when the pulley is turned the lamp should light up, also pay attention to the slip rings and the operation of the bearings.
Rice. 7 a – designation of the voltage regulator terminals: 2 – ground terminal, 3 – DF terminal, 4 – regulator body, 5 – D+ terminal of the regulator;
Fig. 7b - diagram for quickly checking the generator
Generator VAZ 2110: technical characteristics
The generator is the power of the entire system of functioning of a single, albeit artificially created, organism called a car. It is specially designed to convert mechanical energy into electricity. But, like all components of any car, the generator on the VAZ 2110 performs its duties, which there is simply no one to do for it.
Ways to troubleshoot battery problems
First of all, you need to check the battery charging while the engine is running. During normal charging, the voltage will be in the range of 13.6 - 14.2 Volts. If the charge is weak, the value will be below 12 Volts (the author of the video is VAZ 2101-2107 repair and maintenance).
To troubleshoot problems, you need to prepare instructions with a diagram of the electrical equipment of the VAZ 2110 car and the necessary tools:
- pliers;
- flat and Phillips screwdrivers;
- multimeter;
- 12 V indicator light;
- knife;
- sandpaper.
Principle of operation
The principle of operation is this: you turn the key in the lock, and current flows to the excitation wire. The magnetic field that the armature creates penetrates the stator windings, at the terminals of which voltage appears. When the armature reaches a sufficiently high rotation speed, which is provided by the pulley and belt drive, the so-called self-excitation mode occurs.
The rectifier unit converts alternating current into direct current. The voltage regulator starts working when the crankshaft speed changes (accordingly, the armature rotates faster or slower) and regulates the time for which the field wire is turned on. Sometimes a generator malfunction may occur due to a blown fuse in the circuit.
Purpose of the voltage regulator relay on the VAZ 2106
As you know, the power supply system of the VAZ 2106 consists of two important elements: a battery and an alternator. A diode bridge is built into the generator, which motorists in the old fashioned way call a rectifier block. Its job is to convert alternating current into direct current. And to ensure that the voltage of this current is stable, does not depend on the rotation speed of the generator and does not “float” much, a device called a generator voltage relay regulator is used.
The internal voltage regulator of the VAZ 2106 is reliable and compact
This device provides constant voltage throughout the entire on-board network of the VAZ 2106. If there is no relay regulator, the voltage will deviate abruptly from the average value of 12 volts, and it can “float” in a very wide range - from 9 to 32 volts. And since all energy consumers on board the VAZ 2106 are designed to operate under a voltage of 12 volts, without proper regulation of the supply voltage they will simply burn out.
Design of the relay regulator
On the very first VAZ 2106, contact regulators were installed. It is almost impossible to see such a device today, since it is hopelessly outdated, and it has been replaced by an electronic regulator. But to get acquainted with this device, we will have to consider the contact external regulator, since its example reveals the design most fully.
The first external regulators of the VAZ 2106 were semiconductor and were implemented on a single board
So, the main element of such a regulator is a winding of brass wire (about 1200 turns) with a copper core inside. The resistance of this winding is constant and is 16 Ohms. In addition, the regulator design includes a system of tungsten contacts, an adjustment plate and a magnetic shunt. There is also a system of resistors, the connection method of which can change depending on the required voltage. The highest resistance these resistors can provide is 75 ohms. This entire system is housed in a rectangular PCB body with contact pads for connecting wiring brought out.
Operating principle of the relay regulator
When the driver starts the VAZ 2106 engine, not only the crankshaft in the engine begins to rotate, but also the rotor in the generator. If the rotation speed of the rotor and crankshaft does not exceed 2 thousand revolutions per minute, then the voltage at the generator outputs does not exceed 13 volts. The regulator does not turn on at this voltage, and the current goes directly to the excitation winding. But if the speed of rotation of the crankshaft and rotor increases, the regulator automatically turns on.
The relay regulator is connected to the generator brushes and to the ignition switch
The winding, which is connected to the generator brushes, instantly reacts to an increase in crankshaft speed and is magnetized. The core located in it is pulled inward, after which the contacts on some internal resistors are opened, and the contacts are closed on others. For example, when the engine is running at low speeds, only one resistor is used in the regulator. When the engine reaches maximum speed, three resistors are turned on, and the voltage on the excitation winding drops sharply.
Functions performed
So, what is a generator for? First of all, in order to provide all VAZ 2110 equipment that runs on electricity with energy. Perhaps someone thinks that this is the battery's task. Not really, because the battery is needed to maintain functionality when the engine is not running (it starts the engine, supports the alarm, music system while parked, etc.).
But when the engine has already started, with the help of the battery, the generator comes into play. During the trip, it is he who supports the operation of all electronics, air conditioning, audio (or even video systems), and everything else that you have added to your VAZ 2110.
Another equally important function of the generator is charging the battery. This also happens when the engine is running. And if it weren’t for this device, the battery would not be able to cope with its tasks, and it would have to be charged all the time.
Considering that today on the VAZ 2110, in addition to the standard layout, many additional energy consumers are installed, it happens that the generator voltage is not enough. In this case, it makes sense to install a 120 amp generator.
Specifications
Most often, the VAZ 2110 is equipped with a Katek generator, usually designated by the numbers 5102.3771, but it can also be 94.3701. Both generators have a power of 80 amperes, and the output voltage is about 14V. But recently Katek has been releasing a new type of generator, also suitable for the VAZ 2110.
It produces a current of up to 120 amperes, and is more suitable for the high energy loads of a modern car. By installing a 120-amp generator, you can ensure simultaneous uninterrupted operation of almost all electricity consumers.
Device components
If the generator device is considered in terms of size, then there are compact and traditional ones. They also differ in their design features.
They are different:
- drive pulley;
- excitation wire;
- bracket;
- anchor device.
They can be fastened with one bolt, or with several, and other “little things”. However, any generator has a general structure.
Its components:
- The rotor (or armature) is the rotating part of the generator. The armature is designed to create a magnetic field using an excitation winding located on the shaft. The excitation wire is powered by slip rings located on the same shaft. The following are also located here: the excitation winding wire, the fan impellers (one or two), the drive pulley and the bearing assembly;
- The stator is the stationary part of the generator, consisting of three windings (three-phase), which create alternating current. These windings can be connected to each other by the so-called “star” or “delta”;
- The housing is most often made of lightweight non-magnetic aluminum alloy; it consists of two covers, secured with a bolt. The front cover is located in the same place as the drive pulley; the back cover is on the side where the slip rings are. Each bolt that connects the back and front covers is tightened. In the future, to disassemble the generator on a VAZ 2110, it is enough to remove the bolt mounts;
- Mounting the generator on a VAZ 2110. There is an upper mounting bracket that uses 2 bolts. The lower mounting bracket most often has one bolt, but there may be two, in which case minor modifications may be necessary. The bolt can be anything, the main thing is that the size is suitable, sometimes a sleeve is required for this. It is better not to redo the bracket itself. The bracket securely holds the generator, which has many responsibilities. And yet, we should not forget that the bracket, like the bolt, can break, so you need to monitor its condition;
- The structure of the brush assembly consists of two graphite brushes, springs that press them, and a brush holder;
- In modern Katek generators, the voltage wire and brush holder are located together in a non-separable unit. Therefore, if the voltage regulator fails, the entire assembly must be replaced. Structurally, this regulator can have a hybrid device - when radio elements with electronic devices are in the same circuit. But an integral is when the regulator is made in thin-film microelectronics technology. Many believe that the integral regulator copes better with its mission - controlling the duration and frequency of current pulses. The regulator changes the voltage used to charge the battery. At higher temperatures, less voltage goes to the battery. Although, in principle, it is not so important whether the integral is responsible for this regulation, or the hybrid;
- A rectifier unit with six diodes is responsible for converting the alternating current generated by the armature and stator into direct current, directly used by all on-board equipment. It also serves to charge the battery;
- The device is driven by a belt drive. It provides a significant increase in the speed at which the crankshaft rotates. In this case, the V-belt wears out faster if the pulley has a small diameter. If the driven pulley is small, it is better suited to a serpentine drive, which is more often used in modern generators.
Here, in brief, is the basic structure of generators, regardless of whether they produce 80 or 120 amperes.
↑ Description of generator design 94.3701
The generator is a synchronous AC electrical machine with electromagnetic excitation and a built-in rectifier using silicon diodes. The generator rotor is driven into rotation from the engine crankshaft pulley (damper) by a poly-V belt.
The stator and generator covers are secured with four screws. The rotor shaft rotates in bearings installed in the covers. The lubricant placed in the bearings at the factory is designed to last the entire service life of the generator. The rear bearing is pressed onto the rotor shaft and is pressed by the rear cover through a plastic sleeve.
The front bearing is pressed and rolled into the front cover and can only be replaced together with it. Its inner race, together with the spacer ring and washer, is clamped by a nut between the pulley and the step on the rotor shaft. The back of the generator is closed with a plastic casing with latches.
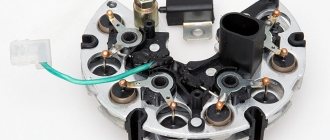
The generator stator contains a three-phase winding made in a star configuration (the terminals of the phase windings have a common point). The second ends of the phase windings are connected to a rectifier bridge consisting of six silicon diodes (valves) - three “positive” and three “negative”.
The valves are pressed into two horseshoe-shaped aluminum holder plates in accordance with the polarity (positive and negative - on different plates); one of the plates also contains three additional diodes, through which the excitation winding of the generator is powered after starting the engine. The plates are combined into a rectifier unit mounted on the back cover of the generator (under a plastic casing).
The excitation winding is located on the generator rotor, its leads are soldered to two copper slip rings on the rotor shaft. Power is supplied to the field winding through two carbon brushes. The brush holder is structurally combined with the voltage regulator and is mounted on the back cover of the generator.
The voltage regulator is non-separable; if it fails, it is replaced.
To protect the on-board network from voltage surges during operation of the ignition system and reduce interference with radio reception, a capacitor with a capacity of 2.2 μF (±20%) is connected between the terminals of the “positive” and “negative” valves (between the “+” and “ground” of the generator) on the rectifier block.
Resource
The standard Katek generator on the VAZ 2110 is designed to operate over a range of 140 thousand kilometers, which in terms of operating time is about 10 years. But this, however, is subject to the rules of handling it.
Many people doubt whether a powerful 120-amp generator will have a negative impact on the battery. Practice shows that it is not, but if you have a powerful sound system in your car, it will be just right.
What to choose?
In terms of popularity and reliability, the first places are occupied by manufacturers Bosch (Bosch), Denso (Denso) and Delphi (Delphi). But you should know that Katek (KZATE) (made by us) are also quite reliable and do a good job of their duties on the VAZ 2110, creating the required voltage. Maybe somewhere they lose against Bosch, but compared to the Chinese they are at their best.
VAZ generators of the tenth family:
Staff - KATEK, KZATEtm (Samara)
Kraft
PRAMO/ELTRA (Rzhev)
So it’s difficult to say for sure which generator is right for you; the best one is the one that provides the necessary power to operate electrical appliances and charge the battery. If we take the advantages that Katek clearly has, then this is sufficient reliability, and also - what is important - the availability of inexpensive spare parts for sale: you can always buy at least a fuse, a pulley, an armature, a voltage regulator, an excitation wire, etc.
Dismantling and repair
After you have succeeded in removing the device, you need to perform an inspection and find defective parts. It is better to carry out diagnostics at a service station in order to be sure which part needs to be removed and a new one installed. The work must be carried out in a garage with an inspection hole. Disassembly is performed as follows:
- The negative terminal must be disconnected from the battery;
- The next step is to remove the power plant mudguard. After this, access to the generator excitation wires will appear - they must be removed;
- Using a 10mm wrench, you need to unscrew the nut that secures the wires to the positive drive. Now both wires can be removed;
- Next you need to remove the belt. Having opened access to the device, unscrew the adjusting bolt and then pull the unit out of the top bracket;
- Now you can remove the tension bar. While holding the device, unscrew the lower fastening nut and remove the bolt;
- Disassembly is complete - the unit can be removed.
After performing troubleshooting, you can understand whether the VAZ 2110 generator needs to be replaced or not. In some cases, it will be enough to replace a few worn parts. When disassembling, you should have a diagram at hand. If you have no experience working with electrical appliances, it is better to contact a service center.