Replacing and repairing a window regulator on a VAZ 2107 is a fairly simple task that anyone can handle with the help of detailed instructions. You should start repairing the seven at the moment when the first signs of a malfunction appear. In order to replace an old window regulator with a new one, you only need to prepare a small set of tools.
Replacing the window regulator on a VAZ 2107 yourself will help you better understand the design of your car and save your money. The car owner will not have to pay a technical center for easy repairs and waste time waiting if he copes with this task without assistants.
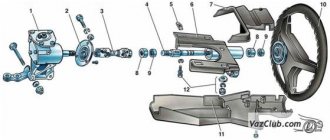
Design Features
Before you start replacing the window regulator on a VAZ-2107, you should carefully study the design of this part. There are two types of manual window lifters:
- Rack and pinion. The gears of this mechanism are plastic, which is why the mechanism quickly wears out and fails. Moreover, the mechanism is more bulky and takes up more space under the door card. This design has its advantages - skewing the glass is impossible, and the raising and lowering of the glass element is much quieter than with other mechanisms.
- Cable. In such a window lifter, the main element is a cable, with the help of which the glass moves up and down. The load is taken on by the rotating mechanism blocks. This design is quite simple and has a significant advantage - maintainability. In order to repair or replace any parts, you won’t have to put in too much effort. But the system also has a drawback - it is not very reliable.
In some stores you can purchase electric windows for the VAZ-2107 to make every trip even more comfortable. However, it is worth considering that connecting this device will require a little more time. All actions are carried out strictly according to the scheme.
It is also necessary to remember that any intervention in the electrical system must be carried out carefully, in accordance with the instructions of the electric window manufacturer.
Selecting new devices
The rear and front ESP on the VAZ-2107 is very convenient. It is relatively inexpensive, can be installed without any problems, is fully equipped, and does not require additional parts. There is no unnecessary noise during its use. However, before installing power windows on the VAZ-2107, you need to choose the appropriate option:
- Russian models. They are produced as “Forward” and “Granat”.
- Foreign models. They are supplied to the Russian market by the Chinese company Ningbo Stone.
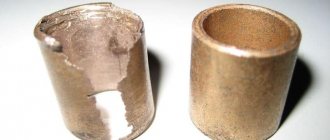
Malfunctions of window regulators and ways to eliminate them
Having studied the structure of the window regulator in VAZ 2107 cars, you should also learn about the “diseases” of the system. The reason for their appearance is a flaw in the design and the use of low-quality materials. These shortcomings were not identified during testing on special stands.
In addition, manual window regulators are quite difficult to repair manually. You can disassemble them in a couple of steps, but in order to bring the parts into working condition, you will need a real workshop. There are several types of malfunctions of the mechanism in the VAZ-2107 door.
Window creaking
This malfunction is accompanied by a characteristic sound. It can be confused with the sounds of the usual operation of the Zhiguli mechanisms, but special attention should be paid to this sign. It appears when something goes wrong with the window regulator. The cause of the breakdown is a lack of lubrication on the internal parts.
If you “start” the problem, the window regulator may break. Also, when assembling and disassembling the system, it is recommended to replace the rubber bands or simply wipe them, removing dust and small grains of sand that scratch the mirror.
Window regulator jammed
With such a malfunction, the side windows cannot be moved. The mechanism wedge occurs quite often in Zhiguli cars. There are several reasons for this problem:
- Failure of the welded connection between the glass strip or cable. In this case, you will have to unfasten the cross and clean it, and then re-weld the bracket and make sure the system is reliable.
- The correct winding of the cable on the block is lost. It is recommended to carefully unwind the cable. If this fails, you need to prepare for a complete replacement of the mechanism. This failure is fatal.
- The lift mechanism jams, causing the gear teeth to grind down too quickly. You can get by with minor repairs and simply replace failed parts.
Glass falls
A typical malfunction for the seventh model Zhiguli is considered to be the fall of the side window. It does not fall to the lowest position. The reason is a weakened tension cable, due to which the glass simply sags. In the best case, it will be enough to tighten the cable or straighten it by placing it in the fastenings.
In the worst case, you will have to install a new cable and wrap it around the fasteners.
How to adjust wiper pauses on a VAZ 2107
The whole point of this adjustment is to increase the pauses in the windshield wiper operating modes. In continuous operation of this device, the pause between strokes is 1 second. In intermittent mode, 4 strokes are made and a pause between them is 4 seconds. Practice shows that there is no particular need for such operating parameters of this device. However, they can lead to premature wear of unit parts. It is in order to increase the service life of the mechanism that the pause of the windshield wiper of the VAZ 2107 is adjusted. The most optimal option for the operation of the wiper is the following:
- The pause between swings in continuous mode should be 2 seconds.
- The number of strokes in intermittent mode is 2 times.
- In intermittent mode, the pause should be 20 seconds.
These adjustment settings will also have a beneficial effect on the condition of the windshield. With minimal pauses, the glass does not have time to get wet, and the brushes work on an almost dry surface. As a result, sanded stripes and scratches appear on the glass. Increasing pauses in the purifier operating modes will help avoid this problem. In order to be able to regulate the operating modes of the purifier, some changes and additions must be made to its electrical circuit. For example, if you include a variable resistor in the electrical circuit, then the pause can be adjusted “manually” and its value can be set at your discretion. However, not all car enthusiasts are well versed in electrical circuits and have the necessary skills to perform this work. In this case, a very good solution to this problem is proposed. You can install relay 63.3777. It is designed to work on a VAZ 2107 car.
Relay 63.3777 for VAZ 2107
This device has the following advantages:
- The relay allows you to change the pause between brush strokes in the range of 1 – 70 seconds. The driver independently determines the size of the pause depending on how dirty the car glass is.
- When installing this relay, there is no need to replace the electrical wiring.
- There is no need to make any additions or changes to the design of the front panel of the car.
- Each product includes detailed instructions for installing and operating this device. By following these instructions, the driver can install the relay independently and without resorting to the services of a service center.
In conclusion, we note that installing this relay will allow you not only to increase the service life of the wiper mechanism, but also to maintain the normal condition of the windshield and wipers. It will expand your options for using various tuning services.
Window regulator replacement sequence
Before you start replacing the door mechanism, prepare a few tools:
- Key for 8 and 10;
- Phillips and flat blade screwdrivers.
Despite the most common “diseases” of the Zhiguli mechanism, it is easily repaired even in the field. If you have spare parts and the necessary tools, you can repair the window regulator without additional help. You need to know step by step how to remove and place parts.
Regardless of whether the rear door or front door requires repair, the process for replacing window regulator parts will be similar.
Removing the window handle
Iron handles and handles in Soviet-designed cars should be handled with particular care. And plastic handles break quite often, but, in contrast, they are easy to remove and replace:
- Release the handle from the retaining ring.
- Use a flat-head screwdriver to carefully move the outer ring and then remove the retaining ring.
- Slowly remove the handle.
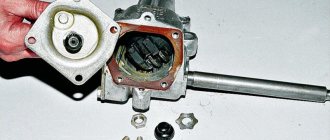
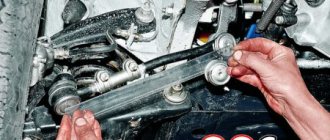
Removing the window regulator
At this stage you will have to perform a little more steps:
- Lower the glass to its lowest position. If you have already removed the handle, you can do this with a key.
- If you plan to reinstall the lift in the future, the cable should be screwed to the drum using thin wire. At the same time, it must be left in the guides so as not to waste time in the future installing the cable into the grooves. In new mechanisms, an installation bracket is installed to simplify fastening.
- Loosen the bolt that holds the lower roller.
- Move the bottom roller a little higher to gradually release the tension on the cable.
- We remove the cable, leaving it hanging on just one roller.
- Unscrew the screws that secure the window regulator to the metal plate in the door.
- We get the mechanism.
Installing a new mechanism
When purchasing a new replacement mechanism, check its quality before installation. After all the parts in the mechanism are replaced, they need to be lubricated and put back in several steps:
- We install the mechanism and fix it by tightening the three standard nuts;
- We throw the cable over the rollers and only after that remove the wire;
- Adjust the degree of cable tension using the lower roller, and then tighten the nut;
- Check the window regulator for functionality. If the glass moves slowly, the tension should be loosened;
- We check whether the glass rises all the way;
- Install the door card;
- We put the door handle in place, and then the window handle.
Installation
To install a new window regulator, you must select the type of device. If a mechanical fragment is installed, it can be replaced with an electrical one. To do this, you will need to additionally install an electric motor. Experts advise purchasing a set of manufacturers who produce rack-type products: “GRANAT” or “FORWARD”. In the set the motorist will find:
- instructions;
- 2 window lifters;
- wiring harness;
- 2 switches;
- plugs;
- repair kit
It is better to install the product indoors, with good lighting and a reliable source of electricity.
As a last resort, a machine battery is used. In addition to the kit you will need: nuts, glass clamps, wires and fuses, a drill. Next, select the location for installing the buttons. The hole from the mechanical handle can be easily closed with a plug, so there is no need to worry about aesthetics. Instructions:
- Disconnect the battery terminals.
- Raise the glass and secure the element with tape.
- Remove the trim.
- Install the old beet lifting mechanism.
- Install and secure the electric motor and fuses.
- After fixing the electrical product, configure and connect it.
- Create holes for the keys on the handle of the door leaf.
- Install the buttons and run wires from them to the window regulator.
- Connect the contacts.
- Turn on the battery and check the operation of the new device.
Additionally, it is worth cleaning the niche from dirt and treating internal parts with anti-corrosion and silicone agents. This will avoid repeated dismantling in the near future.
Replacing the cable
In order to replace the cable if it breaks, you must follow the short instructions:
- Remove the door card, and then remove the cable from the guides.
- Apply a generous amount of lubricant to the cable before installing it.
- First, pull the cable along the upper roller with the lower branch, and bring the upper branch to the lower roller.
- At the top of the cable, fold a small loop and pull it to the hidden roller and secure it in a few movements.
- After the cable is secured to all rollers, check how the window regulator works.
The installation is complete.
Replacing rollers
The seven window lifters have four rollers:
- The first is a tension roller. It maintains the cable in a certain state of tension, but over time it “relaxes”;
- The second and third are fixed on the glass. The left and right rollers transmit lifting torque when controlling the movements of the cable;
- The fourth is fixed to the door and is motionless. It takes the lifting force.
In order to dismantle the rollers, you need to remove the door card and simply unscrew the nuts that secure them. They also need to be installed carefully. After new parts are installed, the structure must be reassembled.
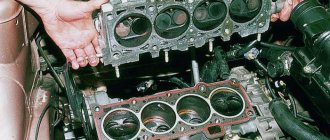
PREPARATORY ACTIVITIES AND DISASSEMBLY OF DOORS
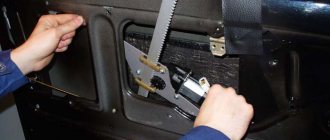
To provide access to the mechanism, it is necessary to dismantle the upholstery; the operation is performed as follows:
- Using a screwdriver, unscrew the screws securing the door handle, remove it and put it aside.
- Carefully remove the mechanical window handle and the opening handle.
- Inserting a flat-head screwdriver into the gap between the upholstery and the door, press it out, overcoming the resistance of the plastic latches.
- We unscrew the screws holding the parts of the drive and the executive part of the standard mechanism and remove them along with the glass.
The preparatory activities for installing electric windows on a VAZ 2107 model car are completed and you can move on to the next stage.