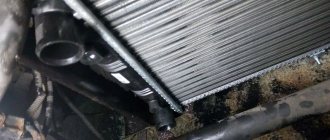
A catalyst is a part of a car's exhaust system that neutralizes products of incomplete combustion and harmful substances. It is also called a catalytic converter. The unit consists of a housing, a block carrier on a metal mesh and thermal insulation. The carrier block is a longitudinal ceramic honeycomb that increases the effective area of interaction with the neutralized gases.
Catalyst for VAZ 2114
Catalyst (Priora): description, characteristics and reviews
The design of the exhaust gas exhaust system of absolutely all modern cars requires the presence of a catalytic converter (catalyst).
This is a prerequisite for complying with environmental regulations. VAZ-2170 is no exception. Its exhaust system is also equipped with a catalytic converter. This is what we will talk about in this article. We will look at how the catalyst (Lada Priora) works, and also talk about the problems that arise when it malfunctions. In addition, we will try to figure out alternative devices used to replace it.
How to repair a muffler
If your car's muffler requires repair or complete replacement, it is not recommended to do this work yourself, since there is a high risk that you will only worsen the condition of the exhaust system, and possibly the entire vehicle as a whole. In order to prevent such a situation, contact only specialized car services. In our car service center, qualified specialists with the necessary competence in the field of working with exhaust systems will competently diagnose the exhaust system of your car, and, if necessary, repair or install a new muffler in the shortest possible time.
If you encounter any malfunction in the exhaust system and you need to diagnose it, repair it or replace the muffler, then our salon specialists will be happy to help you with this, since we carry out all types of this work!
When developing most modern cars, technical solutions are widely used in their design, the main task of which is to ensure maximum comfort for the driver and passengers of the vehicle. In addition, a car that comes off the assembly line today simply must be environmentally friendly: it pollutes the air minimally and creates a low level of noise when driving. Environmental standards are especially strict in Europe and the United States, but Russia is gradually moving in the same direction.
Reducing the amount of harmful exhaust into the atmosphere and the noise level of the machine is achieved through the design of the exhaust system and the operation of the catalyst, whose task is to neutralize the main toxic gases generated during engine operation. This is a necessary part of any car; in the West, a car cannot be operated without a catalyst, but in Russia the situation is somewhat different. The fact is that the catalyst is quite expensive (precious metals are used in its design), therefore, after the end of the service life of this element, various cheaper alternatives are sought for it.
One of the most common ways to replace a catalyst is to install a flame arrester in the vehicle's exhaust system. Currently, you can easily find a flame arrester for any type of engine; many well-known foreign and domestic manufacturers of automobile parts are engaged in their production. The most common is the so-called universal flame arrester; they are manufactured by such well-known brands as “Platinik”, “Asmet”, “Ferroz” (Poland), “Asso” (Italy), “Simons” (Finland), “Walker”, “ Universal" (Estonia), "Marmittesara" (Italy).
Design Features
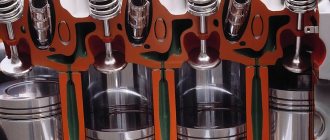
How does the catalyst work? "Priora" in terms of its design is no different from other modern cars. The part consists of a steel body (can) and a working element - metal honeycombs, the surface of which is coated with an active substance that promotes heating of the exhaust. The latter is a platinum-iridium alloy.
Unburned harmful impurities, passing through the honeycomb of the device, settle on the surface of the catalytic layer and, under the influence of high temperature, continue to burn, oxidizing almost completely. As a result, at the output we have an exhaust with a minimum amount of harmful substances.
Firmware for EURO2 and snag – what does this mean?
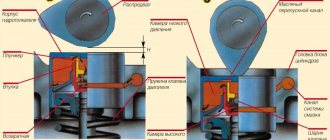
As I wrote above, the second oxygen sensor (lower lambda) controls harmful emissions. Their number is now strictly regulated by European standards, which are called “EURO”; I will not talk about EURO “0-1” now; we are interested in the second generation.
So, what is EURO2? It was introduced a long time ago, namely in 1996. AT that time, the cars received an innovative system, namely a catalyst. As we all know, over time it can become clogged, and the fuel then was not the same as now, it had a lot of sulfur, which contributed to the honeycombs clogging much faster, and as you and I know, the car began to choke itself. Then the engineers installed an oxygen sensor, there was only one, and it was needed to capture CO2 in the chamber in front of the catalytic converter.
If the CO2 level increased, this indirectly indicated that the catalyst was clogged (that is, a backpressure effect was manifested); the sensor sent this information to the ECU and the ignition was adjusted, namely, a decrease in the supply of the fuel mixture. Thus, the power dropped significantly, the car did not drive and the owner “willy-nilly” had to go to a service station and change this spare part.
BUT, as you and I know, the price tag is, to put it mildly, HIGH, so many owners simply removed these honeycombs and the POWER RESTORED!
But how? YES, everything is simple, the CO2 level in the chamber in front of the neutralizer dropped significantly, the oxygen sensor recorded this (that everything is in order) and the car drove cheerfully and without constraint. This suited everyone, BUT NOT ECOLOGISTS! Therefore, they introduced the EURO3 standard (now the EURO5 standard already exists). What has changed is that a second oxygen sensor (lower lambda) just appeared behind the catalyst. The principle of operation here is this: the first lambda (before the filter) records the level of harmful substances, the second (after it) should record a much lower level, because the harmful substances have decomposed.
If you remove the catalyst cells, then both sensors will record the same values (“the second one” supplies information to the ECU), thus, CHECK ENGINE will light up, the power will drop, and the car will not drive. Now this doesn't solve the problem.
What is done with firmware for EURO2? The firmware in the ECU is changed, instead of EURO3.4 standards, EURO2 standards are installed. The essence of all these actions is banal - we simply turn off the second lower lambda (only the upper one remains), the car begins to drive as expected, without underestimating the power.
But such interventions in the firmware are not entirely good. The whole point is that they don’t produce them themselves, okay, the second “lambda” is simply turned off, that is, they simply adjust the readings. Or maybe this programmer will want to put some incomprehensible algorithms into the ECU, the engine will definitely not benefit from this. You need to be very careful here.
Therefore, we found a second solution, and I think it is more correct - installing a blende. What is a snag - essentially it is a “spacer” in front of the second oxygen sensor, it seems to move it a greater distance from the exhaust gases, it detects more oxygen and starts working normally.
Now there are several options for deception:
- Empty. It's just a tube with a very thin hole at the end (the part that screws into the muffler), and an oxygen sensor is screwed into the other side. A limited amount of harmful substances from the exhaust passes through it, there are no excesses and therefore CHECK does not burn.
- With a mini catalyst inside. That is, right in the “spacer” there are, as it were, mini honeycombs, which also clean the exhaust precisely to record normal values.
- Angular. These are both of the types described above, only they are made at an angle of 90 degrees; they are needed for difficult places.
The advantages of the decoy are that you don’t need to go into the ECU and change the standard firmware, as well as the price (knocked out the cells, screwed on the decoy and that’s it, you can spend 3,000 - 5,000 rubles).
Signs of a bad catalytic converter
The declared service life of the VAZ-2170 catalyst is 140 thousand kilometers. However, this does not mean that after this mileage the device needs to be changed. It can last much longer, or it can fail even after traveling 10 thousand km. It all depends on how you use the car.
How do you know when it's time to change the catalyst? "Priora", being a car stuffed with various sensors, will first of all let you know about this with a burning CHECK light on the dashboard (when reading the code, error 0420). Failure of the catalytic converter is also accompanied by:
- difficult (long) process of starting the engine;
- reduction in power characteristics;
- increased fuel consumption;
- floating speed at idle;
- uncharacteristic sounds of a running engine;
- pungent (acrid) smell of exhaust gases.
Chip tuning of Lada Kalina engine
The Hephaestus car service has all the necessary equipment, including official programmers and system applications, for downloading, editing and installing new firmware of the leading electronic engine control unit on LADA. With us, unlike most other car services in Moscow, Lyubertsy, Zhukovsky or Ramensky, you can order a full-fledged chip tuning of your car, which will be performed both at the physical and software levels.
We provide a quality guarantee for repairs of both the engine and exhaust system!
Removing the catalyst
To forget about the loss of traction in the engine, the delay of exhaust in the catalyst, we will change the ECU settings (we will flash the ECU), and also physically remove the unusable catalysts from the exhaust pipe of the Lada Kalina.
All these services are large-scale, but we perform chip tuning of Lada Kalina literally in one day, we carry out all work on this service with 100% high quality, accurately and taking into account the technical features of the model.
ECU firmware
Having physically removed the catalyst on the Lada Kalina, we will complete the procedure for optimizing the operation of the exhaust system at the software level - and disable scanning of the second oxygen sensor in the system. In simpler terms, through the ECU firmware we will disable the lambda probe of the Lada Kalina.
All system settings and programming of the electronic control unit are performed on our part by an experienced specialist. We perform system coding and lambda probe removal correctly - so that not a single error light comes on on the dashboard of your car.
Improvement of the Lada Kalina engine
And even if before this your Lada had a Check Engine light on the catalyst and lambda probe, then after we perform chip tuning and ECU firmware, there will no longer be any software errors in the system of your car.
We will actually improve the engine without boring. We will correct + remove software errors, resolve the issue with unusable catalysts and capricious lambda probe, increase the power of the Lada Kalina engine and optimize high-quality fuel consumption.
For all this - for chip tuning - you will not need to receive any documents. This engine tuning and car improvement is absolutely legal. We have extensive experience in such modifications of various LADA cars, and of course, we have already performed full chip tuning of Lada Kalina more than once.
Come to us to remove the catalyst and flash the Lada Kalina ECU; we carry out all the work at the highest level, with a quality guarantee and at the most affordable prices!
Start with the sensor
If you notice the above signs, do not despair immediately. A faulty oxygen sensor (lambda probe) may also be to blame for the fact that the car has lost its former agility. By the way, Priora has two of them: control and diagnostic. The first is designed to determine the amount of oxygen in the exhaust gases, and the second is to promptly inform the driver about a possible malfunction of the first device.
Often these sensors are called by other people's names, for example, asking how many catalysts are in the Priora and which ones. This is fundamentally wrong. There is one catalyst, two sensors. Let's get back to them.
Considering that the diagnostic lambda probe rarely fails, check the catalyst control sensor first. In the event of a breakdown, the Priora will also notify you with a lit CHECK lamp. All that remains is to read the error code with the scanner and decipher it. If it turns out that there is a problem with the lambda probe, you are in luck.
How not to “kill” a car: cut out the “cut” correctly
The complexity of this procedure directly depends on the machine. For example, BMW has metal “cats”, and when removing them you cannot do without an angle grinder and welding. Ceramic ones, like the LADA Granta, are easier to knock out.
Step-by-step instruction:
- We go to the lift.
- We dismantle part of the exhaust system with the neutralizer.
- Using a pry bar, a screwdriver and a hammer or a hammer drill with a drill with a diameter of 23 mm or more, we knock out the insides of the catalyst.
- We install a flame arrester in its body.
- We install a lambda probe decoy or flash the ECU to remove the Check Engine error.
Exhaust system with and without
decoy There are mechanical and electronic decoys, but their task is the same - to tell the “brains” that the catalyst is working and all indicators are within normal limits. Reflashing the ECU to Euro-2, roughly speaking, removes all references to the converter from the program and ignores the sensor data.
Important:
- When removing the first catalyst, there is no point in leaving the second one - the car has no use for it.
- When directly knocking out, you need to make sure that no ceramic particles remain. It is better to blow the insides of the pipe with air or use a vacuum cleaner.
- When installing a flame arrester, it is important to choose the correct size so as not to disturb the geometry of the exhaust system.
How to check the catalyst
The catalytic converter can be checked in two ways: by visually inspecting it and by measuring the pressure inside the can. In the first case, the device is dismantled and a visual inspection is carried out. If the body of the device has traces of mechanical impact, and the honeycombs visible through the holes are melted, the catalyst is clearly faulty.
The pressure inside the device can is checked using a special pressure gauge screwed in instead of the control sensor. The engine is started, warmed up and brought to 3 thousand rpm. If the catalyst is working, the pressure should not rise above 0.3 kgf/cm2.
Cleaning methods and products used
Car enthusiasts and service station technicians practice 3 methods of cleaning the catalyst from oil deposits and soot:
- Preventive cleaning with detergent is carried out at a mileage of 70–100 thousand km without removal from the car.
- Mechanical cleaning.
- Repeated washing.
The last 2 options involve dismantling and partial disassembling of the neutralizer.
For preventive maintenance of catalysts, special fluids such as Hi-Gear HG3270 are available for sale. The product is simply poured from the bottle into the fuel tank, and then the car is operated as before. The soot removed from the unit flies out along with the exhaust gases.
For mechanical cleaning, you need to have a compressor and prepare fine sandpaper. The method cannot be called successful, since only external contaminants are removed; part of the soot remains deep in the ceramic honeycomb.
A frequently used chemical for cleaning a removed converter is an ABRO aerosol liquid used for flushing carburetors.
It has been proven by practice that the liquid does not harm the expensive catalytic coating. Sometimes, at their own peril and risk, motorists use kerosene, ethanol and other chemicals, but it is better not to use such folk remedies. It is unknown how they affect an expensive element of a particular car.
Why does the catalyst fail?
The main malfunction of the catalytic converter is cell obstruction. Over time, their working layer burns out, and they themselves begin to melt, turning into a solid mass. This creates an obstacle to the free exit of exhaust gases, which is why, in fact, the engine “chokes.”
Premature failure of the catalyst can be caused by:
- use of low-quality fuel;
- oil getting into the fuel;
- irregularities in the ignition system.
Causes of malfunctions
The main reasons causing catalyst malfunction include:
- Poor quality fuel.
- Faulty oxygen sensor. In this case, too rich a mixture destroys the neutralizer.
- Leaks of oil and lubricating fluids. Liquids entering the working chamber.
- Prolonged operation of the engine in idle mode.
Signs of a faulty catalyst
- Loud noises from broken ceramic honeycombs.
- A characteristic smell in the cabin and from the exhaust gases released.
- Black exhaust color.
- Reduced engine power. This is especially noticeable on the rise and during acceleration.
- Unstable engine speed.
- Sometimes the case overheats so much that it begins to melt, and other parts behind it become deformed.
Faulty catalyst
With extreme driving styles and/or poor road conditions, ceramic honeycombs break before their normal service life expires.
Diagnostics
For diagnosis you will need:
- tools for removing the lambda probe;
- pressure gauge;
- remote pyrometer.
A pressure gauge is installed in place of the lambda probe and the pressure is measured with the engine running. If it is more than 0.5 atm, there is most likely a problem in the converter.
Another way to check is to measure the pipe temperature with a remote pyrometer. If the converter is operating normally, the section of pipe upstream of it will be hotter than the section downstream of the catalyst. When the temperature is the same, this confirms the destruction of the ceramic carrier and the violation of flame retardant functions.
If a malfunction is detected, the catalyst on the VAZ 2114 must be immediately replaced.
We change the catalyst on a Priora with our own hands
To replace the VAZ-2170 catalytic converter, it is not necessary to go to a service station. This can be done in your own garage. For this you will need:
- a set of keys;
- head 13 with handle;
- pliers;
- slotted screwdriver.
Replacing the catalyst (Priora) is carried out as follows:
- We install the car on the inspection hole.
- Raise the hood and disconnect the negative terminal on the battery.
- Remove the decorative casing of the power unit.
- We go to the inspection hole. Unscrew (not completely) the lower nut of the clamp connecting the main and additional mufflers. Unscrew the top nut completely. Remove the clamp and remove the O-ring.
- Use pliers to bend the antennae of the catalyst's thermal protective shield.
- Unscrew the three nuts securing the exhaust pipe flange and the catalytic converter flange. Remove the locking plate.
- We lift the additional muffler up and remove its bracket from the front cushion of its suspension (rubber band).
- Disconnect the exhaust pipe of the additional muffler from the catalyst studs. Remove the sealing gasket.
- Disconnect the wiring harnesses from the connectors of the control and diagnostic oxygen sensors.
- Remove the sensor wire holders from the heat shield of the steering mechanism.
Before installing the catalyst, be sure to check the condition of the gasket. If it is damaged, you will have to buy a new one. Under no circumstances should you install a torn gasket!
You should also check the flatness of the catalytic converter flange. This can be done by applying, for example, a metal ruler to it. Using a feeler gauge, measure the size of possible gaps. If they exceed 0.1 mm, we grind the flange surface.
Removal and replacement (8-valve engine)
The prepared car is jacked up or placed over an inspection hole. The neutralizer body is located in front of the middle resonator, next to the exhaust manifold. How to remove the catalyst on a VAZ 2114? The resonator mounts are unscrewed and the spring washers are removed. Remove the exhaust pipe fasteners. All bolts are removed along with the springs. The catalyst must be held from below with one hand. The new part is installed in the reverse order.
Removing the catalyst
Is there an alternative
Will Priora work without a catalyst? Of course it will be! The absence of a catalytic converter will not affect its performance in any way, as some “experienced” craftsmen claim. Yes, the car will no longer meet established environmental standards, but it will not work any worse.
If you don’t want to spend money on a standard catalyst, you can always buy a universal device, which will cost you half the price, taking into account installation. Essentially, it is the same catalytic converter with the same functions and similar design. And they are produced mainly in the same factories as the original ones, and their price is lower due to the absence of various trade markups.
Well, if you want to easily tune your Priora, buy a good flame arrester for it. It is installed instead of a catalyst. With it, the engine power will increase due to improved exhaust gas flow, and the sound of the power unit will acquire sporty notes.
The catalytic converter is knocked out, is this bad for the car?
As I wrote above, this is simply an environmental system, and if it is not there, then the car, on the contrary, will improve its characteristics (power, consumption). To put it simply, the engine doesn’t care about this converter, whether it is there or not.
But why on many cars, if this unit fails (say, melted, clogged or crumbled), the CHECK ENGINE starts to light up and the car begins to behave abnormally, traction disappears, sometimes it trots a little, and simply may not start at all.
And here, friends, everything is simple. If the catalyst is melted or clogged, then the exhaust gases cannot pass through it normally, which means that some returns back into the combustion chamber and makes the newly introduced combustible mixture less efficient. The motor is choking itself.
If there is no melting, but the “CHECK” light comes on, then perhaps it has simply worn out due to high mileage. In modern cars there are so-called oxygen sensors (lambda umbrellas), one is located in front of the catalyst, the other after and detects the presence of harmful compounds; if their percentage has increased, then the second (or also called the lower “lambda”) gives a signal that the converter is not working ( or it doesn’t do its job as it should) AND IT NEEDS TO BE REPLACED. By the way, some cars may not even start (a tribute to the environment).
Thus, by knocking out or removing it, you simply free the car’s exhaust tract from the obstacle in the form of a filter and lower its environmental standards. BUT AGAIN - THIS DOES NOT AFFECT THE RESOURCE OF THE POWER UNIT IN ANY WAY!
BUT in order for your car to drive normally, you need to upgrade to a lower environmental class (usually EURO2) or install a fake one. Otherwise, the program in the ECU will not allow you to drive normally.
A few words about “spiders”
There is another option for tuning, which involves completely reworking the exhaust system. It is called “direct flow”. Its essence is to remove from the system all elements that prevent the free exit of exhaust gases, including the catalyst.
The main part of the forward flow is the insert (“spider”). This is an analogue of the exhaust manifold, differing from the latter by a special connection of pipes, in which the exhaust gases leaving the cylinders have practically no effect on subsequent exhausts.
Two types of spiders are installed on Priora: 4-1 and 4-2-1. The numbers indicate how the manifold pipes are connected. The catalyst insert (Priora) 4-1 provides for the connection of four pipes into one. In the “spider” 4-2-1, the collector pipes are first combined into a pair, and then converge into one.
It is believed that the optimal pipe connection for the VAZ-2170 is scheme 4-1, but the other is no worse. It is important that the fastening elements of all parts of the exhaust system match, because in addition to the insert, you will also need to purchase a resonator and a muffler.
Possible breakdowns
In most cases, this unit begins to malfunction after the car travels more than 150,000 kilometers. So these breakdowns can be attributed, rather, to age-related problems with the car. Inside any catalyst there are ceramic honeycombs, which can deteriorate over time and no longer block the release of harmful gases into the atmosphere.
Clogged honeycombs
The pressure in the exhaust system increases significantly as spent exhaust gases rush back into the engine, causing the engine to lose power and begin to choke.
How to extend the life of a catalyst
Finally, check out the tips that will help you avoid returning to the topic of replacing the catalytic converter for a long time:
- Do not use low-quality gasoline. This solution will save not only the catalyst. “Priora” is not at all the kind of car into whose tank you can pour anything that burns.
- Do not allow oil to get into the fuel. If you notice that the exhaust has acquired a bluish tint, do not be lazy to check the compression in the cylinders. Parts of the piston group may wear out, causing oil to enter the cylinders.
- Pay attention to the dashboard. If the CHECK warning light comes on and the car has difficulty starting or has lost power, do not delay diagnostics.
Source
How to replace the speedometer cable on a VAZ 2101-VAZ 2107?
Note! Before buying this sensor in a car store, take exactly the same one that you had (you need to look at the markings for this on the old sensor, but for this, of course, you will have to remove the sensor), if you neglect this, the engine will most likely not work as expected should, we also categorically do not recommend that you take oxygen sensors without heating, (Even if your car was equipped with one), such sensors may not always give correct readings until they warm up, due to which the engine will again not work correctly, so before When purchasing a new sensor, be sure to take all these nuances into account!
1. The sensor is removed very easily, first remove the negative terminal from the battery (How to do this, read “in this article”, point 1) and then disconnect the deck and wire connectors, as soon as this is done, unscrew the sensor itself by the thread that is on applied to it and thereby remove it from the hole in the exhaust manifold and that’s it, you can install a new one.
Additional video: Watch the video that talks about the oxygen sensor, which is located below:
The Kalina oxygen sensor (photo 1), also known as UDC, allows the engine control system to adjust the fuel supply if the oxygen level in the exhaust gases increases, that is, the air-fuel mixture becomes lean. Oxygen creates an electrical potential difference, which amplifies the sensor signal.
What catalyst is on Prior?
I decided to try removing the catalyst from the factory exhaust manifold. A friend in a Priora also had it removed from the standard manifold; I knew roughly how this thing would look and work in its final form. I’ll say right away - it’s not loud, but there is a certain whistling, not a whistling, not a ringing, but something like that, probably due to the fact that there was an empty volume of this very “can” where the catalyst was located. Sometimes you could hear the rear can, as if there was now not enough bandwidth.
I thought it would be “much better” after removal - not really! Honestly, I didn’t feel anything, I thought it would drive better (after the sharp contrast of chip tuning), maybe the catalyst was already clogged after 68,000 km, but the car didn’t see 92 gasoline at all. In short, I wanted to delete it, but I wasn’t sure what would be better.
I didn’t remove the collector, I didn’t even remove the protection - there was no need. I drilled it out using a drill and a long drill bit (fortunately, my grandfather has a reasonable supply of all this stuff)
After I removed the entire catalyst, I was even a little upset. - WHY?! - Yes, because it was literally new.
But again, guided by the laws of physics, the removal brought a certain positive aspect, because any obstacle to the passage of air (exhaust gases) is not good.
And, yes, in the garage while the car was running I felt a sharp contrast - the supply of exhaust gases became more noticeable.
On a Lada Priora car, a catalytic converter is located between the exhaust pipe and the preliminary resonator. Exhausts passing through the catalyst are cleaned, which is accompanied by the oxidation of hazardous compounds, increasing environmental friendliness.
But, having a filter element, the unit is a replaceable part, gradually failing. A complete blockage can damage the vehicle. In this case, we recommend removing the catalyst on the Lada Priora model.
Articles and prices
On VAZ 2108–2115, 3 types of catalytic converters are installed: under
- Euro-2 8 valves;
- for Euro-3 and Euro-4 8 valves;
- for Euro-3 and Euro-4 16 valves.
Part number for Euro-2 is 21100120601011, average cost is 4 thousand rubles. The main difference is one hole for the oxygen sensor. This part cannot be installed on cars with Euro-3 and Euro-4 engines, because there is nowhere to install the second lambda probe. Neutralizers for Euro-3 and Euro-4 for eight-valve engines are similar in design to the previous ones, but are equipped with two holes for oxygen sensors, their article number is 11183-1203008, the average cost is 6 thousand rubles.
Neutralizers for 16V engines (this is how the number of valves is designated) are the same not only for all VAZ 2108-2115 models, but also for their modern descendants. Part number 11186-1203008, average cost 10 thousand rubles. Remember, converters for 8V and 16V motors are not interchangeable because they are installed in different places.
Removing the catalyst on Priora: when is it required?
The operation of the unit, its ability to clean exhaust gases, depends on the catalytic spraying covering the honeycombs inside the ceramic matrix.
During operation, the catalytic layer decreases, and various products stick to it. As a consequence, removal of the catalyst is required.
Also, the working coating fades as a result of exposure to high temperatures. This leads to a deterioration in the purification process, oxidation, and even a reduction in throughput. Natural wear and tear of the unit on the Lada Priora occurs after a mileage of 150,000 km.
Preliminary failure is accompanied by violation of operating recommendations:
- The ingress of low-quality leaded fuel, including tetraethyl lead, is dangerous for the system. Accelerated clogging and sticking of honeycombs occurs.
- Malfunctions of the ignition system can lead to some of the fuel burning in the exhaust system, destroying the coating of precious metals, melting the structure itself.
- Failure of the second oxygen sensor involved in the formation of the fuel mixture leads to violations of the optimal proportions, which affects the operation of the system.
- Possible failure if cold water gets into the hot body, destruction of the ceramic matrix as a result of an impact.
- It is possible that oil gets into the catalyst, which is accompanied by sudden sticking and a decrease in throughput.
We can eliminate most problems with timely treatment and diagnosis.
The control unit constantly evaluates sensor performance and system operation. If any violations occur, the “Check Engine” signal will light up on the panel. Most often, it is activated precisely because of problems with the Lada Priora neutralizer. Then we recommend immediately contacting the service to determine the fault and remove the unit.
The need to remove the Lada Priora catalyst may arise with the following manifestations:
- dynamics and responsiveness gradually decrease (in the initial stages it is compensated by increased work on the gas pedal);
- problems appear during the start; if the situation worsens, the start may fail or the car will immediately stall;
- the smell of exhaust changes, becomes more pungent, chemical, since cleaning is no longer carried out;
- knocking and rattling noises appear as a result of chips.
If signs of a converter malfunction appear, we carry out diagnostics - scanning the ECU. So, we detect errors, read, decipher codes for further work.
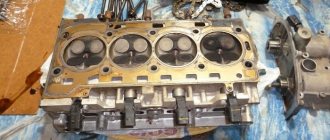
Removal and replacement (16-valve engine)
On cars with 16-valve valves, the catalyst is located in the engine compartment next to the exhaust manifold. The node must be looked for behind the cylinder block. If you know how to remove the catalyst for a VAZ 2114, you can do the work yourself, but you will have to remove the fuel rail.
There are 2 lambda probes on the unit. One is located on the catalyst. It is used to regulate the composition of the fuel mixture. The second probe is mounted behind the assembly on the flange and is called the “environmental” probe. If this probe is missing, the sensor generates an error, the injection system is rebuilt, and thrust increases with fuel consumption. The sensors are removed from the assembly. Having dismantled the unit, install a new one and connect the sensors.
What happens if you don’t remove the Priora catalyst in time?
Failure of a node is always accompanied by a decrease in throughput.
Consequently, there is an obstacle to the passage of exhaust, which is why the engine cannot operate normally. There is a noticeable loss of performance and performance continues to deteriorate. The appearance of chips and cracks in the ceramic matrix leads to further destruction. The broken particles mix with the exhaust. And as a result of high back pressure, they return to the cylinders and cause engine failure. Other vehicle systems also suffer. Therefore, it is worth paying attention to the appearance of signs of malfunction.
Let's find out the origins of the misconception
The catalyst, which, due to poor operation, is clogged, melted or torn away from its body, prevents the passage of exhaust gases, which reduces the ventilation of the cylinders and disrupts their filling with the fuel-air mixture. Having problems in the intake system, a person comes to a service station. There, after diagnostics, the faulty cat is removed, after which: lo and behold, the car began to drive well. But the person thinks that the car has begun to drive even better than just a serviceable one, and he famously distributes recommendations to all his comrades on the appropriateness of this procedure, using his own experience and a bunch of positive emotions as an example. But in fact, a simply serviceable car will drive the same as a car without a catalytic converter.
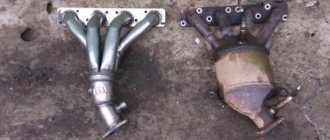
Lada Priora: removing the catalyst at a service station
The design of the Lada Priora uses a collector type of catalyst. That is, it is part of the collector. Our service station technicians have the necessary experience to remove such a neutralizer. All work is carried out carefully, as it is easy to damage other components of the Lada Priora exhaust system.
We highlight several main stages:
- The car must be raised on a lift so that the technicians can gain access to the unit.
- Next, the dismantling of the protection, if provided, begins.
- The bolts on the muffler side are unscrewed. Attention - the fasteners may be rusty, which requires special care.
- The bolts are loosened to secure the housing to the base.
- The next step is to remove the oxygen sensors.
- The nuts securing the system to the block also unscrew. All connections are difficult to reach and may stick.
- After dismantling the structure, you can begin to remove the catalytic converter.
 The part is knocked out or cut out. We recommend the latter option as it is safer and faster, ideal for Priora.
 - When reassembling the system later, we use new gaskets.
- When welding, the seams are treated with heat-resistant paint to prevent rusting.
Maintenance instructions
Preventative washing of the catalyst with Hi-Gear and the like is done by emptying the bottle directly into the gas tank immediately before refueling the car. No further action is required on the part of the motorist - while driving, the ceramic honeycombs of the element are cleaned independently, and dirt flies out through the exhaust tract.
To clean or rinse a clogged neutralizer with your own hands, you will have to dismantle it. Drive the car into an inspection ditch, turn off the lambda probes in the car and unscrew the clamps holding the unit to the exhaust pipe or exhaust manifold. Then follow this algorithm:
- Thoroughly blow out the catalyst on both sides with a compressor, pumping up a pressure of 7–9 bar.
- Fill the ceramic honeycomb with ABRO carburetor spray foam. Pour the product through both pipes.
- Wrap the neutralizer with a rag and wait 20 minutes.
- Thoroughly rinse the internal mesh of the element under hot water pressure and blow it with a compressor.
- Repeat the operation again, dry the catalyst and make sure that the ceramic honeycomb is visible through. Reinstall the unit on the vehicle.
Note. In some car models, the lambda probe is installed directly in the body of the neutralizing element. Before washing, the sensors should be unscrewed and soot removed from them mechanically.
If you can't clean the catalytic converter with spray foam, you have nothing left to lose. Soak the element in kerosene or diesel fuel and leave for 12–24 hours. To be sure, diesel fuel can be diluted with a small amount of acetone or solvent 646 (ratio approximately 4:1). After a day, perform the cleaning procedure with an aerosol cleaner as described above.
Mechanical cleaning is carried out with fine sandpaper with periodic blowing with a compressor. The outer meshes are cleaned carefully, with slight pressure, so that the fragile ceramics do not crack. It will not be possible to remove carbon deposits from internal cavities using this method.
Often, instead of washing, car enthusiasts pierce contaminated honeycombs with a metal object to free the passage for flue gases. It is permissible to use such extreme measures only in one case - you have tried all flushing means and have not been successful.
Please note: driving with a broken catalyst not only harms the environment, but also costs you money: the lambda probe “sees” untreated exhaust gases, and the controller switches to emergency mode with increased fuel consumption. To solve the problem, you need to install a fake oxygen sensor, which leads to additional costs.
Product delivery options
Note! Below are the shipping methods available specifically for this product. Payment options may vary depending on the shipping method. Detailed information can be found on the “Delivery and Payment” page.
Parcel by Russian Post
Available payment methods:
- Cash on delivery (payment upon receipt)
- Using cards Sberbank, VTB, Post Bank, Tinkoff
- Yandex money
- QIWI
- ROBOKASSA
Shipping throughout Russia. Delivery time is from 5 to 12 days.
Finally, about fuel selection and prevention
In the vast majority of situations when the lambda probe has become unusable, it is substandard fuel
We recommend that you pay significant attention to the choice of refueling location. Do not be inclined to purchase gasoline from an unverified supplier, because in such fuel the risk of the presence of harmful impurities increases many times over
At the factory, the engine and fuel system are configured for a specific type of gasoline, which is then indicated by the manufacturer in the car's characteristics.
Also, a fairly effective measure to extend the life of the sensor is timely maintenance of the fuel circuit. A properly functioning fuel supply system will provide the LADA Kalina engine with cleaner exhaust, where the lambda probe can “feel more comfortable.” At the same time, its resource increases significantly. Otherwise, the sensor will need to be replaced.
Pros and cons of deletion
I have prepared a small sign with the pros and cons of what will happen if you remove the catalyst
| MINUSES | PROS |
| Increase in harmful substances in the exhaust, decrease in the environmental component | There is no need to buy a new catalyst, because it is very expensive |
| The smell of the exhaust becomes much more toxic, sometimes this exhaust penetrates into the car (it smells unpleasant) | A small increase in power (really small in terms of error, about 3%) |
| Exhaust sound. After knocking out the catalyst honeycomb, it is advisable to install a flame arrester, otherwise there will be a ringing sound from the empty “can” (especially at high speeds) | You can install a 4-2-1 or 4-1 spider instead of an empty can, plus more power (which is said out of the blue) |
| You need to install either a fake or new firmware for EURO2 | Reduced fuel consumption (also about 3%) |
| Increasing the life of the power unit, because ceramic dust can get into the combustion chambers and wear it out prematurely |
As you can see, there are a few more advantages, the most significant is the price of this whole rework (removing it will cost several times, if not dozens of times, cheaper).
Now let's watch the video version.
In conclusion, I would like to say that removing the catalyst is NOT CORRECT AT ALL from an ECOLOGICAL point of view. After all, our planet is already polluted, and in this way you are making it even dirtier!
This is where I end, I think this material will help you make the right choice. Sincerely yours, AUTOBLOGGER.
Similar news
- How to unscrew a stuck bolt (nut). Let's disassemble the muffler, call...
- The catalyst is clogged. The main signs (symptoms), so what...
- Water in the muffler. Reasons, how to get rid of it and whether it can be drilled
Technical features of the insert for Lada Kalina 8V
The industry offers two types of tuning inserts, the design of each of them depends on the location of the pipes. Moreover, each design is designed for a specific power unit:
- Insert 4-1 is installed on forced engines with a speed range from 5,000 to 10,000 rpm. structurally suitable only for 16-valve engines.
- The 4-2-1 insert operates over a wider range and is considered a "low-end" insert. It is possible to increase engine power by about 3-5%. This is the model most often installed on the VAZ 1118.
Since it will not be possible to install a preliminary flame arrester on this VAZ car, you will have to carefully approach the issue of choosing an insert. The installation process of the part will not take much time if you follow all the recommendations.
How does a resonator work and its functions?
As mentioned above, the exhaust system includes a resonator. In a resonator, each of the constituent components has its own role. The main purpose of this unit is to dampen low-frequency sounds generated during the intensive movement of the exhaust gas stream inside the muffler circuit. Sounds of this nature occur for the following two reasons:
- from the effect of gas expansion;
- due to vibrations of components in the muffler line.
An important function of the resonator unit is reducing the speed of movement of the gas jet. Here physical fundamental laws come into play, indicating the inevitable damping of speed during the transition of a gas mass from a thin pipe into a volumetric cavity
It is precisely to achieve this effect that the design concept of the resonator is designed.
In the exhaust gas circuit, the resonator component is located in front of the main muffler, thereby being the primary link in the chain of damping low-frequency sounds.
Structurally, the product assumes the presence of a perforated section of pipe inside the metal body, where there is a throttle-type hole, designed to effectively dampen vibrations arising from the movement of the gas jet. The internal space of the housing has partitions that are oriented transversely to the perforated pipe. Now you have an idea of what an exhaust system is.
In comparison with the resonators in the exhaust circuits of other models, this unit in the Lada Kalina has a corrugated element. The design necessity is due to the tendency of the device to move during the heating of the gas exhaust jet.
The manufacturer makes all resonator components only from high-quality steel. Otherwise, the car's exhaust system would constantly require repair work. But sometimes it is still necessary to replace the resonator, and in some cases, replace the muffler.
Main malfunctions and the order of work to replace the muffler
The main malfunctions of Lada Kalina mufflers include:
- muffler corrugation burnout;
- catalyst malfunctions;
- gasket burnout;
- breakage of rubber fasteners, etc.
However, the main and defining defect remains muffler burnout. Therefore, we will study the issue of replacing the Lada Kalina muffler with our own hands, having previously prepared plumbing tools and the car itself for this. When preparing a vehicle for repair, we select a platform without slopes and install the car in the parking brake mode and first gear engaged.
The order of work when dismantling the muffler on the Lada Kalina:
- Having prepared the necessary tools for the repair, we dismantle the clamp that tightens the muffler pipe at the junction with the resonator. This operation is carried out using a pair of keys set to “13”; for convenience, you can select a head with a knob and a ring wrench.
- It happens that the nuts securing the plug are stuck to the base and are very difficult to unscrew even with the help of special liquids. When there is no longer any hope of safely dismantling the product, it is easier to prepare new fasteners, and the old nuts must be cut off with a grinder.
- After dismantling the tightening clamp, it is necessary to apply several gentle blows with a mechanic’s hammer along the circumference of the muffler bend to facilitate complete removal of the product. After this, use your hands to press the muffler in the direction opposite to the direction of travel of the vehicle.
- Then remove the rubber fasteners on the sides of the product.
- We dismantle the “glushak”, set the unusable part aside and install a new part, and do everything according to the “reverse” principle.
The technological operation takes only a couple of hours, after which the car is ready for use again.
Typically, mufflers can withstand quite a long service life. In my memory, there were many cars, and almost all of them had the same muffler service life. For example, on the Twelfth we replaced it at about 50,000 km, and on the Seven the resonator recently burned out when the mileage was 60,000 km. So far I have driven a little more than 40 thousand on Kalina, but thank God, so far everything is fine and there are no signs of burnout.
I’ll say right away that I didn’t want to remove and put it back using Kalina as an example, I’ll just show from previous experience how this procedure is performed, but with photographs using the example of my station wagon. I’ll just show you clearly what needs to be removed and unscrewed and where.
So, to perform this repair, you will need:
- WD-40 lubricant or its analogues, such as all kinds of liquid wrenches
- Keys size 13, preferably a socket and a head with a knob
- Hammer (may not always be needed)
First, I’ll show you where the clamp connecting the resonator and muffler is located, since it is this that will need to be unscrewed.
First of all, be sure to apply lubricant to the bolts and nuts securing the clamp, since they stick thoroughly and in some cases it is simply impossible to unscrew it. After 10 minutes, unscrew the nuts. On one side you can completely, and the other just slightly unscrew.
After this, we move the clamp to the side and now you can knock it off the junction with the resonator with small knocks on the bend of the muffler. Often there are no problems with this step and it can be easily knocked down or even removed without any extra effort.
After this, you need to free the muffler from the fasteners and remove it from the rubber bands that hold it. There are two of them in total. The first is located near the rear beam. Shown more clearly in the photo below:
And the second is in the back of the car, almost at the exhaust pipe. Its location is also shown in the picture:
After these steps, you can safely and without any obstacles remove the muffler and replace it with a new one. Installation occurs in the reverse order of removal. The price of this part in auto parts stores is approximately 1050 rubles.