The correct operation of a vehicle depends on the performance of many components, in particular, we are talking about the electrical system of the car. If problems occur in the wiring, this can affect the performance of the engine as a whole, so every car owner must understand the electrical circuit. What is the electrical circuit of the VAZ 2110, what malfunctions are typical for it and what needs to be done as a preventive measure? Read about it below.
How is the wiring built?
Regardless of which engine is used in the car, the wiring has common features. To understand them, you need to know the basic principles of electrical construction. And you will need a detailed electrical diagram of the VAZ-2110 (injector) with a description. Here are the main features:
- All devices and equipment that are connected to the electrical wiring in VAZ-2110 vehicles operate according to a single-wire circuit. All wires differ in color from each other and are responsible for the functioning of certain components and assemblies. This makes electrical wiring repairs much easier. And for the manufacturer this is a significant saving on wires.
- The car body is used as a negative wire. On the VAZ-2110 (8-valve injector), the electrical circuit is built on exactly this principle.
- The positive terminal that comes from the battery to consumers is always red. Therefore, when installing equipment, be sure to use only red wires to connect to the “+” power supply. The negative wire is always black.
- Each system connected to electrical equipment is equipped with a wiring harness.
- The electrical circuit of the VAZ-2110 (16-valve injector) is designed so that when the battery is connected, the electrical equipment is energized. It is for this reason that during any electrical repair it is necessary to disconnect the negative terminal.
- All circuits are protected by fuses. Relays are used to switch on powerful electricity consumers.
These features are typical for both carburetor and injection engines. On the VAZ-2110 (8-valve injector), the electrical circuit has exactly these features.
Legend
For ease of maintenance and installation, the electrical wires in the diagrams are made in different colors, identically laid in the car, so that their purpose can be visually determined.
For brevity, colors are indicated by the first letters of the name:
- Blue – “G”;
- Brown – “K”;
- Gray – “C”;
- White – “B”;
- Orange – “O”;
- Yellow – “F”;
- Black – “H”;
- Green – “Z”;
- Pink - "R".
Thanks to the colors, it is easy to determine whether the rein belongs to a particular chain
For reference: the red wire is traditionally used to supply power from the positive terminal of the generator or battery. Therefore, in all diagrams contained in the factory instructions, it is designated by the letter “P”.
The article Wiring diagram for VAZ 21074 injector: understanding the intricacies will also be useful.
Carburetor engines
The very first VAZ-2110 cars, produced since the mid-nineties, were equipped only with engines with a carburetor injection system. Injection engines began to be installed at the beginning of the two thousandth. They are much better, they work more stable, but still many motorists still use cars with carburetor injection. Today they are not uncommon.
There are no significant differences in the electrical circuit between the injection and carburetor options. On carburetor “tens” the systems are almost the same as on injection ones. But you will definitely encounter a problem when replacing a carburetor with an injector. You will have to additionally lay several braids of electrical wiring. They are necessary to power the sensor system, electric fuel pump, on-board computer and other components.
The car does not start - there is no charge in the battery
This problem occurs because the battery charge is going somewhere. It does not disappear by chance, but always for some reason.
Here are some of them:
- you leave the car outside at an ambient temperature of -20 degrees or below;
- the battery life is ending;
- The radio was left on in your car for some time, which led to a loss of charging power.
In all these cases, two types of treatment are usually used: firstly, urgently recharge, and secondly, buy a new battery. If you keep pulling and driving on a dead battery, soon you won't even be able to disarm your car. You will have to manually remove the terminals, trying to make it “silence”. The situation will immediately improve as soon as the battery is charged again.
Injection injection system
For VAZ-2110 cars (8-valve injector), the electrical circuit differs slightly from that used in carburetor cars. Injection engines are much more complex, since they have an electronic control unit and a system of sensors and actuators. It is also worth noting that injection engines come with 8 and 16 valves. There are no carburetor engines with 16 valves. All wiring can be divided into engine compartment and interior wiring.
Their purpose is clear from the name. The engine compartment connects elements such as the starter, generator, sensors on the engine, etc. Interior wiring is necessary to connect the instrument panel, backlights, and various switches.
Modifications of the VAZ-2112 car
VAZ-21120. Modification with a 16-valve injection engine with a volume of 1.5 liters and a power of 93 horsepower. 14-inch wheels were installed on the car. This modification has a problem with valves bending when the timing belt breaks. The problem can be solved by increasing the depth of the grooves in the piston bottoms.
VAZ-21121. The car was equipped with a VAZ-21114 8-valve injection engine with a volume of 1.6 liters and a power of 81 horsepower.
VAZ-21122. Budget modification with an 8-valve injection engine VAZ-2111. The car was produced without electric windows, the wheels were 13 inches in size, and the brakes were unventilated from a VAZ-2108 car.
VAZ-21123 Coupe. Three-door, five-seater hatchback. The only two doors for entering the car are 200 millimeters wider than those of the five-door hatchback, and they are mounted on new, durable hinges. The rear arches of the car have become wider. The engine was installed with a 16-valve injection engine with a volume of 1.6 liters and a power of 90 horsepower. The car was produced from 2002 to 2006 in small quantities, the reason for this was the high cost of the car.
VAZ-21124. Modification with a 16-valve injection engine VAZ-21124 with a volume of 1.6 liters. Produced from 2004 to 2008. For this type of engine, the problem with valve bending was solved. To do this, the depth of the grooves in the piston heads was increased (up to 6.5 mm). In addition, the design of the cylinder block was changed to achieve a working volume of 1.6 liters, for which its height was increased by 2.3 mm, and the radius of the crankshaft was increased by 2.3 mm accordingly. There were also a number of other minor changes.
VAZ-21128. The luxury version of the car, produced by Super-auto JSC, was equipped with a 16-valve VAZ-21128 engine with a volume of 1.8 liters and a power of 105 horsepower.
VAZ-2112-37. A racing modification of the VAZ-2112, prepared for the “ring” in the Lada Cup qualifying group. The car was equipped with a 1.5-liter VAZ-2112 engine with a power of 100 horsepower. The racing car was equipped with a safety cage, an external aerodynamic kit and a front extension of the strut support cups.
VAZ-2112-90 Tarzan. All-wheel drive modification with a VAZ-2112 body on a frame chassis with transmission and suspension parts from a VAZ-21213 Niva. It was also equipped with a 1.7 or 1.8 liter engine from the Niva.
This is interesting: Which oil filter is better for the Chevrolet Niva - survey
How to look for faults?
In case of almost any breakdown in electrical wiring, the first step is to diagnose the contacts. To check their condition, you need to carefully inspect all the wires that are laid in the harness. You can do this in several ways:
- Visual inspection to determine integrity.
- Full inspection of the integrity of connections and their reliability.
- Checking the wires using a multimeter with the battery disconnected.
On carburetor and injection engines, it is imperative to pay attention to the wires that transmit high voltage to the spark plugs.
If they are damaged, the engine will run unstably. Signs of failure of high-voltage wires:
- Extraneous noise when the engine is running.
- The car may jerk while driving.
- Gasoline consumption increases.
- Unstable operation at low speeds.
Therefore, before sinning on any sensors, make sure that the high-voltage wires and the ignition module are in good condition.
Prevention measures
What preventative measures will help avoid wiring problems:
- any electrical repair work must be carried out with the battery disconnected,
- in turn, disconnecting the battery terminals, as well as connecting them, should only be done with the ignition off,
- if the fuses break, it is possible to install only standard devices (any homemade parts made from pieces of wire cannot be installed), corresponding to the nominal value,
- When the engine is running, you cannot disconnect the battery, as this may cause problems with the generator,
- You should always monitor the condition of the generator drive belt; there should be no signs of damage or defects,
- welding work must be carried out with the battery and generator disconnected, as well as the computer, as this can cause serious damage,
- Periodically you need to clean the battery terminals.
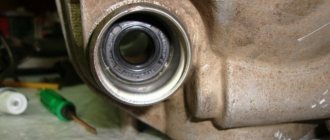
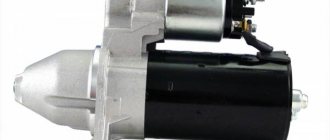
Starter connection
An electric starter is used to start the engine. It is a simple DC motor. The whole system works as follows:
- When the ignition is turned on, the rotor winding of the generator is energized, resulting in a constant magnetic field being created around it. This is a necessary condition for the operation of the generator set.
- As soon as the key is turned to the “Start” position, voltage is applied to the relay coil.
- Together with the retractor relay core, the gear and overrunning clutch move along the starter rotor. As a result, the gear meshes with the flywheel ring.
- At the same time, the core closes the power contacts inside the solenoid relay.
- Voltage is applied to the starter winding, the rotor begins to rotate and spins the engine crankshaft.
- The generator begins to produce current as the magnetic field rotates inside the stator winding.
Label cloud
July 2009
| Mon | W | Wed | Thu | Fri | Sat | Sun |
| « Jun | Aug » | |||||
| 1 | 2 | 3 | 4 | 5 | ||
| 6 | 7 | 8 | 9 | 10 | 11 | 12 |
| 13 | 14 | 15 | 16 | 17 | 18 | 19 |
| 20 | 21 | 22 | 23 | 24 | 25 | 26 |
| 27 | 28 | 29 | 30 | 31 | ||
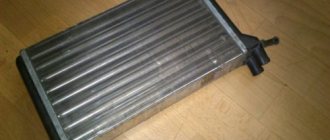
Interior heating system
The VAZ-2110 stove consists of a radiator, fan, and air duct system. Using a fan, the radiator is blown and air (hot) is supplied to special channels. The electrical circuit of the VAZ-2110 heater also includes a damper position regulator. In essence, this is a regular stepper motor.
It allows you to move the damper, changing the angle of its opening, as well as the amount of cold air entering the heater from outside. The blower fan electric motor is connected through a specially designed switch. It has several positions, each of which corresponds to a specific rotation speed.
The fan speed is adjusted using resistances installed in the heater housing. These resistances are included in the power supply circuit of the electric motor. Switching occurs using a regulator installed on the instrument panel. On older cars of the tenth family you can still find mechanical damper drives. Similar designs are also found on “nines” and “eights”.
Functions performed
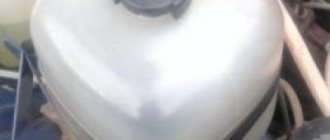
So, what is a generator for? First of all, in order to provide all VAZ 2110 equipment that runs on electricity with energy. Perhaps someone thinks that this is the battery's task. Not really, because the battery is needed to maintain functionality when the engine is not running (it starts the engine, supports the alarm, music system while parked, etc.).
But when the engine has already started, with the help of the battery, the generator comes into play. During the trip, it is he who supports the operation of all electronics, air conditioning, audio (or even video systems), and everything else that you have added to your VAZ 2110.
Another equally important function of the generator is charging the battery. This also happens when the engine is running. And if it weren’t for this device, the battery would not be able to cope with its tasks, and it would have to be charged all the time.
Considering that today on the VAZ 2110, in addition to the standard layout, many additional energy consumers are installed, it happens that the generator voltage is not enough. In this case, it makes sense to install a 120 amp generator.
Heated seats and rear window
These two systems are very similar to each other, as they consist of the same components:
- Fuse to protect the circuit.
- Electromagnetic relay for switching a power circuit.
- Illuminated power button.
- Wire harnesses.
- Heating elements.
It is imperative to use electromagnetic relays. They are available in the electrical circuit for heated seats of the VAZ-2110. With their help, you can get rid of switching with a high current button.
As a result, the button on the dashboard switches only the low-current control circuits of the electromagnetic relay windings. The rear window heater has a similar design. If the car has heated rear view mirrors, then a similar scheme is used.
Fog light
A very useful device, provides light in bad weather environments. The factory version is supplied for the VAZ 2110 “Lux” configuration. In other versions you need to install them yourself. At the same time, the place in which they will be placed is determined. Most often, this is the bottom of the bumper, there are holes for fastenings.
- transparent - they give light in spots, they are a little worse;
- corrugated - scatter light well on the road surface.
They purchase frames, relays, a power button, and wires for them. The latter are placed under the hood from the instrument panel, they are connected to the connectors on the instruments, they are isolated, the instruments are fixed in frames and secured to the bumper, and the wires are connected. The button is mounted in the break of the supply wire. Then the devices are adjusted.
Electric fuel pump drive
The electric fuel pump is powered through separate fuses and relays. It is installed under the rear seat directly in the tank. Moreover, it is combined with a gasoline indicator sensor. The main components of the electrical circuit of the VAZ-2110 pump:
- Electric motor driving the pump.
- Electromagnetic relay.
- Fuse.
- Wiring harness.
When the ignition is turned on, the electromagnetic relay is activated, after which power is supplied to the fuel pump.
Gasoline is pumped into the system to a certain pressure, after which the electric pump stops. A pressure sensor installed in the fuel rail sends a signal to the electronic control unit. It is by these parameters that the control system understands at what point it is necessary to turn on or turn off the fuel pump.
Adjustment
Once a year, the low beam on the VAZ 2110 should be adjusted. This procedure is necessary in order to increase the lighting efficiency and also to prevent dazzling oncoming drivers.
Below we will take a closer look at how to adjust the low beam headlights:
- You need to find a flat area with a wall that will serve as a screen.
- The car should be placed at a distance of five meters from the screen. A passenger must sit in front. You can also put a load weighing 75 kilograms in the car.
- On the screen you need to draw a horizontal line at 600 mm, as well as a second line 75 mm below the first.
- Then you need to draw three vertical lines - the two outer lines should correspond to the centers of the headlights, and the middle one should be located in the middle between them.
- The headlight hydraulic adjustment handle should be moved to the position corresponding to the minimum load.
- One of the headlights must be covered with cardboard or a sheet of plywood.
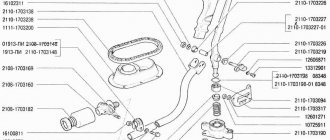
Adjustment screws
Adjustment screws
- Then the light beam is adjusted according to the diagram. Adjustment is carried out with screws with plastic heads, which are located on the back side of the headlights. They rotate the optical element around the horizontal and vertical axis.
- Next, you need to adjust the second headlight in the same way.
Here, in fact, is all the information on how to adjust the low beam headlights.
Sensors and actuators
In the electrical circuit of the VAZ-2110 (8-valve injector), the fuel pump operates based on signals received from the sensors. All these devices are connected to one control unit. It is with its help that the necessary information is collected about the operation of the internal combustion engine. After processing all the signals, the current engine operating parameters are superimposed on the fuel map, which is stored in the internal memory of the microcontroller.
This fuel map regulates the operation of the actuators depending on the signals received from the sensors, engine load, speed, etc. For clarity, you can use the interactive electrical diagrams of the VAZ-2110 (injector). They allow you to much better understand the principle of construction of all car systems.
I continue to tinker with wires (my dad often gave me circuits as a child and I soldered them), I love this work
I pulled out the ECU braid because... it was all filled with oil after my cylinder head gasket blew out. Before that, my engine overheated to wild temperatures (then I had to get home, don’t think that I was a monster) So I knew exactly what awaited me)
In general, I have a pretty tattered corrugation (in some places it has completely fallen off) The insulating tape no longer holds anywhere The wires have become stiff from high temperatures and began to break off in places of bend In general, everything that was once new and flexible back in 2000 has become hard plastic Well, naturally this applies to those sections of the wiring where it was closer to the motor and where there is less insulation
I bought new chips for all the sensors, except for the mass air flow sensor (everything is alive there). I have a lot of 16 and 20mm corrugations left over from work, although they are white. Well, I also bought some small diameter corrugations of 7mm and 9mm
Wiring diagram and troubleshooting
Electrical wiring plays one of the important roles in a car. The correct operation of the main devices and systems, as well as the vehicle as a whole, depends on it. Today we will look at the electrical wiring diagrams of the VAZ-2110 family.
Electrical wiring for the VAZ-2110 is of two types: carburetor and injector . There are slight differences, but the basic principles of operation and wiring are the same. Depending on the location, the wiring differs into: under the hood and in the cabin . All electrical equipment of the car is connected using wires of a certain color. Each element has its own wiring harness through the blocks and fuses.
The on-board voltage is 12V constant, minus on the car body.
Having a wiring diagram and knowing the operating principles of the main components of the car is not at all difficult to find the malfunction and the cause of its occurrence.
Before starting to repair the vehicle's electrical wiring (if this is not related to troubleshooting), the terminals should be removed from the battery.
Electrical diagram of a carburetor ignition system
At the first releases of the VAZ-2110, a carburetor was installed, which was later replaced by an injector, as a more modern and reliable system that ensures economical stable operation of the engine. The wiring of an engine with a carburetor includes almost the same vehicle life support systems as with an injector.
Information that a motorist must know before replacing existing wiring
First of all, the car owner must know when and in what cases the car wiring is replaced. At the same time, it is also necessary to have information about the final operational life in order to objectively understand when the wiring may need to be replaced. List of the most common reasons that cause wiring to malfunction:
- the appearance of cracks in insulation during a long period of operation;
- oxidation;
- corrosion;
- fuse blown, etc.
Components needed to perform wiring replacement:
- multivariate set of wires;
- fuse block for VAZ 21104;
- housing for the heating system;
- various types of sensors: brake fluid, cooling system, etc.;
- pads;
- many terminals;
- Of course, it goes without saying, duct tape.
A practical look at rewiring
So, a detailed step-by-step algorithm for replacing the wiring:
- first you need to dismantle the front part of the cabin;
- then you can deal with the proper degree of isolation, if there is a desire for it;
- after which, you need to pay special attention to the front headlight switch;
- The windshield wiper (see Replacing windshield wipers on a VAZ 2110 on your own) operates using its own mini-motor, the wiring of which must be checked for serviceability, since very often it simply becomes acidified;
- understand all heating modes;
- the connection of all electronic devices must be carried out strictly sequentially, by increasing the number of connected wires.
Note. Before disconnecting all electronic devices, it is necessary to draw your own conventional electrical circuit by hand in order to correctly make the appropriate connections in the future.
- now it’s time to tackle the fuse blocks, or rather their installation;
- most wires exceed the required length, so they simply do not fit into the allotted space;
- the bracket is the most rational solution to the problem; it will allow you to successfully replace the fuses with new ones;
- with the installation of a new fuse, the position of the front light indicator light, as well as the emergency warning light, will change;
- the heater will also have to be affected: first you need to remove the old radiator and then disassemble it to make it possible to replace the fan;
- Assembly is carried out strictly in reverse order.
Note. Before you begin the wiring replacement procedure, you need to find its current diagram. Otherwise, during the process of assembly and disassembly, you can quickly get confused, and you will have to send the car to a car service center.
The main advantages of the new wiring:
- the emergence of a practical opportunity to connect any gadget;
- longer service life compared to old wiring;
- high degree of reliability of everyday functioning;
- improving the quality and stability of electronic devices and much more.
It is always necessary to remember that installing homemade wiring is an easily feasible technical manipulation; the main thing is to understand all the necessary nuances.
The main objective signs of a car wiring fault
So:
- the car engine does not start;
Note. If the essence of the malfunction lies in the ignition system, then one of the diagnostic signs is that the car will not start. Moreover, if the car starts poorly, but still starts, then problems with the wiring can be excluded from the list of possible causes.
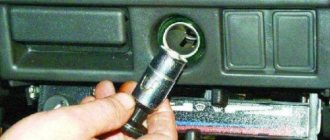
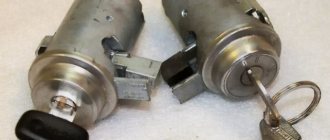
- the central ignition lock has stopped functioning properly;
- the car’s electronics begin to function intermittently or do not work at all;
- headlights function intermittently or do not function at all;
- the characteristic smell of burnt rubber began to appear regularly in the car interior;
- the battery discharges too quickly, although it was functioning properly before;
- and of course, it goes without saying, multiple problems associated with the ignition system.
Practical example of wiring fault:
- the engine suddenly began to function with noticeable interruptions;
- at first glance it may seem that the essence of the problem lies in a malfunction of the ignition system;
- however, a motorist with sufficient experience will not be able to immediately determine where the essence of the malfunction lies, since the cause of an interruption in engine operation may be the ignition system, or a burnt-out spark plug as a result of a wiring fault.
The instructions for replacing the wiring yourself are extremely simple, and the diagnostic process, in principle, does not present any significant practical difficulty. It is recommended to use photo and video materials during the replacement process. The main thing is to find the root cause of the problem in the wiring system. It is never too late to modernize VAZ wiring, and this, in turn, will allow you to use almost any modern high-tech devices for your car. The price of replacing the wiring yourself is significantly lower than the corresponding service at a car service center.
Diagnostics using ODB-2 scanner
The general technical condition of the car can always be checked using a personal diagnostic car scanner.
Of the options available on the market, we recommend paying attention to the Korean-made scanner Scan Tool Pro Black Edition. This model is perfectly compatible with most domestic and foreign cars
A special feature of the device is comprehensive car diagnostics. Unlike analogues, this auto scanner is capable of diagnosing not only the engine, but also ABS, gearbox, transmission, airbag, air conditioning system, etc. The device is also great when used as an on-board computer: in real time it displays speed, revolutions, readings from all available sensors, oil pressure, temperature and much more.
Summary
So you got rid of the problem with the failure of the rear lights that tormented you for years. As you can see, it is still too early to write off the classic lamp and wires, since the electronic components are still far from ideal quality. And on the video attached to the article you will find useful information on the topic under consideration.
Products of the domestic automobile industry have always aroused a desire among car owners for independent servicing. There are several reasons for this: from high prices at service stations to the lack of professionalism of domestic service providers. Whereas many technical operations can be performed on a car yourself.
Wiring on a VAZ 2112: general diagram of connecting electrical equipment and devices
Features of work
Image of wires. A clear example of a bundle with different colors.
After you turn the key to the “all inclusive” mode, the main electrical wiring components come into operation. However, the operation of electrical wiring begins when voltage is applied to the following electrical wiring elements:
- Interior lighting of the VAZ 2110.
- Parking lights.
- Rear brake lights.
- Electric fan from the cooling system.
- Sound alarm.
- Electrical wiring assembly for high beam headlights.
It is important to know: when the VAZ 2110 engine gets very hot, the electric fan continues to operate. And he does this even after stopping the engine.
The electric fan turns off when a warning signal is received from the thermostat.
All electrical equipment in the VAZ 2110 is protected from short circuits using electrical equipment fuses. But there are elements that do not have fuses:
- Electrical wiring elements for engine start and ignition circuit;
- Generator electrics;
- Injector wiring.
The main fuses can be found inside the mounting block. It is located at the bottom left of the steering wheel. All electrical components of the mounting block can be replaced. There is also a diagram of the mounting block, which shows the main fuses and relays.
https://www.youtube.com/watch?v=SfCG2tKNvUs
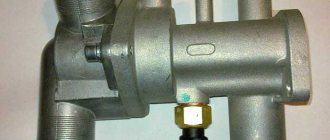
Ground contact
Next to the ground, under the dashboard, is located
. After turning on the ignition, the operating relay allows the pump to create the required pressure in the system in a few seconds, after which it turns off. When you turn the key in the ignition, you can hear a soft click, which means that
turned on, and exactly the same when it was turned off. If the relay does not make a click, then the problem is in it or in its contacts. Then it is advisable to replace it with a new one.
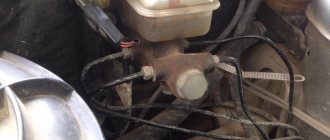
When looking for the cause of a non-working fuel pump, you need to check the fuse. It is located under the hood and has a resistance of 15 A. It must be carefully inspected; if it is not working, it should be replaced with a new one. The fuel pump in the VAZ-2110 car is immersed in gasoline for active cooling, and the bad habit of driving a car with a minimum amount of gasoline in the tank can very soon cause the fuel pump motor to become inoperative due to burning.
There is a special offer on our website. You can get a free consultation with our corporate lawyer by simply submitting your question in the form below.