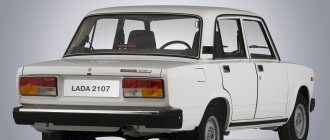
Replacing the headlight
Let's first consider the situation when the old headlamp has outlived its usefulness and needs to be replaced. Such cases occur when water gets inside and causes corrosion processes on the reflector or its darkening, as well as when the headlight is completely damaged. Replacement requires the presence of a basic tool and disconnecting the car from the battery. After this, we proceed to removing the unusable headlight:
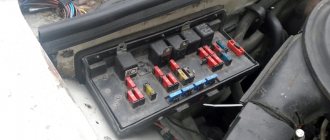
- All power wires are disconnected by removing the plugs;
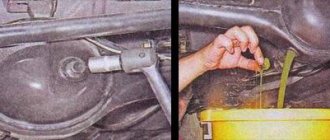
- Removing the hydraulic corrector. To do this, press the plastic lock, turn it clockwise 90 degrees and pull it towards you.
- From the outside, the headlight unit is attached to the body of the VAZ-2107 car using three bolts. One is located on top and in the middle, and the other two are located below - on the sides. There may be a problem with unscrewing the bottom bolt closest to the grille. On the other side of this mount there is a fixing nut, which must be held with a key “8”.
- The headlight can now be removed to the outside of the vehicle.
- The seat for installing a new headlight is cleaned, all fastening bolts are lubricated and installed in the reverse order of removal.
There is no difficulty at all, and the procedure for replacing one side will take no more than 15 minutes. The cost of a regular block headlight on a VAZ-2107 ranges from 1,500 to 2,500 rubles.
Glass replacement
It is known that the headlights have a glass coating, and it is a rather fragile element. And the front part of the car is the most susceptible to physical destructive actions. Such actions occur primarily due to a pebble jumping out from under the wheels of an oncoming car, as well as during collisions with foreign objects. Replacing the headlight glass on a VAZ-2107 is a pressing question that owners of “Sevens” ask themselves. After all, there is no need to replace a complete set of headlights when replacing glass will cost 150-300 rubles. To replace glass you will need the following tool:
- screwdriver;
- pliers;
- sealant;
- degreaser or acetone.
Sequence of glass removal and installation:
- There is no way to remove the glass without removing the headlight, so you need to follow the sequence of actions described in the previous section.
- When the headlight is removed, its surface must be cleaned and try to remove the glass yourself, always wearing gloves. Glass can be easily removed when it shows significant damage.
- If the glass is not damaged, then you can go in two ways: a) break it if it is no longer needed; b) warm it up with a hairdryer and carefully remove it, but this will take much longer. You can watch a video about this method on the Internet if anyone is interested in this type of withdrawal.
- Having decided that glass removal will be carried out according to method a), we proceed to its implementation. We break the glass with a hammer and all the fragments are removed.
- The glass seat is cleaned of old sealant and degreased.
- Once everything is ready to install the new glass, you need to apply sealant around the perimeter of the headlight. It is better to use a special transparent sealant so that its release is not visible.
- We apply the glass to an even layer of sealant and press it using tape or rope. Leave it to dry in this form for about a day. After drying, you can install it, which will take no more than 5 minutes.
Important! Before breaking the glass, you must remove all the light bulbs to avoid damaging them.
Replacing the hydraulic corrector
The purpose of the hydraulic corrector is known, but to replace it you need to understand its design. It consists of a main cylinder, which is a switch, and actuator cylinders. The mechanisms are connected using special tubes with liquid. Any breakdown of one of the elements of the hydraulic corrector entails its complete replacement, since its design is non-separable.
The hydraulic corrector is replaced in the following order:
- The hydraulic corrector mounts are removed from the headlight unit and on the switch handle. To remove the handle, you just need to pull it towards you.
- Use a wrench to unscrew the nut of the main cylinder and remove it to the inside of the panel.
- Afterwards, the entire assembly assembly is removed and a new one is installed in the reverse order of removal.
Knowing the sequence of removing and replacing the headlight on a VAZ-2107 car, you can save not only money, but also the time that a trip to the service station will take. Replacing a headlight is as easy as changing a tire, so happy repair work!
Glass replacement
It is known that headlights are covered with glass, and this is a rather fragile element. And the front part of the car is most susceptible to physical damage. Such actions occur, first of all, due to the fact that pebbles jumped out from under the wheels of the car, as well as when colliding with foreign objects. Replacing headlight glass on a VAZ-2107 is a pressing problem asked by Seven owners. After all, you don’t need to replace a complete headlight when replacing glass will cost 150-300 rubles. To replace glass, you will need this tool:
↑ Diagram for switching on headlights and fog lights in the rear lights
- block headlights;
- mounting block;
- headlight switch in three-lever switch;
- outdoor lighting switch;
- rear fog light switch;
- rear lights;
- rear fog light circuit fuse;
- fog light indicator lamp located in the indicator lamp unit;
- high beam indicator lamp located in the speedometer;
- ignition switch;
- P5 - headlight high beam relay;
- P6 - relay for turning on the low beam headlights.
- low beam plug;
- high beam plug;
- ground plug;
- side light plug;
B - to terminal “30” of the generator.
↑ B – terminals of the rear light printed circuit board (numbering of terminals from the edge of the board):
- to ground;
- to the brake light lamp;
- to the side light lamp;
- to the fog lamp;
- to the reversing lamp;
- to the turn signal lamp
Alternative optics are an excellent option to update the appearance of your car, as well as replace faulty headlights and lanterns. It will give your car an unforgettable appearance, making your car a good option for a sports car. And yes, all this is for your favorite Classics from AVTOVAZ, that is:
- VAZ 2101
- VAZ 2102
- VAZ 2103
- VAZ 2104
- VAZ 2105
- VAZ 2106
- VAZ 2107
There are a sufficient number of both front and rear lights to choose from
We even provide tinted LED lights, which, with minimal power consumption and an attractive appearance, will attract the attention of everyone around
Chrome headlights for VAZ 2105, 2106, 2107. These headlights are installed in place of the front optics, instead of the standard ones. The headlights combine parking lights, turn indicators and all in an elegant Angel Eyes style. It seems that replacing headlights is a very labor-intensive job, but this is not at all the case. Great for all types of people, all ages. Made of impact-resistant plastic, the material from which these headlights are made can withstand any weather conditions.
There are turn signal indicators on sale that are made of plastic. Installation to replace the standard ones, which are painted yellow, which is not very nice. And Mottoring.ru provides a choice of white or tinted repeaters. Although this is a small thing, it is still part of your external car.
If for some reason you break the headlight glass itself, or as a result of an accident, then headlight glass is available for sale. In order to avoid the complete purchase of headlights, Mottoring.ru provides completely inexpensive glasses made of high-quality plastic.
All these lights for VAZ 2101, 2102, 2103, 2104, 2105, 2106, 2107 use LED daytime running lights instead of side lights. They consume little energy and there is no need to change the wiring. The best lighting at night will help you avoid accidents.
You will also find additional accessories on sale. LED strips, so-called “Angel Eyes”. Easy installation, small size, unusual appearance, low price - you will get all this when ordering this product. You can install them in standard connectors and choose both high and low beams. They are glued to double-sided tape, which is already glued to the tapes. There are different shades of light for you to choose from. But it’s better to order white or warm white headlights in order to avoid troubles with traffic police.
When ordering these products, which consist of glass, you don’t have to worry. We treat goods with care, packing them in shipping bags.
Let's summarize. All presented headlights will refresh the appearance of your car, giving it both a sporty and elegant appearance, suitable for any age. Additionally, by decorating all this with LED strips, you will make your VAZ 2101, 2102, 2103, 2104, 2105, 2106, 2107 unique.
Connection diagram for low and high beam headlights of a VAZ 2107
Low/high beam lamps are installed in the front headlights of a VAZ 2107 car.
Connection diagram for low and high beam headlights of a VAZ 2107
Description of the scheme
The voltage in the electrical circuit for turning on the low and high beam lamps of the headlights of the VAZ 2107 is supplied from terminal “30” of the generator through the mounting block and the ignition switch.
The low beam is turned on by the external lighting switch (third position), installed in the switch block (switches), in the lower part of the “beard” of the front panel. When the contacts inside the switch are closed, the voltage is supplied to the left steering column switch and then through the headlight low beam relay and fuses 17, 16, it enters the front headlights to the lamp, where it energizes the low beam filament (55 W).
When the high beam is turned on, the electric current from the steering column switch goes to the high beam headlight relay, fuses 12, 13 and then to the high beam filaments of the lamps (60 W) in the front headlights.
The 13th fuse also contains the high beam headlight lamp in the instrument panel.
Turning on the low or high beam headlights will only be available when the exterior lighting switch is on.
To briefly turn on the high beam headlights, both with the exterior lighting switch on and off, the driver moves the high-low beam switch lever towards himself and turns on the high beam. In this case, the current to the high beam filaments in the headlight lamps is supplied directly from the ignition switch (INT terminal), bypassing the exterior lighting switch.
Using LEDs
Inexpensive tuning of VAZ 2107 optics involves using LEDs. This method will transform the optics and appearance of the equipment. To carry out the work, you should have the following materials on hand:
- LEDs;
- resistors;
- various wire designs;
- viscous composition based on polymers;
- drill and drill bit of the required diameter.
Tuned lighting fixtures will transform the car. They will look beautiful both from the front and from the back. The main advantage of this option is that the diodes have a long service life and do not have to be changed frequently. When installing these elements in the front light structures, even and diffuse lighting is obtained. This is a convenient way to tune the optics of a VAZ 2106. After installing the LEDs, you need to connect everything to the electrical circuit. At this stage, you should be careful about the polarity and not mix anything up.
Headlight adjustment
It is generally accepted that headlights perform their function if the road in front of the car is well lit and oncoming drivers are not blinded. To achieve such operation of lighting fixtures, they must be adjusted correctly. To adjust the VAZ-2107 headlights you need to:
- Place the car on a flat, strictly horizontal surface at a distance of 5 m from a vertical screen measuring 2x1 m. The car must be fully fueled and equipped with all the necessary equipment, the tires must be inflated to the required pressure.
- Draw a marking on the screen on which line C will indicate the height of the headlights, D - 75 mm below C, O - the center line, A and B - vertical lines, the intersections of which with C form points E, corresponding to the centers of the headlights. J is the distance between the headlights, which in the case of the VAZ-2107 is 936 mm.
Using the second screw, align the break point of the upper border of the beam with point E.
The same must be done for the second headlight.
The device of block headlights VAZ 2107
On a VAZ-2107 car, the front headlight units are plastic boxes, the front side of which is often made of glass and has a rectangular shape. There are also those where the front side is made of plastic. Each option has its pros and cons. Block headlight made of glass. The main advantage of this material is the maximum reflective effect, which is achieved by applying ribbed surfaces inside the device. Another advantage is that it is virtually impossible to scratch. There are also disadvantages to the glass surface:
- when the slightest crushed stone or gravel hits the glass, a crack will form;
- destruction due to stronger physical impact;
- impossibility of fastening with screws.
Headlight made of transparent plastic. So, a plastic device has less focusing properties, but is already quite widely used in the domestic and foreign automotive industry. The main advantage is the fracture resistance; small stones are not able to break through the front coating of the lighting device. Therefore, many drivers, due to this property, choose plastic material. Disadvantages include the possibility of easy scratching, which negatively affects the reflective properties.
The headlights on the VAZ 2107 are plastic boxes with a front side made of glass or durable transparent plastic.
Glass headlights are scratch-resistant and provide better, more focused light output. But glass breaks easily when hit by stones and physical impact. Plastic has less focusing properties and is scratched. But it has greater fracture strength and small stones are unable to damage it. This is why many car owners prefer plastic headlights.
Inside the headlight unit there is a 12-volt lighting lamp with two filaments for low and high beam, a side (parking) lamp and a turn signal lamp. The latter is also intended for emergency signaling.
The lamps are inserted into sockets, and behind them there is a reflector that focuses the light and directs the beam onto the road surface.
The VAZ 2107 headlight has an important detail - a hydraulic corrector. When heavily loaded, the front of the car, and with it the headlight beam, lifts up. The hydraulic corrector changes the vertical angle of the headlight, which allows you to adjust the angle of the light flux and direct it down onto the canvas.
The back side of the headlamp has a cover, which is used to replace burnt out lamps.
What does it consist of?
Inside the device has lighting lamps that are powered by a constant voltage of 12V. The main lighting function is performed by a halogen lamp type AKG 12-60+55 (H4). By design, it has two spirals, which make it possible to switch between high and low beam types of lighting. There is also a lamp type A12-4-1 (T4W1), the purpose of which is to provide the car with side light. The design of the headlight also includes another type of lighting, which is intended for two types of lighting: emergency signaling, and giving a light signal for turning right or left.
All these types of lamps are connected to a socket, which actually provides 12V power. Inside the headlight there is also a reflector, the main function of which is to focus the light flux in one direction. Without a reflector, the light will not be scattered onto the road surface, but will only illuminate the inside of the device.
One important device that is added to the VAZ-2107 is a hydraulic corrector. Many drivers sometimes do not know why the transparent tube is connected to the headlight and what functions it performs. The hydraulic corrector performs the function of changing the angle of the headlights, the need for which arises when the vehicle is loaded. That is, if the car is overloaded, then the light flux will be directed not towards the road, but upward, and with the help of a hydraulic corrector this situation can be corrected. On the reverse side of the headlight unit there is a round cover, by opening which you can replace burnt out lamps.
Replacing the hydraulic concealer
The purpose of the hydraulic concealer is known, but to replace it it is necessary to imagine its design. It consists of a master cylinder, which is a switch and a starting cylinder. The mechanisms are connected using special tubes with liquid. Any failure of one of the elements of the hydraulic corrector entails its complete replacement, since its design does not compress.
The hydraulic corrector is replaced in the following order:
- The hydraulic corrector mount is removed from the headlight and on the switch handle. To remove the handle, simply pull it towards you.
- The cylinder head nut is unscrewed and the inner part of the panel is removed.
- After the entire collection is deleted and the new one is reversed for deletion.
Knowing the sequence of removing and replacing headlights on a VAZ-2107, you can save not only money, but also the time required to travel to the station. Replacing headlights is as easy as changing a wheel, so good repair work!
Installation of electric headlight corrector
And so, first of all, I checked for operability, then I removed the folding on the control unit using a 6-size drill. I removed the cap with the regulator, and got to the board with the resistors.
Replaceable resistors in the divider.
This is a voltage divider. It can be called a variable resistor, but with fixed positions. Initially, I was upset by the number of positions, there are only 12 of them. But when I opened the case, I discovered a restrictive ring; this ring can be twisted as much as you want. Using the selection method, I replaced the outermost resistors with resistors of the required value, I adjusted the maximum rod overhang to 38 mm (I left 2 mm in reserve, so the gears of the gearbox should not be affected), as well as the rod stroke within 10 mm. The photo shows that the 3.92 kOhm resistor was replaced with 1 kOhm (maximum offset), and the 2.45 kOhm resistor was replaced with 800 Ohms (minimum offset). I couldn’t find SMD resistors with the required power, so I used Soviet ones.
But no matter what, the characteristics of the electric corrector fully correspond to the characteristics of the hydro one.
Max stem extension is about 38 mm.
Min rod overhang approx. 28 mm
After putting the regulator in place, I selected the desired position of the limiter ring in such a way that the number of positions increased to 15. Using a drill bit of 2, I drilled holes in the control unit housing and clamped the cover with screws.
The corrector was installed like it was originally, the only thing was that I had to twist it with the connector to the driver's door, I did this so that the dashboard would fit. I ran the cables through a rubber plug that previously contained the hydraulic corrector hoses. There were quite enough cables, there was even a little extra left. I installed the handle from my original hydraulic one, since the one that came with the kit protruded above the body, which spoiled the look a little.
Everything works, the only negative is the speed at which the motors move the reflectors, it is too low and this is unusual after hydro. I hope that this instruction will be useful and useful to someone. I’ll add that I had the idea in my head to use Hella electric correctors, which are similar to the Lanosov ones. But I didn’t find accurate information, so I didn’t take any risks. These correctors are good because, like Lanos, the control circuit is located in the corrector itself. You'll only have to spend money on wire and resistors. If the corrector fails, it is quite simple to replace it. Well, if you have correctors from a VAZ 2110, you will have to look for a used motor or replace it with Volgov ones; when replacing, you will have to re-solder the control unit.
Typical headlight malfunctions and methods for eliminating them
During operation, the car headlight is one way or another subject to mechanical damage and exposure to atmospheric factors, so after a certain period of operation it may require repair or restoration.
Glass replacement
To dismantle the VAZ-2107 headlight, you will need an 8-size open-end wrench and a Phillips screwdriver. The sequence of actions when removing the headlight is as follows:
- Under the hood, you should find the power plugs for the lamps and hydraulic corrector and disconnect them.
On the front side of the headlight, you need to unscrew three bolts with a Phillips screwdriver.
When unscrewing one of the bolts from the reverse side, you will need to secure the counter nut with a size 8 wrench.
Remove the headlight from the niche.
The glass is attached to the headlight housing using sealant. If it is necessary to replace the glass, the joint should be cleaned of old sealant, degreased and a new sealing layer applied. Then attach the glass and secure it with masking tape. After 24 hours, the headlight can be replaced.
Video: replacing headlight glass on a VAZ-2107
Replacing lamps
To replace a burnt-out high-low beam lamp in a VAZ-2107 headlight, you must:
- Disconnect the negative battery terminal.
- Remove the headlight unit cover by turning it counterclockwise.
Disconnect the power supply from the lamp.
Remove the spring clip from the chuck grooves.
Remove the lamp from the headlight unit.
- Install the new lamp in reverse order.
- sandpaper of different grain sizes;
- abrasive and non-abrasive paste;
- masking tape;
- rags;
- grinding machine or grinder with a grinding wheel.
When carrying out work to replace lamps, you should remember that when we touch the lamp bulb with our hands, we oil it, and this can lead to premature failure of the lamp.
Replacing side light bulbs and direction indicators, as a rule, does not cause any difficulties: to do this, you need to remove the corresponding socket from the reflector and remove the lamp by rotating it counterclockwise.
Video: replacing the main and side lamps on a VAZ-2107
Glass cleaning
If the headlight glasses have lost their transparency, you can try to restore their appearance and light transmittance by contacting a service station specialist or performing the restoration of the optics yourself. To do this, the car owner will need:
Glass restoration work is carried out in the following sequence:
- The headlight is covered around the perimeter with masking tape or film so that during work the paintwork of the body is not damaged.
- The surface of the glass is treated with sandpaper, starting with coarse sandpaper and ending with fine-grained sandpaper. If grinding is performed mechanically, the surface should be periodically moistened with water.
- The treated surface is thoroughly washed with water.
- The glass is polished with polish and washed again with water.
- The surface is alternately treated with abrasive and non-abrasive paste using a grinding machine with a foam wheel.
Video: polishing/grinding VAZ headlight glass
How to replace the taillight, also known as the rear light, on a VAZ 2106?
Note! Before you move on to replacement, let’s remember what the headlight consists of, because knowing the composition of the headlight, it will be easier to remove it than without knowing anything!
The rear headlight consists of: Turn signals which are located in the extreme part of the headlight, and they are indicated in the photo by number 1. The headlight also consists of marker-colored lights (Number 2), a bright white reversing light (Number 3), and a brake light (Number 3). 4) and from the side lights that serve to illuminate the rear license plate of the car! (By the way, the taillight can only be removed from the car, provided that the rear license plate lights are also removed and therefore the lights must be removed first, and only then the headlight itself)
Now a few words about what the license plate light itself and the taillight are mounted on! The license plate light is attached to the car using two nuts (Number 1) by unscrewing which it can be easily removed, but in order to completely remove it you will also need to remove the socket with the lamp, which is indicated by the red arrow.
But the headlight itself is attached to the car using four nuts (Number 2), but by unscrewing these nuts, the headlight itself cannot be easily removed because wires are also connected to it, which before disconnecting them must be remembered, and the wires must be reconnected in that the same sequences as they were established earlier.
Removal: 1) At the beginning of the operation, remove the entire rear trim from the luggage compartment. (How to remove the trim, see the article entitled: “Replacing the gas tank”, points 2-5)
2) After the rear trim is removed, remove the side trim from the side where you will be replacing the headlight. Let's say you are going to replace the right headlight, then remove the right gas tank trim, and if you are going to replace the left headlight, then remove the left wheel trim and, moreover, so that the wheel does not interfere, remove it from the car.
3) Now remove the socket that comes with the light bulb by hand and then remove this socket together with the lamp from the license plate light housing.
4) Next, unscrew the two nuts that secure the license plate light to the car body.
5) After this, get out of the luggage compartment and remove the light from the car from the outside.
6) Then, using a marker, or using a camera, photograph or mark the position of all the wires that are connected to the taillight and then disconnect these wires.
7) Next, take a screwdriver in your hands and unscrew the four nuts that secure the light to the car body, and after unscrewing the nuts, remove the light from the car.
When the lantern is removed and if you want to reinstall it again, then be sure to check the condition of the seal that fits the lantern body; in this case, replace the cracked, heavily worn seal with a new one.
Installation: The new lamp is installed on the car in the reverse order of removal.
Note! When installing a license plate light, be sure to check the gasket that is installed on the light; if it is damaged or if signs of rubber aging are visually visible, then replace this gasket with a new one!
And also when installing the rear light, pay attention to the wire that goes to ground and is thereby secured to the lower stud of the rear light housing; be sure to install it in the same way as it was before! (By the way, we were talking about the rear left light, and two wires going to ground are connected to the rear right light, one of which is placed on the lower stud, and the other on the upper)
How to replace headlight glass
Now we’ll find out how to replace the glass itself. First, let’s find out the design of the lantern, what it consists of.
What does the headlight consist of?
As you know, the main link of any lantern is its reflector or reflector. It is a concave mirror component, which serves to form a light beam of the desired shape.
Types of lamps for flashlights
As for the light source, they are car lamps. They can also be different. Currently known:
- ordinary incandescent lamps;
- halogen lamps;
- xenon lamps.
A conventional incandescent lamp is a sealed bulb containing a vacuum or inert gas. Inside the lamp there is a tungsten spiral, which, under the influence of electric current, is heated to a temperature of 2600-3000 K, thus emitting light and heat. As for the efficiency of such lamps, it is about 3400 K.
A halogen incandescent lamp operates similarly to a conventional incandescent lamp. Such a lamp contains minor additions of halogens, such as bromine, chlorine, etc. With the help of these substances, the bulb and glass of the headlamp are darkened. According to experts, the use of halogen headlights on car headlights doubles their service life and prevents rapid failure of the bulb.
Finally, a xenon lamp is a gas-charging version that contains xenon. Such lamps are also called HID lamps and their emission spectrum is identical to that of daytime sunlight. This lamp consists of two bulbs and quartz glass. Such a lamp consumes only 35 W of electrical power, instead of 55 W for a halogen lamp.
Lantern glass
The headlight also consists of corrugated glass, which will be discussed in this article. The most popular types of glass are transparent.
Although tinting headlights is becoming more and more fashionable now.
Transparent glass headlights VAZ 2114
Although reflective options are also known, crystal, modular, lensed, etc.
What kind of light bulbs are on the VAZ 2106-07
Headlight unit:
Low and high beam. Type H4, 60 and 55 W respectively
Dimensions. Type T4W, power 4 W
Direction indicators. Type P21W, 21 W.
Tail lights:
Side light. T4W, 4 W,
Turn signal. P21W, 21 W,
Reverse indicator. P21W, 21 W,
Brakes. P21W, 21 W,
Rear fog light. P21W, 21 W.
Other installed lamps:
Fender-mounted turn signal, glove compartment light: Type T4W, power 4 W.
Room and interior lighting bulbs: C5W, 5 W.
Cigarette lighter, tachometer and speedometer (instrument panel), clock: T3W, 3 W.
Lamps for side lights, turn signals, high beams, low battery voltage, oil pressure: T3W, 3 W. On some modifications there is a type W1.2W, with a power of 1.2 W.
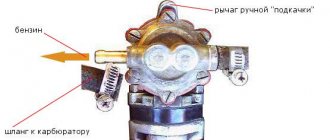
Parking brake indicator, low brake fluid level, rear fog lights on, heated rear window, throttle opening in carburetor models (suction), low fuel level alarm: W1.2W, power 1.2 W. In some modifications, a T3W, 3 W lamp is used for the level in the gas tank.
Engine block control errors (Check Engine) for injection models: W1.2W, power 1.2 W.
Knowing what is installed on our Zhiguli and where, we will move on to replacement. Let's start with the front of the car.
Fog lights
Driving a car in rain or snow can create a lot of trouble for the driver who is forced to drive the car in poor visibility conditions. In this situation, fog lights (FTL) come to the rescue, the design of which provides for the formation of a light beam that “spreads” over the surface of the roadway. Fog lamps are usually yellow, since this color tends to dissipate less in fog .
Fog lights are usually installed under the bumper, at a height of at least 250 mm from the road surface. The installation kit for connecting PTF includes:
In addition, a 15 A fuse will be required, which will be installed between the relay and the battery. The connection should be made in accordance with the diagram supplied with the installation kit.
Video: self-installation of fog lights on the “seven”
Do-it-yourself LED tuning of VAZ 2107 headlights
For the “Seven” you can easily find, buy and install non-standard headlights or individual lighting elements. The cheapest solution is to install LEDs instead of standard lamps or in addition to them. This allows you to transform the appearance of your car at a minimum cost.
Tuning the rear lights of a VAZ 2107 is also often done by changing lamp lighting to LED.
For tuning with LEDs you will need:
- resistors;
- panel or box for mounting lighting elements (LEDs);
- drill;
- drill;
- sealant;
- wires;
- LEDs.
The box or panel must be adjusted to the size of the headlight and installation holes for the LEDs must be drilled. Depending on the number and parameters of the LEDs used, resistors are connected in series to provide the required circuit resistance. The resistor value is selected individually
The sealant is used to secure the LEDs in the holes. Important: when connecting LEDs, polarity must be taken into account
In addition to the original appearance, tuning with LEDs has other advantages:
- low power and, as a result, low load on the on-board network;
- durability and reliability;
- diffused light that does not blind other road users.
If your budget allows, you can tune the VAZ 2107 headlights by replacing the standard units with ready-made tuning products. The advantage of this solution: beautiful design and excellent quality with minimal time investment.
Replacing rear lights
The VAZ taillights have 4 bulbs inside (from side to number).
- Turn signal (closest to the side behind the orange glass).
- Reverse (in the center behind the white glass).
- Side lighting (under the reverse light behind the red glass).
- Stop sign (closest to the sign behind the red glass).
The networks to which these bulbs are connected are protected by fuses F1, F7, F8, F9 and F16. If the standard optics of the VAZ Classic do not suit you, then you can make a small tuning, namely, replace the standard taillights with LED lighting devices.
How to disassemble a headlight without a hair dryer
how to unsolder glass
separately from the reflector without a hair dryer. Be careful not to get burned...
We replace glass on a VAZ 2101 headlight.
If you broke glass
on the headlight, or the reflector has already become rusty, or you want
glass
with the inscription USSR, you can...
There are a huge number of ready-made LED lights on the market from various domestic manufacturers. To install them, it is enough to remove the standard headlights and replace them with tuned ones. Algorithm for removing rear lights.
- First, remove the negative terminal from the battery or remove the fuses mentioned above.
- Then we open the trunk and take out everything that might get in the way.
- Unscrew all the screws and remove the trunk trim.
- We take out the license plate light bulb socket.
- We unscrew the screws securing the plastic housing of the license plate lamp and remove it.
- We disconnect the wiring from the lamp, having previously remembered what is connected to what.
- Unscrew the 4 nuts securing the lamp to the body and remove it.
After dismantling the standard flashlight, it is necessary to install the tuned one in the reverse order. It is important not to forget when installing to connect the ground wires to the inner lower stud of the left lamp and to the inner lower, as well as the outer upper stud of the right lamp.
How to replace bulbs in the headlights of a VAZ 2107 - instructions for replacing bulbs in a Semerka headlight
Good afternoon dear friends. Today I want to offer instructions on how to change the light bulbs in the headlight unit of a domestic car, the seventh model Zhiguli. Yes, there are few such people left who have a “Seven” in the garage, but many buy it as a first car, a training car, so to speak. And she, as you know, requires attention and care. Therefore, this article will be useful primarily to novice car mechanics who want to learn how to handle and maintain a car themselves, and gain first experience in repairing in a garage.
Replacing lamps is useful not only when they burn out, but also when you want to improve the light in your headlights - install LED or halogen bulbs, or carry out a small “tuning” of the head optics with a lighting device. Today we will touch on a narrowly focused topic, namely how to change the light bulbs in a headlight. Let's remember what is there.
Algorithm for replacing the front headlight of a VAZ 2114
When we have decided on the timing and reasons for the replacement, and also know what to follow when choosing new optics, it’s time to move on to the question of how to change the headlight on a VAZ 2114.
REMEMBER! The vehicle's lighting system is part of its electrical network, therefore, we must not forget about the standard safety measures required to work with this part of the car. You need to at least remove the terminal from the battery, and if you have to work with the right handicap (in the direction of travel), you will have to completely remove the battery, otherwise it will be impossible to dismantle it.
So, let's remove the headlight:
- We remove the radiator trim - to do this you need to unscrew 4 screws.
- We remove the turn signal - to remove the turn signal you will have to look into the engine compartment on its back side:
A. remove the wires, they should be well fixed to each other, so disconnecting them will not be difficult. After removal, remove them and fix them on the car body so that they do not fall, because we do not need excess dirt and dust on the terminals; b. press out the spring that holds the indicator in the car body. V. We press out the plastic clamps of the turn signal and headlights with our fingers, and then pull on its front side.
IMPORTANT! If for one reason or another you cannot remove the turn signal separately, do not break the latches. Later, you can dismantle the entire lighting system in one block and separate them separately. This will be less convenient, but much better than a turn signal dangling from the housing.
- Remove the bumper mounting nuts in the headlight area. This is necessary in order to then move the bumper itself a little and get closer to the fastenings of the illuminator trim.
- Now we dismantle the headlight itself.
Replacing headlight glass on a VAZ 2107 (2104-2105)
If the car's headlight is cracked, the glass is broken, or the headlight begins to sweat, you need to repair the VAZ 2107 (2104-2105) headlight. Headlights sweat because they are not sealed, and depressurization of the headlight is possible if there is a crack in the housing, the back cover on the headlight is not tightly closed (when the lamps were changed) or there is a problem with the glass (broken, cracked or poorly glued). Accordingly, auto glass repair is required.
The process of independently replacing the headlight glass of a VAZ 2107, as well as similar “square” VAZs, is as follows:
1. First of all, you need to remove the headlight from the car, after first disconnecting the wire from the negative terminal of the battery.
2. To remove the headlight, press out the plastic clamp using a screwdriver and pull the hydraulic corrector out of the hole in the rear wall of the headlight block.
3. Then disconnect the wire blocks from the headlight unit connectors.
4. Unscrew the three fastening screws of the headlight unit to the car body using a Phillips screwdriver: one at the top in the middle and two at the sides at the bottom.
5. The headlight assembly can now be removed from the vehicle, being careful not to lose the plate nuts. Take the headlight to a convenient place for further disassembly.
6. Unscrew the two headlight wiper stops, as they will interfere.
7. Now you will have to remove the remnants of the old glass or carefully remove it if it is intact. To do this, you need to prepare a sharp knife (stationery knife).
8
Carefully cut the factory sealant along the contour with a knife (if the headlight has not yet been disassembled) or silicone. Then carefully squeeze it out by prying the glass towards you with a suitable tool.
If you trim the sealant well, it should come out quickly. It is necessary to press lightly, feeling that the glass does not crack. Then thoroughly clean everything of the old sealant so that only plastic remains:
9. Now prepare the glass for the headlight and try it on. The glass must fit the headlight exactly.
10. We take a special sealant for headlights (it will look more beautiful), but if you don’t have it, you can use simple silicone.
11. Carefully apply silicone around the perimeter of the headlight housing, something like this:
12. Next, insert the glass, and if there is not enough silicone or sealant, or if there are gaps left, apply it around the perimeter of the headlight without overdoing it.
13. Remove the excess and wrap the headlight with masking tape (such tape does not leave marks, unlike regular tape) so that the sealant hardens properly and the glass does not move. Ideally, the sealant should dry for a day.
14. After the sealant has hardened, remove the masking tape and install and connect the headlight to the car in the reverse order. Do not touch the reflector during operation, as it is very easy to damage or stain it. If necessary, check and adjust the direction of the headlight beams. Thus, do-it-yourself VAZ car repairs have been successfully completed.
- Phillips and flat screwdriver,
- sharp knife (stationery),
- silicone or sealant.
A modern car is capable of driving at night and in conditions where visibility is limited for some reason. The glass on a fairly large headlight of a VAZ 2107 can be damaged by a pebble flying out from under the wheels of passing or oncoming traffic. Usually in such a situation, the internal parts of the assembly remain intact, and replacing the damaged element can solve the problem.
This operation is relatively simple to perform; you need to remove the damaged headlights from the car, remove the remains of the broken glass and glue a new one in its place. This kind of work can be done by almost every driver who knows how to hold a screwdriver. Replacement is carried out using the tools and materials indicated in the list:
- Phillips screwdriver;
- dispenser syringe for applying glue;
- disposable plastic clips for securing the cable;
- One-component universal adhesive-sealant.
If the latter is unavailable, you can use regular tape and place paper or plastic film underneath it.
Work order
Some headlight repair operations should be performed indoors to avoid water and debris getting into the bonding area. In general, replacing a damaged element includes the following steps:
- Disconnecting the unit from the on-board network of the VAZ 2107 by uncoupling the connectors of the turn signal and the headlight lamp.
- Removing the body from the body opening using a Phillips screwdriver.
- Removing shards of broken glass, in this part of the operation you should be careful not to cut yourself.
- From the junction of the parts, it is necessary to remove the remaining adhesive mass using a flat screwdriver.
- The next step is to clean the unit and degrease it with a solvent.
- Using a dispenser syringe, apply a small amount of glue along the contour evenly without gaps or breaks.
- We place the transparent element in its intended place, press it and fix it using disposable devices or tape.
This is interesting: Hall sensors: operating principle, how to check it yourself, application
As the glue dries, the headlight element of the VAZ 2107 is installed in place; it is recommended to change both parts at the same time; during operation they tend to become cloudy and this will become noticeable even with a cursory inspection. The new transparent glass on the headlight of a VAZ 2107 car, which was replaced on our own, is pleasing to the eye. At night, better road lighting is provided.