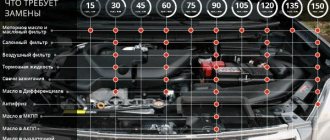
Lada Priora is a very popular car, and it’s not for nothing that it was produced in Russia for about 10 years. And when a lot of machines are produced, then there are many modifications, and there may be several suppliers of attachments, which leads to differences in design. This explains why cabin filter for Lada Priora is a part that has three versions:
- Cabin filter for Priora with Halla air conditioning;
- Cabin filter on a Priora with Panasonic air conditioning;
- Cabin filter if “Priora” without air conditioning.
All three versions of the part have different designs and dimensions. Also, filters for cars with and without air conditioning differ in their installation location. And in the dealer network for the secondary market, not only regular versions of the original filters are available, but also carbon ones. From the factory, of course, they are standard. So what kind of cabin filter do you have on your Priora? Let's figure it out.
When is it necessary to change the cabin filter?
It is possible that you can drive normally even for a couple of years without having to change the cabin filter. But in 95% of cases you have to do this much more often. The fact is that the air that enters the Priora’s cabin passes through the filtration system. And when it becomes clogged over time, it negatively affects its proper functioning.
As a result, the first problems may appear, which will be the reasons and reasons for changing the cabin filter:
- Unpleasant smell when turning on the heater (obvious lack of fresh air intake from outside).
- Constant fogging of windows. It also happens due to the fact that outside air simply does not enter the cabin in sufficient quantities.
- Weak airflow and air flow from the ventilation and heater nozzles. I think there is no point in explaining this point, everything is clear as it is
If at least one of the problems appears on your car, then the first thing you should pay attention to is the cabin filter.
How does the cabin filter work?
Replacing the cabin filter of Lada Vesta. Practical recommendations for choosing
It's a pretty neat design. It is made in the form of a rectangle made of plastic, with a core of filter material. So, there are:
- Frame.
- Filter element.
As already mentioned, the body is made of plastic. On its surface, along the outer rim, there is a small edge. This is due to the fact that it can only be placed in one position.
The filter element is made in the form of a kind of accordion, occupying the entire inner surface of the rectangular body. In general, the Priora cabin filter is quite thin. This is due to its location.
Important! The body is made of plastic in three places on each side, and has cuts that allow this part to be bent.
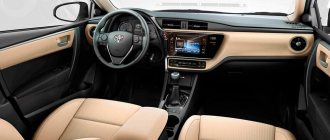
Climate control
Previously, this unit was simply called a heater. But now, due to the radical expansion of its functions and increased accuracy of mode adjustment, it is proudly called climate control. This device is not located in the cabin, as usual, but under the hood of the Priora. Or rather, under the windshield of the car. Below the bottom cut. Unlike previous VAZ models of this class, the peculiarity of the Priora interior air purifier is that it is not located horizontally in front of the system fan, but after it in a vertical position. This is due to the fact that the Priora’s climate control is designed for the installation of an air conditioner, and this forces you to be more careful with the free space.
Attention! Priora Ladas that are not equipped with air conditioning are equipped with a heater similar to the model installed in the VAZ 212 interior since 2004. Its replacement has been described in detail for a long time, and it makes no sense to present it here in full.
Then install a new one
Simply remove the rubber wall seal from the heater compartment casing, and unscrew the screws securing the plastic grill covering the interior air purifier and remove it. Then install a new one.
Where is the cabin filter located?
For vehicles with air conditioning, the cabin filter 2170 has the following location - directly in the heater housing in its front part.
If the equipment is normal, normal or standard, then the heater has an old design, no different from the tenth family. The filter element will be located in the upper left part of the stove body. Its location will be shown below after dismantling all the parts under which it is located:
Standard cabin filter - article number and price
Lada Priora was produced with or without air conditioning, but even after purchase you can install it yourself. If it is installed in a car, then it can be Halla or Panasonic. If you have a Priora without air conditioning, then there is only one option: 21110-8122020-00, it costs about 200 rubles. As for cars with air conditioning, you need to look for the cabin filter for the Priora using the following catalog numbers:
- Halla 2170-8122020-11. Price – about 180 rubles;
- Panasonic 2170-8122020-01. Price – about 350 rubles.
How often does it need to replace the cabin filter on a Lada Priora?
It is recommended to change the cabin filter in the summer, when it is most susceptible to contamination. The automaker also recommends replacement every 15-20 thousand km. mileage - it is believed that it is during this period of time that the filter works most efficiently, after which its efficiency decreases, and dust and contaminants begin to enter the cabin. External signs of the need to replace the cabin filter are: the appearance of an unpleasant odor in the car interior, fogging of the windows, unstable/inefficient operation of the stove, a noticeable increase in air humidity in the cabin.
Lada Priora without air conditioning
- Remove part of the frill seal (wind flap).
- Remove the right side of the frill (in the direction of travel) by unscrewing 3 screws under the seal and 3 screws under the plugs.
- Remove the filter cover by unscrewing the 4 fastening screws.
- Remove the Lada Priora air filter from the air intake housing.
- Install a new cabin filter (catalog number: 2111-8122020).
The replacement process is also shown in the video:
Replacing the cabin filter on Lada Priora
Note that the procedure for replacing the cabin filter on a Priora differs depending on the presence/absence of air conditioning in the car. Some also differ between Panasonic and Halla climate systems? However, the replacement process itself in both systems follows the same principle. The differences are only in the type of fastening of the element plug - with self-tapping screws in Panasonic systems and with a latch in Halla systems.
Replacing the cabin filter on a Lada Priora with air conditioning
To perform the procedure, you need to have with you a Phillips screwdriver, a rag, a new cabin filter and a few minutes of time.
- The cabin filter on Priora is located behind the engine. To gain access to its location, you need to unscrew the bolts that secure the soundproofing of the compartment. If necessary, you can disconnect the vacuum booster pipe.
- Unscrew the cabin filter cover latch using a Phillips screwdriver if the car is equipped with a Panasonic climate system or tighten the filter latch if a Halla system is used.
- Pull the used filter towards you and remove the element from the compartment.
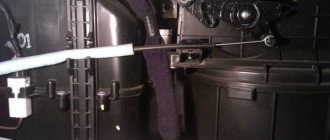
- Get a new filter. In order for the element to fit into the narrow compartment between the engine and the upholstery, roll the part as shown in the photo below.
- Install the new filter element into the compartment and close the lid.
Replacing the cabin filter on a Lada Priora without air conditioning
- Open the hood and unscrew the grille located on the passenger side.
- The previous action should open access to the cleaning system mounting compartment. Unscrew the three bolts that secure it and remove the cover.
- Remove the used filter element. Clean the compartment thoroughly from dust and dirt, it is better to use a vacuum cleaner.
- “Place” the new filter into the socket and reassemble everything in reverse order.
Original codes for Priora cabin filters
The original cabin filters for Lada Priora are as follows:
- 21110-8122020-00 - without air conditioning;
- 2170-8122020-01 — with Panasonic air conditioning;
- 2170-8122020-11 - with Halla air conditioner.
But, there is a nuance. You will not buy filters with such codes. Nowhere. Even in the dealer network, in the original packaging. They are supplied exclusively from the assembly line. This is confirmed by the fact that neither zzap.ru nor exist.ru have filters with such codes for sale. These are OE numbers, which are used to cross and select analogues on other sites. And that's the only thing you can do with them.
What numbers are available for the “original” Priora cabin filter? The article numbers for purchase in the dealer network or from auto parts sellers are as follows:
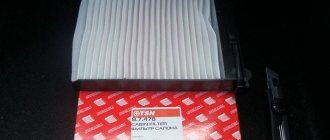
- 2170-8122020-82 - regular filter;
- 2170-8122020-83 - carbon filter.
2170-8122020-82
2170-8122020-83
Only AvtoVAZ can tell you how three filters of different design in the original packaging can have the same code. And that’s not a fact. Perhaps, when buying an original filter, you just need to tell the seller what kind of car you have - with or without air conditioning, and what version.
Even the packaging of the filters confirms our words. Three links Link 1, Link 2, Link 3 - original filters for two versions with different air conditioners and a version without air conditioning. All in the characteristics refer to the same original number 2170-8122020-82, all have the same packaging (it is generally the same for both regular and carbon versions), and two of the three filters even in the photo show the same article number on the side .
We also note that it is better to look for analogue filters using the “factory” OE codes - then the selection is much more accurate, you just need to pay attention to whether the filter is regular or carbon. Because when selecting 2170-8122020-82 and 2170-8122020-83, the results are inconsistent. Most often, versions are offered for cars with Panasonic air conditioning, then, based on the number of search results, there are filters for cars without air conditioning, and only then - with Hella air conditioning. Perhaps this demonstrates which cars are most abundant in Russia.
Where is the cabin filter on the Priora?
Let's determine where the cabin filter is located on the Priora and how to determine what kind of air conditioning system you have if you don’t know it and have no one to ask?
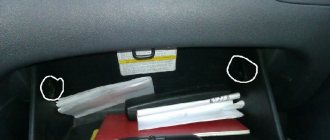
In all versions of the car, the cabin filter is located on the right side of the engine compartment , in the part near the windshield . Important! The right side is if you count in the direction of travel of the car. If you are facing the open hood, the air duct system will be on the left.
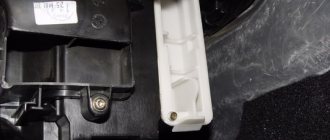
In the version without air conditioning, the filter can be seen immediately - it is hidden behind the grille. To see and unscrew the grille fasteners, you need to remove the rubber seal.
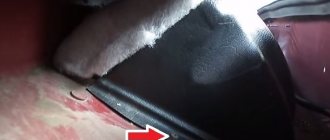
You won’t just see the cabin filter of a Priora with air conditioning, because its cover is hidden behind the sound insulation of the hood. By removing it, you will gain access to the filter.
Placement of the cabin filter in a Priora without air conditioning
Location of the cabin filter in a Priora with air conditioning
By the way, the cover is a clear distinguishing feature by which you can understand what kind of air conditioning system you have. Not even by the cover itself, but by the type of its fastening. For Halla systems it is attached with a latch, and for Panasonic systems it is attached with a screw. There are no exceptions! Read our detailed instructions on how to change the cabin filter on a Priora.
To close the topic of maintenance, let’s add that the manufacturer recommends changing the cabin filter every or after 10,000 kilometers. Everyone decides for themselves when to change the cabin filter or not and how important it is for them to breathe clean air by installing a regular or carbon filter element. If you change this part as necessary, then remember that severe fogging of the windows can be one of the clear signs of a clogged cabin filter. This is confirmed by the owners of Prior.
Cabin filter on Priora without air conditioning
The cabin filter for this Priora has the following dimensions: height - 40 mm, length - 240 mm, width - 180 mm. Dimensions of analogues may vary. And to fit them, a strip of foam rubber is often glued around the perimeter, which improves the efficiency of the stove.
The filter has a cardboard frame with foam clips and folds of filter material inside. Also, comparing the original and analogues, you will notice that the original has a fixing tape in the middle, which should prevent the filter folds from creasing. Most analogues do not have it! On the other hand, analogues often use a larger number of folds, which, with the same quality of filter paper, should give a better effect.
Owners of “Prior” without air conditioning note that often original and analog filters simply dangle in the seat. Therefore, many handicraft filters are modified with foam seals. It is also recommended to glue a mesh onto the air duct grille to prevent large fractions of contaminants from entering the system. And judging by the reviews, the filter from the manufacturer “Filter-Service” (article VF011N) fits tightly into the seat.
What other analogues are there for the original filter on a Priora without air conditioning and how much does the original cost? The answer is in the table.
| Brand | vendor code | Price, rub |
| Regular filter | ||
| Original | 21110-8122020-00 / 2170-8122020-82 | 225 |
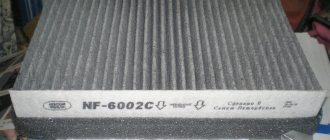
| Nevsky filter | NF-6002 | 120 |
| Filter-Service | VF011N | 230 |
| Coal | ||
| Original | 21110-8122020-00 / 2170-8122020-83 | 355 |
| BIG-Filter | GB-9833/C | 230 |
| Filter-Service | VF011U | 455 |
Cabin filter on a Priora with Panasonic air conditioning
The cabin filter for this version of the Priora has the following dimensions: height - 40 mm, length - 240 mm, width - 210 mm. Dimensions of analogues may vary slightly.
Structurally, it is similar to the filter for the version without air conditioning - it also has a cardboard body and is covered with foam rubber all around. But a distinctive feature of this particular filter for the Priora is the presence on one side of an additional and clearly visible protrusion made of foam rubber.
Considering that the part is not symmetrical, the question arises - which side to install the cabin filter on the Priora. To do this, you don’t need to remember anything - always focus on the arrows that are printed on each filter. They either indicate the direction of air flow or indicate the direction of installation!
What analogues of the original filter on a Priora with Panasonic air conditioning do car owners use and how much does the original cost? See the answer in the table.
| Brand | vendor code | Price, rub |
| Regular filter | ||
| Original | 21110-8122020-01 / 2170-8122020-82 | 230 |
| Nevsky filter | NF-6007 | 175 |
| BIG-Filter | GB9957 | 195 |
| Coal | ||
| Original | 21110-8122020-01 / 2170-8122020-83 | 315 |
| Pilenga | FA-P 4021 | 265 |
| BIG-Filter | GB-9957/C | 300 |
Cabin filter on Priora with Halla air conditioner
The cabin filter for this version of the Priora has the following dimensions: height - 20 mm, length - 370 mm, width - 220 mm. Dimensions of analogues may vary slightly.
The filter for this version has foam inserts only on two sides, and is generally thinner. On one side it has a special tongue for easy dismantling. By the way, according to the experience of car owners, if the replacement is untimely, this tail of a worn and clogged filter comes off, and then it is much more difficult to get it!
What analogues of the original filter on a Priora with Halla air conditioning do car owners use and how much does the original cost? The answer is in the table.
| Brand | vendor code | Price, rub |
| Regular filter | ||
| Original | 21110-8122020-11 / 2170-8122020-82 | 220 |
| Nevsky filter | NF-6008 | 135 |
| BIG Filter | GB-9977 | 210 |
| Coal | ||
| Original | 21110-8122020-11 / 2170-8122020-83 | 280 |
| BIG Filter | GB-9977/C | 275 |
| Nevsky filter | NF-6008C | 230 |
Replacing the cabin filter with air conditioning
As mentioned above, the element is installed in the front part of the housing, and in order to get to it, you first need to unscrew the two screws securing the section of insulation, under which the filter cover is located.
The top photo already shows the moment when the filter cover is removed, and it is also attached with self-tapping screws. It is necessary to unscrew them and remove the plug, the result of which is shown in the photo below:
After which you can remove the old element by bending it as shown below.
It is worth noting that this instruction given above specifically shows an example of replacement with the Panasonic climate system. If you have Halla, then the only difference will be in the fixation of the cover under which the cabin filter is located. At Halla it is attached with a latch, which is more convenient and practical.
The new filter is installed in the reverse order of removal. For greater ease of installation, the new element has special slots along the edges so that it can be slightly bent. This is something to pay attention to.
We put the plug in place and fix the insulation in place with screws. Well, below we will consider an example with a regular Priora, which does not have a climate system.
Main menu
Lada Priora hatchback Logbook Steering rack repair
Replacing the cabin filter in Lada Priora (Halla climate)
It's time to replace
Now we can get acquainted with installing a cabin carbon filter LGR 7410 in the Priora.
The cabin filter in a Priora with Halla climate control is located behind the engine and is not placed vertically.
If you have a front strut extension installed, it needs to be removed. Then we remove the hood seal.
There is also an option to disconnect the vacuum booster hose, because space is limited and it will not interfere.
Then, using a Phillips screwdriver, you need to unscrew the two bolts securing the compartment upholstery to gain access to the filter installation location.
Then you need to bend the upholstery without snapping off the filter cover by squeezing the latch at the top with 2 fingers without pulling the top edge only towards you.
Now you need to remove the filter itself using a special tab. Draining and replacing brake fluid and filter on Ford Focus 2; Drain and change oil c. The filter is difficult to remove without deformation or damage, but since we are changing it, it is natural not to try very hard. There are filters with a rigid frame - these are obtained by breaking them at the notches on the edges.
Replacing the cabin filter
Priors with
air conditioning
detailed video. At the bottom of the video, on
replacing
the cabin
filter
.
we call this filter
; salonnik.
The filter turned out to be thoroughly clogged with dust. Removing and replacing the interior lamp of a VAZ. When I installed it, it was snow-white (regular filter - not carbon).
Given the experience of removing the old filter, it may seem that installing a new one will not be easy - there is very little space between the motor and the upholstery. But that's not true. And that is why replacing the filter with the air conditioner. cabin filter on Priora. If you look at the new filter from the side, you can see special slots.
Thanks to them, the filter can be twisted with a “screw”. In this case, the filter accordion will shrink and it will become very compact.
Carefully push the filter into place without applying much effort. If difficulties arise, we make back-and-forth movements.
Now you need to close the lid. To do this, insert the lower shank into the slot and press the upper part until it clicks. Do not mix up the sides - the sealing foam should be on the outside.
All that remains is to screw the engine compartment trim back on and reinstall the vacuum booster hose. Replacing the cabin filter
completed.
Good luck on the roads!
Why make a replacement?
Replacing the cabin filter is a necessary procedure. It is best done in the spring, at the beginning of the dust season. The device can last up to twenty thousand kilometers. After this, its functionality ceases.
When the service life of the equipment expires, all the dirt will get inside, since the cabin filter on the Priora will not be able to prevent pollution. It will be difficult for you to breathe such air.
Where is the part located?
Before you change the cabin filter, you need to know its location. It is installed above the windshield, next to the engine block. The device is in a vertical position. To get to it, remove the seal on the hood.
The location of the filter does not depend on the presence of an air conditioner.
When is it necessary to replace?
The cabin filter of the Lada Priora must be changed after a run of ten thousand kilometers, if you follow the official documentation from the manufacturer. In this case, the vehicle must be used under normal conditions. If you drive on dirty roads and city highways, it is recommended to replace them every five kilometers.
Engine air filter
If the air is not filtered, then all the solid suspension in it will enter the engine and act as an abrasive, which will lead to deterioration in engine performance.
Timely replacement of the air filter is very important. Contaminated, it can cause even more harm than its absence. The consequences can be dire. First, fuel consumption increases by 10-15%. Ultimately, the device will rupture and the engine will fail. And buying a new engine costs much more than replacing an air filter. At the moment, 3 structural types of filters are produced: cylindrical, panel, frameless. Which one is better? Classic air filters are an accordion of filter material with seals around the edges. This is done to ensure that air enters the engine exclusively through the “filtering” elements. The filter partition (curtain) is made of porous cardboard, which is treated with special resins. This impregnation is necessary so that the device does not swell when moisture gets on it.
If during operation you notice that the partition is swollen or the filter element is deformed, it must be replaced immediately. The most common material for making curtains is cardboard. Sometimes it is made from synthetic fibers. Much greater operating tolerances must be applied to them. But such devices are rarely produced on the Lada Priora.
Air filter selection
It doesn't have to be expensive. There are no special requirements for this element, however, you need to choose one that uses high-quality paper, since in this case, effective dust absorption is ensured and pollution is prevented from entering the engine. The most popular parts today are the brands Mann, SCT, BIG. However, their price category is average or high. Many motorists install cheaper options that do their job just as well. For example, “Salyut” or “Nevsky” have proven themselves to be excellent, although they are cheaper.
In addition to choosing the right air filter, you need to know the rules for replacing it. Under normal operating conditions, the regulations require replacement every 30,000 kilometers. During hard use in dusty areas and off-road, the filter should be changed every 15,000 kilometers.
If the filter is dirty, air will pass through it with difficulty, the air-fuel mixture will be enriched in fuel, so gasoline consumption will increase significantly. In addition, in such conditions the engine will overheat, and all that is needed to prevent this outcome is to change the filter element in a timely manner.
Replacing the air filter
It is not necessary to turn to car service specialists for help. This element is located in a special housing next to the battery. The housing cover is secured with 4 bolts. For ease of replacement, it is recommended to disconnect the mass air flow sensor by unfastening the fastening latch. After this, you can remove the housing cover and remove the old filter, clean the box from dust and install a new filter element. Further assembly is carried out in reverse order.
Replacing the cabin filter on a Priora without air conditioning
The design of the heater itself is no different in this case from the VAZ 2110. But before getting to the filter, you will need to remove at least the right part of the frill - the windshield lining, by unscrewing the upper fastening screws using a Phillips screwdriver:
You also need to unscrew the screws securing the insulation from the side, as shown in the photo below.
Next, folding the hood sealing rubber to the side, remove the right side of the Priora frill.
There is also an internal part underneath that needs to be removed:
Well, now we unscrew several screws securing the cabin filter grille.
Then we take it out, putting it aside.
And nothing else prevents us from replacing the old cabin filter with a new one. It must be pulled out carefully so that excess debris does not fly into the heating system.
If dust, dirt or other substances get inside, you must thoroughly blow everything off and wipe it with a rag or napkin.
Now you can install a new cabin filter element in its seat in the heater housing. The arrows on the body indicate the direction and correct installation of this filter. As you can see, changing this consumable on a Priora is quite simple and this repair will not pose any problems.
Video instructions for replacement
This review was made using the example of Priora in the standard configuration, respectively, without air conditioning:
Where to buy and how much does a filter cost for a Priora?
You can purchase a new element at almost any auto parts store, but again, before you buy, check for yourself and the seller which one you have installed. Since both the price and catalog number of these filters are different:
| Model | With Halla air conditioning | With Panasonic air conditioner | Without air conditioning |
| price, rub. | 170-440 | 160-420 | 210-440 |
The difference in price can also be significant both with and without a climate system. This mostly depends on the place of purchase, the manufacturer, as well as on the material of manufacture: ordinary paper and coal.
Don’t forget to replace it at least once a season, and then the air inside the car will always be clean, the heater will work efficiently, and the windows will not fog up!
The manufacturer recommends replacing the cabin filter of the Lada Priora, depending on operating conditions, every 10,000 km, or every 5-7.5 thousand runs under more severe conditions. The process of removing and installing the filter may vary depending on the vehicle configuration.
Replacing the filter
Below are detailed instructions for replacing the cabin filter on a Priora. There is nothing difficult about this process. This can be done by a person who has no skills in car repair.
With air conditioning
Cars with air conditioning must first be secured in place to prevent the car from rolling anywhere. It is not necessary to remove the minus from the battery, although this is prescribed by AvtoVAZ as preparatory procedures before repairs. Do the following:
- Unscrew the two screws securing the insulation. Additionally, unscrew the clamps or pull the hoses in the other direction using an elastic band so that they do not interfere.
- Unscrew the filter cover screws and carefully remove it along with the screws.
- Take out the filter element - it bends in some parts.
The replacement work in cars with Halla air conditioning differs from those that work on Panasonic cleaners in the way the cover is secured. The Halla system means that the plastic cover is secured with a latch. The new filter element that you install in place of the old one can also be bent in the designated areas.
Without air conditioning
Working with Priora without air conditioning is carried out as follows:
- Remove the plugs on the frill and unscrew the screws. Under the frill you will see screws securing the insulation - they also need to be unscrewed.
- Slowly pull out the rubber seal of the hood and take out the right side of the frill - but it will be more convenient, of course, to take it out completely.
- Remove the inner plastic part of the part.
- In front of you is a cabin filter grille, which is attached with screws - they need to be twisted.
- Remove the cover, under it you will see a cleaning element lying horizontally. You will have to be careful with it: remove it smoothly so that dust does not fall into the heating system. If dust does get in, blow out and wipe the stove.
How to change the cabin filter
Replacement methods vary for different heater models. They come with or without air conditioning. The elements themselves also have differences; this must be taken into account when purchasing a new one.
For heaters not equipped with air conditioning
In these vehicles, the element is located under the windshield on the passenger side. It is located horizontally. For dismantling you need:
Lift the hood lid and remove the rubber seal, halfway on the passenger side. Unscrew the plastic trim under the windshield (it is secured with six screws, they are located under the plastic plugs on top, and under the rubber seal at the bottom). Remove the cover and unscrew the filter element cover (four screws). Take out the old element and remove all the debris that has accumulated in the shaft during the operation of the car (a vacuum cleaner is good for this procedure, but you can also use a damp cloth) and install a new one (it is important to follow the direction of flow indicated on the frame). We assemble everything in the reverse order and check the operation of the stove at maximum fan speed.
For heaters equipped with air conditioning system
For a Prior with such a heater, both the method of replacement and the location differ. It is located in the engine compartment, but is installed vertically. Change it this way:
Open the hood lid and loosen the vacuum booster clamp on the head and remove the pipe from the fitting (you don’t have to do this, but then it will be more difficult to get it out). If wires and pipes are attached to the casing with clamps, you need to remove them during replacement, and then attach them to their original place. On the trim of the engine compartment, under the windshield, approximately in the middle, there is a hatch for access to the filter. It is made of the same material as the casing, one part of it is attached with a screw. After unscrewing the screw, you can open the hatch by pulling it towards you. Behind the door there is a cover that must be removed by squeezing the latch. Behind it there is a vertical element that can be pulled out by pulling the tail towards you (you can not remove it carefully, because it must be replaced). We remove all debris from the canal, because
if this is not done, then it will end up in the cabin. The new filter must have places on its frame for breaks (if there are no slots, you need to bend the element in the same places as the old one), they are needed to install it in its normal place without damage. We bend it and put it in place, then close it with the lid (it is important to get the lid into the bottom groove, otherwise it will not snap into place). We check the operation of the heater and close the hatch.
All the steps described above will help you change the cabin filter without much effort. It takes a little time, but after replacement, the operation of the stove (or air conditioner) improves, and the interior will become cleaner.
What functions does the device perform?
Actually, the answer to this question is known without any additional explanation. However, it is only worth noting that this element protects not only from dust and carcinogenic substances resulting from car exhaust, but also from the smell of windshield washer fluid. The so-called “anti-freeze” is composed of various chemicals, the inhalation of which can cause headaches. Constant inhalation of such substances can cause serious respiratory diseases.
The cabin filter on the Priora is designed not only to clean the air entering the cabin, but also to eliminate the possibility of clogging the air ducts, heater and air conditioner (if equipped) with various contaminants in the form of leaves, insects, dust, etc. A clogged cabin filter on a Priora negatively affects the operation of the heater fan drive, since a heavily contaminated element does not allow air to pass through, resulting in increased air resistance and accelerated wear of the electric drive.
If you are careless about your health, then you should think about the safety of passengers. And if you nevertheless neglect the rules of the need to regularly replace the cabin filter, then the heater drive may eventually fail, the replacement of which will require significant financial costs.
Video “How to properly change an air purifier?”
User Andrey Frolov shot and published a video that shows in detail the procedure for replacing the cabin filter on a Priora that is not equipped with an air conditioning system.
The air filter entering the cabin on Lada Priora cars is located directly in the heater housing, and it doesn’t matter whether your car has air conditioning or without it. But it is worth noting that there are still differences in the design of the stove, and quite significant ones. And that is why the replacement will be done differently in different versions.
Types of salon cleaners
Before replacing the cabin filter on a Priora, it is recommended to understand the types of products. They come in the following types:
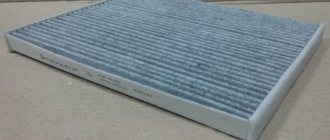
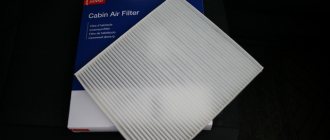
- Conventional - these are the devices that are installed on Priora cars from the factory. Compressed paper and synthetic fabric are used as a filter element. Such products trap small impurities in the air, dust and large substances. These are the cheapest product options that are used by 80% of car owners. They are white in color and as soon as they turn gray or black they need to be replaced.
- Carbon - such purifiers are impregnated with activated carbon, due to which they have the property of not only trapping various particles, but also filtering air. Coal acts as an absorbent, trapping harmful substances in the air. Such products are not much more expensive than conventional ones, but at the same time they guarantee effective air purification.
- Carbon filters with polyphenol coating - such filters have the property of neutralizing allergens. On one side, the cleaning element is coated with activated carbon, and on the other, with polyphenol impregnation. It is recommended to use if the driver is allergic to any substances that can enter the car interior with the air.
There are more modern cleaners, but conventional and carbon products are available for Priora cars.
What types of filters are there and their prices?
For the Lada Priora, just like for any other modern car, the air filter is, although a small part, but simply irreplaceable. It is this element that is capable of retaining leaves, particles of dirt and dust, all of which does not penetrate into the interior. The purifier has one single purpose: only clean air should enter the car interior.
In total, 2 types of cleaner are produced for Priora - Halla and Panasonic. We invite you to consider how these filter elements differ.
Halla:
- A latch is provided as a lock.
- The capacitor is located on the radiator.
- There is no forced heating button.
- The device is more expensive.
Panasonic:
- The fixation is a screw fastening.
- The capacitor is mounted on the body.
- There is a button for the so-called preheating.
- Budget model.
If we consider the material from which the filter is made, we can distinguish between carbon and paper devices. It should be understood that a carbon purifier is of higher quality and more durable, and also cleans the air better, preventing unpleasant odors from entering the cabin.
It is important to understand that the design of the cleaner is quite simple, and Lada Priora owners often stumble upon a fake. Always buy filters in specialized, trusted stores. When purchasing a product, check it for damage, make sure that it is shaped and sized to fit your Lada Priora.
As for prices, an ordinary cabin filter currently costs about 200-250 rubles. A cabin filter with air conditioning from Halla costs between 500-700 RUR. rub., from Panasonic – 300-500 rub.
We also suggest that you save 500 rubles, which you could spend by paying this money for a replacement by a specialist. Believe me, there is nothing complicated in this procedure, and everything can be done in 10 minutes.
Vesta in body kit
Which is better Lada Vesta or Hyundai Solaris
Vesta pendant
How often to change the cabin filter on a car: signs of the need for replacement
The optimal frequency for replacing the cabin filter is once a year or every 20-30 thousand kilometers. However, few people control the frequency of replacement, and sometimes it happens that after a year the filter element will have minor blockages. In winter, the purifier does not clog as quickly as in summer, so the seasonality of vehicle operation plays a decisive role.
Typical signs of the need to replace the cabin filter on a Priora are the following:
- Unpleasant odor coming from air deflectors. If you do not change the cabin filter for a long time (more than 2 years), then instead of performing its main function, it will cause an unpleasant odor from accumulated clogs.
- Dust from air ducts - if dust enters the cabin from the ventilation ducts when the heater or air conditioning system is turned on, then this is a characteristic sign of the need to replace the filter. If you use a regular cleaner that is not promptly replaced after a year of use, then you risk developing serious diseases. Mold and pathogenic bacteria may appear on the filter element, which will certainly enter the cabin, and then into your respiratory system.
- Problems with the heating and air conditioning system. A clogged purifier leads to an increase in air suction resistance, which will certainly affect the operation of the fan electric drive. It is not worth risking the health of your heating and air conditioning system, since repairing them or replacing parts will cost much more than the annual cost of purchasing a cleaning product.
- Fogging of the windows is another indirect sign that the cabin filter needs to be replaced. Typically, this manifestation occurs when the cleaning device is heavily contaminated. You can verify this by removing the part and inspecting its condition.
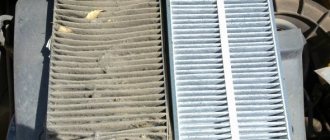
The photo below shows what happens to the filter if you do not change it for 5 years.
Charcoal or regular?
There are two types of filters on the market: carbon and regular.
Charcoal is a little more expensive than regular paper. The difference between a carbon filter is that it fights car exhaust gases much more effectively. For example, when standing in a traffic jam with the interior heater working, the car will suck in air from the exhaust gases of cars standing nearby.
A regular paper filter will not be able to effectively deal with this problem and will allow the smell of exhaust gases to enter the cabin. Coal will cope with this task perfectly, and will kill particles of exhaust gases, leaving them on the other side of the car interior.
So when choosing, you should rely on the operation of the car, but if the car is rarely used in traffic jams, then you can get by by installing a regular paper filter.
How to choose a filter?
The most common several filter manufacturers are Halla and Panasonic.
Distinctive features of each device:
- Halla uses a latch for fixation, while Panasonic uses self-tapping screws.
- In the first version, the capacitor is fixed on the radiator, and in the second - on the body.
- Panasonic has a button to force the heating or cooling system to start.
- Halla is a more expensive manufacturer than Priora with Panasonic air conditioning.