With a working engine, an impeccable gearbox, and a new chassis, the car will not go anywhere without a clutch. On the Lada Vesta this is one of the most important components. The task of a mechanical clutch is to connect the internal combustion engine and manual transmission, transmitting torque from the engine to the chassis, and also to separate them when changing gears (if you leave the gearbox input shaft rotating through the internal combustion engine, the gears will inevitably be damaged).
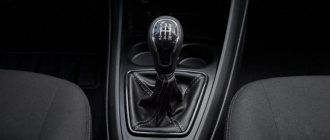
The Lada Vesta clutch on a manual transmission (mechanical) consists of one disc, engagement is made mechanically (dry, permanently closed type), the drive is hydraulic. The latter means that the unit is driven by fluid pressure and is adjusted manually (by foot) by the driver. In addition, the fluid system acts as a pedal booster. After all, simply pressing with your foot is not enough to set in motion the structure, which engages with the shaft while rotating several thousand revolutions. Therefore, there is no need for hydraulics on an AMT. Read the article to the end and you will learn the intricacies of this knot! Find out the problems that often happen and the clutch drive fails: the release bearing or the basket as a whole is broken. It's time to change, or adjust enough, precise adjustment is important for good operation of the unit. Replacement at the dealer at 9 TO.
Clutch replacement on Lada Vesta cars under warranty
You can replace the clutch on a Lada Vesta under warranty. A similar procedure can be carried out when the car breaks down during the first 20,000 kilometers. If it is proven that neither the driver nor third-party manipulations are involved in the malfunction of the unit, the service center will carry out repairs free of charge. After the replacement, the brakes will also be bled. This is a mandatory process for a hydraulic drive, since after the intervention air cavities (plugs) are formed in the system. For a robotic gearbox, another manipulation is carried out - adaptation.
Under warranty: replacement of the clutch mechanism is also included in the list of TO9 works for the Lada Vesta. Even if the unit is working, it will have to be replaced. There is no need to worry about this; the life of the part has come to an end anyway, and it will not last long.
Total
If it clicks when you release or squeeze the clutch of a Lada Vesta in the cabin, the reason may be in the limit switch, pedal support or hydraulic cylinder design. Knocks in the engine compartment are more serious - the dealer is less likely to refuse to find out their cause, since this may indicate a malfunction of important parts - springs, release bearings, working cylinder.
As a temporary solution to a serious knock, drivers use the accelerator. You need to get used to this: when the clutch is released, the driver applies more gas and the knocking disappears. Typically, such actions indicate defects in the release support guide.
Source
Clutch adjustment on Lada Vesta cars
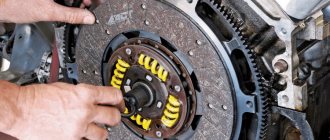
Since the knot is constantly engaged/disengaged, it needs fine adjustment. Adjustments are made on site during installation. The driven disk is centered, the basket, and the release bearing are also centered - they must fit exactly into the splines of the flywheel and the input shaft of the gearbox.
In the future, you can adjust the position of the clutch cable so that the pedal is softer/harder, so that it responds better to the command (during operation, the cable may stretch).
On a Lada with a robotic gearbox, the clutch is regulated by special programs. Adaptation can only be completed at an official dealer. However, the service life of the AMT clutch is significantly longer than that of a manual transmission.
Clutch faults
Vesta, depending on the type of transmission, may have a different drive. Accordingly, their problems may be different.
Problems with the hydraulic clutch
The brake fluid enters the working cylinder from the master cylinder through pipelines. The following malfunctions occur with these two main parts of the mechanism:
- excessive wear of rubber cuffs in cylinders;
- brake fluid leakage (lack of tightness at the pipe connections);
- damage to cylinders, pipelines, etc., which causes cracks to appear.
The hydraulic drive is highly reliable, but it can also fail if air gets into the system. The main sign of airing: incomplete disengagement of the clutch. Because of this, the gears will either be switched on with great difficulty or will be almost impossible to do. Typically, air enters the system when the level of brake fluid in the master cylinder reservoir is critically low, or due to loss of tightness. To troubleshoot problems, it is enough to bleed the system; a special fitting is provided for this.
There is no need to adjust the hydraulic clutch drive while the vehicle is in use.
The durability of the system depends on the driving style of the owner and operating conditions. A working clutch will not slip and fully transmit torque from the engine to the gearbox when the pedal is released. When the pedal is depressed, the transmission must be completely disconnected from the power plant.
You can check the performance of the hydraulic drive of the Lada Vesta manual transmission yourself, following a certain algorithm.
| What to do | What will happen |
| Turn off the engine and press the clutch pedal two or three times. | There should be no jamming, creaking, knocking or any other extraneous sounds in the drive mechanism. |
| Start the engine. | If at the same time a howling sound is heard from the manual transmission, which becomes more distinct when the pedal is depressed, it means that the release bearing is badly worn and needs to be replaced. |
| With the engine running, depress the clutch pedal and engage any speed. | At the same time, there should be no creaks, knocks, or crunches. Otherwise, extraneous sounds indicate incomplete disengagement of the clutch. This usually indicates airing of the system. If there is no air, it means there is a malfunction of the master or working cylinder, or a broken diaphragm spring. |
| With the engine running, turn on the speed and smoothly release the clutch pedal. | When the car starts to move, there should be no jerking or extraneous noise. Otherwise, the cause of failure may be damage to the discs, damper, or oil getting on the discs. |
| While driving, you need to press the accelerator pedal sharply. | If the revolutions have increased, but the car has barely accelerated, it means the clutch is slipping. It is easy to understand about slipping by the characteristic burning smell from the friction linings of the disc in the cabin. The problem is solved by replacing the disks. |
If after performing all these steps no problems are identified, the clutch can be considered working. The service life of the unit is reduced not only due to incomplete shutdown or slipping, but also when driving off-road, with a maximum load, when driving with a trailer or tow, or an aggressive driving style. And even in the case of such a seemingly harmless action as holding the clutch pedal depressed while the engine is running.
Malfunctions and methods for diagnosing them on AMT
The robotic gearbox of the Lada Vesta, as well as Kalinas, Grants, X-Rays, etc. cannot be called ideal. Many car enthusiasts may have problems when operating the robot. The most common malfunctions are jolts, howling, creaking, knocking, and jerking when changing gears.
The source of the noise can also be a worn release bearing. When replacing disks, it must also be replaced regardless of its condition. Clutch repair on an AMT is actually not easy, and this procedure is called “adaptation”. Although it is carried out by specialists using appropriate computer programs, you can diagnose faults yourself.
To do this, you should follow these steps.
- Turn on the ignition and make sure that the robotic gearbox is working. Depress the brake pedal and move the shift lever to any position. In this case, you need to ensure that all relevant icons appear on the dashboard screen. If the symbols are displayed, the selector lever is moved to the neutral position.
- Start the engine, but no sounds should be heard from the gearbox. A characteristic howl may indicate the need for urgent replacement of the release bearing. Similar sounds can also occur when transmission elements wear out.
- Press the brake pedal and use the lever to switch the selector to all positions. The gears should engage clearly, without crunching, knocking or howling. There may be several options here. A howling sound when the clutch engages indicates a worn release bearing. If the sounds disappear when the clutch is disengaged, these are worn out gearbox bearings. Jerks and jolts when shifting gears indicate incomplete disengagement of the clutch. The cause may also be a malfunction of the electromechanical clutch drive. In this case, you need to check the transmission control unit for errors. And for this you will need special software, which is available from the official dealer.
- Move the selector lever to the neutral position with the brake pedal depressed. If you release the pedal, the car should not move.
- Then you can carry out diagnostics on the go. Move the selector to the forward position, while gently pressing the accelerator pedal. The clutch should engage without problems. When moving with sudden acceleration and braking, you should make sure that the gears are downshifted and upshifted smoothly, without jerking or extraneous sounds.
- Turn on the manual control mode of the gearbox and carry out the actions described in the previous paragraph again. The transmission should operate normally, without any extraneous sounds.
- Stop the car and move the selector lever to the reverse position. When you press the accelerator pedal while releasing the brake pedal, the car should move in reverse. Jerks and jolts are unacceptable. Otherwise, this indicates damage to the clutch discs and friction disc damper. If the gears are engaged incorrectly or operate randomly, the transmission control unit should be diagnosed for errors.
If it is not possible to restore the functionality of the AMT, you should try to transfer the robot to manual control. This is especially true in the absence of spare parts. To do this, you need to remove the gear shift mechanism and the electromechanical clutch drive. You will also need to remove the drive cable. The fact that the clutch is faulty is indicated by the burning smell from the friction linings, as well as the lack of dynamics during acceleration. A variety of squeaks and other extraneous noises may indicate problems with the actuator.
The creaking of the Lada Vesta clutch actuator is considered the most common reason for contacting an official dealer.
Analogs
The manufacturers themselves recommend 826818 VALEO 2180 for Vesta. Owners note that when using the model, the pedal becomes noticeably softer and the car starts easily. The note applies to the original set; fakes are often found. The spare part costs four thousand eight hundred rubles.
The original part of the Lada Vesta is not suitable for the 21129 engine in terms of power; it is designed for lower speeds, for example, such as 2112. For 106 horsepower and above, TS-00001321 would not be a bad match. Price – five thousand six hundred rubles.
Sequencing
The procedure for removing and reinstalling the clutch on different modifications of the machine is not fundamentally different. For convenience, the instructions are given using the example of repairing a car with a 21129 engine paired with a JH3 gearbox.
Step-by-step replacement of the Lada Vesta clutch looks like this.
- Place the car on a lift or drive it into a viewing hole. If similar ones are not available, you can make an analogue of the overpass.
- Disconnect the positive terminal of the battery.
- Get under the car and remove the engine protection. For this it is convenient to use heads No. 10. In some configurations, hexagons are used here.
- Next, the subframe is removed. The part can be easily unscrewed using a lever or extension.
- The next stage is dismantling the resonator. To do this, unscrew and remove the air intake pipes, then remove the resonator.
Next you will need to loosen the clamp securing the upper ventilation pipe of the crankcase compartment from the cylinder head cover. In the figure, the elements are numbered 1 and 7, respectively. Perform a similar procedure with the throttle valve inlet pipe (No. 4).
- The next step is to dismantle the air filter box. To do this, use a No. 10 wrench to unscrew the 4 mounting screws and remove the block along with the hoses. After this, you need to plug all the holes with a clean rag.
- Using a Phillips screwdriver, disconnect the oxygen sensor and other sensors that interfere with subsequent work. During work, extreme care must be taken. Sensitive sensors can be easily damaged. For convenience, the unscrewed parts on the wires can be wound with a piece of wire and unscrewed.
- Using a 10-mm open-end wrench, disconnect the drive cables from the transmission control element. Part of the procedure is relevant when replacing the clutch on a Lada Vesta mechanic. Next, you will need to release the cable sheaths and place them on the hanging elements. The next process is to disconnect the wiring of the reverse sensor. The contact terminal is disassembled by snapping off the clips. The sensor itself is unscrewed with an 18 mm wrench. The sensor body is quite fragile; if possible, it is recommended to use an oversized head to unscrew it. Remove the radiator outlet mounting bracket. Here you will need to use force and caution - the bolts are quite weak and often boil in their sockets. Usually VD 40 or its equivalent helps. Finally, the gearbox is removed and the manual transmission clutch is replaced on a Lada Vesta with your own hands. Further actions revolve around the hydraulic clutch engagement. To do this, the hose clamp is opened and the tube is removed from the seat of the working cylinder. To prevent dirt or air from entering the system, technological plugs should be placed on the torn end switches. If there are no such things, you can get by with rubber pegs.
- Using a T10 Torx, unscrew the bolts holding the starter. The assembly does not interfere with removing the box, but for convenience it is recommended to disconnect it.
- Next, unscrew the gearbox ground bolt. The highway is also moved to the side.
- Using sockets, remove the rear engine mount.
- Next you will need to drain the oil from the gearbox. Place a previously prepared container under the technological holes. First unscrew the filler plug, then release the drain hole. Before the procedure, you should make sure that the machine has completely cooled down - getting hot oil on your hands and clothes can cause a lot of trouble.
- The inner fasteners of the front wheels should be knocked out of the differential block. To do this, it is better to use a small hammer and a tool. If available, experienced specialists insist on using special squeezers and pullers. Thus, there is no risk of damage to the nodes due to an accidental mistake.
- You will also need to loosen the motor mounting screws.
- Now everything is ready to remove the engine from the car. Disconnect the upper thermostat mounting pin, remove the spring and install the eye in the vacant space.
- Next, secure a special crossbeam for hanging the power plant. If it is not there, you can use a standard lift. The only difference is that you will have to secure the motor with chains or belts using convenient protrusions. Before tearing off the engine, you should make sure that the fasteners are secure - often a broken suspension or a flying bracket becomes the reason for replacing the engine. An aluminum block can become deformed from a strong impact due to its own weight.
- 16 use a socket wrench to remove the motor bracket on the left side. Also, using wrench No. 18, you need to release the remaining fasteners. When the engine is raised and its supports are dismantled, you should unscrew and remove with all its giblets the two upper bolts securing the gearbox housing to the power unit. Then all other fasteners are unscrewed. To facilitate dismantling, it is recommended to fill all the screws with VD or diesel fuel.
- For the convenience of subsequent actions, you need to lower the engine so that the gearbox housing is 5 cm below the side members.
- Next, you need to carefully move the gearbox unit away from the internal combustion engine and disengage the drive shaft.
- The gearbox can be completely removed from the car. In this case, the help of a second person will be required. The box module is quite heavy, it will be difficult to hold it yourself.
- Next, the clutch disc is replaced on the Lada Vesta. To do this, a flywheel lock is installed on the power unit unit.
- Unscrew the fastening bolts of the release disk to the flywheel device. There are 6 screws in total; different types of motors have different screws.
- After troubleshooting and repairing the device, assembly is performed in the reverse order.
Signs of clutch failure
The occurrence of malfunctions in the Vesta clutch mechanism is most often associated with improper operation (inexperience of the driver, aggressive driving style), an initial defect in the part, or breakdown of other components interacting with it. Of course, you will immediately notice problems with the clutch - the car will begin to behave differently:
- Gears are difficult to shift/do not work at all;
- Pedal too soft/hard;
- The car jerks;
- The device is activated in the upper position of the pedal.
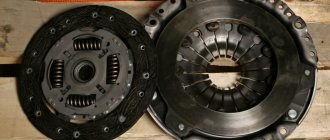
There can be many reasons for this behavior of Vesta, and not all of them are related to the intermediate part between the internal combustion engine and the gearbox. Often the problem comes from the fluid system. There may be a malfunction of the brake master cylinder, clutch slave cylinder, damaged hoses, a simply low DOT4 level or an air lock. Such problems (especially problems with the cylinder of the unit) have exactly the same effect as the failure of the entire unit. The clutch consists of a housing cast together with the drive/pressure plate (basket) and the driven disc. The release bearing of the Lada Vesta acts on the petals of the basket, which, in turn, with the help of damper springs, press the inner disk away from the flywheel - the clutch opens. The bearing moves either under the influence of the hydraulic pedal drive (manually) - manual gearbox, or from the actuator (automatically) - manual gearbox. These parts can fail: more often - the release mechanism, less often - the basket body. Let's take a closer look at the most common “breakdowns”.
Clutch pedal and its bracket - removal and installation
Place the car in the workplace, stop with the handbrake, turn off the ignition, disconnect the “–” terminal from the battery (key “10”).
Remove the clutch pedal position signal switch (see here).
Figure 11-1 — Disconnecting the clutch master cylinder rod:
2 — clutch master cylinder rod;
3 — clutch master cylinder rod head clamps
Insert the tip of a flat-head screwdriver into the gap between the head of rod 2, Figure 11-1, of the clutch master cylinder and clutch pedal 1 and, overcoming the resistance of clamps 3, disconnect the rod from the clutch pedal (flat-head screwdriver).
Figure 11-2 — Removing the clutch pedal:
1 — clutch pedal bracket;
4 — bracket for fastening the wiring harness;
Remove locking bracket 2, Figure 11-2, remove axle 3 and remove the clutch pedal (flat-head screwdriver).
Disconnect bracket 4 for fastening the wiring harness from bracket 1 of the clutch pedal and remove the wiring harness from the work area.
Figure 11-3 — Removing the clutch pedal bracket:
1 — bracket for fastening the wiring harness;
3 — clutch pedal bracket
Unscrew three nuts 2, Figure 11-3, and remove bracket 3 of the clutch pedal (head “13”, extended).
Install bracket 3, Figure 11-3, clutch pedals onto mounting studs and tighten nuts 2.
The tightening torque of the nuts is 18. 24 N.m (1.8. 2.4 kgf.m) (head “13”, extended).
Figure 11-4 — Clutch pedals:
4 — axis of fastening of the clutch master cylinder rod;
Check the condition of bushings 3, Figure 11-4, and replace if necessary.
Install bushings 3 of the axle into the hole in the clutch pedal.
Install pedal 5, Figure 11-2, into bracket 1, install axle 3 and secure it with locking bracket 2.
Attach rod 2, Figure 11-1, to the clutch pedal axis and make sure it is securely fixed.
Install the clutch pedal position signal switch.
Attach bracket 4, Figure 11-2, securing the wiring harness to bracket 1 of the clutch pedal.
Connect the “–” terminal to the battery and tighten the fastening nut.
The tightening torque of the nut is 4. 6 N.m (0.4. 0.6 kgf.m) (head “10”).
Video
Source
The clutch does not disengage (drives)
Often, the Lada mechanism does not fully release due to the hydraulic clutch release. This could be due to poor drive adjustment, leaking fluid system, or cable wedge. Such breakdowns are easily eliminated. It is much more difficult when one of the elements of the main device breaks down.
If the mechanism does not completely disengage, it means that something is holding it: a deformed driven circle, the formation of dirt, rust in the spline joint, flywheel wear, as well as a change in the shape of the release fork, weakening of the pressure plate. In all cases, the disk will need to be replaced.
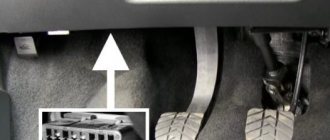
The clutch pedal of Lada Vesta, Largus, XRAY has failed: what to do?
When operating cars with a hydraulic clutch (Lada Vesta, Lada Largus, Lada XRAY, a number of Nissan, Renault models, etc.), when you press the clutch pedal, you can hear a loud click under the dashboard in the pedal area. After this, the clutch pedal falls to the floor. We will understand the causes of the malfunction, as well as how the design can be improved to prevent this problem from occurring again.
Cause of a failed clutch pedal
— a breakdown of the plastic retainer, which causes the clutch master cylinder rod to fly off the pedal axis. As a temporary solution, you can snap the rod into place to get there, but it will still fly off in the future.
At the service station you will be asked to replace the clutch master cylinder assembly with a new one:
- for Lada Vesta - article number 8450007300, price from 1200 rub.
- for Lada Largus - article 306107623R, price from 2200 rub.
- for Lada XRAY - article 306104118R, price from 1900 rub.
In order not to replace the part with a new one, it is proposed to modify the fastening. It will be cheaper and more reliable. It is not necessary to remove the clutch master cylinder.
- washer 10 (3mm thick);
- lock washer for 8 (or fixation washer with petals, article number 8200748573);
- lithol or other lubricant.
- Remove the rod from the pedal axle.
- Using pliers, bite off part of the plastic from the rod along with the latches.
- Lubricate the connection between the rod and axle with lithol.
- Install the washer and snap the lock washer into place.
The refinement process is also shown in the video:
After modification, it was also noted: the disappearance of creaking when squeezing the clutch pedal, and the pedal itself began to be pressed more softly and without rattling.
Have you ever experienced clutch pedal failure? How did you solve the problem?
Source
Jerks when starting off
If you notice that the movement is accompanied by twitching, this is a serious reason to seek help from specialists. The Lada Vesta can shake for various reasons (for example, ignition failures), but if it is the clutch mechanism that gives the effect, we are talking about scrap parts. Obsolescence will never be accompanied by jerks, but destruction, the breaking off of pieces of metal, manifests itself this way. The presence of freely moving debris can cause great damage to other Vesta nodes. It is recommended to carry out repairs immediately.
Noise when disengaging or engaging the clutch
The Vesta device is considered to be turned off when the pedal is lowered to the floor. It is always on when the driver's lever is in the free position - the internal combustion engine transmits torque to the transmission.
A noise similar to rustling, grinding, a slight hum, or howling appears when the unit is turned off. When turned on, it disappears. With almost one hundred percent probability we can say that the release bearing has worn out. Replacing it does not require removing the entire component. However, its untimely replacement leads to failure of the entire mechanism. A squelching, whistling sound when you press the pedal is associated with wear on the master or slave cylinders. There is pressure, the broken part does not hold it - the liquid breaks through further, making noise. The noise in the box disappears only when the clutch is disengaged.
The second type of sound is constant, disappears only when the gear is disengaged, and is located in the area of the gearbox. The nature of the “tinkling” of Lada Vesta is a weakened connection between the three main nodes.
The worn driven circle loses its volume and begins to dangle inside the housing. Worn dampers are not able to press the circle tightly. The box is not tightly connected to the engine. Replacing the clutch on a manual gearbox
The procedure is very complicated. The main difficulty is not even that the gearbox needs to be completely removed, but that during assembly it needs to be centered in weight with the flywheel. Repairs can be done with your own hands. But if you do not have the proper experience, saving is not worth it, because we are talking about direct contact with the most important “organs” of the Lada. In general, the process looks like this:
- We de-energize Vesta, remove all attachments that block access to the gearbox mounting bolts (air filter, pipes);
- To prevent the loose internal combustion engine of the Lada from falling, we will hold it with a small diamond-shaped, barrel jack;
- We unscrew the power fasteners so as not to drain the oil, dismantle the box assembly with drives;
- We loosen one by one, then unscrew the fastening elements of the engaging mechanism housing (the bolts here are strong, but small in diameter, you need a good 8mm wrench). We remove the part and find the defect;
- We install the new product, adjust the position of the driven circle inside with a special tool;
- We change the release bearing in the box housing;
- Smoothly, without tilting, the input shaft of the gearbox hits the flywheel splines;
- We check the operation of the drive.
Not all operations are described here. For example, in order to remove the gearbox with drives, it is necessary to dismantle the suspension arms and so on.
The connection mechanism between the box and the engine is a “vitally” important element. Like any detail, it loves careful handling and timely service. The mechanism is directly connected to the internal combustion engine and gearbox; prolonged use of a faulty part can damage these two components. Do not neglect any suspicions that a unit is malfunctioning. May the car serve you for a long time.
I encountered strange clicking noises on Vesta. When you press the clutch pedal in the cabin, a click is heard in the pedal area.
The bushing is most likely plastic
0 0 Answer rating: 0
Change the release bearing in the clutch
- be able to prepare a seat
- it is necessary to check the new bearing for play. You need to make sure that it rotates freely and does not jam. Installing a defective part is throwing money away
- have holders and other tools for installation and dismantling
When replacing the release bearing in the clutch, it is necessary to partially disassemble the gearbox, which on a foreign car Lada Vesta is carried out according to a certain technological scheme.
For many reasons, it is better to immediately discard the possibility of replacing the release bearing yourself. There are many nuances in this work, and car service employees with specialized training and education know and are able to do it correctly.
To eliminate any risks, it is easier to find a technician who has gained experience and has dealt with replacing a hydraulic or roller clutch bearing, including on a Lada (VAZ) Vesta.
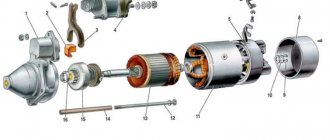
Mechanism design
Structurally, the clutch on the VAZ 2114 consists of a total of 15 elements. Namely:
- Main shaft bearing having rollers;
- Clutch protection housing;
- Fork support bushing;
- Switch, also known as bearing;
- Press disk;
- Pressure spring;
- Secondary disk;
- Flywheel;
- Scale;
- Gearbox main shaft;
- Second bushing-switch;
- Carter;
- Plug switch;
- Fork toggle switch;
- Flywheel mounting bolt.
The clutch design on the “fourteenth” model cannot be considered very complex. In practice, you need to know four main points from him:
- Clutch with one disc brake;
- Type dry, closed;
- The driven disk has a device that dampens vibrations;
- The pressure spring is diaphragm.