How to remove the ignition switch on a gazelle
During operation, the ignition switch undergoes large mechanical and electrical loads, so the contact or mechanical part of the lock fails.
To replace the ignition switch, you will need a 10mm socket, screwdrivers, a thin, sharp chisel, a hammer, and new bracket mounting bolts.
Disconnect the negative terminal of the battery.
Removing the steering wheel
Unscrew the two screws in the recesses of the lower part of the casing
Pull up and remove the upper part of the casing
Unscrew the two screws securing the lower part of the casing to the steering column
Remove the lower part of the casing
Unscrew the four screws securing the steering column switches
Remove the screws from the holes
Remove the lower decorative trim of the instrument panel
We disconnect the white block of the wires of the left steering column switch
We also disconnect the black block of the wires of the right steering column switch
Removing the switch block
Disconnect the instrument switch wire block
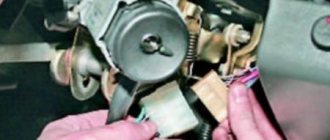
It is necessary to remove the elements described above to gain access to the ignition switch mounting bolts.
Using a chisel, unscrew the two bolts with shear heads.
Removing the ignition switch
Install the ignition switch in the reverse order using new bolts.
In order to replace the switch contact group:
- disconnect the negative terminal from the battery
When removing the locking ring, it is possible that the terminals of the contact group may be accidentally shorted with the tool or ring.
In this case (if the battery is connected), unauthorized starting of the engine may occur! And if at this moment the gear is also engaged, the car may begin to move spontaneously.
Removing the lower decorative panel
Disconnect the wiring harness of the instrument switch
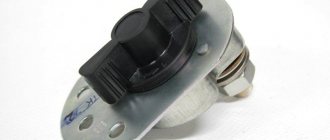
Use a thin screwdriver to pry up the retaining ring.
Remove the retaining ring
Extracting the contact group
After removing the contact group from the switch body, the spring of the starter lock pawl may fall out while the engine is running. Don't lose her. Without a spring, the lock will not work.
Before installing the contact group into the switch body, press out the starter locking pawl while the engine is running.
To do this, use a thin pin to press the pawl stop through the technological hole in the housing.
While holding the pawl depressed, install the contact group in the reverse order of removal.
The retaining ring must be securely installed in the groove of the switch bracket.
If the new contact group does not have a wiring harness, unsolder the wires from the terminals of the replaced contact group and solder them to the terminals of the new contact group in the following order:
1 - white wire to pin 50;
2 - red wire to pin 15-1;
3 - pink wire to pin 30-1;
4 - brown wire to pin 15-2;
Replacing the ignition switch of a Gazelle car
Page 1 of 2
The ignition switch bracket is secured to the steering column with two bolts, the heads of which are sheared off at a certain tightening torque.
Replacing the contact part of the ignition switch
1. Disconnect the wire from the negative terminal of the battery.
To replace the contact part of the switch, remove the steering column covers (see the article - “Removing and disassembling the steering column”).
2. Using a slotted screwdriver, unscrew the two screws holding the steering column covers together.
3. Remove the top casing.
4. Move the steering column to its highest position.
We tilt the upper edge of the casing toward you until its lock comes out of the column slot.
5. Remove the casing by moving it upward.
6. Using a slotted screwdriver, unscrew the two screws securing the contact part of the ignition switch.
7. Remove the contact part from the lock body.
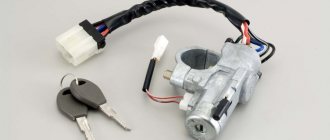
Disconnect the connection block of the switch.
R
is. 8
We connect the new switch to the connector, put it in place, aligning the groove in the hole with the protrusion on the lock, and fasten it with screws.
Repair work with lock
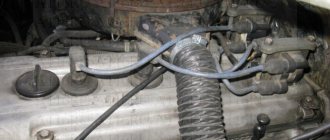
With each new start of the engine, the starter may not start the first time, but after 3-4 attempts. Blaming the battery is not always correct. You should look for the cause in the ignition switch, where its switch is located.
Testing begins by disconnecting the electrical connector. Next, using a small piece of wire with uninsulated ends (bug 6-7 Washing machine long) we close the contacts in the wires of the block suitable for the lock. It is necessary to clarify in advance which wires will be closed in the first position of the key according to the diagram. Next, using a similar bug, we close the starter contacts for a short time (1-2 seconds).
The designers provided for its fixation in the groove to prevent rotation during operation. To assemble, return the plastic cover to its place, screw on the casing and connect the connector.
It's important to know that
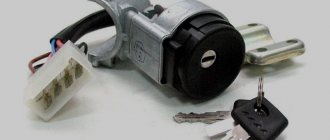
The pinout of the Gazelle 5-pin ignition switch is slightly different. It is shown in the picture.
How to replace the ignition switch of a Gazelle car
Page 1 of 2
The ignition switch bracket is secured to the steering column with two bolts, the heads of which are sheared off at a certain tightening torque.
Replacing the contact part of the ignition switch
1. Disconnect the wire from the negative terminal of the battery.
To replace the contact part of the switch, remove the steering column covers (see Removing and disassembling the steering column).
2. Using a slotted screwdriver, unscrew the two screws holding the steering column covers together.
3. Remove the top casing.
4. Move the steering column to its highest position.
We tilt the upper edge of the casing toward you until its lock comes out of the column slot.
5. Remove the casing by moving it upward.
6. Using a slotted screwdriver, unscrew the two screws securing the contact part of the ignition switch.
7. Remove the contact part from the lock body.
Replacing the ignition switch of a Gazelle car
Page 2 of 2
1. Remove the steering column cover.
2. Disconnect the ignition switch wiring harness block.
3. At the bottom of the ignition switch, unscrew the screw securing it to the bracket
4. On top of the switch, use a thin screwdriver to press the pin into the bracket body
5. Remove the switch from the bracket
6. Remove the two screws securing the contact group to the switch
7. Disconnect the contact group from the switch
If the new contact group does not have a wiring harness, unsolder the wires from the terminals,
having previously marked their position in any way.
It is necessary to mark it, because two wires are blue, and there are no pin markings on the contact block.
8. Solder the wires as shown in the figure.
Install the parts in reverse order.
Removing the ignition switch assembly
To remove the ignition switch assembly, it is advisable to remove the steering column (see Removing and disassembling the steering column) and unscrew two special bolts.
1. If their heads are not broken off, then unscrew them with a “10” key.
2. Otherwise, remove the contact part of the ignition switch,
To avoid splitting it during operation, use a thin chisel to loosen the bolts.
3. Use pliers to unscrew the bolts.
4. Remove the lock.
For subsequent assembly we use new special bolts. To protect against theft, their hex heads can be broken off.
Removing the cylinder from the ignition switch
Disconnect the plugs in advance.
1) Undress the steering wheel, remove the upper and lower plastic. The lower one is difficult to remove; to do this, you need to bend the steering wheel adjustment knob (first unscrew 2 screws with a skate screwdriver).
2) It is impossible to remove the clamp, since the factory nuts do not have edges. You will have to cut it with a grinder, the main thing is to stop in time, otherwise you can cut the main steering column pipe.
3) After cutting, a small piece should fall off, either by itself or with a couple of blows with a hammer.
4) For convenience, you can unscrew the steering column itself. This is a long bolt that goes to the steering wheel height adjuster. It is secured with 2 12mm nuts on the left and a 12mm bolt head on the right. To remove this bolt without any extra effort, you need to raise the steering wheel as high as possible. When removing a bolt, you need to remember the position of the brace (at the bolt head). Then you need to stick it in as well.
5) The steering wheel and steering column have fallen, now you can pull out and throw away the old ignition.
6) Take a new bracket and make slits in the sides where the heads of the tightening bolts will be. These slots are needed so that later you can tighten the 4 tightening bolts with a ratchet without any problems. If you do not make the slots, the head on the ratchet will rest against the edges, and the ignition will not be able to be tightened properly.
7) Place the left part on the steering wheel, attach the right one, then unscrew 4 bolts and tighten them as much as possible. Tie the steering wheel with a long bolt, without tightening the 2 nuts too much, this will prevent you from adjusting the steering wheel.
Wiring diagram for the ignition switch, coil, spark plugs and module on a gazelle with 402 and 406 engines
The quality of the ignition system of foreign and domestic cars affects the performance of cars. Obvious problems result in frequent failures or the inability to start the engine in a timely manner. In most cases, the problem is caused by the electrical part of the ignition switch.
Trucks of the GAZ family and buses can fail their owners due to burnt or oxidized contacts. To restore the functionality of the unit, we recommend studying what the Gazelle ignition switch circuit looks like.
Complete lock replacement
To install a complete lock, you must first remove the contacts from the battery. Then you need to perform the following operations:
- We dismantle the casing;
- to remove the clamp, carefully use a grinder so as not to damage the main axis of the steering column;
- experts recommend turning off the steering column so that subsequent operations can be carried out conveniently, while the steering wheel is raised to its maximum height with preliminary loosening of the fixing bolt with a 12mm wrench;
- It is worth sketching or remembering the position of the curly bracket installed next to the head of the fixing bolt for subsequent comfortable assembly;
- dismantle the old ignition;
- we use a new bracket, make slots in the sides where the heads of the lag screws are supposed to be placed, otherwise the heads will rest against the edges, which will not allow them to be securely fixed;
- put the lock in the seat and screw in 4 screws with maximum force;
- A couple of 12 nuts, unscrewed in advance, should not be tightened to the maximum, so that there is still freedom to adjust the clamp.
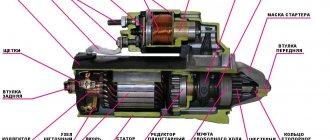
Element structure
A standard ignition switch includes two parts:
- mechanical - a locking part in the shape of a cylinder, inside of which the ignition key is inserted;
- electrical - a contact element consisting of a part of the contacts that is closed taking into account the standard algorithm during the turning movement of the key.
As a rule, a cylindrical lock is installed in the ignition key, the task of which is to rotate the contact assembly and block the steering wheel. For the purpose of blocking, a locking element is used; it comes out of the lock body during the turning movement of the key and goes into the groove part of the steering column. The structure of the ignition lock has a simplified design; this part consists of a body part, a bracket, a facing part with a contact element and a lock with a fixing pin and a hole for it.
How does the part function?
Ignition switch in a Gazelle car
operates according to a fairly simple scheme, it is necessary to solve the main tasks, the list of which includes:
- Connecting and disconnecting the vehicle's power supply system to the battery, connecting the generator element after the engine is started.
- Connecting and disconnecting the ignition system from the engine towards the power source.
- Activating the starter while starting the engine.
- Ensuring the operation of the alarm and radio when the engine element is turned off.
- The ability to use some options as anti-theft devices, this includes the function of placing a block on the steering wheel.
The ignition switch may have two, three or four switching speeds. The ignition key in a car can be turned in one position or another, depending on this it is determined which power systems are operating at a given time. The key in the car is pulled out only in a single position, at a time when each consuming battery is turned off. To draw up a more complete diagram of the functioning of the lock, you need to visually familiarize yourself with its design.
Functions of vehicle electrical systems
Wiring diagram for Gazelle 405 with an engine of the ZMZ family. In any modern car, electrical wiring serves to transmit signals to actuators and electronic components.
Accordingly, depending on the functionality of the vehicle and its technical features, electrical wiring has its own unique features. For example, the wiring diagram for a Gazelle of different modifications is different due to the different arrangement of certain electronic components in the car caused by the use of different systems:
- Carburetor versions of the power unit provide their own independent ignition system;
- In injection versions of engines, the ignition system functions in conjunction with the fuel injection system.
Injection engine ZMZ-405.22
Types of power units
The Gorky Automobile Plant, which mastered the production of Gazelle cars, which it first introduced to the automobile market in 1994, initially had two suppliers of power units:
- The Ulyanovsk Motor Plant supplied power units of the UMZ family (carburetor);
- Zavolzhsky Motor Plant, which supplied the ZMZ family of carburetor and injection engines.
This is a feature of the domestic automobile industry, which consisted in unifying the line of gasoline power units for the Gazelle with Volga passenger cars produced by the GAZ plant and UAZ SUVs of the Ulyanovsk Automobile Plant throughout the entire period of their production, but the wiring diagram was redesigned for the truck version.
Cars with such engines received their own names among motorists - Gazelle 421 (from the UMZ-4216 engine), Gazelle 405 (from the ZMZ-40522.10 and 40524 family of engines) and others.
Accordingly, different engine control systems required a different electrical wiring system:
- Injection power units, being more demanding on the combustible mixture ignition system, are equipped with electronic ignition components and a fuel injection control system, the performance of which depends on the quality of the fuel;
- Carburetor versions of the engine are more traditional, but have their own design features; accordingly, the electrical wiring of the gazelle in the engine compartment is made somewhat differently.
In 2001, a diesel version of the engine from the Gorky Automobile Plant (GAZ) family appeared in the list of modifications, which began to be offered for the vehicle.
Such a Gazelle also required electrical wiring with modified characteristics (more powerful starter, generator and battery).
Environmental requirements
Having started production of the Gazelle car, the automaker used existing wiring diagrams, in particular the ZMZ 402 engine, which was equipped with Volga family cars. Naturally, there was no talk of compliance with environmental standards in those years.
The Euro 2 environmental standard, which appeared in Western European countries in 1995, and regulates the content of harmful substances in exhaust gases, gradually forced domestic automakers to modify the configuration of power units:
- Modernization of existing internal combustion engines by installing electronic fuel injection (injection system);
- The release of multi-valve engines (16 instead of 8) made it possible to equip the power unit with a more modern electronic ignition and power system.
Modifications of power units for Gazelle and their compliance with environmental standards for all years of production
Additional measures taken at the legislative level in the form of the introduction of certification requirements contributed to the emergence of new power units for the Gazelle family that comply with Euro-3 standards. Since 2008 they have become:
Accordingly, the wiring for the Gazelle 405 engine, whose engine complied with Euro-3 standards, as well as the 421 engine, was thoroughly redesigned taking into account the increased functionality and technical features of the power units.
Lock connection
When assembling wired elements into one chip, the standard connection of the locking mechanism will not cause problems; it is enough to place it on the contacts. When the wiring is connected, it is necessary to assemble all the elements, connect the terminal to the battery and test the entire operation. First of all, check whether all devices have power from the locking mechanism, then check the functionality of the starter.
If problems are detected, testing for correct connection of wired elements is carried out again. The operation of each device in the car after turning the key completely depends on these reasons. First you will need to become familiar with the complete wiring structure of the locking mechanism.
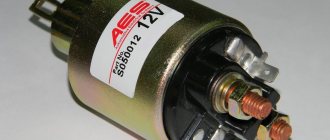
Common breakdowns
The ignition switch can break for various reasons, and the locking mechanism or group of contacts often fails. Each malfunction has its own characteristic differences:
- If there are difficulties at the entrance when inserting the key inside or problems with the core, we can draw conclusions that the lock is broken.
- The inability to unlock the steering shaft in the primary application indicates problems in the locking unit.
- If there are no problems in the locking mechanism, if there are difficulties with activating the ignition, the breakdown must be looked for within the group of contacts.
- If the cylinder stops working, it is a warning that the lock needs to be completely replaced. If a contact unit breaks, it can be replaced without a cylinder. The entire replacement will cost much less than repairing the old ignition switch.
Although the Gazelle ignition switch
Considered one of the most durable parts in a car, it can break periodically. Most often, car owners are faced with jamming or wear of the cylinder, contact rust, or mechanical problems in the contact assembly. All these elements require careful care and timely diagnosis; in the future, this will help eliminate serious problems and malfunctions. In some cases, a problem with a lock can be solved on your own if you have the appropriate skills.
Gazelle ignition switch replacement
In addition to its main task - briefly starting the starter and connecting and disconnecting the primary low-current ignition circuit system to start the engine, the ignition switch of a modern car also performs at least three more important functions:
- switching the car's electronic systems from the battery (with the engine off) to the generator (with the engine running);
- ensuring the operation of a number of car devices, such as air conditioning and radio;
- performing the functions of an anti-theft device (steering wheel lock) when the engine is not running. By and large, the very fact that the ignition switch is turned on and locked with a unique key for each car makes the ignition switch an anti-theft mechanism.
Gazelle (business) ignition switch replacement
Since the Gazelle ignition switch is designed, as we see, quite simply, the Gazelle requires replacement of the ignition switch or its repair in the event of a breakdown in a small number of cases that can literally be counted on the fingers of one hand:
- Malfunction of the lock cylinder. This is the simplest mechanical damage caused by either wear of the cylinder parts or breakdown. This malfunction manifests itself in the fact that the key can either jam in the lock, or it slips in it. In the first case, most likely, dust or sand got into the lock hole - then it is enough to disassemble the lock and clean it; in the second case, the reason most likely lies in the wear of the mechanism - here you cannot do without replacing the cylinder. It happens that it is not the internal mechanism of the lock that is worn out, but the key. It is usually made of softer steel, so it wears out first. And this is good, because making a new key or simply using a spare one is much easier than repairing or changing the lock itself.
- Wear of internal parts of the lock. Friction forces slowly but surely do their dirty work - not a single mechanism is protected from wear. When using a car for a long time, the parts of the ignition switch gradually wear out, as a result of which the lock begins to work unstably, after which it gradually fails completely. In this case, it is easier and cheaper to replace the entire lock rather than disassemble it and look for the specific cause of the breakdown.
- Oxidation or melting of contacts. There are many reasons for this breakdown - from water getting on the contacts to a sudden unauthorized increase in voltage in the car's electrical network, which arose as a result of a short circuit in the wiring. The latter occurs due to damage and physical aging of the wires. Such a breakdown is a very alarming signal, indicating a problem with the electrical network as a whole. If you can save the ignition switch by cleaning its contacts (although this is not always possible), then you will have to seriously deal with the wiring. To do this, you will have to contact a car service to carry out a full diagnosis of this system and repair it.
- Destruction of the contact group. It can occur due to mechanical damage or simple aging, when the insulation dries out, cracks and crumbles. The consequence is that the lock causes a short circuit and its contacts simply burn out. To be sure that this breakdown will not happen again in the near future, it is better to replace the lock completely rather than try to revive the old one.
GAZ 31 Transitional › Logbook › 02.19.15. Replacing the door lock cylinder.
Good evening! I’ve been making frequent recordings, maybe I’m already tired of it? Well, since you came here, read and look at the pictures. )))
Today I went to the garage to try on yesterday's new clothes. I grab the BC... and in response there was silence, I didn’t even blink (((I started scratching my turnip, something was wrong. This shouldn’t happen. I remembered that before that, my self-diagnosis (with a jumper) didn’t work either, which means something is missing For the BC to work, 3 contacts from the diagnostic block are needed: “2” - +12V, “11” - K-Line and “12” - ground. Judging by the diagram
+12V is constant and is taken from the ECM relay, and since the engine is running, that means there is “+”. All that remains is to check the ground and the K-line. I'm 95% sure that the problem is Massa, because... if there were no K-line, then the BC should have blinked anyway. And as luck would have it, there was neither a multimeter, nor a tester, nor a piece of long wire to tie to the light bulb. Therefore, I left the chain testing for later. I now have just 5 days off))): February 19 Local New Year - Sagaalgan, working day February 20 - moved to 28.02. well, February 21,22,23 like in the rest of Russia)). So I think there will be enough time.
I sat and scratched my turnip... Well, okay, one thing didn’t work out, so there are plenty of them and others. There will be enough spare parts purchased new and not supplied for another month)). I decided to take care of the essentials. I have been worried about the issue of locking and unlocking doors for a long time. I only have one key, and it’s pretty worn and regularly jams. Sometimes you stand at the door for half a minute or a minute, turning it back and forth until it gets into the right position. In general, I took out a set of larvae from 3102 from the package with spare parts and started replacing. I think almost all Volgovodians know how to change larvae, but for those who don’t know, look at the pictures. I removed the door card, and for some reason I unscrewed the “loaf” O_o. Loosen this screw here
I pulled out the larva, and we heard that something fell inside the door. We climb into the door, feel for this “something,” take it in our hands, and together with the larva we go into the light. This “something” turned out to be a retainer.
We pull out the cotter pin from the larva, disassemble it into parts, and lay it out. You should get 4 parts: the body of the larva, the larva itself, the pin and the cotter pin.
We take a new face and compare it with the old one. Once again we note how shitty the quality of spare parts is now. They are even different in height and casting defects are not removed.
We close our eyes and put this g...but into the body of the larva. We check that the protrusions on the body are facing up, and the key inserted into the cylinder is facing down with its teeth.
We combine the holes in the cylinder and the pin, put the cotter pin in place
Now the most difficult part: We insert the cylinder into the door, put on the latch and “by touch” insert the pin into the door latch hole.
Now you need at least three hands, or two very flexible ones. We hold the cylinder with one hand, with the second hand we set the lock in the correct position, with the third hand we turn the screw (which was loosened at the very beginning). We insert the key and check whether everything works correctly.
We take out the key, spray a little WD40 into the cylinder (NOT ADVERTISING, other liquid lubricants can be used)
We insert the key again, make three or four closures and... That's it. Repeat for the second door.
So, for comparison, what was the key and what is it now.
We put one new key on the ring to the ignition key, and the second one in the wife’s jewelry box. She watches over them) Well, she’ll look after the key for one thing))
I also haven’t removed the old key yet; I haven’t touched the trunk cylinder yet. Although I rarely use it since I installed the electric lock.
Something like that. The work was not performed for protection, but solely for personal convenience. The Volgovsky larvae leave much to be desired; they say that they can be opened with the key from another Volga (I haven’t tried it). And to hell with them. For the purpose of theft, anyone who needs it will not climb into the Volga; it is better to climb into the neighboring Zhulka. And if they notice something interesting in the cabin, they won’t bother opening the doors, they’ll open the windows and look for candles.
UPD from 04/11/15 Still, it broke. I had to repair it
The quality of the ignition system of foreign and domestic cars affects the performance of cars. Obvious problems result in frequent failures or the inability to start the engine in a timely manner. In most cases, the problem is caused by the electrical part of the ignition switch.
Trucks of the GAZ family and buses can fail their owners due to burnt or oxidized contacts. To restore the functionality of the unit, we recommend studying what the Gazelle ignition switch circuit looks like.
Egnition lock
The first cars did not have this mechanism at all: to start the engine, the driver had to spin the generator using a removable handle. The ignition switch appeared on the car at the same time as the battery, that is, when a permanent electrical circuit appeared in the car. And this lock served a single purpose: it closed and opened this circuit, representing a very ordinary switch with two positions: “on”. and "off". Somewhat later, car designers equipped it with a starter function. Subsequent modernizations of this then still very primitive ignition mechanism led to the appearance of an anti-theft device function - when the key was removed from it, the ignition lock locked the steering wheel.
All ignition locks existing today (we are now talking about locks with a key) can be divided into two large groups: locks with three and four key positions. The first, however, can be found extremely rarely today - except on old cars. Having barely appeared in the mid-60s of the last century, a new type of lock with advanced functions gradually replaced its more primitive predecessor.
The design of the Gazelle ignition switch consists of: a lock cylinder with a key, a locking device and the so-called contact group. By and large, the mechanics of a car ignition switch are not much different from an ordinary door lock: by inserting the key into the cylinder and turning it a certain number of turns (in a car at a certain angle), we set the lock mechanism in motion, which opens access to the room. In the case of the ignition switch, access to start the engine. In the first position of the key the lock is locked. In the second, he unlocks the steering wheel by turning off its locking mechanism. Further turns of the key close various elements of the contact group, turning on a number of functions in turn. In the third position, it closes the electrical circuit of the car, connecting all devices requiring power to the battery. The exception is the radio, which is connected to the battery bypassing the ignition switch - otherwise it would not work when the engine was turned off. In its quarter position, the far right position, electric current from the battery is supplied to the starter and coil, which causes the engine to start.
The principle of operation of the Gazelle ignition system
First, let's look at the operating principle of the SZ Gazelle 402 engine. In this case, we are talking about any models of this car - both with a 406 engine and 5-seater Gazelles. The principle of operation of the SZ lies in the accumulation and further conversion of low-voltage voltage into high-voltage voltage using a coil after that. After conversion, the coil transmits and distributes high-voltage voltage to the spark plugs of the system. The spark plugs themselves are used to generate a spark, which, in turn, is necessary to ignite the air-fuel mixture in the cylinders.
- accumulation of low-voltage charge;
- converting it to high voltage;
- distribution of impulse over the corresponding candles in a certain order;
- creating a spark on the spark plug electrodes;
- ignition of a flammable mixture.
Firing order
The connection diagram for the cylinders on the Gazelle, that is, the order of their activation, for the 406 engine is as follows:
- first the mixture ignites in the first cylinder;
- then the caviar is served on the third;
- after that - to the fourth cylinder;
- The second cylinder is the last to start working.
Basic elements of SZ
Briefly about the main components of SZ:
- , including several coils;
- switching device;
- distribution mechanism;
- candles;
- spark plug tips;
- elements connecting the spark plugs to the coil are high-voltage cables.
We repair the ignition switch
The ignition switch is a small device, but very important. With its help, we give a signal to our car - we start or stop the engine, and also turn on the power supply to the devices. In addition to starting the engine, the ignition switch has another important function - steering lock, that is, in fact, it is an anti-theft device. Take out the key, turn the steering wheel a little, and you will see that the steering shaft will instantly lock. Accordingly, this device must work flawlessly, otherwise each of us may find ourselves in a situation where it is necessary to replace the ignition switch. This element of the automotive system is very important.
What to do if you forgot the keys in the car and it locked - Auto news and car repair tips
If you are caught by surprise and have forgotten the keys inside the car and do not know how to open the doors, then there are several ways to solve the problem. This article will help you resolve this issue, but remember that everything listed below is used for purely personal purposes, in order to open YOUR car, so that you know what to do if you forgot the keys. It is our duty to warn that BREAKING someone else's vehicle is punishable by law, namely:
- “A crime is considered completed if the act committed by a person contains all the elements of a crime” (Part 1 of Article 29 of the Criminal Code of the Russian Federation);
- “Preparation for a crime and attempted crime are recognized as an unfinished crime” (Part 1 of Article 29 of the Criminal Code of the Russian Federation);
- “An attempted crime is the intentional actions (inaction) of a person directly aimed at committing a crime, if the crime was not completed due to circumstances beyond the control of this person” (Part 3 of Article 30 of the Criminal Code of the Russian Federation);
- “Wrongful seizure of a car or other vehicle without the purpose of theft (theft)” (Part 1, Article 166, Chapter 21 of the Criminal Code of the Russian Federation).
Contact a car auto repair company
The simplest thing you can do is call a car locksmith. This way you will not expose your vehicle to any damage and will save time on opening it.
This service is currently replete with newspapers with advertisements and advertising on the global Internet. Experts in this field claim that they are able to open any car lock without any damage literally within 5 minutes.
Although this method is simple, it is quite expensive. After all, you will have to pay about 3 thousand rubles, and this is a lot of money.
If a problem comes
What if there is something wrong with the ignition switch? Is it impossible to turn the key without force, or is it even jammed? It’s clear that the lock cylinder is damaged, and you can’t go far in such a car. This can happen for various reasons: the larva was caught with a defect, or over time it simply accumulated dust and dirt. In this case, you can try replacing the larva.
If the key still turns, but the ignition system does not respond, then the contact group has clearly failed. Of course, you can replace it, but in this case you run the risk of purchasing a spare part that is not of very high quality. This will not get rid of the problem, but will only temporarily postpone its solution.
What if you simply lost your key and it was the only one you had? Or another, very unpleasant situation: an attempt was made to steal your car (God forbid, of course!), and the ignition switch was completely damaged.
Recommendations based on your search history
REPAIR OF IGNITION SWITCH VAZ 2115 – Duration: 11:51
- 3 years ago
- 156
Anyone who has problems turning on the starter should watch. Useful advice from an auto electrician. – Duration: 14:11
- 1 year ago
- 1 020
SOLVING THE PROBLEM WITH THE IGNITION SWITCH VAZ 2110 2111 2112 – Duration: 7:48
- 1 year ago
- 96
All power to the car is lost. stalls, won't start, nothing works - Duration: 6:10
- 4 years ago
- 499
The ignition does not turn on. The tension is gone. – Duration: 16:45
- 3 years ago
- 441
The starter does not turn, should we change the lock or not? Useful advice from an auto electrician. – Duration: 9:59
- 2 years ago
- 593
Open a gazelle without a key – Duration: 2:42
- 2 years ago
- 64
Removing and disassembling the ignition switch. Repair of the lock cylinder on an Opel Vectra B. – Duration: 7:56
- 4 years ago
- 221
Removing and repairing the ignition switch - Duration: 8:53
- 5 years ago
- 121,541 views
GAZELLE. The starter does not turn, we are looking for the reason. – Duration: 4:27
- 4 years ago
- 91
Egnition lock. Is it possible to understand its electrical part? – Duration: 29:09
- 3 years ago
- 124
Connecting the Ignition Lock (GAZelle) – Duration: 3:47
- 4 years ago
- 33,552 views
Replacing the ignition switch on a gazelle/Power failure will not start. – Duration: 9:41
- 3 weeks ago
- 74 views
Ignition switch gazelle – Duration: 3:06
- 3 month ago
Starting a Gazelle with a faulty ignition switch – Duration: 3:20
- 1 year ago
- 4,781 views
Replacing the ignition lock cylinder – Duration: 12:35
- 2 years ago
- 151
In this video I talk about how to replace the Matiz ignition lock cylinder.
We accept donations for development.
Replacing the lock cylinder on the Next gazelle – Duration: 7:47
- 12 months ago
- 9,871 views
Ignition switch contact group: device and replacement - Duration: 12:11
- 2 years ago
- 133
Ignition switch contact group - device and replacement in a visual video.
Replacing the ignition switch
To solve all these problems, the surest solution is to replace the ignition switch. Many motorists are in no hurry to immediately contact a car service center, but try to repair their beloved child with their own hands. Is it possible to replace the lock yourself without having special abilities and skills? Yes, this is quite possible, and any real man can do it.
Wiring ringing
So, depending on the cause of the malfunction, replacement may be:
- Complete lock replacement
- Replacing the lock cylinder
- Replacing the contact group.
You can check the serviceability of the contact group without removing the ignition switch. To do this, you will need a multimeter, ohmmeter or any other device for testing wires. The contact resistance must be zero, otherwise they are faulty. And then it is necessary to replace the contact group of the ignition switch.
Dismantling the lock
To partially or completely replace the ignition switch, it must be removed. To do this, we may need a minimal set of tools.
The ignition switch on all classic VAZ car models is located below, on the left of the steering column. So, our actions:
Disconnect the battery to de-energize the ignition switch.
Unscrew the screws securing the plastic casing and remove it. Unscrew the pair of screws that secure the ignition switch to the bracket.
Disable the anti-theft device. To do this, insert the key and turn it to position zero. Using an awl, press the latch and remove the lock.
In the “classic” models (2101-2107), the wires are connected to the ignition switch not using a solid chip, but each separately. Therefore, before removing the lock, when disconnecting its contact group, it is advisable to use markings to mark the correspondence of each wire to the number of the contact to which it is connected. Otherwise, you may get them mixed up when you put the lock in place.
Let's disassemble the castle itself
Once you have the lock in your hands, you can replace its faulty part or replace it with another working ignition switch. If you replace the contact part, you will need to find the retaining ring - it is located at the bottom of the lock - and remove it (you can do this with an awl or a thin screwdriver). Then, after installing the working part, return it to its place. Before installing the aftermarket ignition switch, turn the key inserted into it to position “I” so that the latch that blocks the steering shaft is pushed into the lock body.
It is done. Now, using the previously marked markers, we attach the new contact part of the lock in the same way as the previous one was attached.
We tighten the screws securing the lock, fixing it, put the decorative casing in place - and the dismantling is complete! You can now turn on the engine to ensure that all contacts are active and the job is successful.
Later VAZ models
If we consider later VAZ models, then their ignition switch is mounted on the right side of the steering column using a bracket clamped with mounting bolts. The most difficult thing in dismantling a lock is unscrewing the bolts, which are made specifically in such a way as to complicate the task of removing the lock, thereby reducing the likelihood of hacking. To overcome this difficulty, it is recommended to use a chisel and pliers. Using a chisel, carefully loosen the bolts, being careful not to damage their heads.
How does the ignition system work?
The system for models with a 402 engine functions similarly to those systems installed on cars with a 406 engine or in a five-seater vehicle. The main tasks performed by the installation are based on the accumulation and subsequent transformation of voltage from low voltage to high voltage. Coils are used for this.
The voltage converted from the coil is sent to the spark plugs screwed into the block. A spark is formed between the spark plug electrodes, which ignites the combustible mixture. The main stages for the Gazelle ignition system are:
- formation of sufficient charge with low voltage;
- raising the charge to high values;
- redistribution of impulse between candles in the sequence specified by the manufacturer;
- sparking at the tips of spark plug electrodes;
- timely ignition of the air-fuel mixture.
To start the rotation of the engine crankshaft, a starter built under the hood is used. Voltage begins to be supplied to it after turning the key to its extreme position.