The situation is not the best when the brakes fail at a speed of 110 km/h, or the pedal suddenly responds sluggishly to an emergency braking order. This should not be allowed at all; it is better to resolve the issue of how to replace brake hoses on a VAZ 2114 in a timely manner and keep the condition of the vehicle under control. No one wants to become involved in a dangerous situation because of a small detail that, out of ignorance, was overlooked and became unusable at the most crucial moment.
VAZ 2114
Do-it-yourself replacement of brake hoses on a VAZ 2115
A properly functioning brake system is the key to your safety! I talked about this a long time ago, in one of my previous articles. Today I am no less confident in this, and I want to talk about brake hoses, or more precisely, about how to replace them on a VAZ 2115.
Only regular maintenance and monitoring of all components of the brake system can provide confidence that the brakes will not fail at the most inopportune moment. One of the most important components of the brake system (BS) is the line through which the brake fluid (FL) is delivered to the brake cylinder and calipers. A leak in one of the hoses can lead to a malfunction of the vehicle, as a result of which the fuel fluid will leak out, and you will simply find yourself without brakes.
Service life of brake hoses
The replacement of brake hoses is regulated differently by each manufacturer, on average it is 3-5 years or approximately 100 thousand km. However, all this is individual, hoses can fail earlier or later, it all depends on the operating conditions and the quality of the brake hoses themselves. From time to time you should carry out a visual inspection of the hoses, and the entire vehicle as a whole, this is the only way you can avoid troubles on the road.
The appearance of microcracks in rubber hoses or metal tubes is a reason to immediately replace the brake hose or part of the damaged line. Damage to the tightness of the line manifests itself in different ways, but one thing will always remain the same - the absence of brakes, that is, when you press the pedal, it will fail, and the car will not stop. Damage to the hose can also be detected by a wet trail after a long period of parking.
In my article today, I will tell you how to replace brake hoses on a VAZ 2115 at home.
To work you need to prepare:
- New brake hose(s);
- Special wrench for removing brake pipes with a double clamp “9x11”;
- Set of keys (8, 10 15);
- Adjustable wrench;
- Jack;
- Liquid WD-40.
Let us remind you how to check the condition of the brake system without leaving the garage.
- A situation arises when the engine is idling and the gear lever is in neutral. The driver must press the brake pedal and hold it in this position for several minutes. If the pedal fails very easily, then there is reason to suspect that there is a malfunction in the system. You need to think about how to replace brake hoses on a VAZ 2114, which specialist you should trust to solve an important issue.
- The contents of the master brake cylinder are checked regularly; if the fluid level drops, you need to sound the alarm and take the car to a service station using an emergency light. Even if there is a slight decrease in the level of contents in the tank, this condition can still be considered a sign of wear on the brake system components. This means that you need to decide how to replace brake hoses or pads on a VAZ 2114. If you notice the rapid disappearance of liquid from the barrel in a short period of time, this means that there is a leak, and it is strictly prohibited to drive such a machine. We remind you that depressurization of the system can be internal or external, and the first can only be recognized by the condition of the tank, while the second leaves its traces in the area of the wheel mechanisms.
Brake fluid VAZ 2114
- An important rule for a novice driver is to learn how to check the condition of the hydraulic and parking brakes. It wouldn't hurt to know how to regulate them. And the aerobatics for a newbie in the car industry is to know how to replace brake hoses on a VAZ 2114, especially since this car brand is a debut for many.
- It is imperative to inspect the condition of the wheels and “adjacent areas” before leaving. If you notice dampness on the surface being inspected, react immediately - check and figure out how to replace brake hoses on a VAZ 2114.
- Beginners should also study the control panel inside the car. Sensors there are always triggered if any of the important parts are worn out or suddenly fail. Always pay attention to the brake warning lights. So, for example, at the moment the ignition signal is given, the brake warning lamp should be on, and go out when the car is started and begins to move. Then everything is in order and you don’t have to think about how to replace the brake hoses on a VAZ 2114 this time.
Replacing the front brake hose on a “tag” - step-by-step guide
- The first step is to determine the location of the damage and decide which hose you need. In this case, the front brake hose burst. Next, we buy everything we need and get to work. The photo shows the location of the rupture (damage).
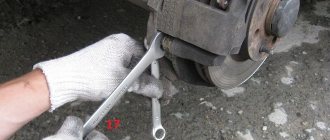
- We begin the work by tearing off the wheel bolts while the car is standing on four wheels, then jack up the side we need, unscrew the bolts and remove the wheel.
- We treat the bolts with WD-40 and wait until the liquid eats away the rust and allows you to easily unscrew the connection.
- Next, unscrew the hose connected to the metal brake pipe. Using a wrench set to “15”, hold the tip of the hose, and with another wrench set to “10”, carefully unscrew the brake pipe fitting. It is important to be as careful as possible here, since it is very easy to tear off or “lick” the edges. If the nut does not budge, use a special brake hose wrench. This wrench allows you to tighten it, making the connection between the wrench and the threaded connection stronger.
- After the connection is unscrewed, the tube should be plugged with something of a suitable diameter, this is necessary in order to avoid leakage of the fuel fluid.
- Now, using a “15” wrench, unscrew the hose fitting connected to the brake cylinder. There is a copper ring installed between the cylinder and the fitting, which it is advisable to replace, but if it is in order, then you can do without it.
Then we reassemble in reverse order. However, it is too early to put an end to this. Before you enjoy the work done, you need to bleed the brake system to remove all the air that has entered the vehicle. I won’t tell you how to bleed the brake system, you can read about this in one of my previous articles - here is a link to this article
After bleeding the brake system, check the tightness of the connections and the level of fuel fluid in the system. Next, let's check how everything works. I warn you, do not rush to accelerate too much to test the brakes, anything can happen, if the brakes fail, you can cause an accident and damage your or someone else’s car. First, check how everything works somewhere in a sparsely populated place at low speed; if everything is ok, check how the car behaves on an empty highway.
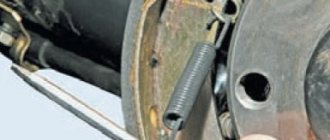
How to remove the parking brake cable?
- Removing the wheels
- Removing the brake drums
- Remove the rubber cushions (holders) of the muffler and manifold.
- Loosen the locknut of the handbrake adjusting nut on the cable equalizer.
- Using keys “13”, unscrew both nuts and remove them.
- We remove the equalizer and disconnect the cable ends from it.
Cable eyelet on the hook of the spacer lever
- From the rear wheels, use a large slotted screwdriver to move the spacer lever forward and remove the cable eyelet from the hook of the spacer lever.
- Using a “10” wrench, unscrew the nut securing the cable to the rear suspension arms.
- Remove the cable end from the hole in the body bracket.
- Next, having removed the additional holding mechanisms, we take the cable out of the hole in the support shield of the rear brake mechanism and remove it.
Replacing the front brake hose of VAZ 2106, VAZ 2107, VAZ 2109, VAZ 2110, VAZ 2114, VAZ 2115
The braking system is a system that the driver must pay special attention to, since the operation of its elements directly affects the safety of the vehicle. To study the design and help in servicing the brake system, the website has a section called - Brake system design , in which you can disassemble this system into its component parts in more detail.
As for this article, it is devoted to a topic called - How to replace brake hoses of a VAZ 2106, VAZ 2107, VAZ 2109, VAZ 2110, VAZ 2114, VAZ 2115, Lada Kalina, VAZ 2170 with your own hands.
Many motorists believe that replacing brake hoses does not deserve a separate topic, since it is not at all difficult, but for novice motorists, I think this article will be useful.
After all, you will agree that no matter what job a person takes on, there will always be nuances that would be better to learn from advice than from your own bitter experience.
I would highlight several basic questions that a beginner should pay attention to when replacing brake hoses on a VAZ 2106, VAZ 2107, VAZ 2109, VAZ 2110, VAZ 2114, VAZ 2115, Lada Kalina, VAZ 2170:
- Which brake hose manufacturer is best?
- What tools are needed to replace brake hoses?
- Consistently work on replacing brake hoses.
We will try to consider all these questions in this article. In order to make your work easier, just find on the Internet the answer to the question - how to replace the brake hose on a VAZ 2106, VAZ 2107, VAZ 2109, VAZ 2110, VAZ 2114, VAZ 2115, Lada Kalina, VAZ 2170.
So, let's start studying information on how to replace the front brake hoses of a VAZ 2106, VAZ 2107, VAZ 2109, VAZ 2110, VAZ 2114, VAZ 2115, Lada Kalina, VAZ 2170.
Tools for replacing brake hose:
- Open-end and ring wrenches for 8, 14, 15.
- Socket wrench 8.
- Special split key and crimp key for 10.
- Hammer.
- Metal brush.
- Don't forget to get WD-40 fluid (it currently costs about 80 hryvnia, but you will need it in the future).
- Transparent bottle for easy brake bleeding.
- It is better to carry out work on replacing brake hoses with a partner.
Diagnostics of brake hoses: basic methods for checking them
As they say: “The salvation of drowning people is the work of the drowning people themselves.” This principle is indisputable for the driver, and if he wants to increase the degree of safety while driving, he must monitor the technical condition of the car. Make it a rule - before leaving, inspect the visually marked units under the hood, pay attention to where the car is parked at night, maybe puddles have formed under the car, which means important brake fluid or oil is leaking. If any problems are identified, postpone leaving in your personal vehicle.
Brake hoses VAZ 2114
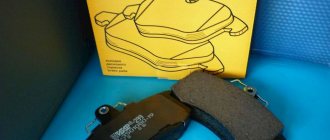
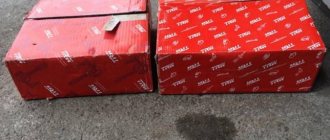
What brake hoses should I buy and what spare parts should I buy to replace the brake hoses?
Brake hoses have proven themselves well , they are of good quality and a little expensive. If you want to save a little, you can buy brake hoses produced by DAAZ , which are also of good quality.
You should also buy copper washers 1.5 mm thick, brake fluid, which is necessary for bleeding the brake system. I recommend buying brake fluid DOT 4 400 grams.
How to tell if brake fluid is leaking
You can recognize a leak in the brake system by the fluid level in the reservoir. If its level approaches the minimum mark, then a leak occurs. Also, the “!” indicator should light up on the dashboard, indicating a critical lack of fluid for the brake system. But this does not always happen, so you need to control the level manually.
You can accurately understand that there is a fluid leak by making a test top-up in the expansion tank. If after this there is a sharp drop in its level, then the brake fluid leaves.
First of all, in such a situation, you need to check the expansion tank itself for cracks. If they are, the brake fluid tank must be replaced.
Vulnerabilities of the VAZ 2114
The most vulnerable points in the VAZ 2114 brake system include:
- Master brake cylinder - most often, leakage occurs due to wear of the sealing collar, which is subjected to stress during operation. There are also cases of installation of initially poor-quality seals. Detecting this leak is the most problematic, since liquid can go into the vacuum booster. In this case, no leaks are formed. If there are leaks on the left CV joint and gearbox, the GTZ is leaking.
- Brake cylinders of the rear wheels - in the VAZ 2114 their cuffs are susceptible to destruction, especially in frosty weather. A leak is determined by the presence of traces of leaking brake fluid on the calipers. If there is a strong leak, there may be marks under the wheels and on the road surface.
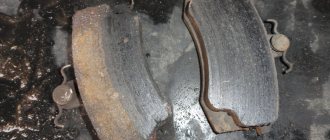
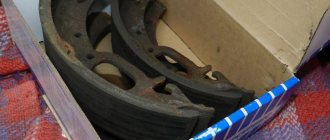
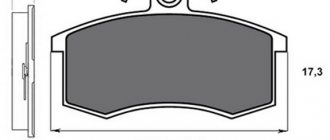
- Brake hoses - they are also subject to mechanical damage. If the rubber is dry, cracks will form on it. You should also inspect for leaks.
How to find the cause of the leak
To find where the VAZ 2114 brake fluid goes, you should conduct a thorough visual inspection.
Brake hoses
The easiest way to detect a leak is on the brake hoses - here it is enough to check the rubber by touch. If it is rigid, inelastic and cracks form when bent, the hose must be replaced, even if there are no leaks.
Sometimes a brake hose of the wrong diameter falls off the fitting. In this case, it should be replaced with a similar one, but smaller in diameter. You can put on the same hose, but in this case you will have to secure it with special clamps.
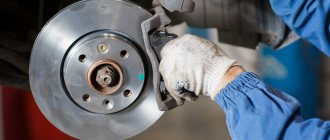
Wheel brake cylinders
To detect fluid leaks on the brake cylinders, remove the wheels and inspect the brake system for signs of leakage on the calipers.
VAZ-2114 is equipped with a drum braking system. To detect leaks in the wheel cylinders, the brake drums must also be removed. This usually causes difficulty in removal due to the fact that their surface wears out.
In this case, they are removed in two ways:
- You can “squeeze” the drum out of the hub by selecting bolts of the required diameter and screwing them into the threaded holes on the drum. This is done until the drum is removed.
- Knock out the brake drum by hitting its internal parts with a hammer from opposite sides.
Important! With the second method, you should only use a hammer with a rubber striker. Metal cannot be used, because The drum may be damaged.
The best option for the VAZ-2114 is to replace the entire brake cylinder assembly at once. Otherwise, you should disassemble the cylinder and inspect its parts for damage.
Front brake mechanism
The design of the front brake mechanism on the VAZ 2114
The front brake mechanism consists of the following components:
- Brake disk. Directly connected to the wheel hub and rotates with it. Slowing down the rotation and stopping the disk leads to the slowing down and stopping of the wheel.
- Pad guide. Serves as a holder for the pads and a base for the guide pins.
- Caliper. It combines the pads, cylinder, and piston into a single unit and ensures uniform transmission of force from both pads to the disc.
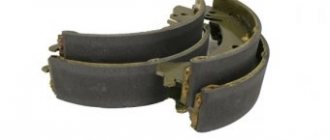
- Brake pads. They directly act on the disc, squeezing it on both sides and slowing down the movement.
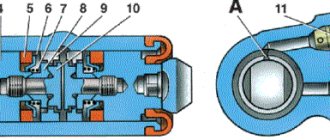
- Cylinder. A sealed cavity in which the piston moves.
- Piston. Under the influence of hydraulic fluid pressure, the pad is pressed against the disc. Thanks to the “floating clamp” system, the second block is pressed simultaneously. This ensures uniform wear of their linings and discs and guarantees effective braking.
- Seal ring. Prevents fluid leakage and ensures system tightness
- A cover to protect the guide pin from dirt, allowing for unhindered movement of the pads.
- Guide finger. Allows the pads to move evenly and adhere to the disc with their entire plane.
- Protective cover. Protects the disc from road dirt.
The front wheels are equipped with disc brakes. They automatically adjust the clearance from the pad to the disc. The caliper and cylinder form a floating caliper, which creates the same even force on both pads. This ensures uniform wear of the linings. To monitor their wear, there is an indicator on the inner block.