The “brake system emergency” indicator came on. This is roughly what it looks like - ((!)), in the photo below, on the left. It lights up when the level of brake fluid in the reservoir decreases. I arrived home, I raised the hood, it was like the level had been lowered. But the photo on the right shows it very well!
There is still something on the right side of the tank, but the left side is dry! And I’m driving, my mother (the autocensor won’t let me through any further...). On the right side is what goes to the front brakes.
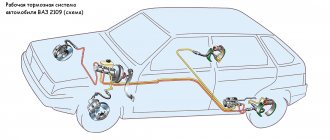
The car has two brake circuits: front and rear. The front brakes mainly stop the car, the rear brakes only help. If last year my brake hose burst on the front brakes, I immediately noticed, but here, even with the indicator on, I didn’t notice anything. Well, maybe the brake pedal is not so sensitive...
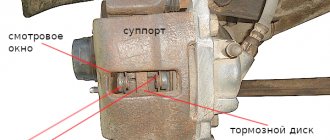
However, it’s still a mess! The brake fluid pipe to the rear axle goes under the bottom, but I can’t get under the car, that’s the last thing. First, just look from behind, look at the hubs from the inside. Well, here it is, the right wheel:
Everything around is free of dirt (it has dried up and floated away), but here there is greasy dirt. Moreover, the tube is dry right up to the nut and there are no traces of drip under the nut.
We can assume that the diagnosis has been completed! I won’t look for anything further. I think everything is intact on the outside. But there is nothing inside except the brake cylinder, the rest is all mechanical.
I went to auto parts and bought a cylinder for the Niva (and also for the classics 01, 03, 06, the same one. I don’t know about the others, which one they have). Previously, when I still had a penny, they bought a repair kit for the brake cylinder and changed the rubber bands. It cost a penny. Now three hundred rubles is not a lot of money, I doubt that anyone will bother with this repair kit. I didn't even ask the store about it. I took the cylinder and a bottle of brake fluid to bleed and top up after the repair.
400 rubles were enough.
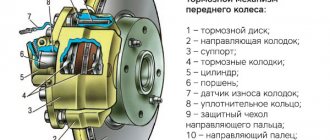
How to repair the front wheel brake mechanism of a Niva Chevrolet
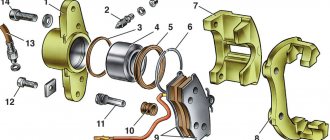
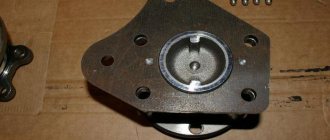
The front wheel brake mechanism (Fig. 1) is a disc brake with a floating three-piston caliper.
Cylinder block 1 is fixed in the caliper on two guides and secured with a spring retainer.
Brake pads 2 with steel bases having a figured shape, ensuring their tight fit to the pad guide.
When installing the pads, spring-loaded levers 3 press the caliper 7 to the ends of the pads, which ensures constant pressing of the pads to the guide grooves.
Brake disc 8 is made of cast iron.
Replacing the brake master cylinder and brake fluid reservoir of a Niva VAZ-21213, VAZ-21214
Removing the master cylinder reservoir
Usually we remove the master cylinder reservoir for washing or other work.
You need to wash the tank with a soapy water solution and then dry it.
Disconnect the wire connectors from the low brake fluid level sensor.
Unscrew the plug and remove the level sensor.
Using a 10" wrench, unscrew the two nuts securing the tank bracket to the body
Remove the two ground wires from the right mounting pin of the bracket.
Remove the bracket from the studs
Remove the hoses from the plastic holder. Tilt the reservoir and drain the brake fluid into a container.
Using pliers, loosen the fastening clamps and remove the hoses from the tank fittings.
To check the brake fluid level sensor, turn on the ignition and lower the parking brake lever.
Press your finger on the rod protruding from the tank lid.
The indicator lamp for turning on the parking brake and insufficient brake fluid level in the instrument cluster should light up.
When the rod is released, the lamp should go out.
Reinstall the tank in reverse order. Add brake fluid and bleed the hydraulic drive (see Bleeding the brakes)
Removing the master cylinder
Remove the spare wheel support bracket.
Using pliers, loosen the clamps securing the flexible hoses to the fittings of the master brake cylinder
Carefully holding the fittings, remove the hoses.
Drain the brake fluid from the reservoir into a substitute container.
To replace the brake master cylinder fitting, pry it off with a screwdriver
Remove the master cylinder from the socket
Use a screwdriver to pry up the rubber connecting sleeve and remove it
To remove the master brake cylinder, use a special “10” wrench covering the five edges of the nut and unscrew the fittings of the four brake pipes
We remove the pipes from the brake cylinder.
Using a 17mm spanner, unscrew the two nuts securing the master brake cylinder to the vacuum booster
Removing the brake master cylinder
Install the brake master cylinder in reverse order.
We bleed the hydraulic drive system (see Bleeding the brakes).
Source
Replacing the front brake pads
The minimum permissible thickness of the friction linings of brake pads is 1.5 mm. Replace the pads in the following cases:
– the thickness of the linings is less than 1.5 mm;
– the surface of the linings is oily;
– the linings are not firmly connected to the base;
– the linings have deep grooves and chips.
If for some reason you have removed the front wheel, check the condition of the pads through the hole in the brake caliper housing.
If the thickness of the friction linings is about 2 mm, replace the pads. If the car pulls to the side when braking or you hear strange noises, remove the brake pads and check their condition.
You will need: a jack, wheel chocks, a screwdriver, pliers, a drift, a wire brush, a hammer.
Loosen and tighten wheel nuts only with the vehicle on the ground. Do not use gasoline, diesel fuel or any other mineral solvents to clean brakes.
The brake pads on both front wheels must be replaced at the same time. It is not permissible to replace the inner and outer pads between each other, as well as between the left and right wheels. This may result in uneven braking.
Brake the vehicle with the parking brake and place wheel chocks under the rear wheels.
Clean the brake mechanism from dirt. To facilitate disassembly, apply WD-40 type liquid to the joints of the pins with the caliper and clamping arms.
Pump out some of the fluid from the reservoir if the brake fluid level in the reservoir is at or close to about zero before replacing the pads.
Using pliers, remove the cotter pin of the lower axis of the clamping lever.
Using a drift we touch the axis of the clamping lever
Holding the lever, use pliers to remove the axle.
We remove the two clamping lever springs from the pad guide so as not to lose them.
Using a screwdriver, lift the brake caliper and place it on the steering knuckle.
Remove the brake pads from the guide.
Before installing new brake pads, it is necessary to move the pistons as far inside the cylinders as possible.
Using sliding pliers (or a gas wrench), press the pistons into the cylinders.
You can recess the pistons into the cylinders in another way.
To do this, insert the outer block into the guide and, having installed the caliper in place, use a mounting blade to press the pistons into the cylinders.
Then we assemble the assembly in reverse order.
To make it easier to install the axis of the clamping lever, we sharpen its tip on a sharpener so that a cone is obtained.
Before installation, lubricate the axis of the clamping lever with graphite grease
Pressing the lever, insert the axle.
After installing the brake pads, you must press the brake pedal several times so that the cylinder pistons move the pads to the brake disc.
Check the brake fluid level in the reservoir and top up if necessary.
After replacing worn brake pads with new ones, do not rush to immediately drive onto busy highways.
It is possible that at the very first intensive braking you will be unpleasantly surprised by the low efficiency of the brakes, although you have installed branded pads.
The brake discs also wear out, and the new pads only touch them at the edges, practically without braking.
Choose a quiet street or passage without cars and brake smoothly several times so that the pads get used and begin to fit the entire surface.
At the same time, evaluate the effectiveness of the brakes. And try not to brake sharply for at least the first 100 km.
When unused pads become very hot, the top layer of their linings burns, and the brakes will not be as effective for a long time.
Removing and installing the front brake caliper
The front brake caliper is removed to replace it or replace the working cylinders and brake disc.
It is more convenient to do the work on a lift. You can do it on a car mounted on supports.
You will need: a 14mm wrench, pliers, a drift, a hammer.
Remove the two manifold mounting bolts.
Please note that there are O-rings installed under the bolts.
Replace a badly compressed ring.
We remove the lower spring lever (described above when removing the pads) and remove the cylinder block with the brake caliper
We take out the brake pads
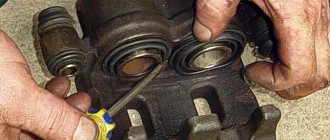
Clamp the brake caliper in a vice with soft metal jaw pads
Use a drift to tighten the cylinder block retainer
At the same time, we recess the cylinder block retainer with a rod with a diameter of 3-4 mm and, hitting the cylinder block with a hammer with a plastic tip, we begin to move the block along the caliper guides
After moving the block 1.5-2.0 mm, remove the rod.
Use a hammer with a plastic tip or a mallet to knock out the cylinder block from the caliper guides
Cylinder block and brake caliper
We remove the clamp and its spring from the socket of the brake cylinder block
The retainer fits into the caliper hole and limits the movement of the cylinder block
We assemble and install the front brake mechanism in the reverse order.
To facilitate assembly, use a file to remove the chamfers from the guides of the cylinder block.
Having sunk the latch into the block socket, insert the block into the grooves of the caliper.
Using a hammer with a plastic tip, hammer the cylinder block until the retainer fits into the caliper hole.
To remove the brake pad guide, remove the upper clamping arm
Using a 10mm socket with an extension, unscrew the bolt securing the protective casing to the pad guide
Using a chisel, loosen the two bolts securing the shoe guide to the steering knuckle.
Using a 17 wrench, unscrew the bottom bolt
It is more convenient to unscrew the upper bolt with a 17mm head
Removing the pad guide
We assemble the unit in the reverse order and bleed the brake system
Source
How to lubricate calipers on a Chevrolet Niva
There are 2 main types of caliper rattles and clanks:
1. Due to the fact that the springs 2121-3501166 holding the caliper bracket have weakened, this very bracket begins to bounce in the pits, moving between the levers, and ringing and rattling melodiously. In fact, the best commercially available springs are too weak, subject to rapid deformation and loss of their properties due to the poor quality of the materials used.
2. Due to the fact that the brake pads are not held in place by anything, they move freely inside the pad guide, naturally producing sounds familiar to the ear.
Eliminating reason No. 1
For this you will need: - steel wire with a diameter of 6 mm - 50 cm (I used stainless steel); - wire for the spring - steel (very hard, preferably spring wire), diameter 1.2 mm, length depends on the number of springs damaged during the manufacturing process (a long piece is better - much easier to work with). You will also need a vice, two birch blocks, sandpaper, and pliers.
First, we will make a “tool” from wire with a diameter of 6 mm, with which we will wind the spring. It's simple, here's a photo:
Now take the spring wire and thread it like this:
We clamp a thin wire by passing it between two birch bars in a vice. And we begin to rotate our “tool” by winding a thin wire. You may need a second person to hold the “tool” slightly. Adjust the distance between the turns by applying axial force to the “tool”. By changing the distance between the coils you can adjust the spring stiffness.
Cut the spring using sandpaper and use pliers to make the ends slightly tapered.
For comparison: on the left are manufactured springs, on the right are removed from the car.
If during the process of assembling the caliper you did not put significant effort into compressing the springs, then you made the springs too soft - increase the distance between the coils or use a stiffer wire. The force applied to the springs to install them must be large. When compressing them, you always really want to call a second person to insert the lever axis:
Eliminating reason No. 2
Attention: eliminating cause No. 2 without first eliminating cause No. 1 will not give the desired result.
To do this you will need: a pair of rubber bushings for the rear shock absorber 2101-2906221, a sharp knife, emery or grinder with a thin cutting wheel, a little lithol.
Take the shock absorber rubber bushing and cut it like this:
Then, using sandpaper or a grinder, we grind a groove in the rubber band, this is what happens (left rubber band):
We put the rubber band on the block and install the block in place. In case of difficulties, you can lightly lubricate the guide of the pads under the rubber with lithol in order to facilitate its installation (the photo shows a lithol stain under the rubber). The rubber band is selected individually for each pad, so that the rubber presses the pad tightly enough.
OK it's all over Now. The mileage with such upgrades is about 15,000 km - everything is in place, nothing rattles.
Update dated July 29, 2008, by evgen.
The problem does exist with the rattling, and an even bigger problem exists in the purchase of springs. When you go to the store for something significant - about such a small thing as springs - you simply forget. And when you specifically look for springs, as luck would have it, they are not available in any of the stores.
My idea does not pretend to be technically correct, but I don’t see any specific flaws in it.
I carried out this upgrade in a much simpler way. The springs are taken out, and either a ball from a ball bearing of a suitable diameter is placed under them, or, as I did, a turnkey nut for 8. Another option - if there is not a sufficient number of nuts for 8, you can also take a nut for 10 and cut it with a chisel in half and also place it in the hole for the spring. The problem is solved with a bang.
Update from 08/26/08, by longer
Tired of the ringing and rattling noise in the right caliper (for some reason and only in it), I started researching why this happens.
1 - the springs pressing the caliper clamping lever have actually weakened and sagged (No. 14 in the picture in the illustrated album). The replacement did not give anything, because all the freshly purchased springs were much weaker and worse than the original ones that had already sagged.
2 - the cylindrical recesses on the guide of the pads in which these springs are located, for unknown reasons, broke and over time became 1-2 mm wider in diameter than the springs, so the spring warps over time and ceases to perform its function /
3 - there is a noticeable wear, 1-2 mm (compared with a new caliper in the store) of the hole in which the axis of the pressure lever is attached (No. 17). The axle itself is sold together with springs and is easily replaced, but after replacement it continues to dangle too loosely in its socket.
4 - the working surface of the clamping lever has been developed, which is in direct contact with the caliper. It is difficult to measure the thickness of the excavation, but it is there, and noticeable.
5 - round platforms on the clamping lever are also produced, into which the springs directly rest.
Thus, all these workings together give a backlash of about 4-5 mm, leading to loose fixation of the caliper on the guide, hence the ringing and rumble.
I solved the problem simply - I welded a bead approximately 5-6 mm thick on the working surface of the pressure lever, did not level it - it would rub in during the process. And I replaced the springs with the springs of the support strut of the rear drum brake shoes (No. 56), they are stiffer, made of thicker wire, and the diameter is just a little larger than the original ones, which is necessary. Their shorter length is fully compensated by thick welding.
I installed everything in one place, mileage is 5,000 - nothing still rings.
Disassembling the front brake caliper Chevrolet Niva
Tools:
- Flat file
- Small hammer
- Hammer with plastic tip
- Vice with soft metal jaws
- Pliers
- Punch
Parts and consumables:
- Aerosol lubricant type WD-40
- Front caliper
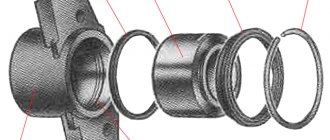
The front brake cylinder block is replaced when brake fluid leaks through the O-rings, as well as when the pistons jam due to corrosion.
1. Remove the caliper from the vehicle as described here.
2. Clamping the brake caliper in a vice with soft metal jaw linings, use a drift to remove the cylinder block retainer.
3. At the same time, we recess the cylinder block retainer with a rod with a diameter of 3-4 mm and, hitting the cylinder block with a hammer with a plastic tip, we begin to move the block along the caliper guides.
4. After moving the cylinder block by 1.5-2.0 mm, remove the rod. Using a hammer with a plastic tip or a mallet, knock out the cylinder block from the caliper guides. Cylinder block and brake caliper.
5. We remove the retainer and its spring from the socket of the brake cylinder block.
6. The retainer fits into the caliper hole and limits the movement of the cylinder block.
7. We assemble and install the front brake mechanism in the reverse order. To facilitate assembly, use a file to remove the chamfers from the guides of the cylinder block.
8. Having sunk the latch into the block socket, insert the block into the grooves of the caliper. Using a hammer with a plastic tip, hammer the cylinder block until the retainer fits into the caliper hole.
9. Install the caliper on the car.
10. Bleed the hydraulic brakes as described here.
The article is missing:
- Photo of the instrument
- Photos of parts and consumables
- High-quality photos of repairs
Source: Chevrolet niva device, operation, maintenance and repair. Publishing house "Behind the Wheel".
Niva front brake cylinder, problem solving
The first problem was solved in a simple way. Complete disassembly of the unit, washing and reassembly with lubricant designed to work with rubber seals and brake fluid. My friend helped, who has been repairing hydraulic systems all his life, from loaders to industrial presses. He gave me a tube of glamorous pink lubricant, made in Japan. On the Internet it is known under the Toyota brand, although in fact it is made by Seiken. There is also a slightly cheaper analogue, the German trendsetter in brakes, the ATE brand. The cylinders that are in the price list are additionally treated with just these lubricants, depending on their availability. On forums I often came across the opinion that it is enough to apply lubricant under the boot and everything will be fine. WILL NOT BE! You have to disassemble the entire cylinder to get to the O-ring, and nothing else. The lubricant will not get there naturally. The problem with rubber bands can be solved by installing a repair kit. Several companies produce it for our cylinders, but this will be the subject of the second part of the article.
Replacing the caliper boot 15 sec. Should I lubricate the caliper or not? Chevrolet NIVA, LADA 4×4 Caliper lubrication
What to do to prevent the calipers from sticking. Lubricate? Lubricate the caliper and the caliper will jam even faster. So what should you do to prevent the caliper from sticking? The answer is simple - replace it with a new one. Who doesn't agree? For Donat in support of my channel, a new project. For Sponsors, order advertising, review idplayer.infoabout?disable_polymer=1 THANK YOU. How to remove a heavily stuck brake drum and bearing on any car. VAZ NIVA Chevrolet NIVA Remove the brake drum idplayer.info/show/dkpTejdxLXNFRTQ.html SHOCK! Everyone watch. NIVA 300,000 KM. Off-road. Foreign cars are resting. Review of LADA 4×4 Niva idplayer.info/show/TXA4NXY1ZUNsdUU.html 200-250,000 rub. Chevrolet Niva or LADA Niva 4×4 3D, 5D VAZ 2131. Comparison of Chevrolet NIVA and LADA Niva 4×4 idplayer.info/show/LWJodVFHQUhpMVE.html Replacing the clutch master cylinder VAZ, NIVA, Chevrolet Niva. Bleeding the clutch. Details in HD idplayer.info/show/WnVLdHlUbktFSEE.html Buying a car - an SUV for 50 thousand. We are not buying a new car, SUV 1st, from idplayer.info/show/d2dMb0paVWNkdTg.html Buying an SUV for 50 thousand. Instructions for resellers - Finding and buying a car 2nd from idplayer.info/show/XzdSOG84QWJ4Qm8.html Replacing the caliper boot 15 sec. Should I lubricate the caliper or not? Chevrolet NIVA, VAZ 2121, LADA 4×4 Caliper lubrication idplayer.info/show/a0Y1d25FeE4wSEk.html
Communities › Chevrolet Niva › Blog › Question about front calipers.
Good afternoon everyone! Something bad happened, the front brake caliper began to jam, so much so that the brake disc almost turned blue and you couldn’t engage it higher than second gear. Somehow I got home, took off the wheel, loosened the pads and pumped it several times, it seemed to come off, everything was fine. But the next day history repeated itself. I suspect that the brake cylinders have soured. So the actual question is, who lubricated the brake cylinders and caliper guides with what? (I didn’t really find anything in the search; some write with lithol, others with molybdenum or copper grease.)
Tags: brake caliper, guides, pads, discs, shniva
Comments 28
Are your wheel bearings over-tightened? This is what causes the heating. Check the brake pads. They should move freely in the caliper seats, but not play. Often the pads come with burrs. Most of them don’t remove these burrs and hammer the pads in the hope that they will get used to it. But it doesn’t rub in, it sticks. And if they sour, then it’s not the cylinders, but the pistons. What's in your brake system? Brake fluid? Well, lubricate it for her.
That's it, thanks everyone for the advice, I took it apart, cleaned it, lubricated it and the machine started running again. I will make a report with photos in my blog.
Install a new cylinder and don't worry!
It is better, of course, to install new cylinder blocks. I've encountered this myself. I did this www.drive2.ru/l/6667353/.
Yes, just like you did, nitrous the first cylinder from below.
www.frenkit.es/ here there are articles of repair kits, incl. rubber bands and pistons. They say the manufacturer is not bad. You look at the article and buy an existential autodoc from Emex.
Not all lubricants are suitable. ordinary mineral ones destroy rubber. Barium lubricants are somewhat inferior to lithium lubricants in terms of temperature characteristics, but do not exceed them in water resistance. We produce complex barium grease ShRB-4 - a slightly fibrous, yellow, sticky ointment. It protects well from corrosion, maintains high performance in the presence of water, and DOES NOT HAVE A HARMFUL INFLUENCE ON RUBBER. These properties make it the best lubricant for use in car ball joints, where it does not need to be replaced for 100 thousand kilometers. CV joint-4 is a long-fiber yellow or brown ointment created specifically for use in constant velocity joints of automobiles. A progressive type of lubricants that are used abroad are complex aluminum lubricants. Their cost does not exceed the cost of solid oils, at the same time they have high mechanical, thermal and physico-chemical stability, high adhesion and very high water resistance. This combination of properties contributes to their gradual spread in the automotive industry. taken from here www.uazbuka.ru/lib/oiling.htm but since there is no need to lubricate the rolling friction in the calipers, I fatten everything ca.d-cd.net/b944b1as-960.jpg
The calipers need to be sorted out, perhaps the pins need to be replaced. MC1600 lubricant is not expensive and effective; you can lubricate both your fingers and rubber bands.
brake lubricants
The topic of the article is brake lube. We receive a lot of questions on this topic, and about all cars. Therefore, I will talk in relation to all cars, sometimes focusing on the Niva and Shniva. As I said earlier, replacing pads and servicing calipers are two “big differences”. And if replacing the pads can be done in a couple of hours on both sides, then routine work on the calipers can take a whole working day. This includes cleaning the unit, lubricating the guides, and checking and replacing rubber elements.
Lubricant for seals, pistons and boots
I would probably call this group of lubricants assembly pastes. They lubricate everything that is structurally located under the boot. In the old days, when Lenin was still vertical, mechanics used camphor or castor oil. It was both a good lubricant for rubber and protection against water. But the time has come for modern lubricants. For these purposes, you can use two lubricants, identical in their functions, but different in price and manufacturer.
Toyota brake lubricant
Color glamor pink J. I put the manufacturer in quotation marks because Toyota does not make oils and lubricants, like other automakers, but uses the facilities of other chemical companies. There are plenty of them in Japan, and if I give several company names, they won’t tell anyone anything. (IDEMITSU KOSAN, JX Nippon Oil & Energy, SHOWA SHELL SEKIYU). The most disgusting thing for a Russian person is that this lubricant can only be bought under the Toyota brand and half the price will be for the name. It has the most magical effect on rubber. As an example - brake cylinder boots in the field. After processing, it seems that the boot is made not of bad rubber, but of silicone, it becomes so soft. Moreover, this effect does not disappear in either cold or heat. I provide this lubricant for clients only upon request. Firstly, because I order it exclusively in Japan, and secondly, because the item is quite expensive. The cost of a tube is about 1000 rubles.
Brake Lubricant, Caliper Guides
Under no circumstances should you use “lithols and solid oils”. These lubricants are thermally stable up to 80-90 degrees, then they either coke or leak. The temperature at the calipers can be significantly higher. Also, these lubricants must be moisture-resistant and “salt-resistant,” and only “semi-synthetic” base fillers can do this. Another important characteristic of these lubricants is their neutrality towards rubber, plastic and non-ferrous metals. And just for the Niva family, this point is very important, since the cylinders are made of “aluminum alloy”. In our case, these lubricants are applied to the ends of the pads, the caliper axles, and the bracket, in the place where the “horseshoe” is adjacent to it.
Bosch and ATE grease
There are two manufacturers in the title. The explanation is simple: inside the tubes there is the same lubricant. This lubricant is not recommended for use when the guides are in rubber boots. But in our case, the structure is completely bare. Practice has shown that even in the conditions of St. Petersburg humidity and salt, it remains alive until the next replacement of the pads.
Brake Lubricant, TRW
As in the first case, Bosch lubricant, there is an alternative. This is a German product, manufactured by TRW. It has one significant advantage. It is absolutely neutral to rubber, plastic and paints. That is, it can and should be used where there are rubber boots on the guides. And this is 95% of modern designs of disc calipers from all manufacturers.
Grinding noise when braking. The main causes of squeaking brakes.
The problem of grinding noise when braking affects every motorist from time to time. Of course, a long whistle when braking is frightening and alarming. But is it always necessary to immediately go to the nearest service center or even call a tow truck for this? In most cases, yes. The creaking of brakes (pads) is in any case a sure signal of a malfunction of one of the most critical components of the car, directly related to your safety. Let's try to look at the four main reasons why car brakes squeak?
Brakes squeak not only when braking, but also while driving.
Brake pads are equipped with special metal “petals”; when the surface of the pad wears off during operation, the “petal” touches the disc and a nasty grinding noise from the brakes occurs. This was done on purpose - to reliably indicate that it is time to replace the pads. In addition, some cars have a special sensor - a warning light, and if it is necessary to replace the brake pads, it lights up.
How can you check for yourself whether your brakes are squeaking due to wear?
If your car has disc brakes, you can simply try turning the steering wheel all the way to the side and shining a flashlight on the pad, you can “by eye” determine the thickness of the pad. If the thickness is more than decent, and the brakes squeak when driving, you need to immediately contact a service station. If it seems difficult for you to determine the thickness of the pads by eye, immediately contact your nearest service center to check for pad wear.
The thickness of the block is easily determined by eye.
The thickness of the block is easily determined by eye.
The squealing of brakes (pads) occurs due to their vibration.
When braking, a strong vibration is naturally created in the area of action of the pad and brake disc, resulting in squeaks and even prolonged “squeals”. Usually, in order to avoid extraneous sounds, a special “anti-creaking” plate is installed between the pad and the caliper piston, which absorbs vibration. It happens that in some service stations that are not entirely clean, they simply lose such pads or throw them away on purpose, so that the client would quickly come to them with a new problem - whistling brakes and change practically new pads.
It happens that the old plate has rusted and collapsed, but the new one is not included in the set of pads, and it had to be ordered as a separate item. The advice here is simple - if you recently changed the pads at a service station and the brakes started squealing again, then simply contact another service center to make sure that the work was carried out exactly with all the requirements.
New pads squeak, what should I do?
In addition to the lack of an “anti-squeak” plate, there are other reasons why new, just replaced, pads begin to creak disgustingly. Firstly, you should pay attention to the quality of manufacture of the pads themselves; you must not skimp on such an issue as the brake system, and take only original consumables. It happens that the pads just need to be properly grounded, and after a couple of days (usually up to a week of intense driving) the squeak will disappear on its own.
If the whistling sound of new pads does not disappear for a long time, this is a good reason to contact a service station, because There is very little chance that the problem with extraneous brake noise will resolve on its own.
I drove into the mud and the pads began to creak!
Another classic problem is grinding brakes - liquid dirt or clay gets into the working surface of the brake pads, dries out and makes terrible sounds - from a squeak to a prolonged howl! Therefore, if you encounter a squeaking problem after an off-road trip (you drove from a federal highway onto a local road somewhere in the outback). It is necessary to remove the wheel, wash it well, clean the caliper and brake system elements (except for the friction surface) with a wire brush, and then use a special tool for cleaning brake discs.
The pads are fine, but the brakes still squeak.
The pads may whistle if they have lost mobility in the caliper, that is, they have become sour. In this case, lubricant will help, don’t laugh, brake lubricant. And not one, but two and both are anti-creaking. For the “floating” caliper to work, it is necessary to lubricate the caliper guide pins with a thin layer of Liqui Moly Anti-Quietsch-Paste (article 7656, red). And not on top of the old grease, but by carefully removing the old and degreasing the surfaces using Schnell-Reiniger (article 1900). The caliper grooves into which the pads are inserted must also be thoroughly cleaned and lubricated with Liqui Moly Bremsen-Anti-Quietsch-Paste (article 7585, blue). To complete the service, it is worth cleaning and degreasing the brake disc itself using Schnell-Reiniger (part number 1900). All these simple measures keep the brake mechanisms in constant tone, and the brakes no longer emit howling, squeaking or grinding noises!
Brake care technology is described in more detail in the special section Brake System Maintenance.
Take care of your car, and it will definitely thank you!
You can buy our products near your home from one of our partners - Liqui Moly products on the map of your city.
Modern offers on the lubricants market
Today you can find lubricants from different manufacturers in stores. One of the common options is grease for guide supports MC 1600. It is available in volumes of 5, 50 and 100 grams. This material helps reduce braking distances, ensures even pad wear, and eliminates brake squealing. For guide supports, it is necessary to apply lubricant in a layer of 0.1 mm. The advantage of MC 1600 is that it is produced in different volumes, which allows each buyer to purchase the most suitable option. The price of a 50-gram tube is a little more than 300 rubles, this volume is the most popular.
Liqui Moly brake lubricants
2022 Addendum
The Frenkit repair kit is in great demand . And very often the question comes up in letters: is there ATE mounting paste available in smaller packaging? Unfortunately, no, brake lubricant, ATE, is a service product and is sold in “professional packaging”, that is, this tube is enough to process and assemble approximately 20 front cylinders of a Niva. For a person who owns one car, and even a private mechanic, this is a very large portion. Use it once, and the tube lies restless. But since one of the goals of my sites is to improve the culture of repair work, I packaged this lubricant in 30 grams. This amount is quite enough to process and assemble 4 front cylinders. In the price list, this item is indicated by the word “packaging 30 grams.”
Why do you need lubrication?
During operation, the calipers are constantly exposed to:
- With dust and dirt
- With low and high temperatures
- With various road reagents
This system is a fragile structure in which the calipers move smoothly along the guides; the entire system is protected by anthers that prevent moisture, dust, and dirt from entering them. If you do not service them on time, or do not service them properly, then the entire system may fail; this MC-1600 lubricant is perfect for these purposes.
This lubricant was developed and created in a special scientific center called VMP-AUTO, and was presented as the first domestic universal lubricant for guides, which has no analogues, which would be comparable to it in its characteristics and properties. This product was also tested by such a leading service in Russia as Volk Brake Performance, as a result of which it was decided to use it in their services when repairing calipers.
Lubricant properties
It has received such recognition due to such excellent properties as:
- It does not lose its properties and functions at temperatures from -50 to 1000 degrees.
- Thanks to its excellent anti-corrosion properties, it prevents the formation of rust on calipers
- Protects all rubber components from deformation
- Resistant to water for long life
- Protects the entire brake system from dust and dirt
- Does not interact with substances such as DOT-3, DOT-4 and DOT 5.1
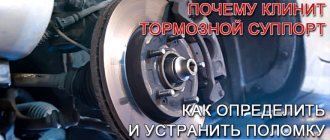
Why the brake caliper jams: how to identify and fix the problem
Hi all! Any problems associated with the braking system of vehicles are potentially very dangerous. Therefore, every motorist should know why the brake caliper jams, what can provoke such a situation, how to diagnose and eliminate it. On your own or with the help of specialists, decide for yourself.
Our regular readers remember that we have previously talked about situations when the caliper knocks. Now let's consider a slightly different situation. Moreover, it is even more dangerous and unpredictable in terms of possible consequences if nothing is done after noticing the symptoms.
Let's start with the theory. The caliper on a car is part of the brake system. It is used in the design to press automobile brake pads when the corresponding pedal is pressed against the brake disc. As you understand, the node is extremely important.
But sometimes it can jam and creak because of this.
What advantages does it have?
Any lubricant has its own advantages, this SV has the following:
- Prevents pads and other system elements from sticking
- Helps extend the life of all rubber components by protecting them from deformation and rapid degradation
- Facilitates the piston stroke and also ensures normal operation of cylinders that are already worn out.
- Reduces or completely eliminates squeaking brake pads
- Has excellent anti-corrosion properties, which reduces the appearance of rust
- Protects all elements from dirt, moisture and dust, this is especially true for those who use the Chevrolet Niva in extreme conditions
- It can be used at high power
- Due to the fact that this lubricant is universal, it can be used for any caliper elements.
- To completely treat all the pads, five grams is enough, which helps save money by at least one thousand rubles
- Helps increase pad life
How to properly lubricate a caliper
Let's take a step-by-step look at how to properly carry out the process of lubricating calipers
- The first thing you need to do is take a jack and install it under the car, then lift it with the jack so that you can remove the front wheels, and then the brake pads
After the wheels and pads are removed, unscrew the special fixing screw at the top, while the pipe with the brake fluid does not need to be touched. Remove the bracket from the caliper; it is secured with screws.
By gently pressing the brake pedal and removing the piston, pressing creates pressure that pushes the piston out. After it has been removed, close the fuel line to prevent dirt from getting there.
- When the caliper is disassembled, it needs to be cleaned, wiping off all dirt
- When everything is prepared and cleaned, you can begin to lubricate all elements of the system. It is advisable to replace the entire repair kit before this, this will help extend the service life of the entire system as a whole.
- We reassemble the caliper in reverse order.
Lada 4×4 3D › Logbook › Replacing the caliper cylinder
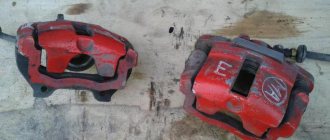
Last Sunday I changed the rear left brake cylinder, it was rusty and simply didn’t work. In general, I also wanted to change the cylinder in the right front caliper, but decided not to do it. And as it turned out, he did the right thing. The reason for the need is below
If anyone is aware of the structure of the Niva brakes, then there are two fittings on the front caliper cylinder. As you can see, there is only one here, and the other one is filled with some kind of shit. When bleeding the brakes last time, it turned out that it was rattling, and since there is no second fitting, it is better to remove the old part and replace it.
But before replacing, you need to jack up the right front wheel. And here a failure awaits us, the old Soviet jack does not fit into exactly one jack of the right front wheel. Well, okay, I took another jack, since I have them, and jacked it up under the threshold. We take off the wheel, spray it with a bucket and wait.
Well, everything seems to be soaked. We try to turn it, it doesn’t turn. We spray some more and wait. It won’t spin, okay, take the key and carefully remove the hammer, twist it and begin to lose the brakes quickly. By the way, how to close the brake hoses so as not to leak? Screw on the nut? In the end, I solved the problem by screwing the hoses onto a new cylinder, but in the end I came to really like the brakes.
Next I remove the caliper. It's quite simple, you just need to remove one pin, cotter pin and springs. And then you can’t sift through it all. I twist it in my hands and realize that everything has soured so well. Don't forget to take either a core or a drift. Otherwise you will not be able to remove the cylinder. It is additionally held in the bracket by a fixator, which must be recessed.
Lada 4×4 3D › Logbook › Brake rebuild part 1 — sorting out the front calipers in the field
Previously, I created a topic on brakes, on which I never received any practical advice - www.drive2.ru/l/454464990473094080/ Today, the day came when I gathered my thoughts and decided to completely go through the brakes. This part concerns the front brakes, namely rebuilding the calipers, replacing rubber and metal tubes. I will write step by step, maybe someone will find it useful))
So, we jump-start the car, put stands, and remove the wheel. Pull out the clamp for the upper caliper clamp and remove the caliper. We need to press the pistons out of the caliper body. I do it this way: I rest the caliper against the brake disc with the outer pistons so that nothing prevents the central piston from coming out. Literally 3 pumps of the brake pedal and the piston came out.
Using a 14mm wrench, unscrew the brake hose bolts and remove the caliper. (In my case, I did not clamp or dampen the brake pipes, as they had to be completely replaced) It’s easy to press out the two outer pistons like this:
A couple of light blows of the hammer on the hexagon and the outer pistons came out.
For easy extraction, it is better to immediately tear the rubber cuffs
An examination of the pistons and cylinders showed that there was nothing fatal or terrible; there were no scuffs or traces of rust.
We wash the caliper and remove the rubber bands from the repair kit. Following the advice, I took the BRT to D2. Soak the rubber bands in brake fluid
We install the internal sealing rings, put the upper cuffs on the piston
Lubricate the pistons with brake fluid and insert them into the cylinders. Insert by hand, no tools or pry bars required
When the piston is in place, carefully tuck the cuff skirts into the groove on the cylinder
We replace the poor 8mm bleeder fittings with reinforced 10mm ones
Let's start installing the brake hoses. Each hose is secured with a bolt. Copper washers must be installed between the caliper and the hose, as well as the hose and the bolt head. Before installation, I heated the washers with a torch to make them softer.
In the entry on the brakes that I voiced above, I wrote that as the front pads I chose the Lada Sport pads vaunted on the D2. We install the brake pads and caliper in place, having previously lubricated the pad guides and the pins of the clamping brackets with caliper grease.
An incident arose when installing metal tubes. When I bought tubes in the store, they told me that the only thing missing for the kit was a tube from the tee to the sorcerer (which goes under the bottom), I paid and took a bunch of tubes without even looking or counting them. As a result, during assembly it turned out that 1 tube was missing.
It's sad, then you'll have to remove the wheel again and put the tube back in place
Remove the second caliper. Everything is fine here too. We do the same thing as the first one.
We install new metal tubes (oh, I had a lot of trouble with them, none of them were bent correctly, they all had to be bent)
While I was fiddling with the tee, I accidentally knocked off the tube from the tank and broke off the plastic fitting on the GTZ. It seems like they are sold separately, but I just don’t know if replacing them would be of any use? I tried to change them on a penny, but they still fell out, so I ended up changing the GTZ. Has anyone changed it in the field? There's a meaning? It’s such a pity for the GTZ, it’s in good working order.
By the way, I made a small discovery for myself))). I've never used gloves like these.
Today my hands were constantly in the brake, I didn’t take off my gloves to lubricate the pistons, I just put my finger in the brake and lubricated it. And here are the hands under the gloves.
Absolutely clean and dry. Gloves cost a ridiculous amount of money and are sold in any hardware store. Because as they say, a must have!
To be continued... Next will be the rear brakes, don’t switch)))
How to properly bleed the brakes
Usually it takes two people to bleed the brakes: it’s much faster than one person. We prepare a tube (hose, cambric) 30-40 centimeters long, 6-8 mm in diameter. A container for brake fluid - a jar of some kind. We pour three centimeters of brake fluid into a jar, and put one end of the tube on the brake bleeder fitting (in the photo it is above the fluid supply tube with a rubber cap), lower the other end into the fluid in the jar.
One person gets behind the wheel and starts pumping the brake pedal. Having pressed it several times, building up the pressure in the system, he says to the second: “I press” or “hold”, something like that. At this time, the second person under the car, near the jar with a straw, after the command, unscrews the fitting one turn or half a turn to bleed air from the system. The brake pedal falls at this time, but you cannot release it. The second person, the one under the car, screws the fitting into place until it stops and tells the first person that the pedal can be released.
This is done to prevent air from being pumped back into the system through the fitting. The end of the tube is immersed in the brake fluid for the same purpose: if there is a newbie in the car and, God forbid, he releases the pedal, then it is better to suck this fluid into the system, although air can still get in if the tube is not tightly placed on the fitting.
This is repeated several times until air bubbles stop coming out of the tube. If the tube is transparent, then you can see air bubbles going right through it until all the air is squeezed out of the system. I saw it myself!
Well, you can feel the pedal when it becomes hard, which means there is no air, the liquid is not very compressed. When there is air in the system, the pedal becomes soft, this compresses the air.
But this time I was alone again - it was daytime, everyone was at work!
Disassembling the front brake caliper Chevrolet Niva
Tools:
Parts and consumables:
The front brake cylinder block is replaced when brake fluid leaks through the O-rings, as well as when the pistons jam due to corrosion.
1. Remove the caliper from the vehicle as described.
2. Clamping the brake caliper in a vice with soft metal jaw linings, use a drift to remove the cylinder block retainer.
3. At the same time, we recess the cylinder block retainer with a rod with a diameter of 3-4 mm and, hitting the cylinder block with a hammer with a plastic tip, we begin to move the block along the caliper guides.
4. After moving the cylinder block by 1.5-2.0 mm, remove the rod. Using a hammer with a plastic tip or a mallet, knock out the cylinder block from the caliper guides. Cylinder block and brake caliper.
5. We remove the retainer and its spring from the socket of the brake cylinder block.
6. The retainer fits into the caliper hole and limits the movement of the cylinder block.
7. We assemble and install the front brake mechanism in the reverse order. To facilitate assembly, use a file to remove the chamfers from the guides of the cylinder block.
8. Having sunk the latch into the block socket, insert the block into the grooves of the caliper. Using a hammer with a plastic tip, hammer the cylinder block until the retainer fits into the caliper hole.
9. Install the caliper on the car.
10. Bleed the hydraulic brakes as described.
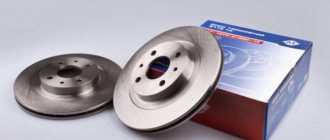
Front brake disc for VAZ Niva, Chevrolet Niva
- Manufacturer: AvtoVAZ
- 0 reviews
- Description
- Characteristics
- Video
- Reviews 0 ? '(' + product.reviewsCount +')' : »>>
Dear customers, in order to avoid errors when sending a VAZ 21214-10 Niva Urban brake disc, please indicate your car model and year of manufacture in the “Comment” line.
Hydraulic disc brakes are one of the types of friction-type brake mechanisms. Their rotating part is represented by a brake disc, and the stationary part is a caliper with brake pads.
Brake disc 21214-3501070-10 is the main element of the Niva Urban brake system. Provides a friction surface for brake pads. When braking, the pads are pressed against the disc and, due to the friction force, stop its rotation. According to the principle of conservation of energy, according to which energy is modified and does not disappear without a trace, the kinetic energy of the rotating disc is converted into thermal energy, and the brake disc heats up.
If you experience vibration or wobbling on your newly installed brake rotors, you should contact your mechanic immediately. He will be able to find the cause of the beating and check whether the disks were installed correctly. It is very important to fix this problem before the parts wear out, otherwise they will need to be completely replaced.
Strong vibrations and beating can be due to the following reasons:
- due to incorrect balancing,
- due to severe tire wear,
- if the brake caliper cylinders are jammed,
- the suspension may be badly worn,
- when the surface of the brake disc is severely worn.
To fix the problem, first check that the brake disc is installed correctly. This is best done by a mechanic who checks the brake rotor using a digital axial and radial runout indicator. If runout and vibration occurs at low speeds, it is most likely from worn brake discs. If at high speeds (from 100 km/h) this is already the so-called hot vibration, and it occurs from overheating of the brake discs. Overheating in brake discs may be due to a mismatch in the friction material of the pads used in the vehicle, or if the manufacturer uses low-quality material for the workpieces.
No matter what car you drive, brake pads are subject to wear. Replacement can be done on any flat, dry surface.
The front pads on a Niva Urban / Urban car need to be replaced if:
— when braking, a sharp squeal, creaking;
— when braking sharply, you feel a noise and a feeling that the wheel is out of place;
— when trying to brake, braking is slower than usual;
— a coating appears on the discs, which looks like shavings.
To replace, you will need the following tools:
Wheelbrace, flat head screwdriver, 7mm hex, pliers, 13mm socket, syringe and WD-40 fluid, jack
Before replacing the pads, the steering wheel must be turned in the direction from which you are removing the wheel. The steering wheel had to be turned all the way.
- Use a screwdriver to move the caliper away from the brake disc.
- Insert a screwdriver between the inner block and the piston block. Press the piston so that it sinks into the cylinder.
- Remove the retaining spring using a flathead screwdriver.
- Remove the two plugs from the caliper from the inside. Unscrew the bolts under the plug with a hexagon.
- Next you need to remove the caliper. To prevent the caliper from being left hanging on the hoses from the brake system, it is necessary to secure it with a rope or wire so as not to damage it.
- Remove the inner block from the piston.
- Take out the second block.
- Use a brush to clean the surface, as the presence of dirt can affect the mobility of the pads. Clean the guides. Check the guide bushings, they should move easily. If the guide bushings move with difficulty, then the seats must also be cleaned. If you can’t clean it manually, you can do it with a pre-prepared liquid.
- Insert new pads into the piston.
- Install the second pad and caliper on the brake disc. The piston must go in completely.
- The guide pins must be lubricated with graphite grease before returning to place.
- Return the plugs that hide the two bolts.
- Put the wheel back in place.
The procedure is quite simple, and even a novice car enthusiast can do it - in addition to the pleasure of doing the work with your own hands, you will also save a lot of money!
Other article numbers of the product and its analogues in catalogues: 21214350107010.
VAZ 21214, Chevrolet Niva, Niva Urban (3 and 5 doors) model from 2017.
Any breakdown is not the end of the world, but a completely solvable problem!
How to install or replace a brake disc on a Niva Urban car yourself.
AvtoAzbuka Internet Store, repair costs will be minimal.
Just COMPARE and BE SURE.
Don’t forget to share the information you find with your friends and acquaintances, as they may also need it - just click one of the social networking buttons below