Any car with a manual transmission needs to have its clutch replaced regularly. Replacing the clutch yourself is not particularly difficult if you have the necessary equipment and you know the procedure. The mileage of the disc is 70–150 thousand kilometers and depends on the operating conditions of the vehicle. Other clutch parts are changed as needed. After reading the article, you will learn how to change the clutch without going to a car service center.
Equipment and tools required for work
Clutch alignment guide
To work you will need:
- pit, overpass, lift or jack;
- a set of open-end and socket wrenches;
- mount;
- winch;
- input shaft of the gearbox (manual transmission) or a special mandrel corresponding to the type of gearbox;
- brake fluid (for vehicles with a hydraulic clutch);
- extension cord with carrying lamp;
- assistant.
DIY clutch and clutch disc repair
The clutch of a passenger car performs an important function. This mechanism protects the gearbox (gearbox) and all its gears, bearings, and shafts from premature wear, tooth breakage, and metal abrasion. The friction linings of the disc wear out over time. For further full operation it is necessary to replace them and repair the clutch.
How does the mechanism work?
The clutch disconnects the engine flywheel from the transmission and, together with the gearbox synchronizers, allows you to smoothly, without shock, change gears on rotating shafts.
Without it, it is impossible to change gear, since gears of different speeds rotate at different speeds during movement. Thanks to the mechanism, when it is turned off, the engine continues to rotate the crankshaft, the gearbox stops briefly, allowing you to engage the next gear at that moment.
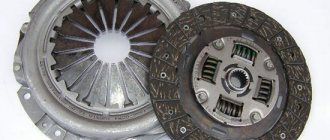
Manufacturers install single-disc dry, permanently closed devices on passenger cars. They have a central diaphragm pressure spring with vibration dampers, which are located on the driven disk. The driving half of the clutch is a non-separable part. It consists of the following parts:
- casing;
- pressure disk;
- diaphragm pressure spring.
The housing is attached to the flywheel with bolts and pins. The pressure plate is connected to the casing by steel plates. Each of them is riveted to the casing on one side, and to the pressure plate on the other. The pressure plate is connected to the outer part of the diaphragm spring using clamps. Two round rings serve as support for it. They are secured with stepped rivets to the casing body.
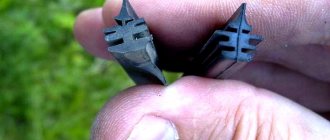
The driven disk is made of steel and has radial slots dividing it into 12 sectors, which are bent in different directions. Friction linings, independent of each other, are riveted to the sectors. A damper that dampens torsional vibrations connects the driven disk to the hub. The system has a hydraulic shutdown drive.
Clutch hydraulic drive device:
- main cylinder;
- clutch release cylinder;
- bearing;
- fork;
- reserve tank;
- a pedal having a servo spring;
- The tank with the drive cylinders are connected to each other by pipelines.
Signs of wear
- The appearance of friction lining odor. Either the feredos are severely worn out, or oil has come into contact with them.
- Shortened clutch pedal travel.
- Airy hydraulic drive or leakage of working fluid.
- Jerks when changing gears.
- The car “grabs” speed at the last highest point of the clutch pedal.
- The clutch is not fully depressed, it is driven.
- Upshifts are engaged without problems, downshifts are impossible to catch.
If at least one of these symptoms appears, you should urgently contact a car service center or repair the discs yourself.
Repair
Replacing a worn clutch disc with your own hands, if you have all the tools, involves the following operations:
- install the machine on a lift, pit, overpass, or lift it with a reliable winch;
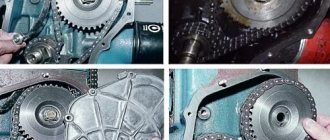
- remove the gearbox by disconnecting the wires from the battery, following the procedure:
- drain the oil, remove the starter, disconnect the block with wires from the speed sensor;
- unscrew the bolt of the ignition module bracket, two bolts securing the gearbox to the internal combustion engine;
- disconnect the wire block from the reverse sensor on the bottom;
- unscrew the bolt of the gear shift rod bracket clamp;
- move back and remove the rod from the hinge, remove the wheel drives;
- to prevent the differential from falling out, insert the plugs and tie them down;
- unscrew the nut securing the gearbox to the internal combustion engine from below;
- unscrew the three bolts, remove the lower hatch of the clutch housing;
- at the bottom left, unscrew the bolt securing the gearbox to the internal combustion engine, hang the engine with a hoist;
- unscrew the left and rear engine mounts;
- by inserting a screwdriver between the clutch housing and the internal combustion engine block, move the gearbox off the guide bushings, the input shaft comes out of the clutch;
- The gearbox is lowered down and removed from under the car;
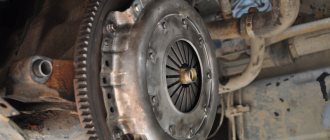
- Use a spanner to unscrew the casing bolts and remove the basket with the disc.
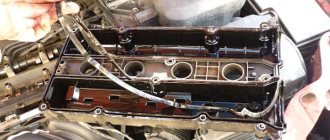
With the clutch removed, it is necessary to check the condition of the disc, bearing, and springs. Worn or faulty parts must be replaced. Take the opportunity to clean and lubricate all rubbing parts.
The disk surfaces must be dry, without burrs or cracks.
After repairing the clutch, replacing as many unusable components as possible, reassemble the gearbox in the reverse order and install it in the car.
Conclusion
Replacing the disc is done, you can continue to operate the car. Now he shows miracles. Gear shifts smoothly, silently, knocking and jerking have disappeared. Pulling away is a pleasure; the car obeys without question. The success of such a repair is that the disk replacement is done with your own hands.
Design of the mechanism for connecting the internal combustion engine and transmission of a car
In order to carry out work with such an important unit for the machine, you need to know its structure and how it interacts with other transmission elements.
There are several types of automobile clutch, which differ in different ways:
- according to the nature of friction, it can be dry, that is, the clutch basket and friction disc work in an air environment, and wet - when the clutch elements are immersed in an oil bath;
- By the number of driven or friction disks, single-, double- or multi-disk devices are distinguished;
- These units are distinguished by the drive with which they are controlled - this is a mechanical, hydraulic, pneumatic or combined method of controlling the mechanism.
The most common is a dry friction single-disc mechanism connecting the gearbox to the engine, which is installed on passenger cars with a manual transmission.
More than one driven disk is used when the clutch basket is installed on trucks and tractors. An oil bath is done on motorcycle equipment.
In a similar passenger car transmission mechanism, a friction disk mounted on the splines of the drive shaft is pressed against the flywheel. The clutch basket, which includes a drive or pressure plate, springs and a casing, is located on the same shaft as the driven disk. Behind it are the release bearing, clutch, as well as springs, rods and drive pedal.
Chainsaw
The woodworking machine's clutch is centrifugal and automatically engages when the engine speed changes. If the speed is low, the elements of the mechanism are pressed against the shaft. Thus, the rotational motion is not transmitted to the sprocket. As the speed increases, the elements move apart and are pressed against the drum, thereby causing the chain to rotate.
A characteristic feature of this type of device is braking, where the chain slows down. This way it turns out to avoid some glitches. But still, this system is subject to enormous load, so it is necessary to systematically carry out preventive inspection and repair.
Replacement of electrical wiring of VAZ 2104
If there is a failure in the power supply to electrical equipment, you should first check the integrity of the electrical circuit. To do this you need:
- De-energize the area being tested by disconnecting the negative terminal of the battery or the corresponding fuse.
- Connect the contacts of the multimeter to the ends of the problem section of the circuit, and one of the probes to ground.
- If there are no readings on the multimeter display, there is a break in the circuit.
- The wiring is replaced with a new one.
Selection of wires and replacement of wiring is carried out according to the VAZ 2104 power supply diagram. In this case, standard components or components from another model with suitable characteristics are used.
Video: replacing wiring, fuses and relays of classic VAZ models
To replace the wiring, the front part of the cabin is disassembled. Wires of insufficient length are extended, and connections are soldered and insulated.
Video: replacing electrical wiring in the cabin and under the hood
It is almost impossible to completely replace the electrical wiring of a VAZ 2104 with your own hands. If such a situation arises, it is better to contact a car service.
How does a chainsaw engine work?
The devices released in the near future have a single-cylinder, two-stroke, carburetor-type engine. Or rather, how to unscrew the clutch cup on a stihl. How to remove the shaft on a trimmer. It contains several devices that work harmoniously. Replacing the clutch on a lawn mower. hd. #clutches, #how to remove the clutch. Main components of the motor:
- Flywheel;
- coupling;
- Incendiary module;
- Muffler;
- Mounting sleeve.
The engine installed in the saw operates at a frequency of 13.5 thousand revolutions/minute, and therefore requires treatment with high-quality oil. A high level of system cooling is required during operation. The engine of the unit is equipped with a cooling system that supplies air to cool the systems.
Brushcutter repair and review.
Chainsaw clutch
The clutch of the device for processing wood is centrifugal and is activated automatically when the engine crankshaft speed changes. If the speed is low, then the elements of the mechanism are pressed against the shaft. This way the rotational motion is not transferred to the sprocket. As the speed increases, the elements spread out and are pressed against the drum, thereby causing the chain to spin.
A corresponding property of this type of device is braking when the chain slows down. This way you can avoid any damage. But still, this system is subjected to heavy load, so it is necessary to systematically carry out preventive inspection and repair.
Why does the node get damaged?
The clutch, like all other mechanical equipment, is subject to heavy loads, which means that over time its elements wear out and begin to perform poorly or fail completely.
Manufacturers have set a period of time within which the clutch must be replaced with a new one. It is usually recommended to carry out such a replacement after 60–160 thousand km, but this does not mean that it cannot break prematurely. How long your clutch and its components last depends on your riding style and maintenance.
How to remove
The drive sprocket also serves as a drum. The coil on the trimmer has stopped rotating in order to remove it. And if it’s behind the clutch cup. One of the main reasons for the breakdown of this block is the grinding of the sprocket teeth. In a solid drum version, the chain may cut through the sprocket during operation. This mechanism requires replacement. If the drum has a replaceable crown, it must be removed and replaced during maintenance. After which the drum can continue to operate.
When there is a need for repairs, you should seek help from a service center where experienced specialists work. But if there is no such thing nearby, the question arises - how to remove the clutch without the help of others? If you have the necessary set of tools, you can easily implement your plans. Of course, there are some differences in models from different companies, but the disassembly scheme remains the same:
- First, remove the chain brake cover by turning the lever. Lightly unscrew the nuts to release the tension on the chain. After loosening, you can completely unscrew the nuts and remove the cover;
- The chain and guide bar are disassembled, as well as the mechanism is cleaned of dirt;
- The cylinder head spark plug is turned out and the piston is fixed. To do this, the crankshaft must be rotated until the exhaust port is blocked, and then a piece of rope is placed in the cylinder to lock the piston. After completion of the work, the rope is removed from the mechanism;
- The nuts on the clutch are unscrewed using the special wrench included in the kit. In this mechanism they are made with a left-hand thread, and this must be taken into account when dismantling. After this, the mechanism is disassembled and all its parts are inspected for damage. Although I already have it on my trimmer in order to remove the clutch assembly once as in the photo. I hope my tips on how to remove the mowing head on the Black&Decker GL716 trimmer How to replace. Worn parts must be removed and replaced with new ones.
After repairs and replacement of parts, it is necessary to reassemble in the reverse order. The disassembly process is presented in more detail in the video.
In order to independently repair such chainsaws as Shtil, Husqvarna, Partner, Goodluck, you need to know some of the features of the models. For example, some types of saws have a washer installed (between the drive sprocket cup and the motor). During assembly, it must be installed in its original place.
If the model is equipped with a special spring that transmits rotation to the pump drive, then its correct installation after repair is extremely important. Otherwise, the device may be seriously damaged. After preventive and repair work, it is necessary to check whether the mechanisms are working properly.
How do you know if your clutch needs to be replaced?
Tricks that some drivers use will help you maintain your clutch, but there is no way to completely protect it from damage. The most correct and reasonable solution is if you have doubts that the mechanism has problems, visit a service center and ask for diagnostics. To save money, you can check the site yourself.
Main signs indicating that the clutch needs replacement
If you notice that the crankshaft RPM is increasing but the speed is not increasing as expected, the problem is most likely clutch disc slippage.
If the clutch engages late (almost at the end of the pedal travel), this also means you have a problem with the clutch discs.
If you hear a burning smell when you press the pedal, this is most likely due to disc slippage. When they wear out, they become excessively hot during operation, and their friction coatings begin to emit the odor characteristic of overheating the metal.
If you feel that fuel consumption has increased and at the same time engine power has decreased, the likelihood of a clutch problem is more than 50%.
Extraneous noise and rattling when the clutch pedal is released, the likely problem is the release bearing.
If the pedal is too soft, too hard, or sinks like butter, you have a 100% clutch problem.
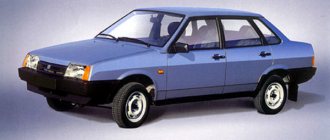
How to change the clutch on a VAZ 2110, 2111, 2112
1). Loosen the mounting bolts on the left wheel. We jack up the front part of the wheel and place it on the sawhorses.
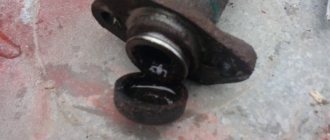
2). Remove the wheel and unscrew the 2 bolts securing the lower ball joint.
3). Remove the negative terminal from the battery.
4). We remove the mass air flow sensor (mass air flow sensor), loosen the clamp that secures the mass air flow sensor corrugation, and take out the air filter.
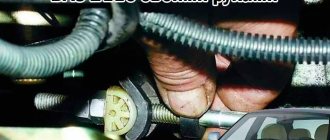
5). Remove the clutch cable from the clutch fork. Loosen the two fastening nuts that secure the cable to the bracket on the gearbox.
6). We unscrew the bolt that secures the starter to the box, and remove the first bolt securing the gearbox.
7). We find the second mounting bolt on the gearbox and release it. We also loosen the top bolt that secures the starter.
8). Remove the connector from the speed sensor and unscrew the speedometer cable.
9). We dismantle the longitudinal extension and the lever.
10). Unscrew the bolt that secures the starter.
eleven). Remove the 3rd gearbox mounting bolt. Unscrew another nut located near the right CV joint.
12). Remove the torque rod mounting bolts. There are two of them.
13). We loosen the nut, which is located on the clamp of the gearbox control drive rod, and remove the rod from the box.
14). We install the support under the engine, unscrew the 2 nuts that secure the rear cushion (the point of this is to avoid a possible breakthrough of the hoses).
15). Carefully remove the gearbox from the engine and release it to the floor. It should hang on the axle shafts.
16). As an option: we immediately replace the clutch release bearing.
17). We assess wear, replace the disc, install a new clutch basket if necessary, and check the paddles.
18). We perform assembly in reverse order.
Video
How to change clutches on Lada Priora?
1). We drive the car onto the overpass.
2). We remove the battery.
3). Disconnect the cable going to the speedometer.
4). We remove the gearbox and if you plan to put back the old pressure plate, then to maintain balance, you need to note the relative position of the flywheel and the casing of the above-mentioned disc
5). Next, insert the mandrel into the hole in the disk. You can do without this procedure, but then you need to hold the driven disk, otherwise it will fall out.
6). Holding the flywheel, unscrew all 6 mounting bolts. At the same time, this work must be done gradually, one turn from each bolt, so that the disk does not warp.
How to protect the mechanism and its elements from damage?
There are some interesting tricks that some drivers use to help maintain traction. Here's what you can do to extend the life of your transmission.
Do not keep the clutch pedal partially depressed
Some drivers have the habit of keeping the pedal partially pressed while driving. You can't do that. When you hold down the pedal, you're essentially holding the clutch halfway down, creating unnecessary tension and causing the clutch parts to wear out much faster.
Don't stand at a traffic light with the clutch depressed
This is another common mistake that young drivers tend to make, and it can cause the clutch to wear out faster. Instead, it's better to turn off the transmission.